

Hardware components | ||||||
 |
| × | 1 | |||
| × | 1 | ||||
| × | 1 | ||||
 |
| × | 1 | |||
Software apps and online services | ||||||
 |
| |||||
| ||||||
Hand tools and fabrication machines | ||||||
 |
| |||||
Introduction
I have an old legacy home alarm system. It's reliable and use our landline (Vonage) when the alarm is tripped.
We arm it using a keyfob, similar to arming and disarming a car alarm.
However, it's not automated and it's not connected.
I wanted to connect it to the net so I could control it remotely, and I wanted to automate it using IFTTT and SmartThings.
Process
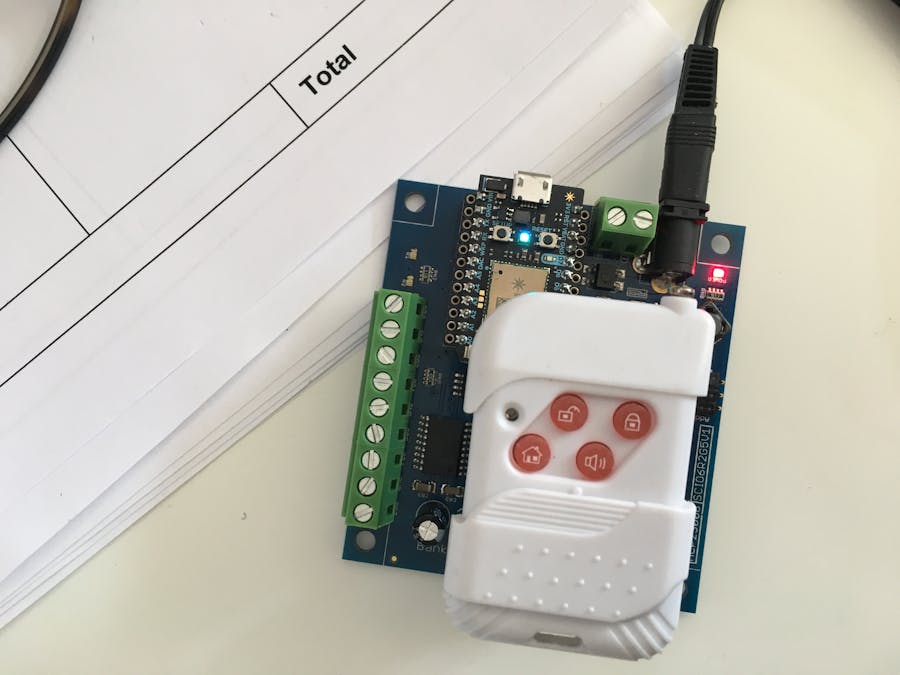
1. Purchase a two channel Relay Shield with the Particle Photon, about $30 from ControlEverything.com.
Channel 1 will be used to Arm, and Channel 2 to disarm.
2. Connect the Particle to the cloud. (https://www.particle.io)
3. Load the appropriate firmware for the relay shield
I used the following for my 2-channel board:
https://github.com/ControlEverythingCom/NCD2Relay
4. Setup two IFTTT recipes, one to Arm and one to Disarm using a SmartThings Virtual Switch.
Arm:
https://ifttt.com/recipes/382348-arm-legacy-house-alarm-when-smartthings-is-away
Disarm:
https://ifttt.com/recipes/382349-disarm-legacy-house-alarm-when-smartthings-is-away
***I already had a virtual switch setup for SmartThings that would indicate presence using our Smart Phones. Please find further instructions here:
https://community.smartthings.com/t/faq-creating-a-virtual-device/11282
5. Open up the keyfob, use a wire to figure out which connections arm and disarm.
I simply used the solder points behind the physical buttons and "connected" them until I found the right combination to trigger the button.
6. Solder four wires to the keyfob at the appropriate solder points discovered in step 5
7. Connect the "Arm" wires to relay 1, using the "NO" and "COM" terminals (NO = Normally Open; COM = Common Wire)
8. Connect the "Disarm" wires to relay 2, using the "NO" and "COM" terminals
Results:
It WORKED!
I also have to add that ControlEverything.com is awesome.
I had a bunch of questions since this was the first time I used a Particle Photon, and I'm new to this relay thing. Trey at CE was quick to answer and very friendly, great company to purchase from and work with!
Here are pictures of the finished project:
And here's a short video of it in action:


Comments