


Hardware components | ||||||
 |
| × | 1 | |||
Software apps and online services | ||||||
 |
| |||||
Hand tools and fabrication machines | ||||||
| ||||||
Then you have extra things around your house what you do? Something out of it.But the real reason was because I can do it, also wanted to sharpen my terrible skills with FreeCad and all the simple electronics stuff from soldering to tracing and etc....
I have few Atari Flashback controllers laying around which I bought in thrift store long time ago, and always wanted to adapt for regular computer and I did it. End of Story.But.... I didn't wanted to make a dongle to connect the cable (which is maybe more a better choice), but decided to have everything integrated inside the controller.Here is really good guide which inspired me to make it happen.Arduino Atari Dongle by Dante Roumega
First things first was to make the bottom part of the controller. After measuring everything many times and printing and checking if everything fits made the bottom part of the controller in FreeCad.
And bunch of test prints for checking the tolerances and how everything fits.
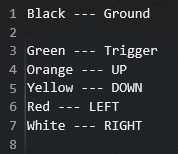
Then followed tracing and checking which wire color is for which action from controller.
The controller PCB was in really good condition, so no big cleaning or fixing was needed. And tracing which color is what was easy too.Black --- Ground
Green --- Trigger
Orange --- UP
Yellow --- DOWN
Red --- LEFT
White --- RIGHT
After having the final print of bottom piece came the soldering and assembly of the controller, which was really easy to be honest, I was surprised by my own soldering skills.
The slot for Micro Pro was designed to snap fit in so I wont do anything crazy like hot glue or similar. At this point what's left was to assemble back and upload the code through Arduino IDE.Code is very simple only utilizing Adruino Keyboard Library and checking the PIN state HIGH or LOW and then executing the keyboard press. Which was mapped to WASD and Spacebar. At the end is really simple and good project to work on your design and assembly skills. Its a half a day project from design to print to finish. On default settings for printing it took around 55 minutes.
It's so simple where's nothing to much to tell about it.Thank you for your attention. :)


_3u05Tpwasz.png?auto=compress%2Cformat&w=40&h=40&fit=fillmax&bg=fff&dpr=2)
Comments