
If you want to build an audio application with the Raspberry Pi, you will find practical support with the un4seen.com BASS library.In combination with the TMS component for a 8x8 matrix, it can be used to design an interesting audio level display.
Lesen Sie diesen Artikel in Deutsch
For my mediaplayer TACTbox I have programmed an audio spectrum display. The software for this is developed with Lazarus in Freepascal, so the visualization on the 7" display is easily realized.
After trying and testing a I2C LED matrix, I wanted to use this technique for the level display.
In my case, all that fit together perfectly:
- Lazarus as a programming base for the entire project
- BASS library to play MP3 files or Internet radio
- BASS function for level meter and spectrum is available
- Control of the LED matrix with the Lazarus component of TMS software
If you have a similar requirement or would like to develop your own mediaplayer with level meter, you will learn in this article how this is implemented.
I had in mind a nostalgic 80s variant: a Knight Rider display on a speaker. But I could not inspire my daughter! No wonder - speaking computer as KITT, are for you today quite normal and "oldschool".
Play an MP3 file with BASSBefore starting, add the BASS library to your Lazarus project. This works on the project inspector. In the unit statement, you only need lazdynamic_bass insert.
The functions of BASS must be loaded next. The best place for that is the FormCreate procedure.
Every operating system needs a matching file for BASS. For the Raspberry Pi with Raspbian, it is called libbass.so. You find it in the sample app at the end of the article.
I copy the file preferably in the project directory. Then BASS is initialized and, if it does not work, a message appears:
if not BASS_Init (-1, 44100, 0, handle, nil) then
  MessageDlg ( 'Note' 'Bass Init Error', mtWarning [mbOK], 0);
Now we can start playing an MP3 file.
channel: = BASS_StreamCreateFile (FALSE, PChar (FileName)
  {$ 0,0,0 IFDEF UNICODE} or BASS_UNICODE {$ ENDIF});BASS_ChannelPlay(channel, false);
Every MP3 player includes the ability to rewind and fast forward. For us this is more important, because in order to test the level meter, we jump between loud and soft passages back and forth.
For the implementation, we need some component that is suitable for this purpose. In the standard palette we could use a TTrackbar.
By clicking on the trackbar position the stream output of BASS is repositioned. BASS is providing the function ChannelSetPosition. The position is then expected to be Double variable. But even for this conversion there is a function with ChannelSeconds2Bytes.
Determine a level meterBASS offers to determine the current level the function ChannelGetLevel. It returns a DWORD (32 bit).
var level: DWORD;
...
level: = BASS_ChannelGetLevel (channel);
In the value of the left (first 16 bits) and right (next 16-bit) audio channel is encoded. With the Pascal functions LoWord() and HiWord () you can separate the channels.
Left: = LoWord (level); // Left channel
right: = HiWord (level); // Right Channel
The two level values are thus within the range of 0 to 32768. For conversion of our 8x8 matrix we use a function CalcLevel.
function CalcLevel(level: DWord): integer;
begin
  Result:=Round(level/32768*9);
  if result> 8 then result: = 8;
end;
It ensures that all possibilities 9 (LED 1 to 8 and all LEDs off) are uniformly distributed.
For more information, look at the online documentation of Un4seen.com.
The sample app MiniPlayerBut now it's time to merge the functions in a sample app and test it.
How to connect the 8x8 matrix at the Raspberry Pi and programmed with the TMS component, I described in my blog article 8×8 LED-Matrix with Raspberry and Lazarus. Please look at these ahead if you do not have any experience with Lazarus.
We use in this example also the advantage of Lazarus and create a visual copy of the LED matrix on the screen.
In the app, two timers take care of updating the display. Timer2 ensures that the progress of the MP3 songs will be displayed according to the playback duration. This happens every second.
In the event routine of Timer1 the LED matrix is updated with the audio level. This must be done a bit faster. The interval in this case is 200 ms.
The visualization to realize is easily possible with the above commands. That led to experiment. Now let's look at the results of my experiments.
Classical bar displayThe classic bar display for the left and right stereo channels is a must. The necessary functions are already described above in this example. What's missing is the output on the 8x8 LED matrix.
Across the Peak-array (0.. 7) the bar heights per column of the matrix are stored. The left bar is Peak[1] and Peak[2], the right bar is Peak[6] and Peak[7].
The LEDs of the bar height be turned on according to a loop.
level: = BASS_ChannelGetLevel (channel);
Peak[1]: = CalcLevel (LoWord (level)); // Left channel
Peak[2]: = Peak[1];
Peak[5]: = CalcLevel (HiWord (level)); // right channel
Peak[6]: = Peak[1]; // paint matrix - switch LEDs on or off
for x: = 0 to 7 do
  for y: = 0 to 7 do
    if y + 1 <= Peak[x] then SetPixel (x 7-y, true)
    else SetPixel (x, y 7, false);
After the KITT version already appears in the title screen, you'll have to learn how that can be implemented.
I just drew a channel up and down. The whole is divided into 3 columns, wherein the outer are identical - only the height is a bit smaller.
GradientIf we shift the values of the matrix to the left and display only on the far right the current level, we can achieve a nice run effect.
For this, the array Peak is reused. The right column Peak[7] is always the current level.
Move matrix image to the left:
for x: = 0 to 6 do
  peak [x]: = peak [x + 1];
Peak [7]: = 0;
Then "draw" the current level at the right column of the matrix:
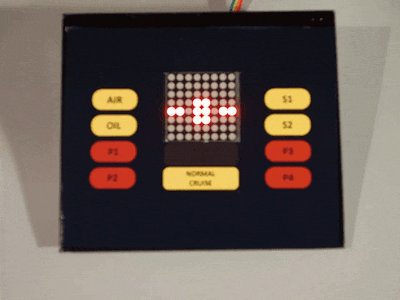
CircleInterestingly, it is also possible to display different, self-designed LED pics. For that we can use also the example app my previous article on the 8×8 matrix.
In this example, this is a circle which size is depending on the level.
The animation I created with the tool of the article. The content of the saved text file (animation.txt) is defined as a constant in this example.
In the timer event, the corresponding pic is selected depending on the height of the level and also with the stolen function StrToMatrix8x8 from the article.
With this variant you can tinker easily very individual level indicators.
You see, it's pretty easy with BASS and the TMS component to realize a level meter in many different variants.
Now it is your turn:
- download sample app
- experiment yourself!
Here we go.
If you want to read this more detailled have a look at my blog article too.

Comments