

Hardware components | ||||||
 |
| × | 1 | |||
 |
| × | 1 | |||
Software apps and online services | ||||||
 |
| |||||
| ||||||
In this project we illustrate how, using real-time videos, you can get sensor data to/from a MS Azure PowerBI dashboard using the OmnIoT SoftHub's MQTT functionality in just minutes time. If you are unfamiliar with the SoftHub, it is a Hub/Gateway Platform that allows you to create and deploy many typical IoT scenarios very quickly and without doing any actual programming. Instead of writing code, the SoftHub incorporates an object based rule engine that allows you to configure your application by defining rulesets to be executed. The rulesets are created using a provided SoftHub Configuration Utility. The SoftHub is free for non-commercial use and a full working copy of the installation package, including documentation, can be downloaded from the support page at the OmnIoT website (www.omniot.com).
The tutorial is broken up into two video sections -
In the first we'll build, deploy, and run a configuration utility to simply send packet data from a TI SensorTag to the public Eclipse MQTT broker. Again, the full video is done in realtime and takes about 3 minutes.
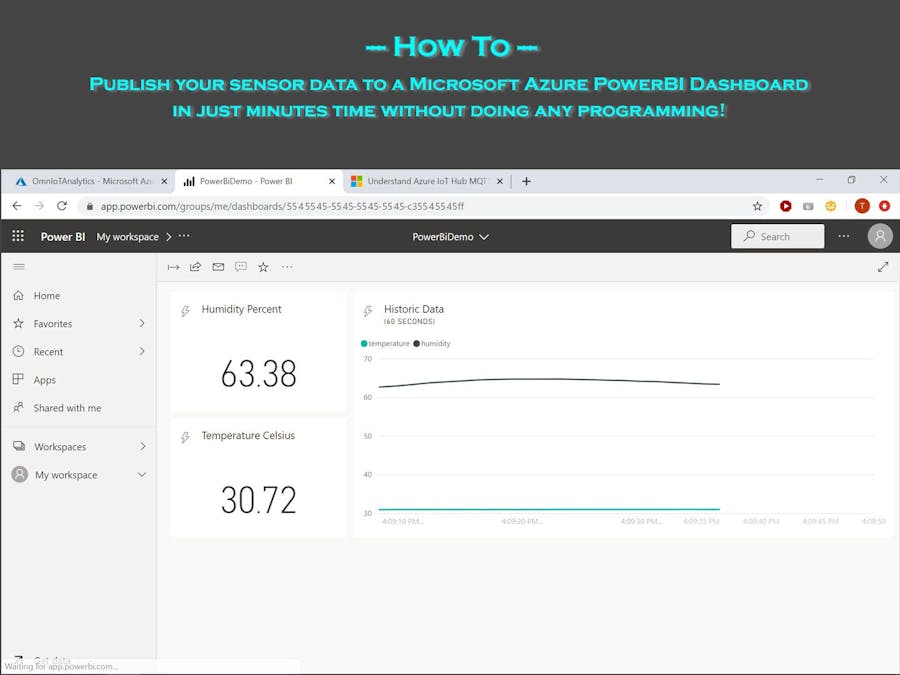
In the second video we'll modify the original configuration file to instead send our sensor data to a MS Azure PowerBI Dashboard we've configured. We'll then deploy and run the new configuration showing the data updating our dashboard widgets.
Part 1, OmnIoT SoftHub to the public Eclipse MQTT broker:In the video below we'll go through the following steps -
- We'll create our SoftHub configuration file
- We'll load it onto our SoftHub device
- We'll restart the SoftHub daemon on the device,
- We'll view our packets as they arrive at our target MQTT broker
To keep things as simple as possible we're sending our data to the public Eclipse test broker and we'll use the MQTT.fx utility to view the packets. The public Eclipse broker simply echos all packet data received to the same topic the client device publishes from, so the data you see will be the exact JSON data sent from the SoftHub device.
You can download the files used in the example 1 video HERE
Part 2, OmnIoT SoftHub to MS Azure PowerBI Dashboard:To visualize our sensor data on our PowerBI dashboard, there is actually only one change we need to make from our previous example. We'll simply need to modify the "Publish Data" action object to connect to our target Azure IoT Hub's MQTT broker (instead of the Eclipse broker). In the example we've created an Azure IoT Hub and named it "OmnIoTAzure" and we've created an associated IoT Hub Device with an ID of "TestMachine". We use that information to build out most of our credentials. Additionally, we'll need to download and verify the DigiCert Baltimore Root Certificate as well as create an SAS ("Signed Access Signature") token we'll use as our login password. While there are multiple was documented by Microsoft to generate these tokens, we use the Azure IoT Hub Device Explorer tool in the video.
You can download the files used in the example 2 video HERE.
Video Summary -
To visualize our sensor data on our Power BI dashboard, we only needed to change the Publish Data action object. Microsoft's Azure IoT Hub provides multiple options for specifying your MQTT connection parameters. In our example we illustrated how to create a fully encrypted TLS/SSL MQTT connection. To create our connection we needed to specify the Message Topic, Server User Name, Server Client ID, Server Address, Trusted Store File, and the Server Password fields in for Publish Data object. Referencing the Microsoft's "IoT Hub MQTT support" webpage (link below), we can create the required Message Topic, Server User Name, Server Client ID, and Server Address fields by using the following set of template strings -
- Message Topic: devices/<<HubDevId>>/messages/events/
- Server User Name:<<IotHubName>>.azure-devices.net/<<HubDevId>>/?api-version=2018-06-30
- Server Client ID:<<HubDevId>>
- Server Address: ssl://<<IotHubName>>.azure-devices.net:8883
where you will need to replace each occurrence of <<IoTHubName>> with your target Azure IoT Hub's Name string, and each occurrence of <<HubDevId>> with the IoT Hub Device Id you've created as a sub-component of the associated Azure IoT Hub.
For the Trusted Store File you will need to download a copy of the current DigiCert Baltimore Root certificate and place it in a directory on your Raspberry Pi. You will then need to provide the full path and filename of the file you've downloaded as the Trusted Store File value. To verify the certificate file contents reference the Microsoft github c program file linked below.
Lastly, you will need to create a Microsoft Signed Access Signature (SAS) token you will need to provide via the Server Password field. There are multiple ways to generate these tokens however in the video we downloaded and ran the Azure IoT Hub "Device Explorer" app (link below). Note that when using this app your SAS tokens will have a maximum "Time To Live" of one year, and thus will no longer be valid to connect beyond that date (and so would need to be updated).
In the video we also looked at a sample JSON packet that the SoftHub generated and we captured in the base example -
--- BEGIN PACKET ---
{
   "OmnIotHubPacket": {
         "OriginDeviceId": 555,
         "PacketGeneratedTimestamp": "2019-08-06T23:47:56.769023Z",
         "SequenceNumber": 21,
         "PacketType": "Raw BLE",
         "PacketContents": {
               "SensorType": "TI CC2650 SensorTag",
               "SensorMacAddress": "42303A42343A",
               "PacketDataField": [{
                  "FieldName": "TI HDC1000 Ambient Celsius",
                  "FieldValue": 26.537781,
                  "FieldValueHex": "00000000AC893A40"
               }, {
                  "FieldName": "TI HDC1000 Relative Humidity",
                  "FieldValue": 69.671631,
                  "FieldValueHex": "00000000FC6A5140"
               }]
            }
      }
}
--- END PACKET ---
and from that packet we derive the Azure IoT Analytics job query required to extract the data suitably for input to the Power BI dashboard -
--- BEGIN QUERY ---
SELECT
   CAST(GetArrayElement(OmnIotHubPacket.PacketContents.PacketDataField, 0).FieldValue AS Float) As Temperature,
   CAST(GetArrayElement(OmnIotHubPacket.PacketContents.PacketDataField, 1).FieldValue AS Float) As Humidity,
   CAST(OmnIotHubPacket.PacketGeneratedTimestamp AS datetime) AS timestamp
INTO
   AzureDemo
FROM
   OmnIoTStreamInput Timestamp by OmnIotHubPacket.PacketGeneratedTimestamp
--- END QUERY ---
This query extracts three values, Temperature, Humidity, and a timestamp from the designated input stream, "OmnIoTStreamInput", and writes them to a streaming output we'd created named "AzureDemo". The AzureDemo input stream is then in turn referenced in our Power BI dashboard as input to our dashboard widgets.
Tutorial Summary:In this tutorial we configured and deployed rulesets to display our sensor data on a MS Azure PowerBI dashboard in just a couple of minutes. While we kept the example as simple as possible, both the OmnIoT SoftHub and the MS Azure platforms provide far more functionality to aid you in quickly building out your IoT edge infrastructure.
See Microsoft's "IoT Hub MQTT support" webpage, which details Azure's MQTT interface HERE.
See Microsoft's github page referencing the current DigiCert Baltimore Root certificate HERE.
Read about Microsoft's Azure IoT Hub "Device Explorer" app HERE.


Comments