

Hardware components | ||||||
 |
| × | 1 | |||
 |
| × | 1 | |||
Software apps and online services | ||||||
 |
| |||||
 |
| |||||
In this project we illustrate how, using realtime videos, you can get sensor data to/from an Ubidots dashboard using the OmnIoT SoftHub's MQTT functionality in just minutes time. If you are unfamiliar with the SoftHub, it is a Hub/Gateway Platform that allows you to create and deploy many typical IoT scenarios very quickly and without doing any actual programming. Instead of writing code, the SoftHub incorporates an object based rule engine that allows you to configure your application by defining rulesets to be executed. The rulesets are created using a provided SoftHub Configuration Utility.
The SoftHub is free for non-commercial use and a full working copy of the installation package, including documentation, can be downloaded from the support page at the OmnIoT website (www.omniot.com).
The tutorial is broken up into three video sections -
- In the first we'll build, deploy, and run a configuration utility to simply send packet data from a TI SensorTag to the public Eclipse MQTT broker. Again, the full video is done in realtime and takes about 3 minutes.
- In the second video we'll modify the original configuration file to instead send our sensor data to an Ubidots Dashboard we've configured. We'll then deploy and run the new configuration showing the data updating our dashboard widgets.
- Lastly, we'll modify our configuration file further to have the SoftHub subscribe to an MQTT control topic so that we can control our SoftHub remotely from an Ubidots Dashboard control widget. And we'll again deploy and run the new configuration showing the control widget controlling our SoftHub.
In the video below we'll go through the following steps -
- We'll create our SoftHub configuration file
- We'll load it onto our SoftHub device
- We'll restart the SoftHub daemon on the device,
- We'll view our packets as they arrive at our target MQTT broker
To keep things as simple as possible we're sending our data to the public Eclipse test broker and we'll use the MQTT.fx utility to view the packets. The public Eclipse broker simply echos all packet data received to the same topic the client device publishes from, so the data you see will be the exact JSON data sent from the SoftHub device.
You can download the files used in the example 1 video HERE
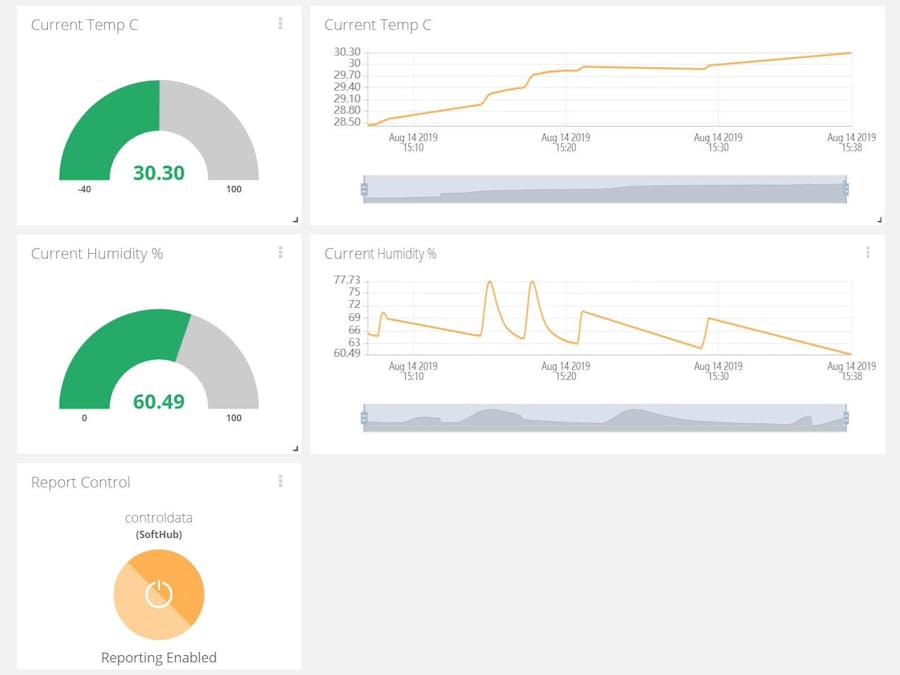
Part 2, OmnIoT SoftHub to Ubidots Dashboard:One issue when sending data to the various third party cloud platforms is that many, while being compliant in terms of the MQTT communication protocol, will none the less require your sensor data be sent in a format specific to only that platform. When communicating with remote MQTT brokers, the SoftHub produces generic JSON formatted packet data by default. In order to mitigate this issue, the SoftHub allows you to reformat your outgoing packet data "on the fly".
To visualize our sensor data on our Ubidots dashboard, there are three sets of changes we needed to make from the previous example on the SoftHub. The first is to modify the "Publish Data" action object to connect to the Ubidots broker (instead of the Eclipse broker) and to associate the connection with a.mcfg (MQTT extended options) file. Next we'll create the.mcfg file which is needed to specify any.jff (JSON filter/format) files we'll require to transform our outgoing packets. And lastly we'll create a single.jff file, in which we'll specify the transformation to be made on our outgoing packet in order to be compatible with the Ubidots broker's requirements.
Video Summary:
To get our sensor data displaying on our Ubidots dashboard we made the following changes -
Changed the RuleEngine.xml file (all updates to the Publish Data action object only) -
- Message Topic: changed to message topic per the Ubidots documentation
- Server User Name: changed the server user name per the Ubidots documentation
- Server Address: changed the server address to point to our assigned Ubidots MQTT broker
- Extended Options File: add a reference to ubidotsDemo.mcfg
Created ubidotsDemo.mcfg from template.mcfg, enabled/changed the following options -
- FlattenJson: enabled the flattening of all outgoing JSON packets
- PublishUnformatted : disabled publishing of any packet not transformed
- JffFile01: added a reference to ubidotsDemo01.jff
Created ubidotsDemo01.jff from template.jff, enabled/changed the following options -
- FormatDataLabel01: specified the label associated with the temperature value variable
- FormatDataLabel02: specified the label associated with the packet timestamp
- FormatDataLabel03: specified the label associated with the humidity value variable
- FormatDataLabel04: specified the label associated with the packet timestamp
- OutputFormatStr: specified the packet template to be used to generate outgoing packets
You can download the files used in the example 2 video HERE
Part 3, Controlling the OmnIoT SoftHub from an Ubidots Dashboard:In this video we expand on our configuration example above by adding a control widget to our Ubidots dashboard. Ubidots control widgets allow you to remotely control your SoftHub device(s) from any cloud based Ubidots dashboard. To keep the video brief, we illustrate a simple example where we've added a switch allowing you to enable or disable sensor data reporting. In watching the video it should be apparent however that the same technique can be used to control any of the SoftHub's functionality, including the ability to issue Linux system commands or initiate the execution of your own scripts.
As with our previous examples, the changes required to implement this functionality are made in "real time" and take only minutes from start to finish.
Video Summary:
To add our remote control functionality there were two sets of changes we needed to make on the SoftHub. The first group of changes was to the RuleEngine.xml to subscribe to our control topic and to carry out the actions requested from the remote dashboard. The second was to change the ubidotsDemo.mcfg file to tell the SoftHub to translate specific incoming message strings to their corresponding SoftHub events.
For our RuleEngine.xml file we made the following changes -
- added the Device Control Topic to specify the topic the dashboard will be publishing to
- added two new Action objects to disable/enable new packet event processing
- added two User Defined Event objects to be triggered from our Ubidots control widget
- added two new Rule objects to tie our Event objects to our Action objects
For our ubidotsDemo.mcfg file we made the following changes -
- InputToUEV01: Added mapping from incoming message to disable reporting processing event
- InputToUEV02: Added mapping from incoming message to enable reporting processing event
You can download the files used in example 3 video HERE.
------- TUTORIAL SUMMARY -------In this tutorial we configured and deployed rulesets to display our sensor data and remotely control our SoftHub from an Ubidots dashboard in just a couple of minutes. While we kept the example as simple as possible, both the OmnIoT SoftHub and the Ubidots platforms provide far more functionality to aid you in quickly building out your IoT edge infrastructure. You can check out more info regarding the OmnIoT SoftHub platform HERE, or the Ubidots platform HERE.


Comments