

Hardware components | ||||||
 |
| × | 1 | |||
 |
| × | 1 | |||
 |
| × | 1 | |||
| × | 1 | ||||
| × | 1 | ||||
| × | 1 | ||||
Software apps and online services | ||||||
| ||||||
 |
| |||||
Hand tools and fabrication machines | ||||||
 |
| |||||
 |
| |||||
| ||||||
| ||||||
Smart plug is a home automation device and is a hot new thing. Several types of smart plug are available in the market but they are quite expensive. Besides, as a hobbyist, I always like to make my own thing and I think you are same.
Generally, smart plugs are compact device and plug into traditional wall sockets, upgrading them with remote control, scheduling, and power usage monitoring via smartphone apps.
In this tutorial I will show you how I build my smart plug using ESP8266 wifi module which has the following features:
- Local and Remote Control - The device is made based on Cayenne and you can easily on/off the plug using Cayenne smartphone app or Cayenne Web app.
- Motion Control - You can automatically on/off the plug with your presence and can enable or disable the option from Cayenne app.
- Voice Control - You can turn on or off the plug by using Alexa voice assistant.
- Power Scheduling – Easily create on/off schedules for your devices and you can easily set the timer from Cayenne app.
- Thermal Protection – A built-in temperature sensor will automatically turn off overheating appliances and notify you through SMS or E-mail.
- Details Monitoring - Using Cayenne app you can easily monitor voltage, current, temperature and state of the plug (either it is on or off).
- Energy Usage Statistics – You can monitor power consumption of connected devices and get notified.
You may wonder why I am setting dashboard first before any programming and hardware setup. I first want to determine the parameters I like to monitor and control and as well as like the set the channel for every widget before programming. Because it would be required during programming. For this reason I am preparing the Cayenne environment first.
- I added two Value Display Widgets for displaying Current and Temperature. To add Value Display Widget follow the screenshot below.
- I added one Gauge Display Widget for monitoring Voltage. Follow the screenshot below.
- I added three Button Controller Widgets. One button to turn on and off the Plug. Another for enabling PIR sensor and last one is for starting timer. To add a button follow the screenshot below.
- I also added one 2 State Display Widget to monitor the state of the Plug. See the screenshot below.
- To set the time I added one Slider.
After adding all the widgets the dashboard gets following look.
- Then I added two triggers. One for automatically turning off the load if excessive heat is generated inside the plug for loose connection of fault.
- Another trigger is for getting notification and email about the high temperature. You can easily set the limit of the temperature from the slider.
Trigger window looks like as follows.
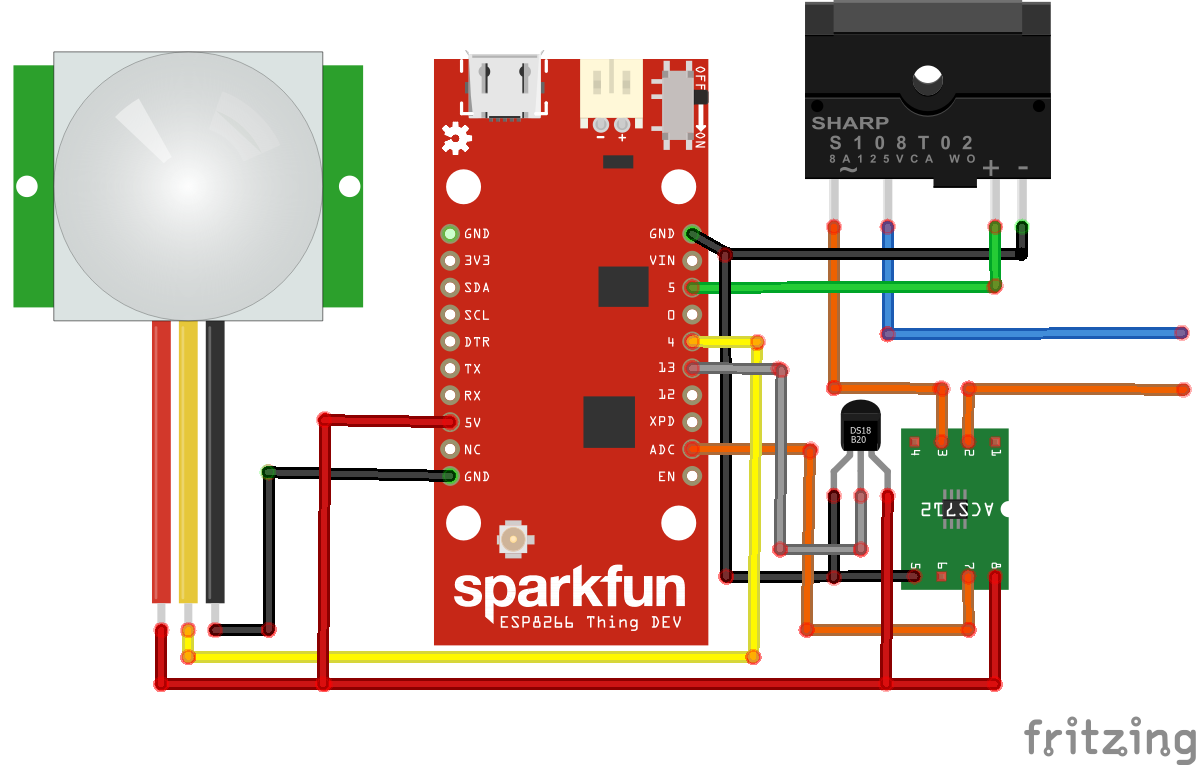
After preparing your Cayenne environment it is the perfect time for coding and testing. Before starting coding I soldered some pin headers with the ESP Thing Dev Board I received from Sparkfun (thanks to Sparkfun) because I will test my code in this Dev board. Then I start coding for each feature I like to implement in my smart plug and tested each separately.
I used a green LED instead of physical plug for testing. After testing each features separately I marge all the code snippet in a single sketch and then tested again. I found everything ok after some debugging. Though I used ESP Thing Dev Board for development and testing purpose, but finally I used generic ESP8266-12E module for my plug to fit it in a box.
To make the Smart Plug I already collected a standard plug available in the market with a box. The look of the the plug is bellow and it is a universal plug with a switch at top right corner. I will replace the switch with a PIR motion sensor later.
Before playing with the plug first, I made a solid state relay using a triac (BT134) and a triac driver optocoupler (EL3021). The solid state relay has some advantages over a mechanical relay. One of the biggest advantage is it requires very small current to turn on and operates on a wide voltage range. A digital I/O pin of esp module can directly drive a solid state relay without any transistor. The schematic of the relay is as follows.
This is a simple circuit of a solid state relay without snubber. If you like to drive a large inductive load a snubber circuit is highly recommended. I attached a photo of my self made solid state relay here.
For powering the control circuit I am using an old smart phone charger. The output of the charger is 5V but ESP8266 module required 3.3V for stable operation. For the reason I used a 3.3V regulator (AMS1117) IC to convert 5V to 3.3V. I placed and soldered the regulator in a piece of perfboard. I also solder the temperature sensor (DS18B20) in the same board.
Then, I placed and soldered the ESP8266-12E module in another piece of perfboard. I used some thin wires to solder the module with the pcb board because ESP8266-12E module has no pin to solder with pcb.
After soldering I uploaded the previously developed program in the ESP8266-12E module and connected the module to the regulator board. Though I used Sparkfun ESP Thing Dev board for program development and testing, finally I used generic esp module so that I can easily fit the board in the box with very small free space.
Then, I connected PIR motion sensor to the esp board.
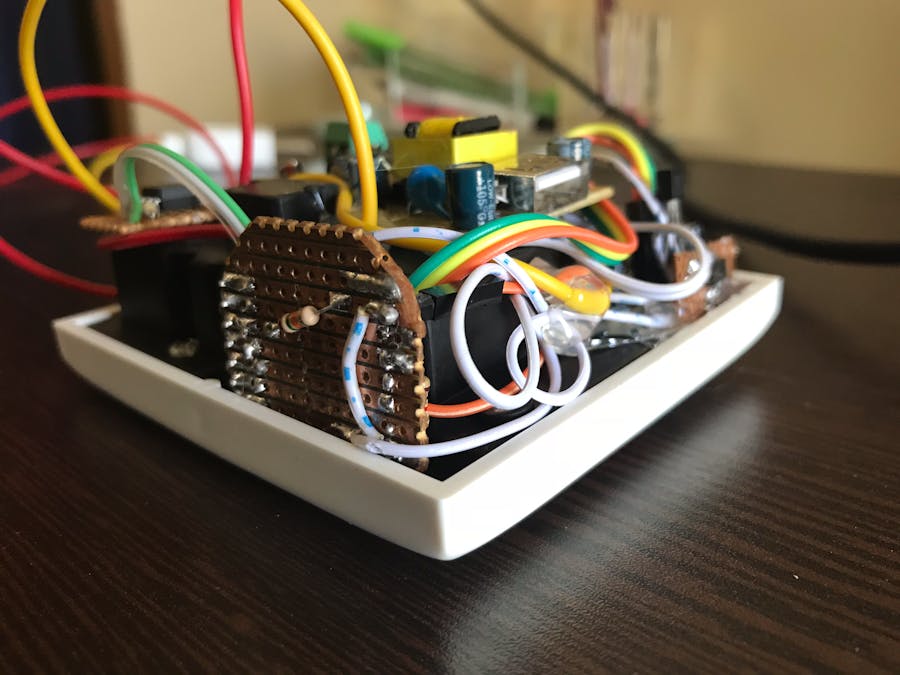
As I said earlier that I will replace the switch from the plug with a PIR motion sensor. In this stage I removed the switch from the plug. I got a nice hole for placing motion sensor. The following image shows all the connection among the sensors, triac and power circuit. All are connected with the plug. I connected the triac and the current sensor in series with the power source and the plug. The current sensor was used to measure current. I did not use any voltage sensor for measurement instead I take the standard voltage (220V) in my country to calculate the energy consumption rate. The output of the current sensor (ACS712) is 5V and is not compatible with ESP8266. The analog pin of the ESP board can tolerate only 1V. So, I added a voltage divider (5K and 1K) to get 1V output for 5V.
After completing all the connection it is right time to place all the components inside the plug box. For placing the components hot glue is a very good option. First I placed PIR motion sensor to the plug hole using hot glue.
Then, I added some glue at the middle of the plug to place the power circuit.
After keeping the power adapter at the right place I gently press down the board for about one minute to fix it with the glue.
After placing power adapter I placed the relay circuit at upper right corner of the plug.
Than I placed the main part of the circuit the ESP8266-12E board.
Finally, I placed regulator circuit and current sensor in an appropriate place.
At the last stage I place the bottom box and adjusted it with the top part using two screws provided with the plug.


_3u05Tpwasz.png?auto=compress%2Cformat&w=40&h=40&fit=fillmax&bg=fff&dpr=2)
Comments