

Hardware components | ||||||
_ztBMuBhMHo.jpg?auto=compress%2Cformat&w=48&h=48&fit=fill&bg=ffffff) |
| × | 1 | |||
 |
| × | 1 | |||
 |
| × | 1 | |||
| × | 1 | ||||
 |
| × | 1 | |||
 |
| × | 1 | |||
 |
| × | 1 | |||
Software apps and online services | ||||||
 |
| |||||
 |
| |||||
 |
| |||||
| ||||||
 |
| |||||
 |
| |||||
 |
| |||||
 |
| |||||
 |
| |||||
| ||||||
 |
| |||||
Hand tools and fabrication machines | ||||||
 |
| |||||
Security and accessibility is the main concern in today's world. We always try to keep our house secure and at the same time we want to make our home devices easy accessible even from the remote location. Think, you have a guest waiting at your front door and you are outside of the home. But you want to allow him inside your house. Or you are doing a very important task in your desk and want to know who came at the front door without leaving your seat. Just imagine! Alexa can do everything for you!!
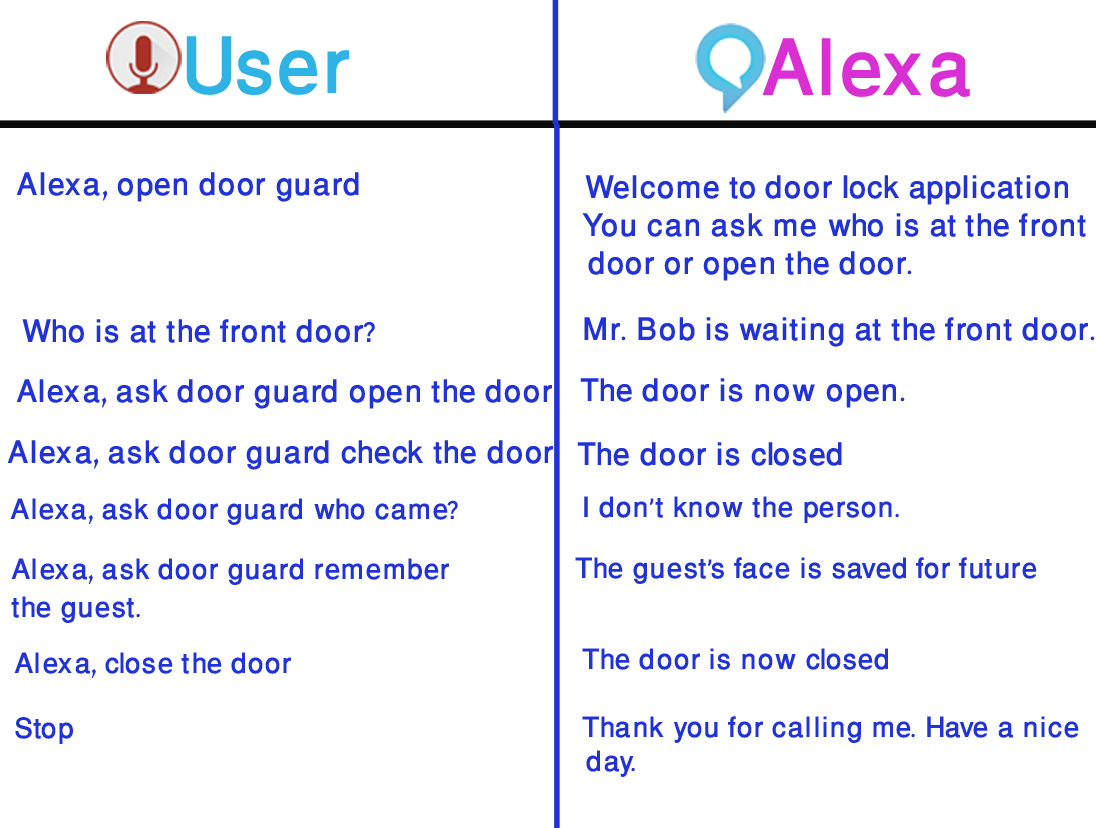
Yes, I made an intelligent door lock which can recognize a guest, greet the guest with name, notify the owner about the guest and remember an unknown guest. House owner can know the name of the guest by asking Alexa like "Alexa, who is at the front door?" You can also ask Alexa to open or close the door. I made a custom Alexa Skill for this. Using the skill you can know your guest and welcome him inside your house without leaving your seat.
My skill is live at Amazon Store (Skill ID: amzn1.ask.skill.4ba64998-cb8f-461d-8712-16c5dfcfc9d3)
Before going to the details please watch the demo videos:
Step by step instructionsIn this tutorial I will show you how you can make such intelligent device yourself. I am assuming you have some previous experience with Arduino & Raspberry Pi and some basic knowledge in Python programming.
In this project, I used several AWS services (e.g. IoT, Lambda, Bucket, Polly, SNS). So, you will be required an Amazon AWS account.
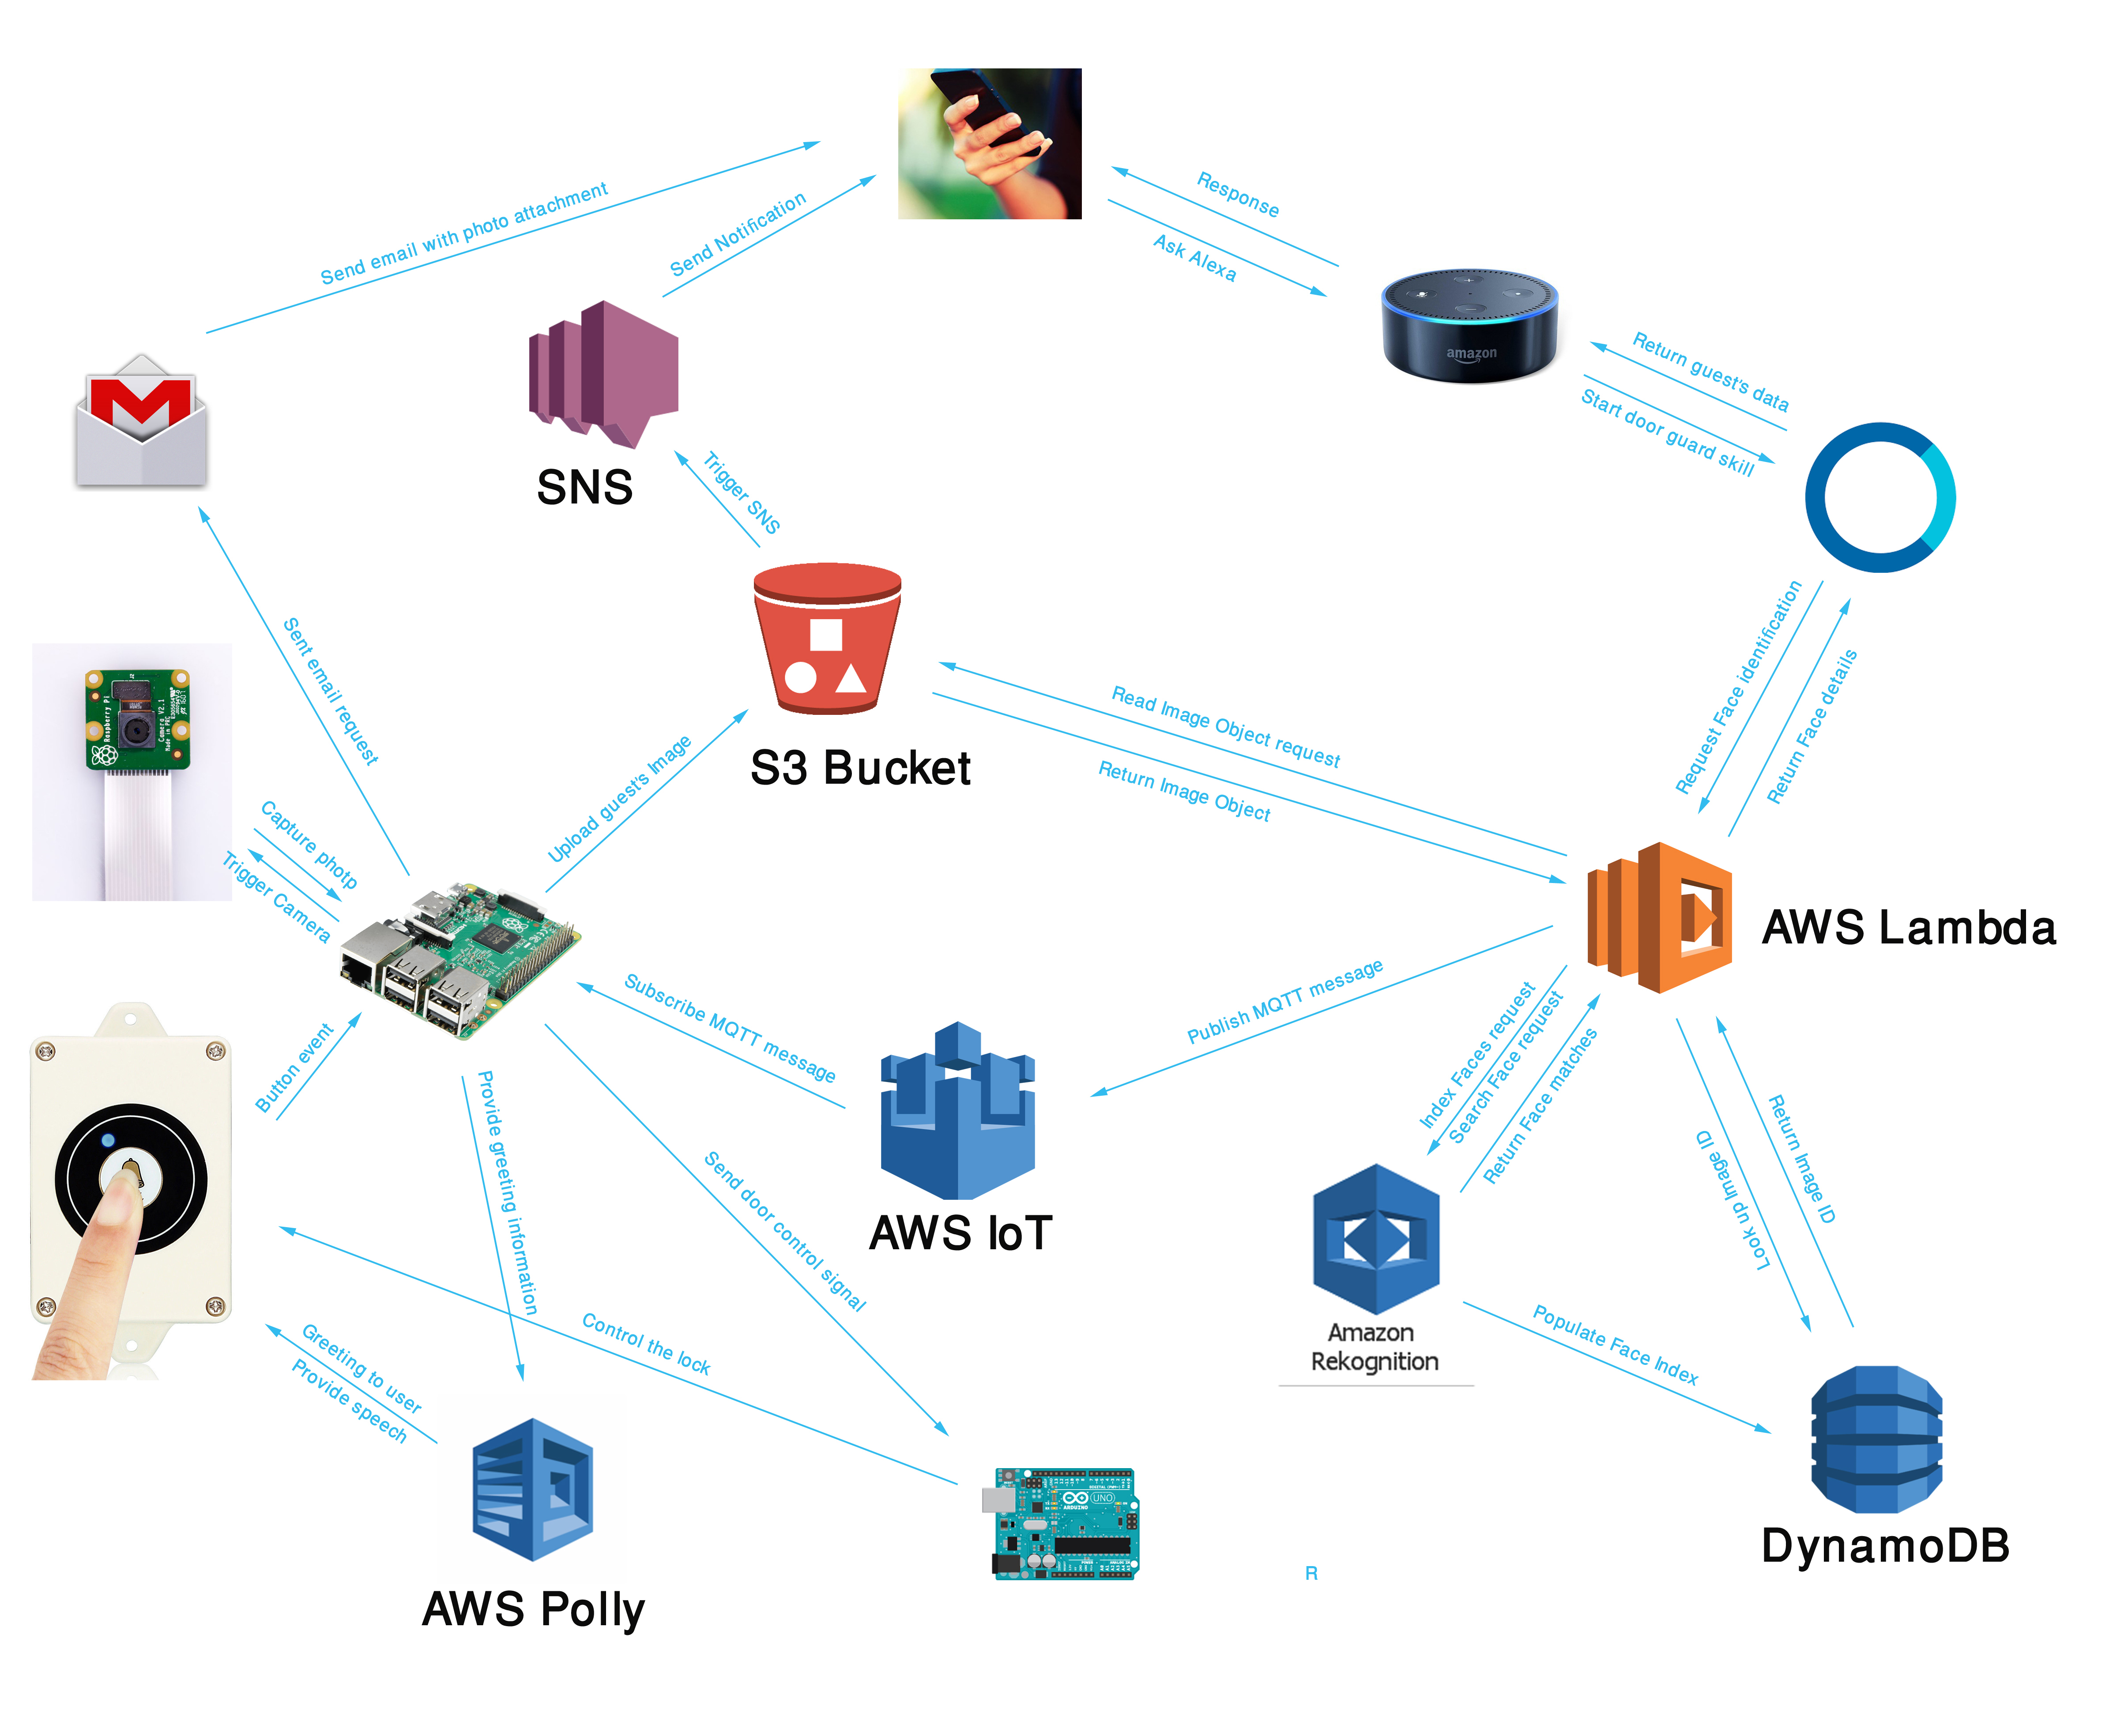
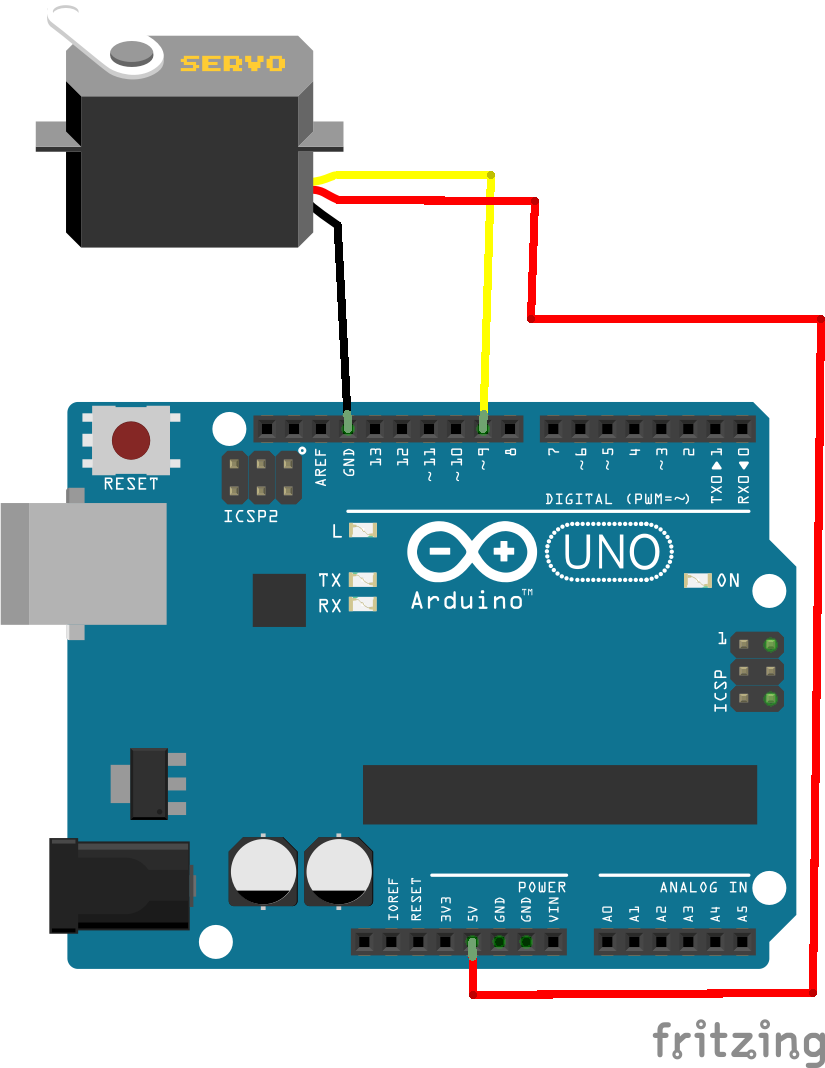
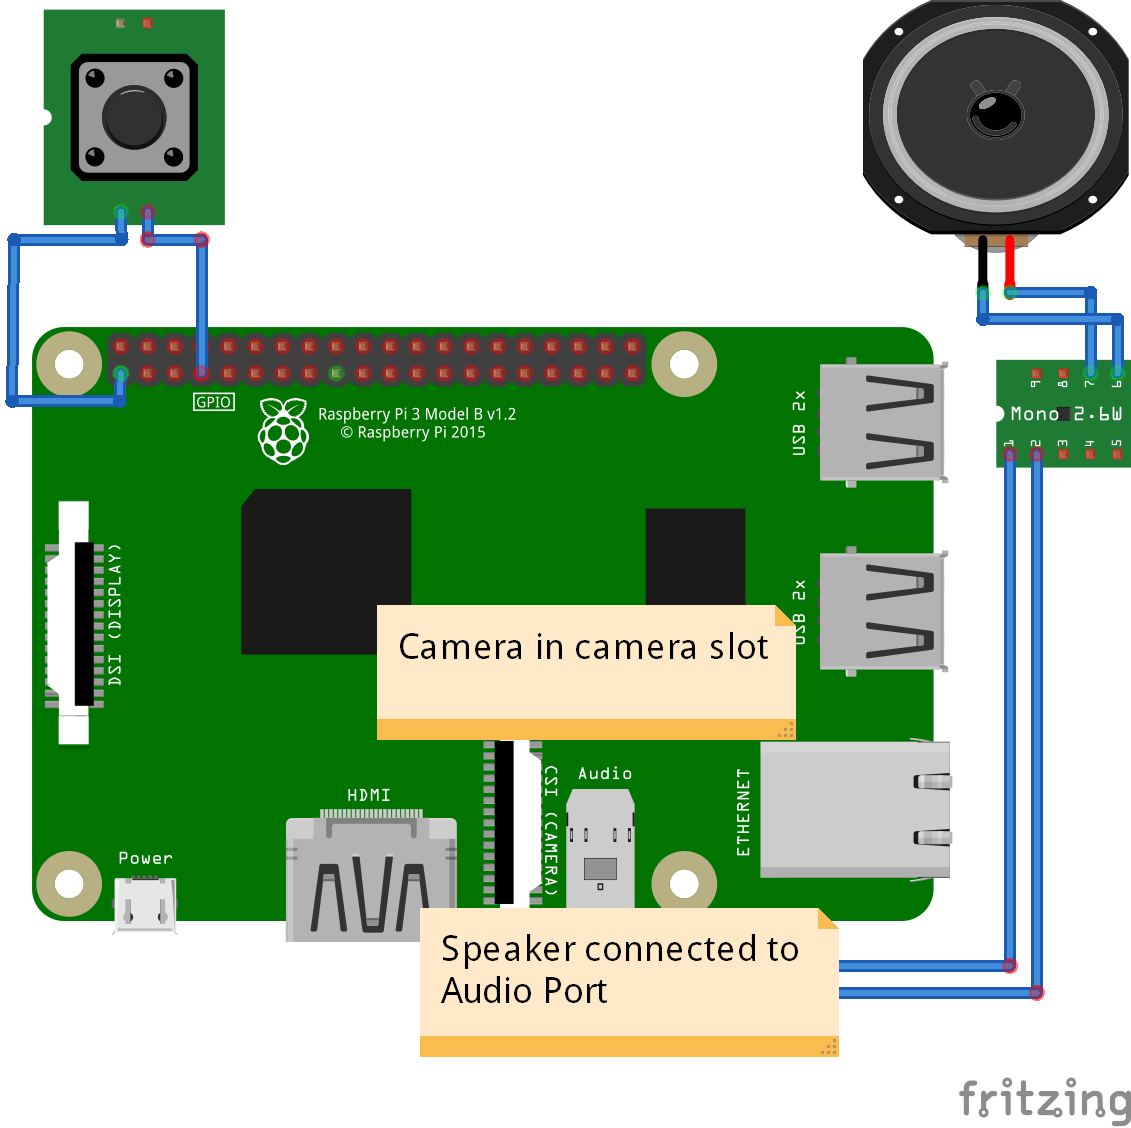
Before going into detail instructions let me first explain how it works. I am calling this device Intelligent Door Lock and for making the device I used a Raspberry Pi with official camera module and an Arduino with a servomotor for controlling the lock.
When a guest comes to your door and press the calling button, Raspberry Pi performs three tasks:
- It takes a picture of the guest and upload it to AWS S3 Bucket and S3 Bucket trigger a SNS notification to a specific topic.
- It sends an email with the photo to the house owner.
- It sends a greeting text to AWS Polly and then play the audio greeting for the guest returned by the Polly.
After getting the notification from AWS SNS or the email house owner can ask Alexa to introduce the guest by invoking the custom skill "Door Guard" and saying:
Alexa, ask door guard who is at the front door? or
Alexa, ask door guard who came?
Alexa triggers a Lambda function and Lambda function does the following jobs:
- Read the image uploaded to the S3 Bucket.
- Sends a face search request for the image to AWS Rekognition.
- After getting face matches result return by Rekognition, Lambda search for the name to AWS DynamoDB and return the name to the Alexa if found.
Alexa provides the name to the house owner and house owner again call the Alexa to open the door for the guest. In this case Lambda sends a open door command to AWS IoT to a specific topic. Raspberry Pi receives this command and sends to Arduino using serial port. Arduino control the lock accordingly. The following block diagram can helps for better understanding.
- Preparing Raspberry Pi (installing required libraries)
- Writing program for Raspberry Pi (for capturing image on button press, uploading the image to S3, sending email to the owner, receiving message from mqtt broker, greeting guest, sending control signal to Raspberry Pi)
- Setting AWS Services (AWS S3 Bucket, AWS DynamoDB, AWS Lambda, AWS SNS, AWS Rekognition)
- Writing program for uploading Images of knows persons and storing Face Index in the DinamoDB table.
- Making Custom Alexa Skill and writing code for Lambda function.
- Writing code for Arduino.
- Connecting all the hardware.
- Testing & Debugging.
Prepare your Raspberry Pi with latest Raspbian operating system and get ready to do some programming. If you are new in Raspberry Pi read this how to get started using Raspberry Pi guide. You can plug a mouse, keyboard, and monitor into your Pi or access it using SSH client like PuTTY. To know how to connect with PuTTY you may read this tutorial.
Install python serial module using the command:
sudo apt-get install python-serial
Install AWS IoT SDK using following command:
sudo pip install AWSIoTPythonSDK
Details of AWSToTPythonSDK is here.
Installing & Configuring AWS CLIThe AWS Command Line Interface (CLI) is a unified tool that allows you to control AWS services from the command line. AWS CLI helps you creating any AWS object from command line without using GUI interface. If you already have pip and a supported version of Python (integrated with latest Raspbian OS), you can install the AWS CLI with the following command:
pip install awscli --upgrade --user
You need to configure AWS CLI with Access Key ID, Secret Access Key, AWS Region Name and Command Output format before getting started with it.
Follow this tutorial for completing the whole process.
Setting up Amazon S3 Bucket, Amazon Rekognition and Amazon DynamoDBAmazon Rekognition is a sophisticated deep learning based service from Amazon Web Services (AWS) that makes it easy to add powerful visual search and discovery to your own applications. With Rekognition using simple APIs, you can quickly detect objects, scenes, faces, celebrities and inappropriate content within images. Amazon Rekognition also provides highly accurate facial analysis and facial recognition. You can detect, analyze, and compare faces for a wide variety of user verification, cataloging, people counting, and public safety use cases.
Amazon Rekognition is based on the same proven, highly scalable, deep learning technology developed by Amazon’s computer vision scientists to analyze billions of images and videos daily, and requires no machine learning expertise to use. Amazon Rekognition is a simple and easy to use API that can quickly analyze any image or video file stored in Amazon S3.
Amazon Rekognition can store information about detected faces in server-side containers known as collections. You can use the facial information stored in a collection to search for known faces in images, stored videos and streaming videos. Amazon Rekognition supports the IndexFaces operation, which you can use to detect faces in an image and persist information about facial features detected into a collection.
The face collection is the primary Amazon Rekognition resource, each face collection you create has a unique Amazon Resource Name (ARN). You create each face collection in a specific AWS Region in your account.
We start by creating a collection within Amazon Rekognition. A collection is a container for persisting faces detected by the IndexFaces API. You might choose to create one container to store all faces or create multiple containers to store faces in groups. You can use AWS CLI to create a collection or use the console. For AWS CLI, you can use the following command:
aws rekognition create-collection --collection-id guest_collection --region eu-west-1
The above command creates a collection named as guest_collection.
The user or role that executes the commands must have permissions in AWS Identity and Access Management (IAM) to perform those actions. AWS provides a set of managed policies that help you get started quickly. For our example, you need to apply the following minimum managed policies to your user or role:
- AmazonRekognitionFullAccess
- AmazonDynamoDBFullAccess
- AmazonS3FullAccess
- IAMFullAccess
Next, we create an Amazon DynamoDB table. DynamoDB is a fully managed cloud database that supports both document and key-value store models. In our example, we’ll create a DynamoDB table and use it as a simple key-value store to maintain a reference of the FaceId returned from Amazon Rekognition and the full name of the person.
You can use either the AWS Management Console, the API, or the AWS CLI to create the table. For the AWS CLI, use the following command:
aws dynamodb create-table --table-name guest_collection \
--attribute-definitions AttributeName=RekognitionId,AttributeType=S \
--key-schema AttributeName=RekognitionId,KeyType=HASH \
--provisioned-throughput ReadCapacityUnits=1,WriteCapacityUnits=1 \
--region eu-west-1
For the IndexFaces operation, you can provide the images as bytes or make them available to Amazon Rekognition inside an Amazon S3 bucket. In our example, we upload the images (images of the known guest) to an Amazon S3 bucket.
Again, you can create a bucket either from the AWS Management Console or from the AWS CLI. Use the following command:
aws s3 mb s3://guest-images --region eu-west-1
Although all the preparation steps were performed from the AWS CLI, we need to create an IAM role that grants our function the rights to access the objects from Amazon S3, initiate the IndexFaces function of Amazon Rekognition, and create multiple entries within our Amazon DynamoDB key-value store for a mapping between the FaceId and the person’s full name.
To get the access use the file: access-policy.json
{
    "Version": "2012-10-17",
    "Statement": [
        {
             "Effect": "Allow",
             "Action": [
                "logs:CreateLogGroup",
                "logs:CreateLogStream",
                "logs:PutLogEvents"
                ],
                "Resource": "arn:aws:logs:*:*:*"
         },
         {
             "Effect": "Allow",
             "Action": [
                "s3:GetObject"
                 ],
                "Resource": [
                     "arn:aws:s3:::bucket-name/*"
                      ]
          },
          {
            "Effect": "Allow",
            "Action": [
                 "dynamodb:PutItem"
            ],
            "Resource": [
                "arn:aws:dynamodb:aws-region:account-id:table/family_collection"
            ]
          },
          {
            "Effect": "Allow",
            "Action": [
                "rekognition:IndexFaces"
             ],
            "Resource": "*"
                 }
             ]
        }
For the access policy, ensure you replace aws-region, account-id, and the actual name of the resources (e.g., bucket-name and family_collection) with the name of the resources in your environment.
Now, attach the access policy to the role using following command.
aws iam put-role-policy --role-name LambdaRekognitionRole --policy-name \
LambdaPermissions --policy-document file://access-policy.json
We can almost configure our AWS environment. We can now upload our images to Amazon S3 to seed the face collection. For this example, we again use a small piece of Python code that iterates through a list of items that contain the file location and the name of the person within the image.
Before running the code you need to install Boto3. Boto3 is the Amazon Web Services (AWS) Software Development Kit (SDK) for Python, which allows Python developers to write software that makes use of services like Amazon S3 and Amazon EC2. You can find the latest, most up to date, documentation at Read the Docs, including a list of services that are supported.
Install the Boto3 library using the following command:
sudo pip install boto3
Now, run the following python code to upload the images into S3 Bucket. Before running the code be sure that you keep all the images and the python file in the same directory.
import boto3
s3 = boto3.resource('s3')
# Get list of objects for indexing
images=[('afridi.jpg','Shahid Afridi'),
       ('sakib.jpg','Sakib Al Hasan'),
       ('kohli.jpg','Birat Kohli'),
       ('masrafi.jpg','Mashrafe Bin Mortaza'),
       ('ganguli.jpg','Sourav Ganguly')
      ]
# Iterate through list to upload objects to S3
for image in images:
   file = open(image[0],'rb')
   object = s3.Object('taifur12345bucket',image[0])
   ret = object.put(Body=file,
                   Metadata={'FullName':image[1]}
                   )
   #print(image[0])
   #print(image[1])
Now, add the Face Index to AWS DynamoDB with full name for every image using the following python code.
import boto3
from decimal import Decimal
import json
import urllib
BUCKET = "taifur12345bucket"
KEY = "sample.jpg"
IMAGE_ID = KEY  # S3 key as ImageId
COLLECTION = "family_collection"
dynamodb = boto3.client('dynamodb', "eu-west-1")
s3 = boto3.client('s3')
# Note: you have to create the collection first!
# rekognition.create_collection(CollectionId=COLLECTION)
def update_index(tableName,faceId, fullName):
	response = dynamodb.put_item(
	TableName=tableName,
	Item={
		'RekognitionId': {'S': faceId},
		'FullName': {'S': fullName}
		}
	)
	#print(response)
def index_faces(bucket, key, collection_id, image_id=None, attributes=(), region="eu-west-1"):
	rekognition = boto3.client("rekognition", region)
	response = rekognition.index_faces(
		Image={
			"S3Object": {
				"Bucket": bucket,
				"Name": key,
			}
		},
		CollectionId=collection_id,
		ExternalImageId="taifur",
	    DetectionAttributes=attributes,
	)
	if response['ResponseMetadata']['HTTPStatusCode'] == 200:
		faceId = response['FaceRecords'][0]['Face']['FaceId']
		print(faceId)
		ret = s3.head_object(Bucket=bucket,Key=key)
		personFullName = ret['Metadata']['fullname']
		#print(ret)
		print(personFullName)
		update_index('taifur12345table',faceId,personFullName)
	# Print response to console.
	#print(response)
	return response['FaceRecords']
for record in index_faces(BUCKET, KEY, COLLECTION, IMAGE_ID):
	face = record['Face']
	# details = record['FaceDetail']
	print "Face ({}%)".format(face['Confidence'])
	print "  FaceId: {}".format(face['FaceId'])
	print "  ImageId: {}".format(face['ImageId'])
Once the collection is populated, we can query it by passing in other images that contain faces. Using the SearchFacesByImage API, you need to provide at least two parameters: the name of the collection to query, and the reference to the image to analyze. You can provide a reference to the Amazon S3 bucket name and object key of the image, or provide the image itself as a bytestream.
In the following example, I used following code in Lambda function to to search face by taking the image from S3 Bucket. In response, Amazon Rekognition returns a JSON object containing the FaceIds of the matches. Using the face ID it retrieves the full name.
1. Sign in to https://developer.amazon.com and click on Create Skill.
2. Give a name of the skill and click on Next
3. Select Custom and then click on Create skill
4. Select JSON Editor
5. Drag and drop the json file attached in the code section or paste the code in the editor window.
6. Save and Build the model.
Your custom skill is almost ready. We will back here again after creating a Lambda function.
Creating Lambda Function1. Go to aws management console and from the services tab select Lambda and click on Create function
2. Put a name of the function, Select Python 2.7 as runtime and from the Role select Choose an existing role. (we you use the rule we created earlier from aws cli)
3. Select the LambdaRekognitionRole we created using aws cli and click on Create function from the right bottom corner.
4. From the Add triggers tab select Alexa Skills Kit
Alexa Skills Kit will be added with your Lambda function.
5. Go to the top bottom corner and copy the ARN in your clipboard.
6. Go back to Alexa developer console on click on Endpoint tab. Paste the ARN to the Default Region text box (or any specific region if you want to make it for a specific location)
7. Copy the Application ID (skill id) to your mouse clipboard and got the Lambda
8. Paste the Skill ID to the text box and click to Add
9. Click on Save.
10. Configuration for Lambda function is almost complete.
11. Create a Thing on AWS IoT, download certificate key, private key and root ca files. (follow the link to create aws IoT)
12. Download the code file for Lambda function from the code section and replace the skill id with your own. Download AWSIoTPythonSDK from the github link and make a .zip folder including all (lambda code, certificate file, private key file, root ca file and SDK moudle directory)
13. Go to the Lambda function again from AWS console and from the code section choose Upload a ZIP file, browse the zip file you created and then click on Save.
Your Custom Skill with a Lambda function is now ready to test.
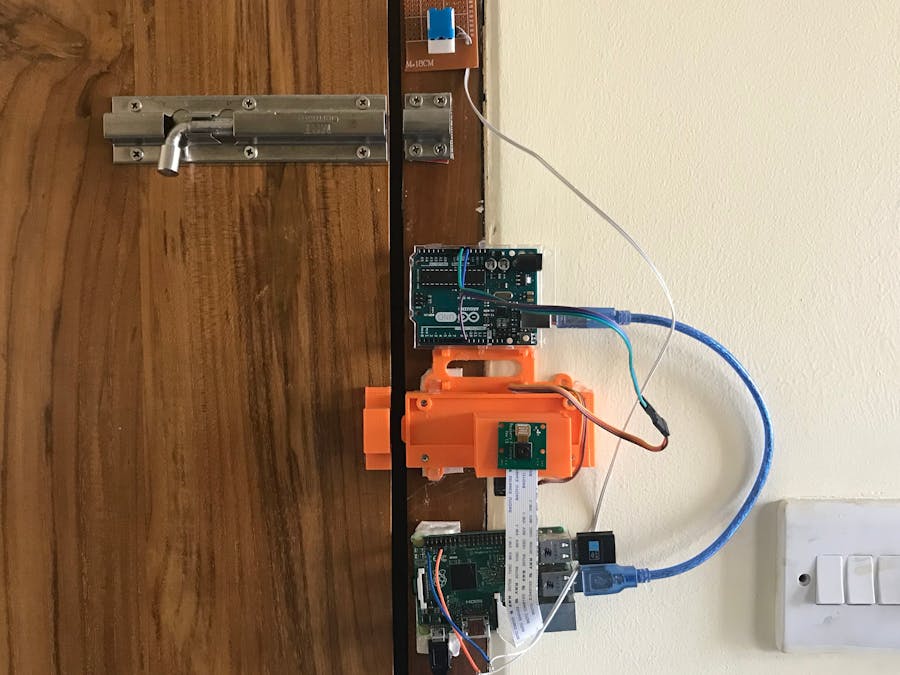
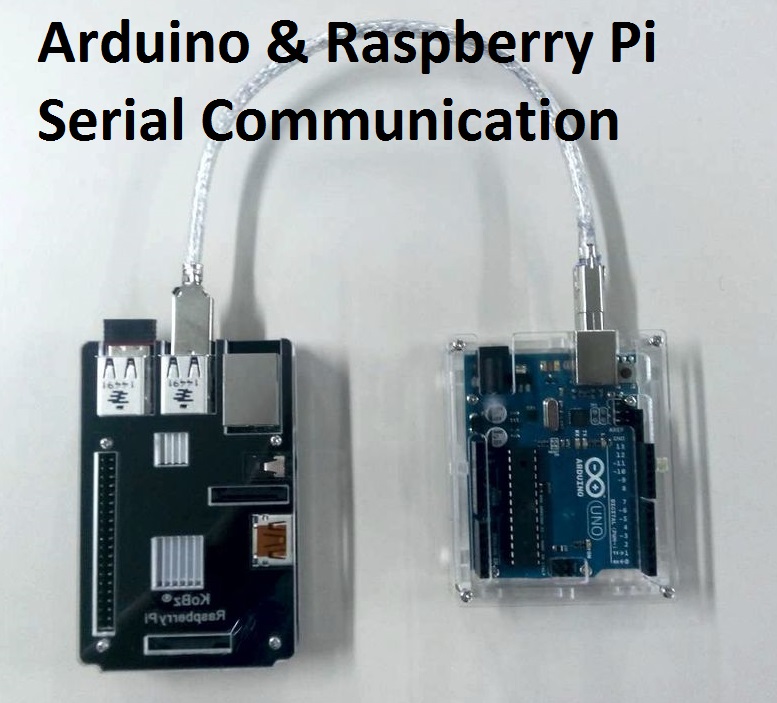
Making the HardwareRaspberry Pi is connected with a camera module. Raspberry Pi sends data to Arduino using serial cable. I short Arduino cable was used to connect Arduino with Raspberry Pi.
A test setup was made for primary testing either it is working perfectly or not.
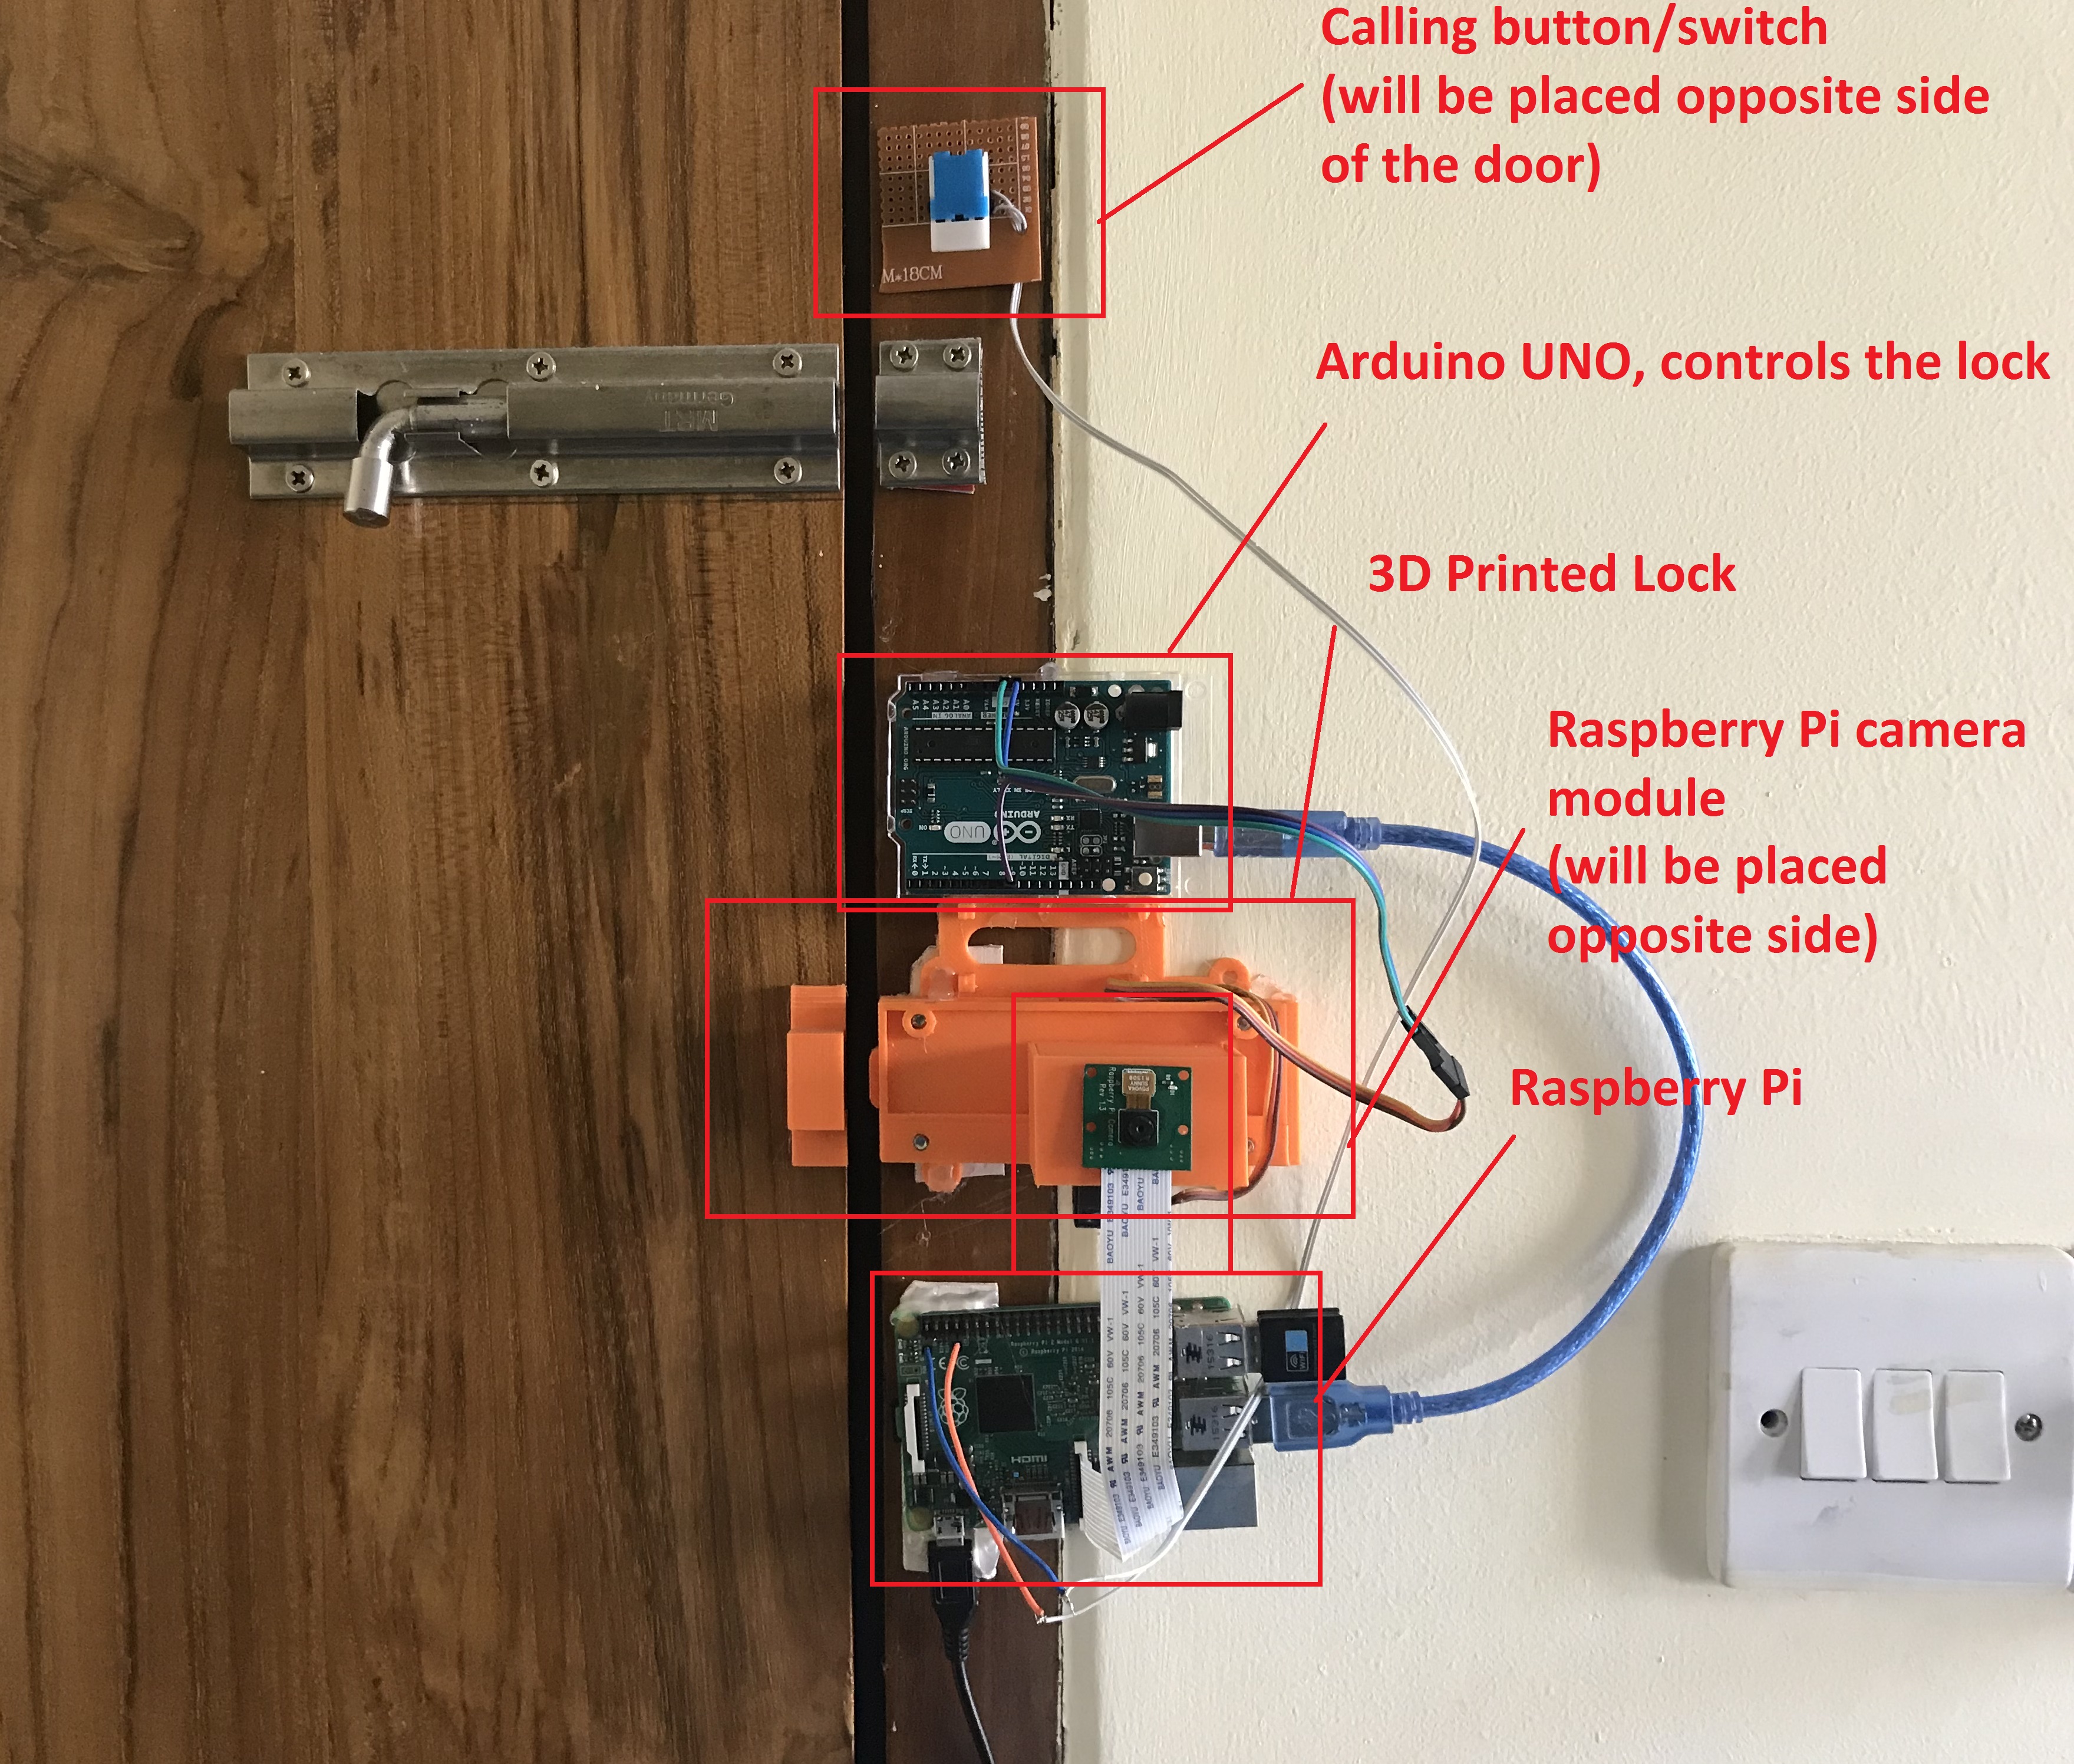
After primary testing I setup all the devices in a door using some hot glue. This setup is for demonstration purpose only. To make the demonstration easy I place all the components in the same side of the door. Practically the camera and the button switch will be outer side of the door. Here, I did not attached any speaker. A speaker is required to play the greetings for the guest. The demo lock was printed using a 3D printer. To get full design of the lock see my previous tutorial.
Special thanks to Mr. Christian Petters for his nice tutorial Build Your Own Face Recognition Service Using Amazon Rekognition. It was really helpful and I copied some instructions and commands directly from his writing.
This GitHub link also helped me to develop program.


_3u05Tpwasz.png?auto=compress%2Cformat&w=40&h=40&fit=fillmax&bg=fff&dpr=2)
Comments