


Hardware components | ||||||
| × | 1 | ||||
| × | 1 | ||||
| × | 1 | ||||
| × | 1 | ||||
| × | 1 | ||||
| × | 1 | ||||
| × | 1 | ||||
| × | 1 | ||||
| × | 1 | ||||
| × | 1 | ||||
| × | 1 | ||||
| × | 1 | ||||
| × | 1 | ||||
| × | 1 | ||||
 |
| × | 1 | |||
Software apps and online services | ||||||
 |
| |||||
 |
| |||||
| ||||||
 |
| |||||
| ||||||
Hand tools and fabrication machines | ||||||
 |
| |||||
 |
| |||||
Birds are an essential part of our natural ecosystem, playing vital roles in pollination, seed dispersal, and maintaining ecological balance. Unfortunately, many bird species in Bangladesh are facing alarming population declines due to rapid urbanization, deforestation, pollution, and climate change. Common species like the crow and tailorbird, once abundant, are now at risk, highlighting the urgent need for conservation and protective measures. The loss of bird populations not only threatens biodiversity but also disrupts the stability of the environment and weakens the natural resilience of ecosystems.
Protecting endangered and vulnerable bird species requires effective monitoring, proper identification, and a deep understanding of their environmental needs. Traditional methods of observing birds are often time-consuming, human resource–intensive, and prone to error. Modern technology, however, provides an opportunity to address these challenges through advanced monitoring and data-driven insights.
My SolutionTraditional bird monitoring is often challenging — it requires trained experts, long observation hours, and costly equipment. To address these limitations, I developed Edge-Bird, an open-source, solar-powered system that can:
- Identify bird species in real time using their calls, songs, and sounds.
- Monitor environmental parameters such as temperature and humidity.
- Store or transmit data to researchers and conservationists for analysis.
By combining machine learning with custom hardware, 3D-printed enclosures, and low-power ESP32-S3 microcontrollers, Edge-Bird enables scalable, low-cost, and automated monitoring of birds in their natural habitat. Integrated environmental sensors add valuable context by linking bird presence with habitat conditions, providing deeper insights into how environmental factors affect bird populations and behavior.
Through automated bird sound recognition and ecosystem monitoring, this project aims to support the protection of endangered birds in Bangladesh. By delivering accurate, real-time data on bird activity and habitat health, Edge-Bird can help guide conservation strategies, encourage sustainable coexistence, and ultimately contribute to preserving biodiversity for future generations.
Project Goals- 🎙 Identify bird species in real-time from their calls using an ML model running on ESP32-S3 WROOM.
- 🌡 Collect environmental data (temperature, humidity, light, pressure, motion, magnetic field) to understand habitat conditions.
- 📍 Track location of bird detections using GPS.
- ☀️ Run off-grid with solar power and Li-ion battery management.
- 📡 Send data to the cloud over GSM in remote areas where Wi-Fi isn’t available.
- 💾 Store all recordings and sensor logs locally on an SD card for backup.
The bird recognition project requires a device that is reliable, energy-efficient, and capable of running independently in remote natural environments. Off-the-shelf development boards or modules cannot meet all the requirements at once, especially when it comes to low-power management, multi-sensor integration, and solar-powered operation. That is why I designed a custom circuit and schematic tailored specifically for this project. I considered the following things while designing the circuit and PCB board.
Integration of Multiple Components
- The system needs to combine bird sound capture (microphones), environmental sensors, GPS, GSM, local storage, and a power management system.
- A custom schematic ensures all components are connected properly, with correct logic levels, interfaces (I²C, I²S, UART, SPI), and power routing.
Power Optimization for Remote Deployment
- Since the device runs on a Li-ion battery with solar charging, careful design of the schematic allows for dual LDO regulators and selective power shutdown of peripherals.
- This reduces unnecessary current draw and enables months of autonomous operation.
Field Reliability and Protection
- The schematic includes reverse battery protection, overcharge/discharge protection, and a fuel gauge.
- These protections make the device robust for harsh outdoor conditions where human access for maintenance is limited.
Scalability and Cost Efficiency
- A custom PCB based on the schematic reduces bulk compared to multiple breakout boards.
- It lowers cost, simplifies deployment, and ensures repeatable assembly for multiple devices.
Tailored for Machine Learning on the Edge
- The ESP32-S3 is central, with AI acceleration to run the ML model directly on the device.
- The schematic ensures microphones are routed through I²S, storage through SPI, and cloud communication through GSM, making the hardware fully compatible with the ML workflow.
Contribution to Conservation Research
- By designing a dedicated schematic, the device becomes compact, energy-aware, and scalable, making it suitable for wide deployment in forests, wetlands, or other habitats.
- The result is systematic data collection that directly supports understanding bird populations, their habitats, and the factors affecting endangered species.
👉 In short: I designed a circuit and schematic because the project needed a custom, reliable, low-power, and sensor-rich system that standard boards could not provide. This ensures the device can work sustainably and autonomously in the field, making it an effective tool for bird conservation.
The following section describes the important sections & components of the board.
1. Core Processing UnitESP32-S3 WROOM
The ESP32-S3 WROOM is a powerful Wi-Fi + Bluetooth 5.0 SoC module designed with AI acceleration in mind, making it well-suited for embedded machine learning applications. Compared to earlier ESP32 versions, the S3 integrates vector instructions optimized for neural network and signal processing workloads, significantly improving the performance of tasks like audio classification, speech recognition, and sensor data analysis.
With its dual-core Xtensa LX7 processor, up to 512 KB SRAM, and support for external PSRAM, the ESP32-S3 WROOM can efficiently run quantized TensorFlow Lite Micro models for on-device inference. Its I²S, I²C, and SPI interfaces make it easy to connect microphones, sensors, and other peripherals needed for ML-based IoT projects. Additionally, the module’s low-power design allows ML workloads to run in edge devices that rely on batteries or even solar power, enabling long-term, off-grid deployment.
In short, the ESP32-S3 WROOM provides the right balance of processing power, memory, and low energy consumption to make real-time, AI-powered sensing possible at the edge.
In my project, ESP32-S3 serves the following:
- Acts as the brain of the system.
- Runs the ML model (bird sound classification).
- Handles sensor data collection, local storage, and cloud communication.
- Has sufficient processing power, dual cores, AI acceleration, and wireless support.
Two I²S Microphones (IM69V103)
- Capture bird calls and ambient sounds.
- Digital I²S interface ensures clean, high-quality sound input without analog noise issues.
- Two mics can be used for redundancy or stereo recording.
- HS3003 (Temperature & Humidity) → helps identify climate preferences of birds.
- LPS22HBTR (Pressure Sensor) → adds altitude/air pressure data, useful for migration/habitat research.
- APDS9960 (Ambient Light & Proximity) → tracks light levels, day/night cycles, or vegetation density.
- BMI270 (IMU – accelerometer/gyroscope) → measures vibrations, can detect disturbances (e.g., predators, storms, or device movement).
- BMM350 (Magnetometer) → provides orientation and Earth’s magnetic field data, can complement IMU for positioning accuracy.
NEO-M8U GPS
- Provides precise geolocation for bird sightings.
- Enables mapping of species distribution and migration routes.
SIM800C GSM/GPRS Module
- Ensures data upload in remote, Wi-Fi-scarce areas.
- Sends both bird recognition events and environmental logs to the cloud.
SD Card Storage
- Acts as local backup for sound clips and sensor data.
- Ensures no data loss if GSM connection fails.
- Solar powered for off-grid operation.
- Long runtime with high energy density.
- 18650 Li-ion Battery
DW06 Protection Circuit
- Safeguards against over-discharge, over-charge, and reverse polarity.
CN3165 Solar Charge Controller
- Manages charging from a solar panel.
- Optimized for Li-ion batteries, making the system fully renewable.
MAX17048 Fuel Gauge
- Provides accurate battery level and health monitoring.
- Allows smart power management decisions by the ESP32-S3.
Dual 3.3V LDO Regulators
- Regulator 1 → dedicated to ESP32-S3 (always powered).
- Regulator 2 → powers all sensors and peripherals, can be software-disabled to save energy during idle periods.
Low-Power Design:
- ESP32-S3 deep sleep + selective regulator shutdown maximizes runtime.
Data Redundancy:
- Cloud upload (SIM800C) + local SD storage prevents data loss.
Environmental Correlation:
- Linking bird calls with temperature, humidity, light, and pressure provides insights into habitat suitability.
Scalability:
- Multiple devices can be deployed across regions for large-scale biodiversity mapping.
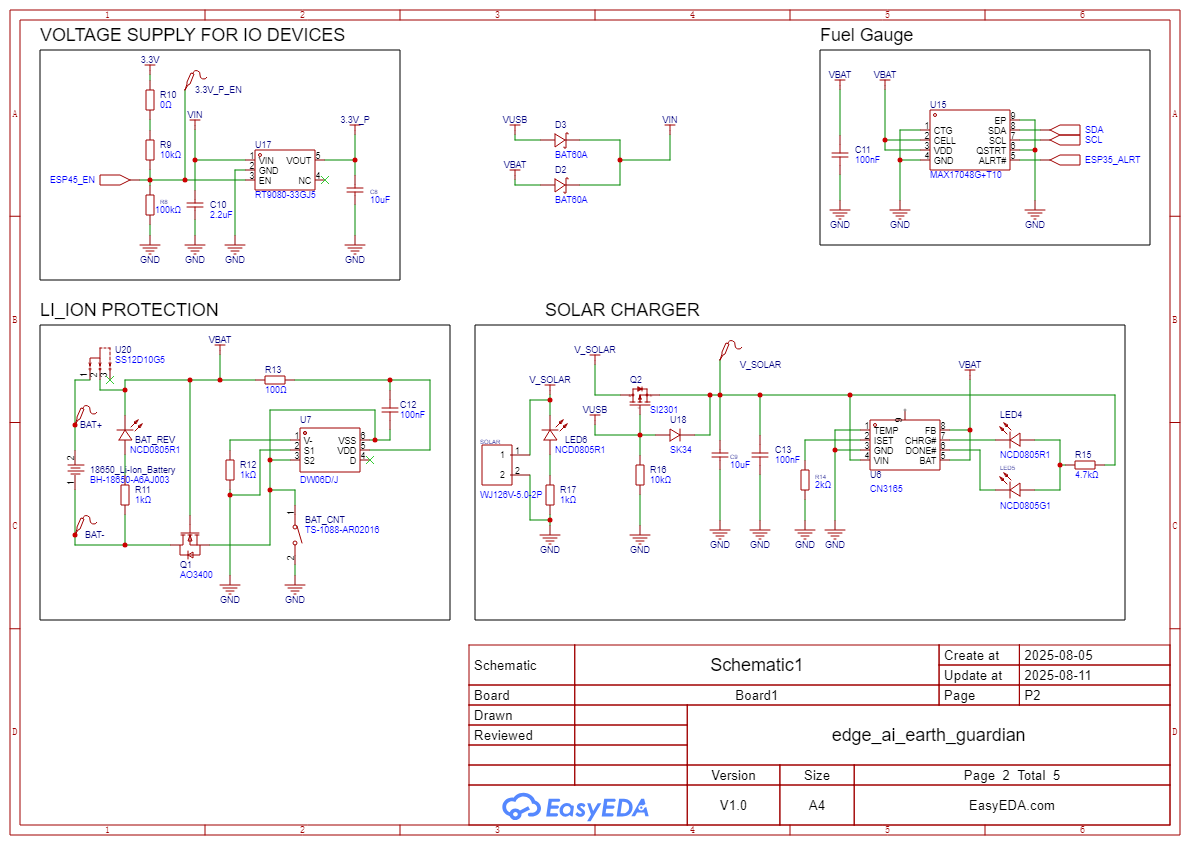
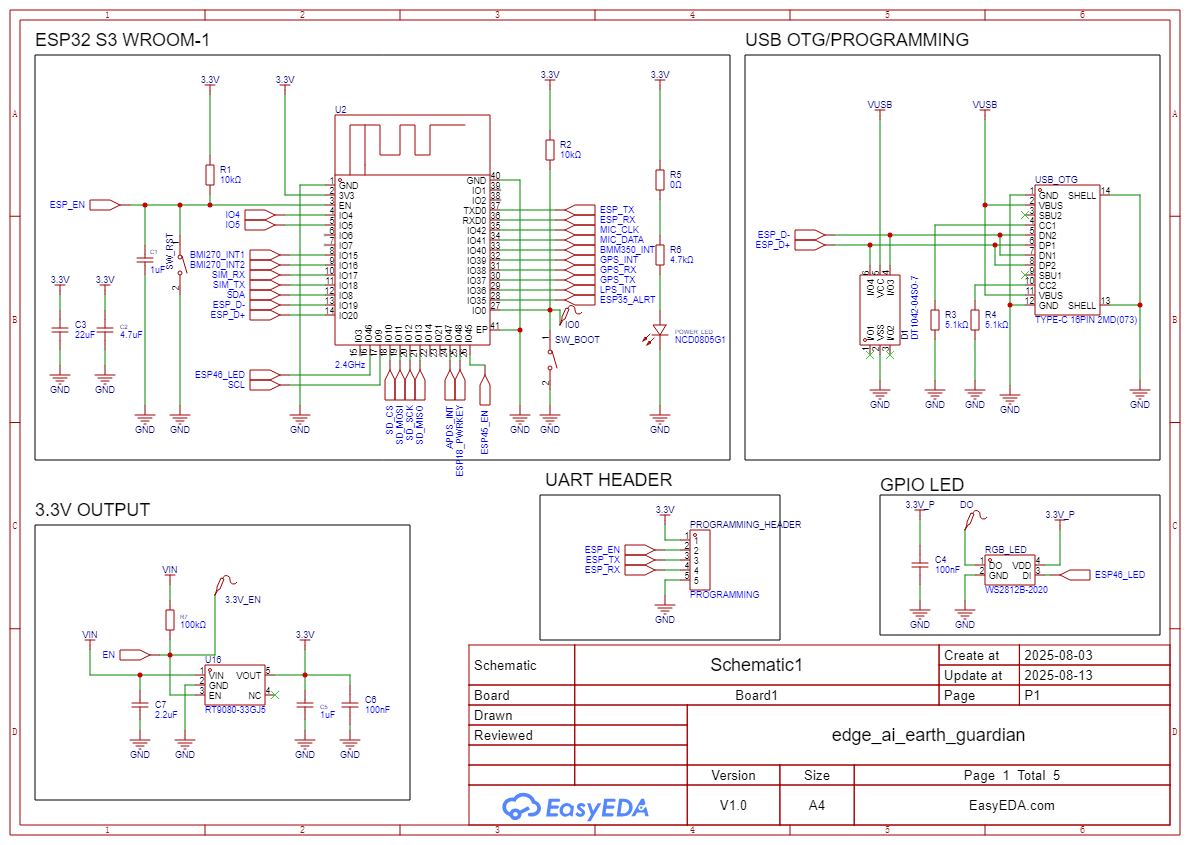
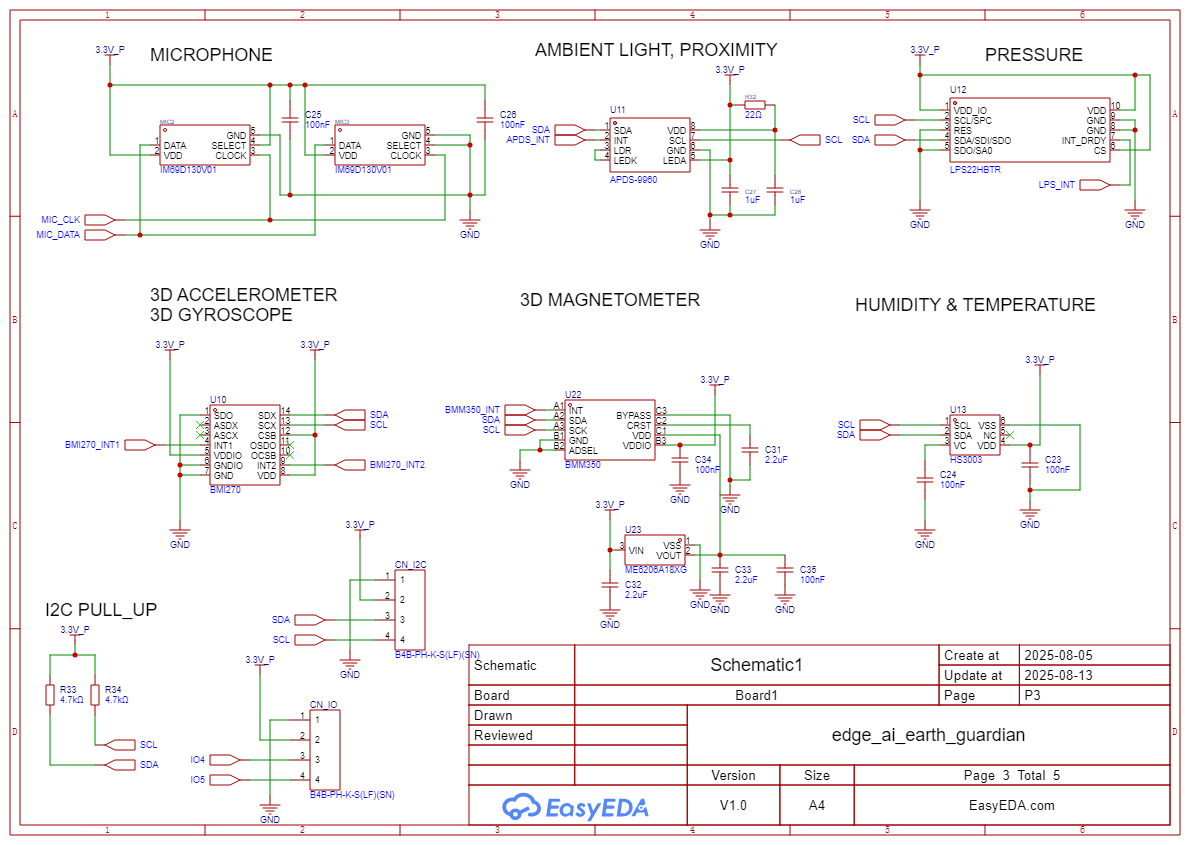
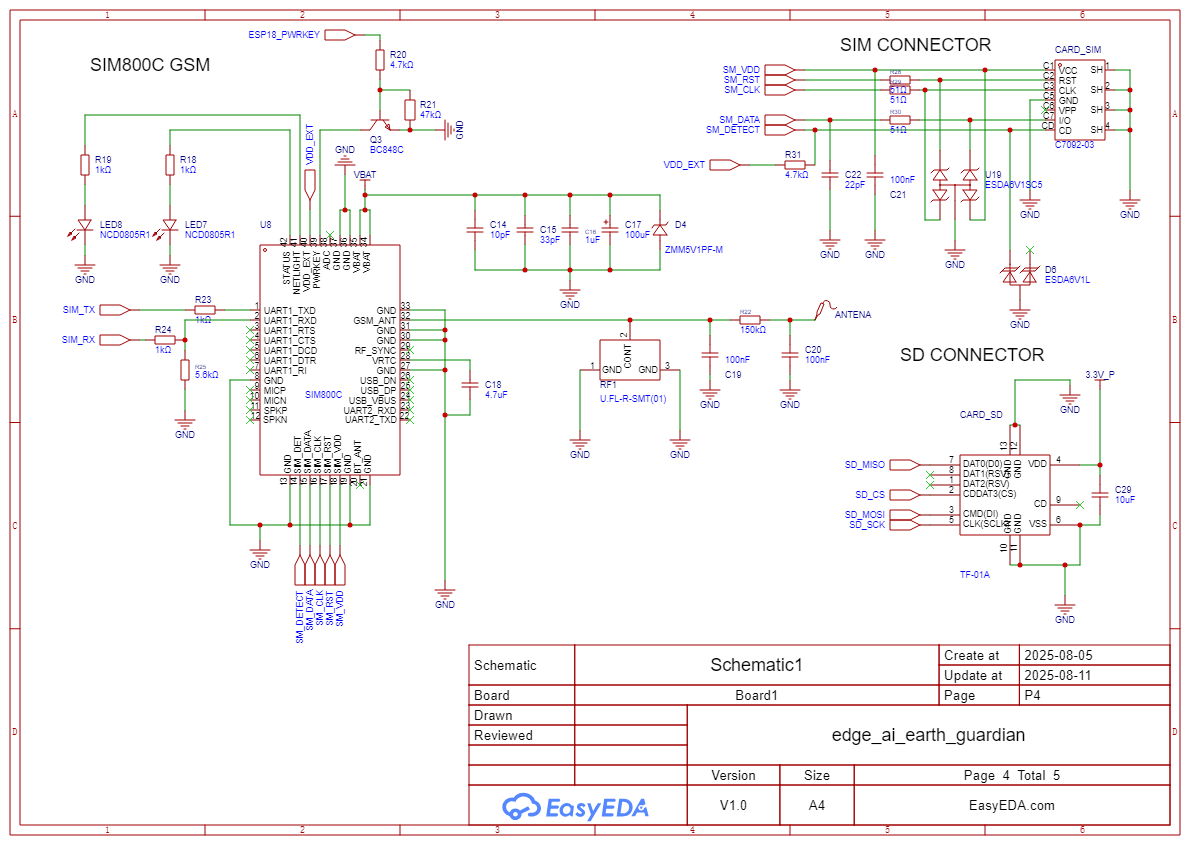
With all the core components described, the complete system comes together in the schematic shown below. The design was created in EasyEDA, integrating the ESP32-S3 WROOM module, I²S microphone, environmental sensors, power management circuit with solar charging, and peripheral connections into a single, compact layout. This schematic serves as the foundation for the custom PCB, ensuring stable connections, reliable operation, and ease of replication for anyone building the project.
To make the design easier to follow, the schematic was divided into five separate sheets, each focusing on a specific functional block of the system:
1. Microcontroller (ESP32-S3 WROOM) & I/O & Connectors– Core processing unit with clock, reset, and essential supporting components. USB-C Programming header, debug pins, external connections, and peripheral expansion with the main power regulator are included in this sheet.
2. Power Management & Solar Charging – Includes the solar panel input, charge controller, battery connection, and voltage regulation circuitry.
3. Environmental Sensors and Audio Input (I²S Microphone) – Digital microphone interface with I²S connection to the ESP32-S3. Temperature, humidity, and other sensor interfaces over I²C.
4. Communication & Storage (SIM800C + SIM + SD Card) - This sheet contains the SIM800C GSM/GPRS module along with the SIM card connector for mobile network access, enabling the system to transmit data from remote field locations without Wi-Fi. It also includes the SD card connector, which provides local storage for audio samples, sensor logs, and inference results.
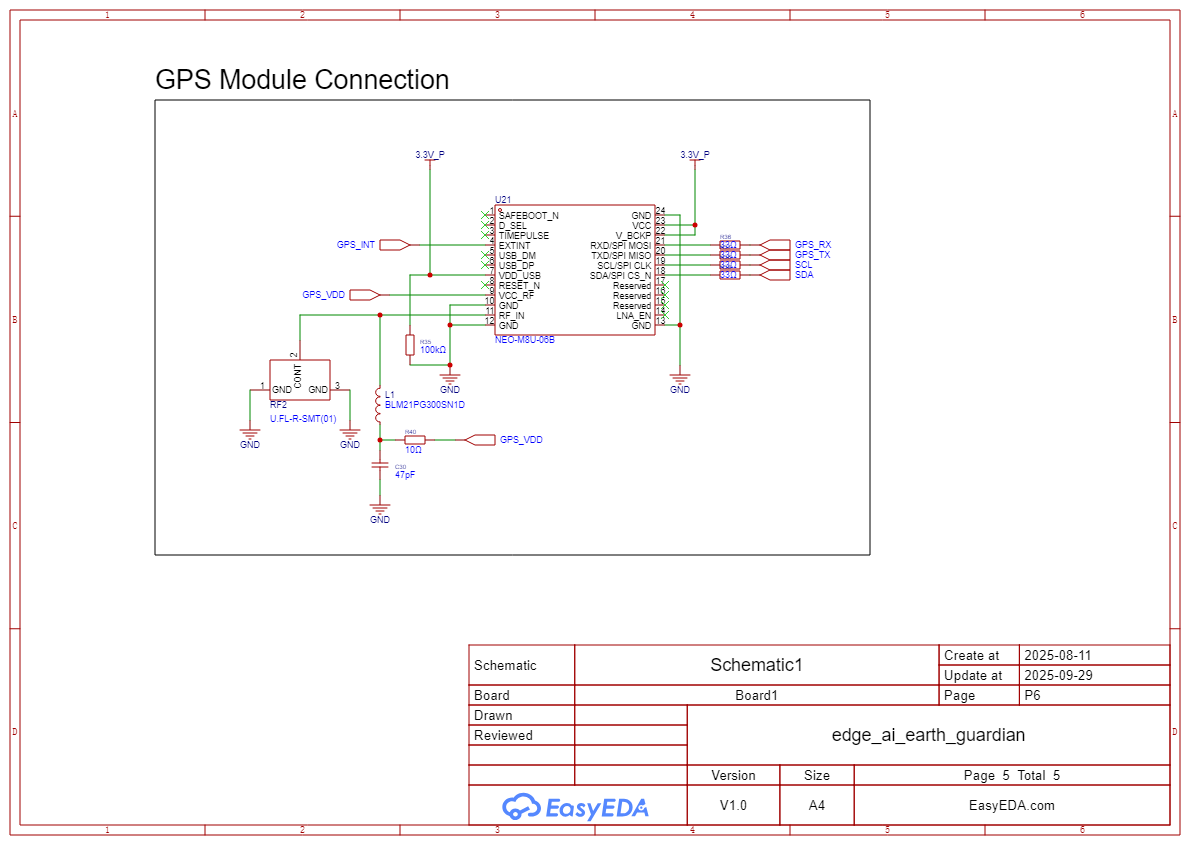
5. GPS Module (Neo-M8) – This sheet contains the u-blox Neo-M8 GPS module, which provides accurate positioning data. By tagging bird detections and environmental readings with location coordinates, the system enables researchers to map bird activity and habitat conditions geographically. This feature is especially useful for field studies, migration tracking, and conservation planning.
After finalizing the schematic, the complete circuit was converted to PCB. The PCB was laid out with careful attention to signal integrity, power distribution, and modularity, ensuring reliable operation in outdoor environments. Each functional block from the schematic—such as power management, ESP32-S3 core, microphone interface, environmental sensors, communication/storage modules, and GPS—was placed and routed systematically to minimize noise and improve performance.
Special care was taken with power and ground planes to reduce interference, especially important for sensitive audio and RF components. Connectors and headers were positioned for easy assembly, debugging, and future upgrades. The design also considered compactness and durability, making it suitable for use inside a 3D-printed enclosure deployed in the field.
By using EasyEDA, the PCB could be visualized in 2D and 3D views, checked for errors, and optimized before fabrication. This design step bridges the schematic with the physical hardware, ensuring that the final system is not only functional but also practical for open-source replication and deployment.
PCB layout of Edge-Bird showing component placement and routing.
2D PCB view of Edge-Bird designed in EasyEDA
3D PCB view of Edge-Bird designed in EasyEDA
To bring the design from digital to physical form, I used NextPCB for both fabrication and assembly services. NextPCB provided high-quality multi-layer fabrication, precise solder mask application, and reliable surface finishes, all of which are suitable for long-term outdoor use.
After completing the PCB layout in EasyEDA, the Gerber files and BOM (Bill of Materials) were generated and uploaded directly to NextPCB’s platform. NextPCB delivered a very impressive and fully assembled PCB board.
Thanks to NextPCB for sponsoring the board. I would like to give special thanks to Viviane and Betty Lv from NextPCB. I found them very cooperative.
To be honest, I was a bit nervous about whether the board would function as expected. As soon as I received the fabricated PCB, I immediately powered it on — and to my relief, it worked perfectly!
To verify the basic functionality, I uploaded an I²C scanner code to the ESP32-S3, and the serial monitor successfully detected the connected devices, confirming that the core system was alive and ready for further testing.
The following figure shows the components' location on the PCB board.
For developing a machine learning model to identify birds from sound requires a rich dataset. For this project, I prepared my bird sound dataset using Audacity, a free, open-source audio editor. This section shows how you can collect raw recordings (from Xeno-canto or YouTube), clean them up, split them into consistent 1-second clips, and organize them for Edge Impulse.
Step 1 — Install Audacity- Download and install Audacity: https://www.audacityteam.org/download.
- Open it and set the project rate (bottom left corner) to your target sample rate 16000 Hz.
- From Xeno-canto: Search by species name, download WAV/MP3 recordings (check license).
- From YouTube: Download audio with a tool like
yt-dlp(check license/permissions). - Save them in a folder named
raw_recordings/.
- Open Audacity.
- Drag and drop your audio file into the workspace.
- If the file is stereo, go to Tracks → Mix → Mix Stereo down to Mono.
- Save your project (
File → Save Project As) before starting edits.
Once you import the bird recordings into Audacity, the raw audio often contains background noise, silence, or uneven volume. To make the dataset consistent and easier for a machine learning model to learn from, you should clean and preprocess the audio before splitting it into clips:
- Convert to mono – If your recording is stereo, go to Tracks → Mix → Mix Stereo Down to Mono. This ensures a single audio channel, which reduces complexity.
- Trim irrelevant sections – Select and delete long silences, human voices, or other unwanted sounds.
Noise reduction –
- Highlight a portion of the recording that only contains background noise.
- Go to Effect → Noise Reduction → Get Noise Profile.
- Then select the full track and apply Noise Reduction with moderate settings (start with: Noise Reduction 8–12 dB, Sensitivity 6, Frequency Smoothing 3).
- Normalize audio – Go to Effect → Normalize and set the peak amplitude to around –1.0 dB. This ensures volume consistency across clips.
- Optional: High-pass filter – Use Effect → High Pass Filter with a cutoff around 1000 Hz to reduce low-frequency rumble (wind, traffic), while preserving bird call frequencies.
After this step, the recording is clean, normalized, and ready to be split into 1-second clips for dataset creation.
Step 5 — Splitting into 1-Second Clips AutomaticallyOpen your cleaned audio file
- Import your recording into Audacity.
- Make sure the track is mono, normalized, and noise-reduced.
Use the “Labels” method for 1s segments
- Go to Analyze → Regular Interval Labels.
In the dialog, set: - Label interval:
1 second - Label text: leave blank (Audacity will number them).
- This will automatically place labels every 1 second across the entire track.
Export the labeled clips
- Go to File → Export → Export Multiple.
- Choose WAV (Microsoft) signed 16-bit PCM.
- Under “Split files based on,” select Labels.
- Choose a file naming scheme (e.g., “crow_###”).
- Click Export, and Audacity will save each 1-second segment as a separate WAV file.
Organize the output
Move the clips into your dataset folder structure:
/dataset/
  /Crow/
    crow_001.wav
    crow_002.wav
  /Tailorbird/
    tailorbird_001.wav
/dataset/
  /Crow/
    crow_001.wav
    crow_002.wav
  /Tailorbird/
tailorbird_001.wav- Record a few minutes of background sounds (wind, city, silence, etc.) with your mic, or use parts of Xeno-canto/YouTube files where no bird calls exist.
- Export 1-second clips as above, and place them in a
background/folder.
Organize clips into folders so Edge Impulse can auto-label them:
/dataset/
  /Crow/
    crow_001.wav
    crow_002.wav
  /Tailorbird/
    tailorbird_001.wav
  /Background/
    bg_001.wav
/dataset/
  /Crow/
    crow_001.wav
    crow_002.wav
  /Tailorbird/
    tailorbird_001.wav
  /Background/
bg_001.wav- Log into Edge Impulse Studio.
- Create a new project → Data Acquisition → Upload data.
- Drag each folder (Crow, Tailorbird, Background) to upload.
- Confirm that all clips are 1s, mono, and the correct sample rate.
- In Impulse Design, define how your raw audio clips will be processed before being sent to the ML model.
Add a Spectrogram or MFCC block:
- MFCC (Mel-Frequency Cepstral Coefficients): lightweight, good for embedded devices like ESP32-S3.
- Spectrogram: captures richer detail, slightly heavier but often better accuracy.
- Set window size = 1000 ms (to match your 1-second clips).
Set Training Parameters
- Number of Training Cycles: Start with 50–100 epochs. More cycles may improve accuracy but can risk overfitting.
- Learning Rate: Use 0.005–0.01. If accuracy stalls, lower it slightly.
- Batch Size: 16 or 32 works well for audio datasets.
- Optimizer: Adam (default in Edge Impulse) is usually best.
- Click Start Training.
Edge Impulse will display live graphs:
- Accuracy Curve → should go up with cycles.
- Loss Curve → should go down with cycles.
When training finishes, you’ll see:
- Model Accuracy (Overall %)
- Confusion Matrix → shows which classes the model mixes up.
- Per-class Accuracy → useful to check if one species is harder to detect.
If one class (e.g., common_tailorbird) is much lower, you need more samples or better cleaning for that class.
Step 11 - Deploying the Model to ESP32-S3 as an Arduino LibraryAfter training and validating your model, the final step is deploying it to your device. Edge Impulse makes this easy by generating an Arduino library that you can import directly into the Arduino IDE.
1. Go to the Deployment Tab
- In Edge Impulse Studio, click Deployment (left-hand menu).
- This page shows multiple export options (Arduino, C++, TensorFlow Lite, WebAssembly, etc.).
2. Select Arduino Library
- Scroll down and choose Arduino Library.
- From the hardware options, select ESP32 / ESP32-S3 (or just ESP32 if S3 isn’t listed — it works the same).
- Make sure Quantized (int8) is selected for the model type (smaller and faster, fits in ESP32 memory).
3. Build and Download
- Click Build → Edge Impulse will compile the model into a library.
- Once ready, a .zip file will be available for download.
- Save this file on your computer.
4. Import Library in Arduino IDE
- Open Arduino IDE.
- Go to Sketch → Include Library → Add .ZIP Library.
- Select the downloaded .zip file from Edge Impulse.
- Arduino will now add the model library.
5. Test Example Code
- After installing, go to File → Examples → Your Project Name → nano_ble33_sense_microphone / esp32_microphone_inference (the example name may differ slightly depending on your device).
- This example already contains code to:
- Record audio from I2S mic.
- Run inference using the trained model.
- Print predictions in Serial Monitor.
Before enclosing and deploying, I tested the device by connecting the solar panel. The following image shows that the battery is charging when the solar panel is connected to the right direction.
Since the battery was already close to full, exposing it to light for about an hour brought it up to full charge, confirming that the solar panel charging circuit is functioning properly.
The board is placed in a 3D printed base. Design files are added in the attachment section.
The top cover of the enclosure has been carefully designed to balance protection and functionality. Its structure prevents rainwater from seeping into the box, safeguarding the internal electronics from moisture damage. At the same time, the cover allows both sound and air to pass through. This ensures that bird calls can be captured clearly by the microphone and that the enclosure remains properly ventilated, helping to maintain stable operating conditions for the electronics during outdoor deployment.
The 3D-printed enclosure was designed with practical field deployment in mind. The base features four mounting holes (two on each side), making it easy to securely fasten the unit to a tree trunk or post in different orientations.
To support connectivity and power, an opening on the right wall is dedicated to the antenna, while another opening on the left wall provides a pass-through for the solar module’s power cable. These design choices ensure that the device can be mounted outdoors in a stable way while keeping all necessary connections accessible and organized.
For all programming, firmware, and cloud updates, visit my GitHub Repository.
ConclusionThis project combines AI + IoT + renewable energy to create a smart, autonomous, and scalable solution for bird conservation. By listening to birds and linking their calls with environmental conditions, we can help protect biodiversity for future generations.
With this device, I aim to contribute to bird conservation efforts by making it easier to monitor populations, track endangered species, and understand the natural environments that support them.


_t9PF3orMPd.png?auto=compress%2Cformat&w=40&h=40&fit=fillmax&bg=fff&dpr=2)


Comments