

_ztBMuBhMHo.jpg?auto=compress%2Cformat&w=48&h=48&fit=fill&bg=ffffff)
.png?auto=compress%2Cformat&w=48&h=48&fit=fill&bg=ffffff)
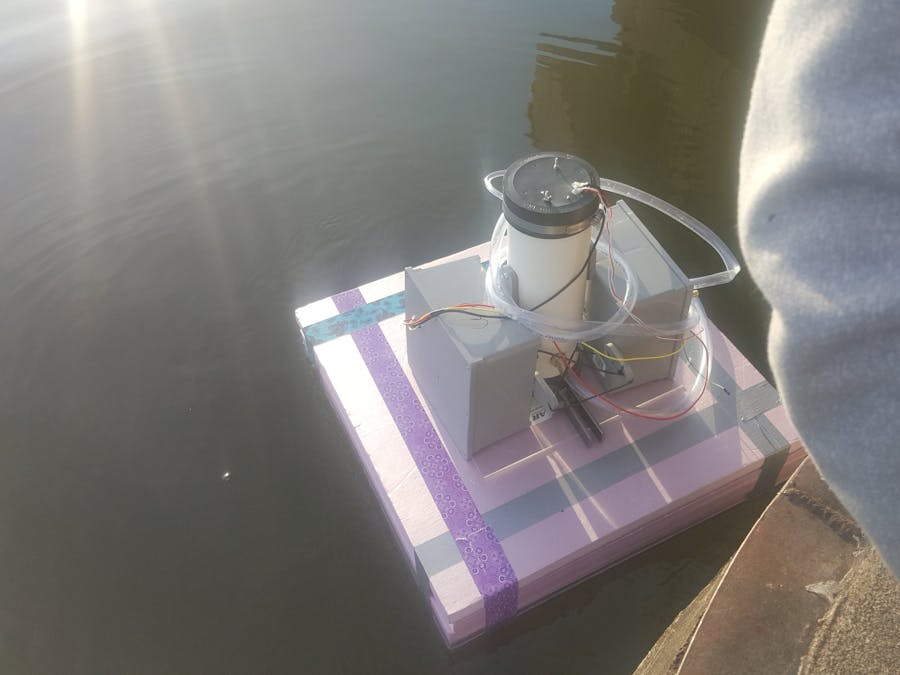
The researchers in UW-Madison Limnology department are having a hard time mesureing CO2 flux data on a regular basis, so they entrusted us to build an automated probe for them.
Briefly speaking, it takes musuremnt of CO2 in a closed chamber for a period of time, clear out the air, and repeat. data are stored in a SD card.
Sensor cap:
Control box (pump, valve, relay, and arduino):
Overall:
sensor cap
File missing, please reupload.
#include <SPI.h>
#include <SD.h>
#include <Wire.h>
#include "Co2Meter_K33.h"

//global variable declarations
Co2Meter_K33 k33;
const int CHIP_SELECT = 4; //CS - pin 4 (for MKRZero SD: SDCARD_SS_PIN)
String logname = "DATA0.txt"; //name of logged data file
//use the blue of an RGB LED to indicate when a measurement cycle is initiated
int ledBlue = 9;           // the PWM pin the RGB LED blue is attached to
//use the red of an RGB LED to indicate errors
int ledRed = 3;           // the PWM pin the RGB LED red is attached to
//use the greed LED to indicate time between sets
int ledGreen = 10;  // the PWM pin the RGB LED green is attached to
int brightness = 100;    // how bright the RGB LED blue, green, and red will be

//establish delays and number of measurements
int measurementWait = 1500; // number of milliseconds to wait between measurements within a set
int setToSetWait = 10000; // number of milliseconds to wait between each set, within a set many measurements are taken
int measurementTake = 3; // number of measurements to take per set, don't exceed setToSetWait time

String dataString = ""; // make a string for assembling the data to log:
double co2 = 0; // holds co2 measurement taken from K33 sensor
double temp = 0; // holds temperature measurement taken from K33 sensor
double relTime = 0; // holds the time, relative to how long the Arduino has been powered on

//relay, pump, and ball valve variables
int prelay = 4; //define output pin for pre-relay
int bvalve = 5; //define output pin for the ball valve
int pump = 6; //define output pin for the pump


//In this example we will do a basic read of the CO2 value and checksum verification.
//For more advanced applications please see the I2C Comm guide.

void setup() {
  Wire.begin();
  Serial.begin(4800); //start a serial port to communicate with the computer
  Serial.println("What a wonderful day, to read atmospheric CO2 concentrations!");
  pinMode(ledRed, OUTPUT); //declare red LED as an output
  pinMode(ledGreen, OUTPUT); //declare red LED as an output
  pinMode(ledBlue, OUTPUT); //declare blue LED as an output
  pinMode(bvalve,OUTPUT); //declare bvalve as an output
  pinMode(pump,OUTPUT);
  pinMode(prelay,OUTPUT);
 while (!Serial) {
    ; // wait for serial port to connect. Needed for native USB port only
 }

 Serial.print("Initializing SD card...");
  // see if the card is present and can be initialized:
  if (!SD.begin(CHIP_SELECT)) {
    Serial.println("Card failed, or not present");
    analogWrite(ledRed, brightness); // display error - LED Red
    // don't do anything more:
    while (1);
  }
  Serial.println("card initialized.");

  //find a filename that doesn't already exist
  String base = "DATA";  //base name of the log file
  String extension = ".txt"; //extension of the log file
  int iteration = 1; //a counter for which number the log file should be
  while (SD.exists(logname)) { // keep searching until we find a "logname" which won't overwrite an existing file
    ++iteration;
    logname = base + iteration + extension;
    Serial.println(logname); // print "logname"s for debugging purposes
  }

  // record the data text header to a file on the SD card
  // open the file. note that only one file can be open at a time,
  // so you have to close this one before opening another.
     File dataFile = SD.open(logname, FILE_WRITE);

  // if the file is available, write to it:
  if (dataFile) {
    dataFile.println("CO2(ppm),Temp(C),RelH(%)");
    dataFile.close();
  }
  // if the file isn't open, pop up an error:
  else {
    Serial.println("error opening: " + logname);
    analogWrite(ledRed, brightness);
  }

  //ensure ball valve is open
  openBValve();

}

/*
 * co2 should be measured every few hours, this defines a "set"
 * within this "set" many measurements should be taken
 * after the measurments have been taken in relatively quick succession,
 * wait until next set to take more measurements
 */
void loop() {
  pumpRunThenStop(); // clear out the air
  closeBValve(); // seal air inside the tube
  for (int numMeasures = 0; numMeasures < 4; ++numMeasures) { // take specified number of measurements within the set
      // We keep the sample period >25s or so, else the sensor will start ignoring sample requests.
      analogWrite(ledBlue, brightness); //light blue LED while taking measurments
      Serial.println("Initializing sensor (20sec)...");
      k33.initPoll();
      //wait for sensor to warmup, "i" designates number of seconds to wait
      for (int i = 20; i > 0; --i) {
        Serial.print("" + String(i) + "..");
        delay(1000);
      }
      Serial.println(); //print a new line for visual appeal
      double tempValue = k33.readTemp();
      delay(20);
      double rhValue = k33.readRh();
      delay(20);
      double co2Value = k33.readCo2();
      relTime = millis();
      dataString = "" + String(co2Value) + "," + String(tempValue) + "," + String(rhValue) + "," + String(relTime); //string that prints to file
      analogWrite(ledBlue, 0); //turn off blue LED when measurement ends

    // record the measurement to a file on the SD card
      // open the file. note that only one file can be open at a time,
      // so you have to close this one before opening another.
         File dataFile = SD.open(logname, FILE_WRITE);

      // if the file is available, write to it:
      if (dataFile) {
        dataFile.println(dataString);
        dataFile.close();
        // print to the serial port too:
        Serial.println(dataString);
      }
      // if the file isn't open, pop up an error:
      else {
        Serial.println("error opening: " + logname);
        analogWrite(ledRed, brightness);
      }

      if (co2Value >= 0) {
        Serial.print("CO2: ");
        Serial.print(co2Value);
        Serial.print("ppm Temp: ");
        Serial.print(tempValue);
        Serial.print("C Rh: ");
        Serial.print(rhValue);
        Serial.println("%");
      }
      else {
        Serial.println("Checksum failed / Communication failure");
        delay(9000);
      }
  }
  // here's the wait in between sets
  analogWrite(ledGreen, brightness); // show green LED in bewteen sets
  openBValve();
  delay(setToSetWait); // this is the amount of time to wait between sets
  analogWrite(ledGreen, 0); // show green LED in bewteen sets
}


///////////////////////////////////////////////////////////////////
// Function : void openBValve()
// Executes : opens the ball valve attached to a relay
/////////////////////////////////////////////////////////////////
void openBValve() {
//open the ball valve
  digitalWrite(prelay, LOW); // closes the relay "prelay" to feed power into relay "bvalve"
                            // since the close pin of the bvalve is attached to normally close,
                            // this action will make sure the bvalve is closed
  delay(4000); // wait 3 seconds before opeing ball valve, in case the ball valve was open when
              // Arduino is first started this time is allotted to physiccally let the ball
              // valve close
  digitalWrite(bvalve, LOW);  // closes the relay "bvalve" and opens the ball valve
  delay(4000); // wait for valve to open
  digitalWrite(prelay, HIGH); // opens the relay "prelay" which cuts power from the relay "bvalve"
                              // therefore leaving the bvalve in an open state w/o consuming extra power
}

///////////////////////////////////////////////////////////////////
// Function : void closeBValve()
// Executes : closes the ball valve attached to a relay
/////////////////////////////////////////////////////////////////
void closeBValve() {
//close the ball valve
  digitalWrite(prelay, LOW); // closes the relay "prelay" to feed power into relay "bvalve"
  delay(4000); // wait 4 seconds before opeing ball valve, in case the ball valve was open/close already
  digitalWrite(bvalve, HIGH);  // opens the relay "bvalve" and closes the ball valve
  delay(4000); // wait for valve to open
  digitalWrite(prelay, HIGH); // opens the relay "prelay" which cuts power from the relay "bvalve"
                              // therefore leaving the bvalve in a closed state w/o consuming extra power
}

///////////////////////////////////////////////////////////////////
// Function : void pumpRunThenStop()
// Executes : closes the ball valve attached to a relay
/////////////////////////////////////////////////////////////////
void pumpRunThenStop() {
  digitalWrite(pump, LOW); // closes relay "pump" to run the pump
  delay(5000); // waits for the pump to run, which ensures the device is working
  digitalWrite(pump, HIGH); // opens the relay "pump" which turns off the pump
}
// CO2 Meter Kseries Example Interface
// by Andrew Robinson, CO2 Meter <co2meter.com>
// Talks via I2C to K33ELG/BLG Sensors for HostInitiated Data Collection
// 4.1.2011

//Modified into Arduio Library by Kina Smith <kinasmith.com>
//06.09.2016

#include <inttypes.h>
#include <Wire.h>
#include "Arduino.h"
#include "Co2Meter_K33.h"

//int devAddr = 0x68; // This is the default address of the CO2 sensor, 7bits shifted left.
// int devAddr = 0x7F;  // This is the broadcast address. There is conflicting addresses with the DS1307 RTC

Co2Meter_K33::Co2Meter_K33() {
	devAddr = K33_BLG_ELG_ADDRESS;
}

Co2Meter_K33::Co2Meter_K33(uint8_t address) {
	devAddr = address;
}

Co2Meter_K33::~Co2Meter_K33(){}


///////////////////////////////////////////////////////////////////
// Function : void wakeSensor()
// Executes : Sends wakeup commands to K33 sensors.
// Note : THIS COMMAND MUST BE MODIFIED FOR THE SPECIFIC AVR YOU ARE USING
// THE REGISTERS ARE HARDCODED
/////////////////////////////////////////////////////////////////
void Co2Meter_K33::wakeSensor() {
	// This command serves as a wakeup to the CO2 sensor, for K33ELG/BLG Sensors Only
	// You'll have the look up the registers for your specific device, but the idea here is simple:
	// 1. Disabled the I2C engine on the AVR
	// 2. Set the Data Direction register to output on the SDA line
	// 3. Toggle the line low for ~1ms to wake the micro up. Enable I2C Engine
	// 4. Wake a millisecond.

	TWCR &= ~(1 << 2); // Disable I2C Engine
	DDRC |= (1 << 4); // Set pin to output mode
	PORTC &= ~(1 << 4); // Pull pin low
	delay(1);
	PORTC |= (1 << 4); // Pull pin high again
	TWCR |= (1 << 2); // I2C is now enabled
	delay(1);
}

//////////////////////////////////////////////////////////////////
// Function : void initPoll()
// Executes : Tells sensor to take a measurement.
// Notes
//
// ///////////////////////////////////////////////////////////////////
void Co2Meter_K33::initPoll() {
	wakeSensor();
	Wire.beginTransmission(devAddr);
	Wire.write(0x11);
	Wire.write(0x00);
	Wire.write(0x60);
	Wire.write(0x35);
	Wire.write(0xA6);
	Wire.endTransmission();
	delay(20);
	Wire.requestFrom(devAddr, 2);
	byte i = 0;
	byte buffer[2] = {0, 0};
	while (Wire.available()) {
		buffer[i] = Wire.read();
		i++;
	}
}

///////////////////////////////////////////////////////////////////
// Function : double readCo2()
// Returns : The current CO2 Value, -1 if error has occured
///////////////////////////////////////////////////////////////////
double Co2Meter_K33::readCo2() {
	wakeSensor();
	int co2_value = 0;
	// We will store the CO2 value inside this variable. digitalWrite(13, HIGH);
	// On most Arduino platforms this pin is used as an indicator light.

	//////////////////////////
	/* Begin Write Sequence */
	//////////////////////////

	Wire.beginTransmission(devAddr);
	Wire.write(0x22);
	Wire.write(0x00);
	Wire.write(0x08);
	Wire.write(0x2A);
	Wire.endTransmission();

	/*
		 We wait 10ms for the sensor to process our command.
		 The sensors's primary duties are to accurately
		 measure CO2 values. Waiting 10ms will ensure the
		 data is properly written to RAM
	*/

	delay(20);
	/////////////////////////
	/* Begin Read Sequence */
	/////////////////////////
	/*
		 Since we requested 2 bytes from the sensor we must
		 read in 4 bytes. This includes the payload, checksum,
		 and command status byte.
	*/

	Wire.requestFrom(devAddr, 4);
	byte i = 0;
	byte buffer[4] = {0, 0, 0, 0};

	/*
		Wire.available() is not nessessary.
		Implementation is obscure but we leave it in here for portability and to future proof our code
	*/

	while (Wire.available()) {
		buffer[i] = Wire.read();
		i++;
	}
	co2_value = 0;
	co2_value |= buffer[1] & 0xFF;
	co2_value = co2_value << 8;
	co2_value |= buffer[2] & 0xFF;
	byte sum = 0;
	sum = buffer[0] + buffer[1] + buffer[2];
	if (sum == buffer[3]) {
		// Success!
		// digitalWrite(13, LOW);
		//Checksum Byte
		//Byte addition utilizes overflow
		return ((double) co2_value / (double) 1);
	}
	else {
		// Failure!
		/*
			Checksum failure can be due to a number of factors,
			fuzzy electrons, sensor busy, etc.
		*/

		// digitalWrite(13, LOW);
		return (double) -1;
	}
}

///////////////////////////////////////////////////////////////////
// Function : double readTemp()
// Returns : The current Temperture Value, -1 if error has occured
///////////////////////////////////////////////////////////////////
double Co2Meter_K33::readTemp() {
	wakeSensor();
	int tempVal = 0;
	// digitalWrite(13, HIGH);
	Wire.beginTransmission(devAddr);
	Wire.write(0x22);
	Wire.write(0x00);
	Wire.write(0x12);
	Wire.write(0x34);
	Wire.endTransmission();
	delay(20);

	Wire.requestFrom(devAddr, 4);
	byte i = 0;
	byte buffer[4] = {0, 0, 0, 0};
	while (Wire.available()) {
		buffer[i] = Wire.read();
		i++;
	}
	tempVal = 0;
	tempVal |= buffer[1] & 0xFF;
	tempVal = tempVal << 8;
	tempVal |= buffer[2] & 0xFF;
	byte sum = 0;
	sum = buffer[0] + buffer[1] + buffer[2];
	//Checksum Byte
	//Byte addition utilizes overflow
	if (sum == buffer[3]) {
		// digitalWrite(13, LOW);
		return ((double) tempVal / (double) 100);
	}
	else {
		// digitalWrite(13, LOW);
		return -1;
	}
}

///////////////////////////////////////////////////////////////////
// Function : double readRh()
// Returns : The current Rh Value, -1 if error has occured
///////////////////////////////////////////////////////////////////
double Co2Meter_K33::readRh() {
	wakeSensor();
	int tempVal = 0;
	// digitalWrite(13, HIGH);
	Wire.beginTransmission(devAddr);
	Wire.write(0x22);
	Wire.write(0x00);
	Wire.write(0x14);
	Wire.write(0x36);
	Wire.endTransmission();
	delay(20);
	Wire.requestFrom(devAddr, 4);
	byte i = 0;
	byte buffer[4] = {0, 0, 0, 0};
	while (Wire.available()) {
		buffer[i] = Wire.read();
		i++;
	}
	tempVal = 0;
	tempVal |= buffer[1] & 0xFF;
	tempVal = tempVal << 8;
	tempVal |= buffer[2] & 0xFF;
	byte sum = 0;
	sum = buffer[0] + buffer[1] + buffer[2];
	//Checksum Byte
	//Byte addition utilizes overflow
	if (sum == buffer[3]) {
		// digitalWrite(13, LOW);
		return (double) tempVal / (double) 100;
	}
	else {
		// digitalWrite(13, LOW);
		return -1;
	}
}
// CO2 Meter Kseries Example Interface
// by Andrew Robinson, CO2 Meter <co2meter.com>
// Talks via I2C to K33ELG/BLG Sensors for HostInitiated Data Collection
// 4.1.2011

//Modified into Arduio Library by Kina Smith <kinasmith.com>
//06.09.2016


#ifndef Co2Meter_K33_H
#define Co2Meter_K33_H

#ifdef ARDUINO
	#if ARDUINO < 100
		#include "WProgram.h"
	#else
		#include "Arduino.h"
	#endif
#else
	#include "ArduinoWrapper.h"
#endif

#include <Wire.h>

#define K33_BLG_ELG_ADDRESS 0x7F

class Co2Meter_K33
{
public:
	Co2Meter_K33();
	Co2Meter_K33(uint8_t address);
	~Co2Meter_K33();
	void wakeSensor();
	void initPoll();
	double readCo2();
	double readTemp();
	double readRh();
private:
	int devAddr;
	int co2_value;
	int tempVal;
};

#endif

Thanks to Calvin Handerson, Galen Giese, Max Roth, Xuejian (Marvin) Zhang, and Yu Dong.

Comments