

Hardware components | ||||||
 |
| × | 1 | |||
| × | 1 | ||||
 |
| × | 1 | |||
| × | 1 | ||||
| × | 1 | ||||
 |
| × | 1 | |||
| × | 1 | ||||
 |
| × | 1 | |||
 |
| × | 1 | |||
| × | 1 | ||||
Software apps and online services | ||||||
| ||||||
 |
| |||||
Hand tools and fabrication machines | ||||||
 |
| |||||
| ||||||
Hey folks,
Is your light too bright or is your fan too fast? Want to control light and fan without getting up ?
Adjust it the Contromat way...Contromat be the controller.
Here's a room model control app, the Contromat App, that can switch on, off and regulate speed/brightness of fan and light, respectively. The app is developed using Bubble platform, while the IoT platform used is provided by Bolt IoT using their IoT module.
Step 1: Getting necessary components1. Bolt IoT Module
2. LED
3. DC Motor
4.Propeller
5.Resistor (330 ohm)
6.Jumpers
7.Cardboard, Polyethylene foam, Cloth,Scissors and Paint
8. Soldering Set
9. Android Charger type-B
10. Wire Stripper
11. Battery 9Vand Battery connector
12.FevibondSynthetic Rubber BasedAdhesive, Cello-tape,Double-side tape
Bolt IoT platform gives you the capability to control your devices and collect data from IoT devices safely and securely no matter where you are. We can get actionable insights by deploying machine learning algorithms with just a few clicks to detect anomalies as well as predict sensor values. The hardware module is used to interface sensors to the WiFi-enabled Bolt micro-controller module while the Bolt cloud can remotely configure, monitor and control your devices. Analytics give insights via visualization and machine learning. Prediction of the next data set can be achieved using ML.
Step 2: Setting Up BoltTo create a new account in Bolt cloud and link your Bolt device to cloud click here. Note down the Device ID and API key from cloud.boltiot.com as shown below:
1. Solder wires to the DC motor.
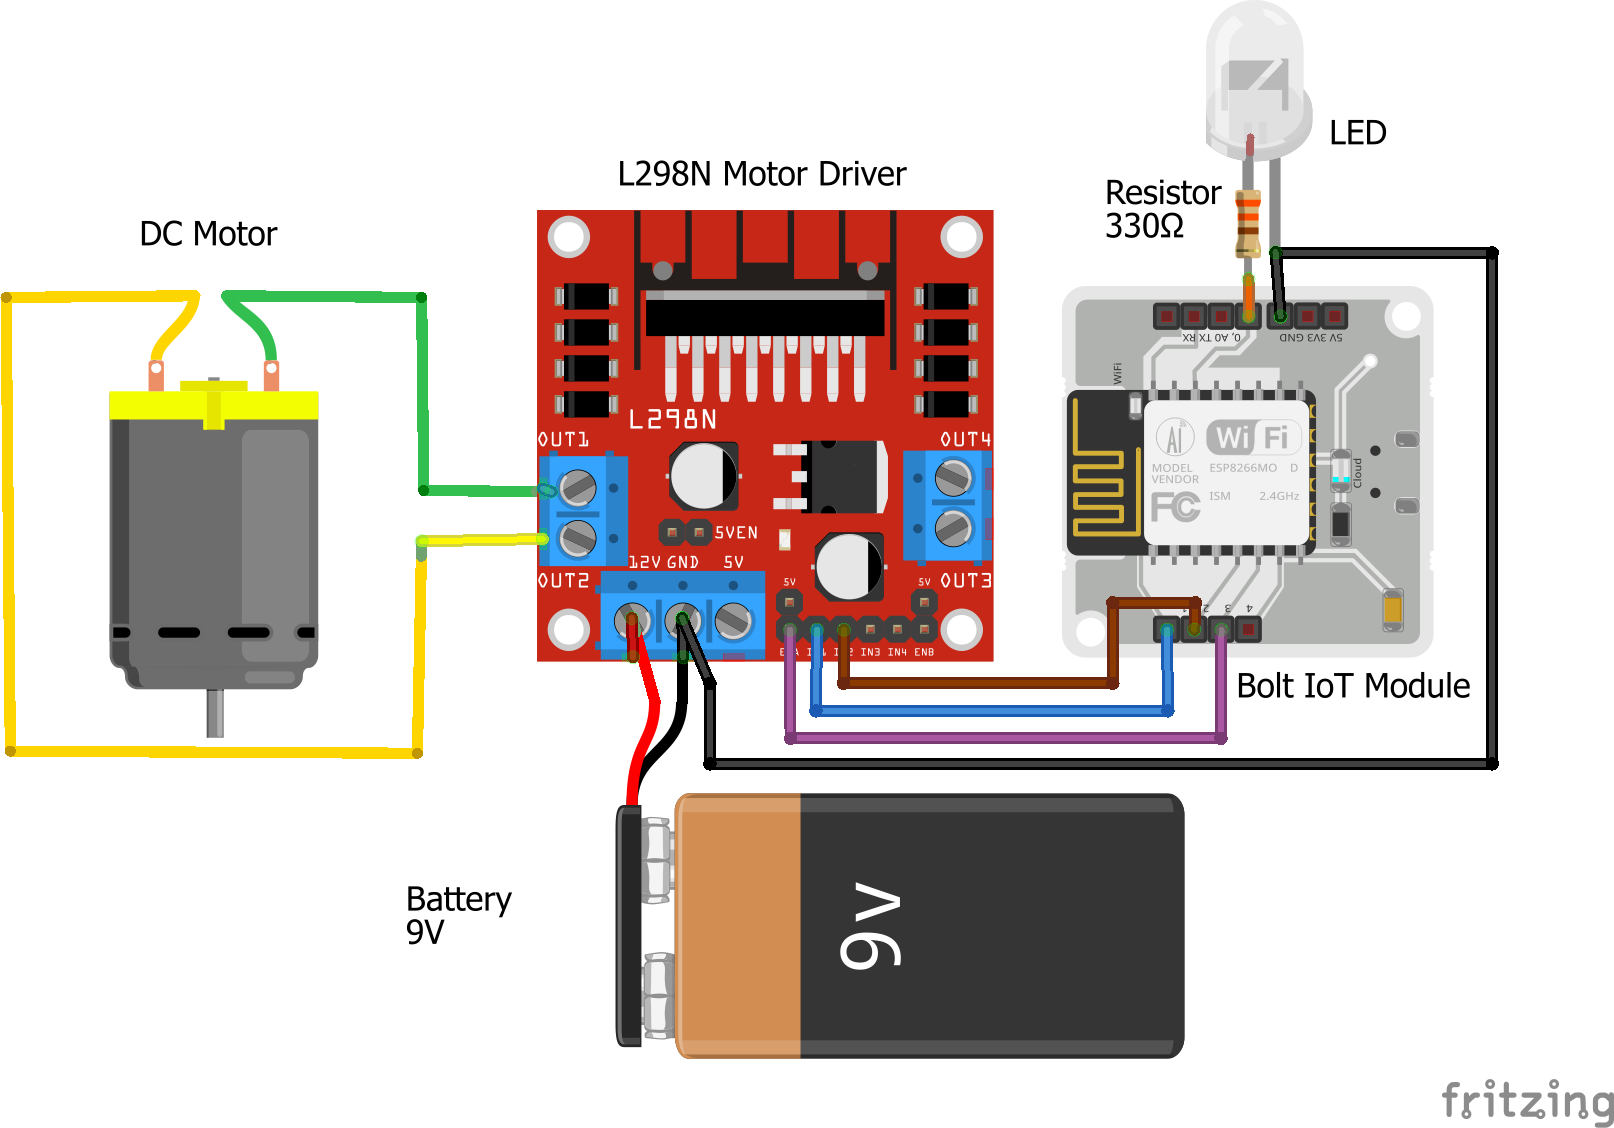
2. Connections to L298N motor driver:
a. Connect positive of motor to pin 1 and negative to pin 2.
b. Connect positive of battery cap to pin 4.
c. Connect negative of battery cap and ground of Bolt module to pin 5.
d. Remove jumpers from pins 7 and 12.
e. Connect pin 7 to digital pin 3 of Bolt module.
f. Connect pin 8 to digital pin 1 of Bolt module.
g. Connect pin 9 to digital pin 2 of Bolt module.
3. Connect positive leg of LED to digital pin 0 of Bolt module via 330 ohm resistor and negative leg to ground.
Refer schematics section for circuit diagram.
4. Building a room like structure using cardboard, cloth, glue and blocks (or anything that comes handy).
5. Place the motor above the ceiling so that the shaft reaches the other side through a hole. Attach a fan propeller to the shaft end.
6. Place the LED in the room wall in such a way that it looks like a light bulb.
7. Fix all the components in such a way that none of the wires or modules are visible from the room front view.
Bubble is at the same time a visual programming tool and a cloud platform. You use the programming tool to build your applications, while the cloud platform hosts and runs them. The application editor is accessed in the browser. There is nothing to download, and you can access your app from any device. Once an application is built on Bubble, there is no need to deploy the application to a cloud solution. As soon as an app is built on Bubble, it is hosted on Bubble's cloud infrastructure.
Step 4: Creating Bubble AppCreate a Bubble account by following this documentation. For familiarizing with application editor click here. You can enter the Device ID and API key (which you already noted down) during setting up of Bolt IoT plugin.
1. Select design option from application editor.
2. Right click the page and select edit. Change page name, color and adjust screen height (1000) and width (350) in the property editor.
3. Delete footer, header and signup/login popup from page drop down at top left corner.
4. Add a new reusable element from the same drop down and name it as Header.
5. Change width of the Header to same of the page width. Also modify its height as per your choice (100). Change type of element to floating group and you may also change background style and color.
6. Add signup and login buttons. You may also change button style.
7. Create a new reusable element named signup_login_popup and adjust its width and height. Set element type as popup.
8. Create two groups named Login and signup that covers the signup-login-popup rectangle area. Un-check the visible at page load option.
9. Create text, input and button in login and signup groups.
10. Click start/edit workflow in properties of Login button.
11. Edit workflow of Login button and Signup button.
12. Edit workflow of Don't have an account signup text and Already have an account ? Login text.
13. Set conditions for Signup group and Login group.
14. Linking Header to Signup_login_popup.
15. Adding Header to index page.
16. Add a new page and name it rooms. Adjust its height and width as same as that of index page.
16. Add one more new page named 1 and then setup rooms page.
17. Go to page named 1 and create two images one for light and other for fan. Also, create corresponding groups with turn on, turn off and brightness adjust (/speed adjust) button along with sliders.
18. Add workflow to images A and B.
19. Add workflow to other buttons.
20. Click preview to see your app and test it.
Working of L298N motor driver: It can control two DC motors; pins 1, 2, 7, 8 and 9 for motor 1 and pins 14, 13, 10, 11 and 12 for motor 2. Pin 4 is 12V input to the module, i.e, supplied by the 9V battery positive. The pin 5 is ground, were battery negative and Bolt IoT module ground is connected. The pin 6 is 5V output, which is not used here. Pin 1 and 2 are output for motor 1, while pin 7 is enable which controls motor speed and is connected to digital pin 3 of Bolt IoT module, were analog values ranging from 0 to 255 can be given. Pin 8 and 9 are direction control pins connected to digital pins 1 and 2 of Bolt IoT module. When pin 8 is HIGH and pin 9 is LOW, the motor rotates in forward direction and it rotates backwards when pin 8 is LOW and pin 9 is HIGH. Configuring both HIGH or both LOW stops the motor.
Working of Bolt IoT module: The Bolt Cloud API provides an interface for communication between the Bolt devices and any 3rd party system e.g. mobile application, web server, python programs etc. The API contains very intuitive control, monitoring, communication and utility functions for the Bolt Devices connected to your account. The Bolt Cloud API uses HTTP protocol for the communication and uses the HTTP GET and HTTP POST methods. Hence users can execute actions and retrieve information from Bolt devices programmatically using conventional HTTP requests. For more details click here.
Working of the project: On launching the Contromat app, connect 9v battery to L298N motor driver module and power supply to Bolt module via charger.
Then login or signup using your email into the app.
Select the room to control (for the time being I have setup only the master bedroom; even if you click other rooms they will notify you that it is not configured) to view the page for controlling appliances in the room.
Select fan or light icon in the page.
Then, you may turn on the fan or light and then adjust its speed or brightness, respectively. Last, you can turn them off using the turn off button and then logout of the app using the button at the top right corner.


_3u05Tpwasz.png?auto=compress%2Cformat&w=40&h=40&fit=fillmax&bg=fff&dpr=2)
Comments