

Hardware components | ||||||
 |
| × | 1 | |||
 |
| × | 1 | |||
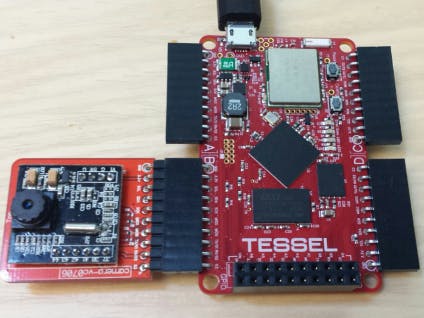
The Tessel board is an awesome little machine. It allows you to program hardware with JavaScript, and includes a ton of cool modules that can be implemented for a wide variety of applications.
One of those modules is the Tessel camera. This enables you to take your own board, capture images, and publish photos to a realtime picture feed (part two).
In this blog post, we’ll get you started programming your Tessel camera app with JavaScript, which will allow you to take photos with your microcontroller. So let’s get started!
Installing the Tessel Camera Module
First let’s get set up. Clone the contents of the pubnub-tessel directory and following the instructions written on the page.
git clone https://github.com/pubnub/pubnub-tessel
After following the instructions from the link you should have a working Tessel board, which is connected to your WiFi. The manufacturer recommends that you only switch modules after unplugging the board. Unplug the board and attach the camera module to the “B” socket on the board.
Plug in the board to power it on. Type tessel wifi -l, to make sure the board is connected to your preferred WiFi network.
Next you need to install the package for the camera. At the time of this entry the camera is vc0706. The software can be viewed here. The source page also provides a code example of uploading the image to a directory.
Install the software using npm.
npm install camera-vc0706
Running the Code
The next step is running the code. Navigate to /projects/streaming-camera. This is the source code. In this directory you will use the camera-server.js.
For the purposes of testing a one-time message you may want to consider removing the setInterval function. The code will work either way, this is just based on preference.
camera.on 'ready', () ->
PUBNUB = require("pubnub").init {
publish_key: "demo",
subscribe_key: "demo",
uuid: uuid
}
console.log("camera ready")return setInterval(function() {
notificationLED.high();
Use the camera-server.coffee file to edit.
After calling package requirements and setting the notification LED, the device is set on.
camera.takePicture (err, image) ->
if err
console.log('error taking image', err)
else
notificationLED.low()
console.log "sending image"
PUBNUB.publish
channel: channel
message: {
uuid: uuid
ts: new Date().toISOString()
image:images/ dataurl.format({
data: image
mimetype: "image/jpg"
})
}
callback: -> console.log "image sent"
Sender
This is where the device functions can be called.
These are the messages that tell us the server side is working.
Receiver
In a separate terminal, use the example in /examples/pubnub_debug_listen.js
node pubnub_debug_listen.js tesseldemo
This is the message, which tells us the code is working on the client side.
Now if we add the setInterval back into the code, we see what happens on repeat.
Everytime the code sends a message, you can see it received in the client-side code. If you’re interested in creating a realtime camera feed, where photos are streamed in realtime, check out part two of our series!
Sunny Gleason
 Joe Hanson

Comments