


Hardware components | ||||||
 |
| × | 1 | |||
| × | 2 | ||||
 |
| × | 1 | |||
 |
| × | 1 | |||
 |
| × | 1 | |||
 |
| × | 6 | |||
| × | 5 | ||||
 |
| × | 1 | |||
Software apps and online services | ||||||
 |
| |||||
| ||||||
| ||||||
| ||||||
At present there is a big need to avoid physical contact with any common things, to avoid spreading of covid-19. To avoid such situations autolight is used. This helps us to turn ON/OFF the lights without touching the switch.
In this project the light turns on automatically when the people enter into the hall and turns off automatically when there is no one in the hall. And it also sends email regarding the number of people in the hall. This project is used for two way halls. It is also used in common places like museum, street light, park, auditorium etc,.,.
DEMONSTRATION:
STEP 1: BASICS
To know the basics of the BOLT Iot module and to know how to set up VPS for using alongside Bolt Cloud follow the links below:-
https://docs.boltiot.com/docs/introduction
https://docs.boltiot.com/docs/python-library
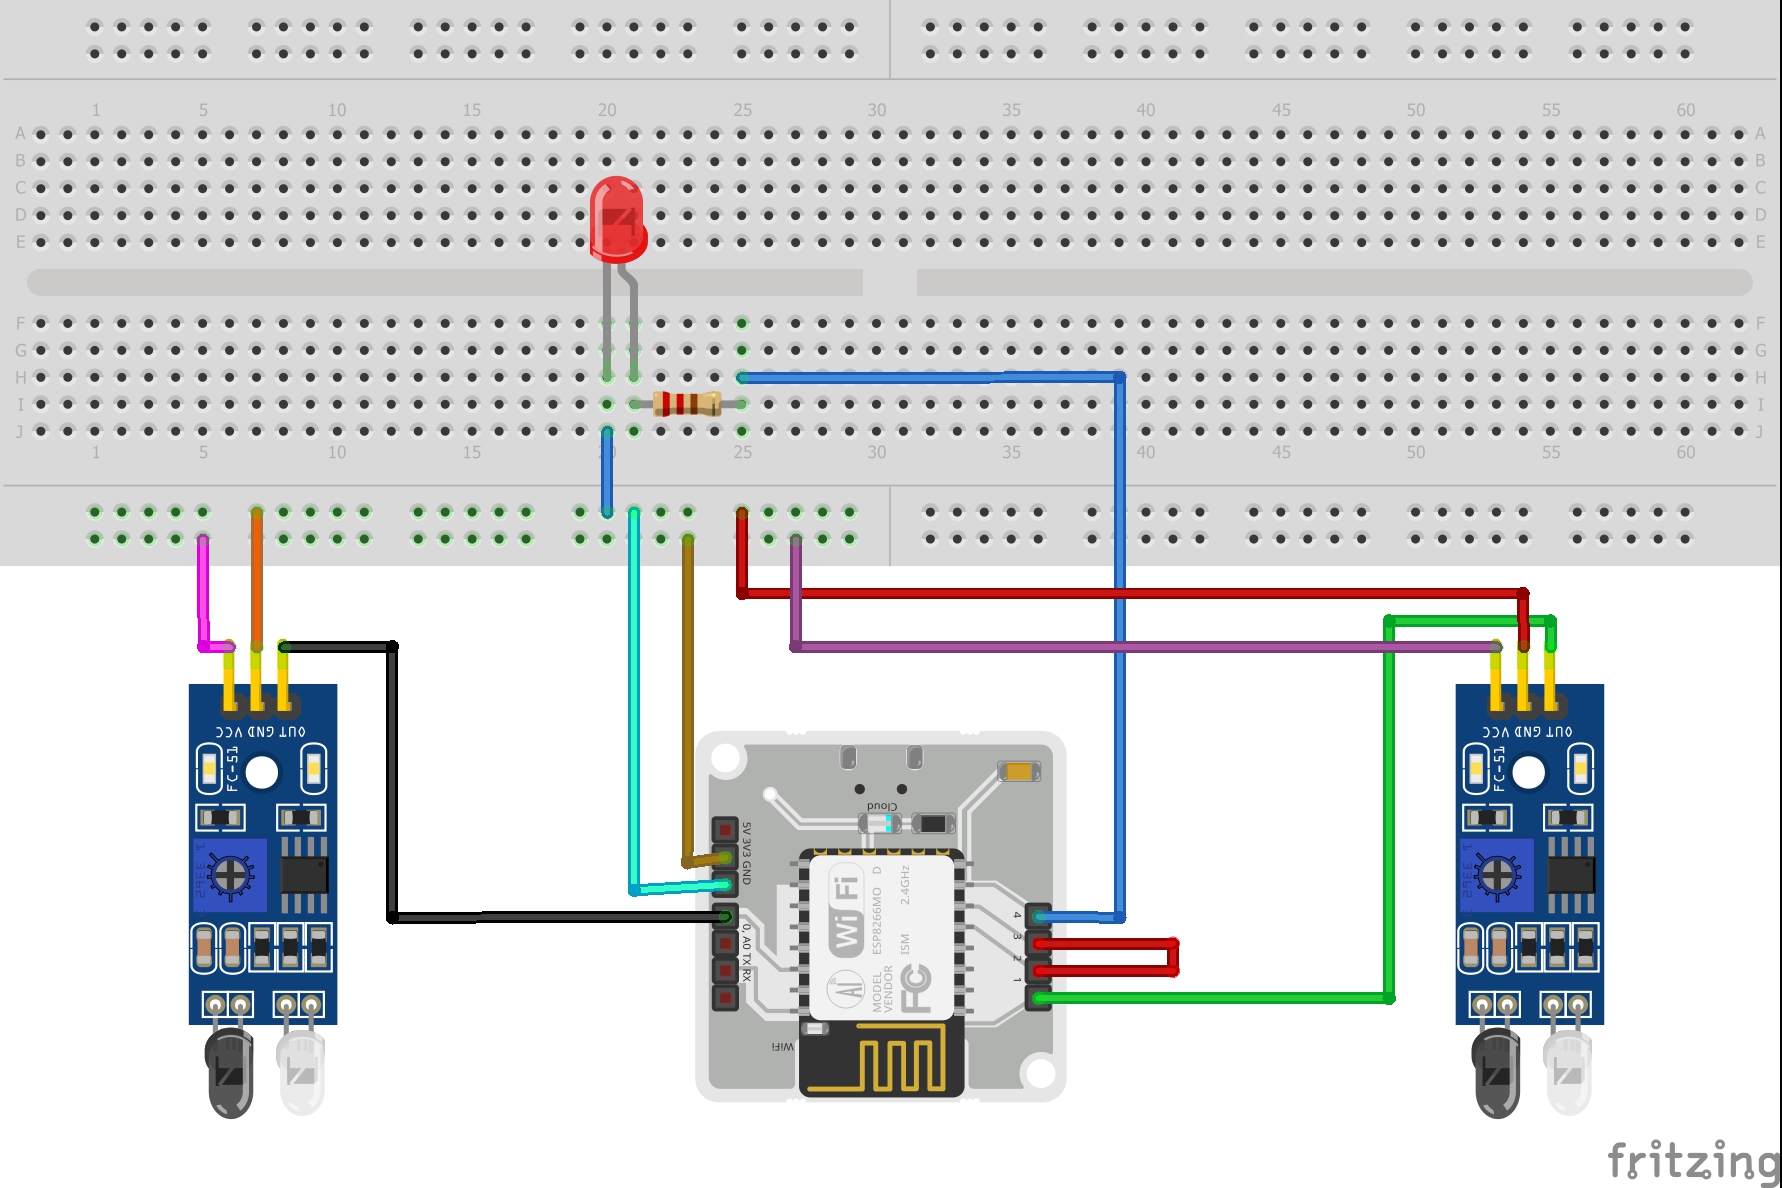
The positive terminal of the LED is connected to one end of the 330ohm resistor. Another terminal of the led is connected to gnd.
In first ir sensor (1) vcc pin is connected with 3v3 pin in bolt module and gnd pin in ir sensor (1) is connected with the gnd in bolt module and output pin in ir sensor (1) is connected with 0 pin in bolt module. The other end of resistor is connected to the pin 4 in bolt module. The pin 3 and 2 are connected to each other.
In second ir sensor (2) vcc pin is connected to 3v3 pin in bolt module and gnd pin is connected to the ground of bolt module and out pin is connected with the pin 1 in bolt module.
STEP3:MAILGUN
Mailgun is the website which is used to send alert mail. Mailgun is an email automation service.
- Open https://www.mailgun.com/ in browser.
- Sign up and fill the necessary details.
- Verify your phone number and email ID.
- Then Sandbox domain > add recipients > invite new recipient > enter email ID.
- Then click on the sandbox ID generated and save the sandbox URL and private API key somewhere safely.
STEP4:CONFIGURATION FILE
api_key = "XXXXXXXXXXXX"     //Bolt Cloud API Key
device_id = "BOLTXXXX"       //Device ID of the Bolt Module
mg_api_key = "XXXXXXXXXXX"   //Mailgun API key
sandbox_url = "sandboxXXXXXXXXXXXX.mailgun.org"      //It is found in mailgun
sender_EM = "test@sandboxXXXXXXXXXX.mailgun.org"     //It is found in mailgun
recipient_EM = "XXXXXX@gmail.com"                    //Your mail ID
STEP5: COMPLETE CODING
from boltiot import Bolt, Email
import conf
import json, time

mybolt = Bolt(conf.api_key, conf.device_id)
mailer = Email(cinf.mg_api_key, conf.sandbox_url, conf.sender_EM, conf.receipient_EM)

people = 0

while True:
        try:
            response = mybolt.digitalRead('0')
            data = json.loads(response)
            if data['value'] == "0" :
                 people = people + 1

            response = mybolt.digitalRead('1')
            data = json.loads(response)
            if data['value'] == "0" :
                 people = people - 1
                 if people < 0:
                         people = 0

            if people > 0:
                   mybolt.digitalWrite('4', 'HIGH')
            else:
                   mybolt.digitalWrite('4', 'LOW')

            response = mybolt.digitalRead('3')
            data = json.loads(response)
            if peolpe > 0:
                   response = mailer.send_email("Room Info", "Light is turning ON. The number of people in the room= " +str(people))
                   response_text=json.loads(response.text)
            elif people == 0:
                   response = mailer.send_email("Room Info", "Light is turning OFF. The number of people in the room= " +str(people))
                   response_text=json.loads(response.text)
            print("The number of people in the hall = " +str(people))
            print("Sleep for 10 seconds")
            time.sleep(10)

        except Exception as e:
            print("Something went wrong: ",e)
            print("Restarting Bolt...")
            response = mybolt.restart()
STEP6:CONTROLLING LIGHT USING WEB APP
Here, we will learn to build a web app using Bubble platform. If you're unaware about bubble, follow the link below:-
https://docs.boltiot.com/docs/creating-app-using-template
In the above link there is a detailed steps to create your own web app.
To turn ON the light press the 'on' button corresponding to pin4.
STEP7:CONTROLLINGLIGHTUSINGGOOGLEASSISTANT
Here, we will learn to control led using google assistant by the IFTTT website. If you're unaware IFTTT, follow the link below:-
https://www.hackster.io/krishnasanjay714/controlling-lights-using-google-assistant-37d053
In the above link there is a detailed steps to control lights using google assistant.
In the URL section,
https://cloud.boltiot.com/remote/API_KEY/digitalWrite?pin=PIN_NUMBER&state=HIGH/LOW&deviceName=DEVICE_ID
Here replace,
- API_KEY = Your bolt cloud api key.
- PIN_NUMBER = Enter pin number "4".
- HIGH = To ON the light.
- LOW = To OFF the light.
- DEVICE_ID = Your bolt device id.
EXECUTION:
This project is useful to avoid the spreading of COVID-19. Since, it is automatic there is no need to make physical contact with the switches which may be affected by the corona virus.


Comments