/*
* A Simple clock using the Nokia 5110 Screen and the esp8266 NodeMCU
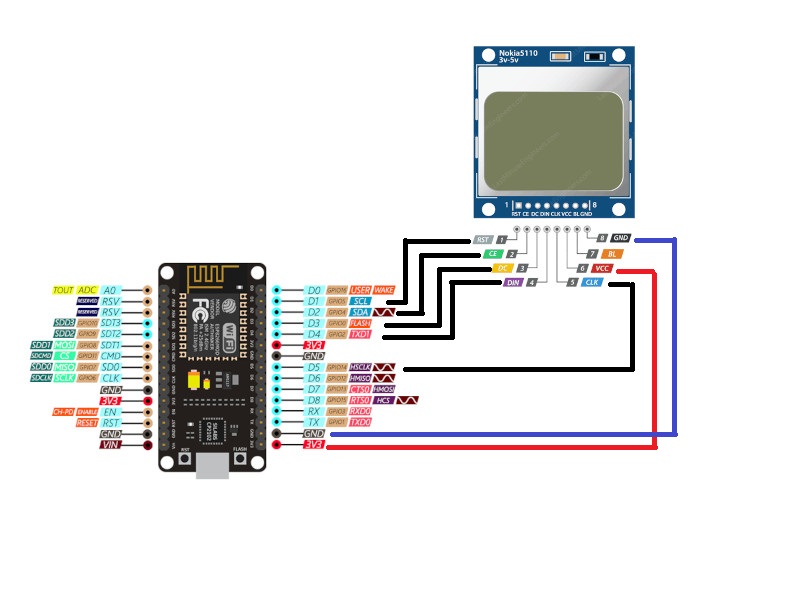
* The pins of the display are connected to D1 - D5 (GPIO 14,2 0,4 and 5
* CLK, DIN, D/C, CS, RST respectively)
*/
#include <ESP8266WiFi.h>
#include <NTPClient.h>
#include <WiFiUdp.h>
#include <Adafruit_PCD8544.h> // include adafruit PCD8544 (Nokia 5110) library
int currentHour; //Hour Variable
int currentMinute; //Minute Variable
int currentSecond; //Second Variable
const char *ssid = "********";// Replace with your network credentials
const char *password = "********";
// Define NTP Client to get time
WiFiUDP ntpUDP;
NTPClient timeClient(ntpUDP, "0.uk.pool.ntp.org"); // This is the UK time server i used
// Nokia 5110 LCD module connections CLK, DIN, D/C, CS, RST (opposite to the actual pin positions !!)
Adafruit_PCD8544 display = Adafruit_PCD8544(14, 2, 0, 4, 5);
void setup() {
display.begin();
WiFi.begin(ssid, password);
while (WiFi.status() != WL_CONNECTED) {
delay(500);
}
timeClient.begin();
timeClient.setTimeOffset(3600); //Add 1 hour (in seconds) to get BST
display.setContrast(60);
display.clearDisplay(); // clears the screen and buffer
}
void loop() {
timeClient.update();
currentHour = timeClient.getHours();
currentMinute = timeClient.getMinutes();
currentSecond = timeClient.getSeconds();
display.setTextColor(BLACK);
display.setTextSize(2);
display.setCursor(0,14);
if (currentHour <= 9) { //If Hour is single figures, put a 0 in front
display.print("0");
}
display.print(currentHour);
display.print(":");
if (currentMinute <= 9) { //If Minute is single figures, put a 0 in front
display.print("0");
}
display.print(currentMinute);
display.print(":");
display.setTextSize(1);
if (currentSecond <= 9) { //If Seconds is single figures, put a 0 in front
display.print("0");
}
display.print(currentSecond);
display.display(); // Everything is written to a buffer.. so now display on screen
/*
* To clear the screen, i just wrote the same thing to the buffer in white
* otherwise the second display would be jumbled with the previous etc
*/
display.setTextColor(WHITE);
display.setTextSize(2);
display.setCursor(0,14);
if (currentHour <= 9) {
display.print("0");
}
display.print(currentHour);
display.print(":");
if (currentMinute <= 9) {
display.print("0");
}
display.print(currentMinute);
display.print(":");
display.setTextSize(1);
if (currentSecond <= 9) {
display.print("0");
}
display.print(currentSecond);
// No need to display the screen again
}


Comments