

Hardware components | ||||||
 |
| × | 1 | |||
| × | 1 | ||||
 |
| × | 1 | |||
Software apps and online services | ||||||
| ||||||
Arduino’s serial UART is the primary route to monitoring and controlling activity in an Arduino. It is useful for debugging, monitoring data values, configuring settings and RTC, plus sending control commands to the Arduino.
The serial port is generally accessed by opening the Arduino IDE's Monitor window or by using a suitable terminal program. The physical connection may be made via a direct cable connection to the Arduino’s USB socket or by connection to the Arduino's Rx & Tx pins and using a TTL to serial USB (eg FTDI) converter.
Having wireless access to the Arduino's serial port is often more convenient and useful than a hard wired USB cable.
Being able to access the serial port to view and control your Arduino remotely from anywhere via an internet connection opens up many applications and ideas. For a beginner, the simple command / response type terminal interface shown here is easy to implement, it is easy to customise and can be made user friendly by the use of some nice serial terminal Apps on Android.
By using a Wifi-Serial module such as a DT-06 we can transparently convey our serial port data over Wifi. The serial port can then be accessed from any mobile device or PC connected to your local wireless network using a suitable Terminal program.
With a few minor configuration twiddles in your router, it soon becomes possible to access your Arduino's serial port from an internet connection anywhere on earth. This can be very useful and provides probably the simplest starting point for creating and accessing an IOT ‘Thing’.
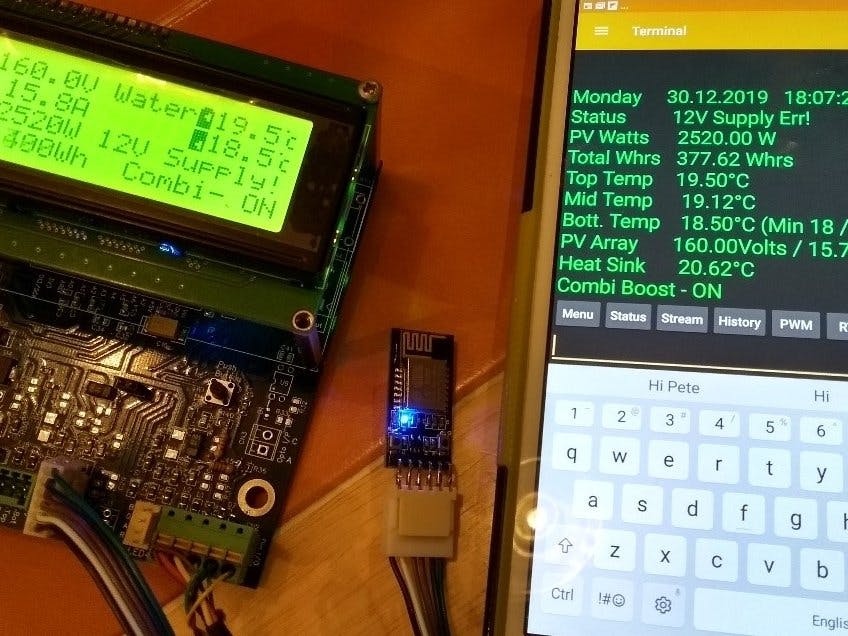
In this example I use a DT-06 WiFi to Serial module to provide remote access to a LoadMaster PV solar hot water controller or Arduino Nano. The serial-WiFi hardware setup and Code (both the attached Example code or the Full LoadMaster project code) are easily hacked and migrated to other applications.
TheBeginning;Serial over Bluetooth Low Energy(HM-10).
My wireless serial port journey started by the HM-10 Bluetooth low energy module in combination with an excellent Android Bluetooth serial application by Kai Moriche.
This worked extremely well, providing over 40m+ range outdoors and just about managing to make my Arduino (located in an outdoors brick garage) accessible from almost all rooms our adjacent house.
The serial terminal interface methods presented here are equally applicable to using the BLE HM-10, You simply need to use the Bluetooth version of the serial terminal App instead of the Wifi version.
I then stumbled across the DT-06 Serial Wifi module. As you can see above, this module adopts the same footprint and pin out as the BLE HM-10. It is cheap, based on the ESP-8285. Unlike using ES8266-01S modules, the DT-06 includes an onboard 3v3 regulator to power the ESP module. As I understand it, ESP8266 and 8285 code are compatible although during programming you need to consider memory size of the actual device and memory address position of loaded files.
Whilst there are WiFI serial examples in the Arduino's Wifi examples (which started from an earlier branch of the ESP-Link application), after some messing I found the Jee Labs esp-link code to be easier to configure and more reliable.
With some searching on the web, ESP-Link firmware can be programmed into an ESP8266-01S module. You will need to make a 1k2k/2k2 level shifter to reduce a 5V Arduino's (i.e Nano) Tx line down to 3v3 levels for the ESP. The ESP8266 will also require a 3v3 regulator if you are using a 5V Arduino Nano,... basically the DT-06 is better suited, simplifies your life, and is seamless swap to the HM-10 BLE.
LetsLoad the Firmware
I used Esp-Link firmware V3.0.14 downloaded from here (or easier from the zipped firmware and Flash programming tool file link within the Apps and Services section of this project).
From the link, you should have compressed TGZ file in your downloads folder:
esp-link-v3.0.14-g963ffbb.tgz
Open this file using a zip program such as 7-Zip for the Microsoft store. Navigate to the downloaded tgz file in your downloads folder.
Double click on this and you will now see this compressed file contains another compressed.tar file.
Select this file and click Extract.
You should now have the extracted firmware files ready for programming.
We now need the programming tools.To program the ESP 8285 module download the Expressif ‘Flash Download Tools (ESP8266& ESP32)’ from here (or use the zipped file pack in this projects Apps and Services section).
Programming hardwareconnections.
To program the module we will use a 5V USB-RS232TTL converter board (eg FTDI board) to connect the DT-06's Tx and RX lines to your PCs USB port. Alternatively, a google search will show its possible to use an Arduino with 'software serial' code.
Datasheets suggest the DT-06 has a series resistor on its Rx line to make it 5V tolerant. Some people say this is wrong, the module is marked 'Level 3v3', so WTF. Anyway to avoid any risk of smoke, it's simple to use 1k2 and 2k2 resistors to form a divider and provide a safe 5V to 3v3 level shift. The 3V Tx level from the DT-06 works fine with the Arduino's 5V Rx level.
ProgrammingFrom the downloaded Expressive programming files, run the flash_download_tools_v3.6.7.exe - Wait a few seconds then select 'ESP8285 download Tool'.
Click the '...' buttons and select the firmware files shown below from the DT-06 firmware folder location. Do this for all four firmware files.
Enter the Hex memory addresses as shown in the right hand boxes then tick all four file selection boxes on the left side.
With the FTDI adapter, DT-06 and PCs USB port all connected, select the com port.
And now an important part (where I wentwrong!)
The DT-06 must now be placed into it's Boot mode. To do this:- (follow carefully!)
Press and HOLD S1. Whilst holding S1, temporarily press then release S2 to reset the board which will now reset into its Boot mode. You can now release S1 and are ready to Erase or re-flash the Board.
Press the Erase button button in the Expressive Download app. You should see RX & TX LEDs on the FTDI board flashing (if you have them!). The App will show 'FINISHED' once complete.
Now its time to flash the firmware.
Repeat the sequence of button presses as before! The DT-06 is again ready to load firmware.
Press the Start button and watch firmware being loaded. Once finished, remove and re-apply USB power or press S2 to reset the module.
Setting Up the WiFiFor an Android device I recommend loading the Serial WiFi Terminal app from Kai Morich on Google Play store.
On your Android device, Search for wireless networks. The DT-06 should now be broadcasting an AP (access point) SSID "ESP_?????". Connect to this Wifi (ignoring 'WiFihasnointernet access' bla bla).
Open a Browser and in the address bar type 192.168.4.1 and hit go.
You should see this web page being served from the DT-06:-
Whilst on this screen, you may wish to scroll down and change 'Pin Assignments' 'Conn LED' to gpio4 and hit 'Change'.
Press the three line 'menu' button, select 'uC Consol'. For operation with Loadmaster or the Arduino 'Command Response Terminal' demo code, set the modules 'Baud' to 9600.
Press the three line 'menu' button, select WiFi Station, then Switch to STA +AP mode.
You should now see a list of WiFi network SSID names, select your WiFi name, Enter the associated Password and hit Connect. After 5 seconds or so, the WiFi State box should show the DT-06 is now successfully connected to your 'configured network' plus the DT-06's LED should light.
Temporarily make a note of the WiFi address:- ???.???.???.???
Once connected to your network the module will enter its 'ST' Station mode and will close its WiFi 'Access point' broadcast. Since the AP network has now dissappeared, your Android device should auto-reconnect to your normal WiFi network which the DT-06 is now also connected to.
Now go to the browser address bar and type in the IP address you noted, once again the DT-06 web page should appear.
Try going to the 'uC Console' menu option. On the P.C, close the Download tool and open the Arduino IDE. Open the serial monitor, select correct COM port number @ 9600 baud. It should now be possible to send Serial message from one device to another. All is working!
Note:- The DT-06's Tx and Rx pins must be set to use the same baud as the device the module is connected to. Set this within 'uC Console' menu of the Web server interface.
On the Android device, Open the Serial Wifi Terminal App. In the Devices menu, select add (+). Set the 'Host' to the noted IP address, and port to 23. The Settings, Display ode should be set to 'Terminal'.
You should be able to send messages between the Arduino IDE serial monitor screen and the Android Application. If the connection is lost for any reason, re-connect with the 'connect icon' in the Apps top bar.
Fixing the modules IP AddressOK, So far so good.
The devices IP address which you noted was allocated to the module from your Router via a process known as DCHP. Its 'Dynamic' meaning the next time the module connects to your network it could easily be allocated a completely different IP address. This makes life difficult and ideally we need your router to always give the same IP address when the module connects.
Routers are all different, here I will explain the basic steps for a BT home hub although the basic concept should be similar in other makes.
Log in to your Router.. for BT this is usually 192.168.1.254
Enter the password to enter 'Advanced Settings'mode and then go to 'Home Network'. Here you should see a list of all devices currently connected to your network and amongst the list you should find the ESP device:-
Click on the esp-link device. The next menu shows addressing options and for this device you should now select the option to 'Always use this IP address'
It is also possible to specify a fixed IP address within the esp-link web page, HOWEVER, with this approach you must be certain to select an address outside of you routers DHCP addressing range. Perhaps get an IT friend round.
OK. Your DT-06 esp-link module will now always be found at the same specified IP address on your network... so, make a note of this address!
Now you should be able to access your DT-06 serial port device from any other device on your network using a suitable terminal program. If you only ever wish to access your Wifi Serial port from inside your network you can stop here.
But what about access from outside your network, from anywhere via the internet?
DDNSJust like the DT-06 module being dynamically allocated a free IP address by your Routers DHCP service, most ISPs randomly allocate residential customers a dynamic IP address every time (well most-times) when your router re-connects to the internet. Using Whatsmyip will display your routers current domestic external IP address.
A changing external IP address makes it difficult to utilize your residential IP address with other services (i.e security cameras, thermostats or your ESP-Serial module etc.) since the address can change without notice.
A Dynamic DNS or 'DDNS' services solves the problem of ever changing residential IP addresses by associating your dynamically allocated IP address with a consistent domain name.
Your router should have a DDNS setup page. You will need to determine which DDNS services it supports and then register for a DDNS account with one of them. There are various free services (FreeDNS, DynDNS, afraid.org, DuckDNS, No-IP etc). Some free services require you confirm the account every month by email links, or you can pay a fee for multiple DDNS names and other advanced services.
In a BT HomeHub, the DDNS setup is located within the Advanced Settings, Broadband, Dynamic DNS menu:-
Your DDNS account will have an associated Username, Password, and Hostname. Again keep a record of them!
After setting up, refreshing and waiting a few minutes, log in to your DDNS provider. The IP address they display against your DDNS host name should match that shown by using the WhatsmyIP service.
We can now contact your routers dynamic IP address using a fixed DDNS Host name from anywhere on the Internet.
Inside your network we know the fixed address for your DT-06 ESP-Link and serial device. For security reasons you can't simply access internal IP addresses from the outside world of the Internet! We now need to set up 'Port forwarding'.
Port Forwarding.Port forwarding is the process of intercepting data traffic headed for a computer's IP address and port number combination, and redirecting it to a different IP address and/or port. This redirection is generally preformed in your routers Firewall - Port Forwarding settings.
Think of a port as a communication end point, it identifies a specific software process or type of network service. In the case of ESP-Link, by default, your serial port traffic carried over the network (Telnet) is serviced by the modules Port 23. The A.P Web page is supported on the standard Web server port 80.
Think of Port forwarding as the method used to map a specific service Port number arriving on your routers residential IP address, to a specific internal device IP address and using either the same port number or a different one. Phew.
In a BT hub Log in to the Advanced settings menu. Port forwarding can be found under the Firewall menu.
The first thing is to create a new Port mapping rule, In the BT hub this is referred to as Adding a New Game or Application:
In the above example, we named the mapping rule ESP-Link Telnet and created e a rule saying 'Any internet traffic arriving which wishes to use the Port 23 service, will pass through the Router to the internal network and still be marked to use Port 23. If you have two ESP-Link serial devices within your network you must access them using different external port numbers, i.e one can still use Port 23, but for the other you may externally access it by setting the Telnet terminal application to use say Port 4750 and then mapping in-comming Port 4750 traffic to Port 23.
Finally, we must now assign the port mapping rule to the relevant internal device / IP address:-
After adding this Rule, external traffic marked for a service on Port 23 will be passed in this example to internal IP address 192.168.1.183 and will remain marked to use the port 23 service on this device. Don't forget to 'Apply' the settings.
DemoandSerial WiFi TerminalApp
Load the demo code into an Arduino Nano. Connect the Nano's RX pin to the Tx pin of the DT-06, and the Nano's Tx pin via the 1k2 - 2k2 level divider to the RX pin of the DT-06.
NOTE!! - When loading firmware, to avoid a coms conflict the DT-06's Tx line must be temporarily disconnected (via jumper P2 on Loadmaster) or by simply unpluging the DT-06.
Power the Arduino from a 5V supply (Not from the USB socket if the USB data lines are connected to a PC- again, this would be in conflict with RX TX data lines from the DT-06!).
In the Android Serial WiFi Terminal App, connect to the Device. You should receive a connected message.
If you send '?' the Arduino should respond with the Interface menu list.
Sent 'L 1' to turn the onboard LED On. Sent 'L 2' to turn the onboard LED Off.
Sent 'S 12 34 56 -678' this will illustrate how data variables in the program now contain the separated numbers. LoadMaster uses this approach to simultaneously send and set multiple (HH:MM DD MM YYYY) RTC values etc.
If you press and hold menu buttons in the App they can be configured with a button name and a character which they will send when pressed. This creates a quick, simple, reliable and flexible two-way comms interface to a remote device. Whilst a Web server page may be more attractive, it will take 20 times longer to implement!


Comments