

Hardware components | ||||||
| × | 1 | ||||
| × | 1 | ||||
| × | 1 | ||||
Software apps and online services | ||||||
| ||||||
Hand tools and fabrication machines | ||||||
 |
| |||||
| ||||||
| ||||||
| ||||||
| ||||||
| ||||||
| ||||||
| ||||||
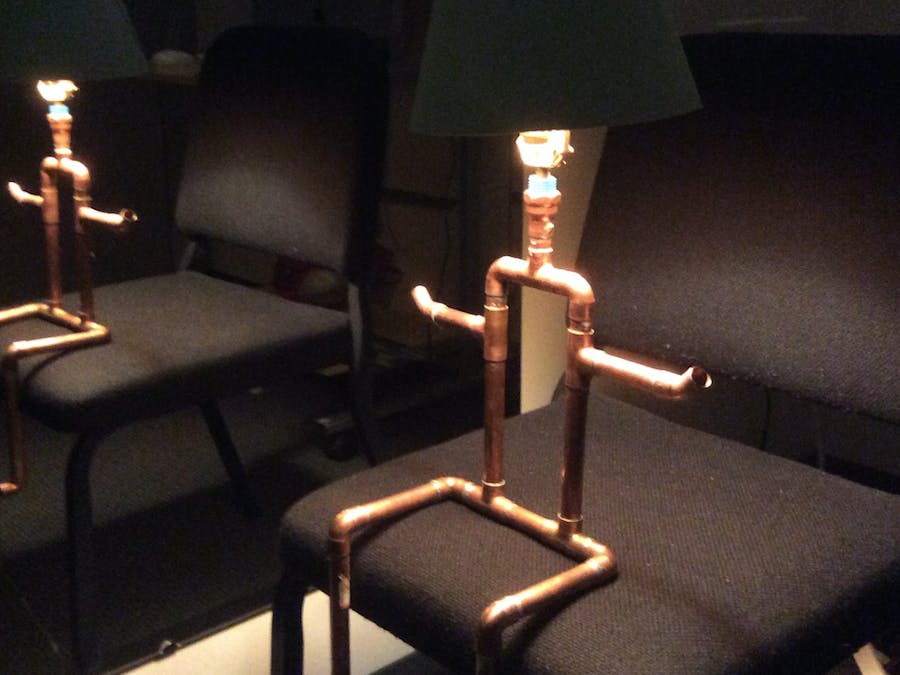
My roommate and I are very interested in lighting. Lighting is one of the most efficient ways to change the setting of a room in a second. I wanted to design a lamp for our last year of rooming together.
I first had to come up with a design of the lamp. I had so many ideas but I had to stick with one to start. As I looked around my room for an idea, I spotted a doll sitting on my desk. I thought a lamp in a shape of a doll will add cozy ambiance to my room so I decided upon that design.
I sketched the design in more detail so I can reference the sketch when I am building an actual model.
On the lamp, you can hang jewelry, lanyards and anything that has a string attached to it. The legs can move around so it is possible to change the gesture of the lampman. If wanted, the lamp can be decorated with small mittles or socks.
For the material, Mr. Holzwarth and I decided upon copper pipes that are durable and also shiny which will reflect light and cause contrast.
In order to connect the copper cylinders, I need connectors which will most likely be nuts and bolts. I decided to create a bushing with 3D printer utilizing Autodesk Fusion 360 program. The bushing created by a 3D printer had to look exactly like the bolt shown below. I used electro-measuring ruler to get more precise and accurate measurements.
It was my first time using Autodesk Fusion 360 to create a design for the 3D printer. I had to take step by step to make a bolt that will resemble the bolt that I have in the picture above.
I first created a cylinder. Then I added a hole in the cylinder so the cylinder could have a hollow space inside of it just like the actual bolt. Then I added threads to the inside and outside of the cylinder.
The hexagon bar on top of the actual metal but was unnecessary for the purpose of my bushing, so I ignored creating that part.
There were total of 4 phases to get the appropriate bushing.
This is the first phase of the union.
The union lacked threading and the size was off.
For the second union, I changed the size, so the size was appropriate.
However, it still lacked threading. It was a bizarre situation because Autodesk Fusion said that the bushing was threaded but when it 3D printed, the threads were missing. I searched for tutorials and the problem was that I didn’t click “modeled” for threads. If you are planning to thread your design, make sure you choose “modeled.” Otherwise, the design will show you that the part is threaded but when you 3D print it, there will be no threads.
This is the third union.
It has threading and the size was right. However, the size of the threading was off. The thread of the union was too big that it will only go in the half way. So I had to modify the threading.
The final model had the appropriate sizing and appropriate threading that could be used for the lamp project.
The union will be connecting the system as shown below.
After the bushing part was done my next part of the project composed of cutting the pipes into appropriate length. I specifically used the tool below to cut my pipes.
I connected the pipes with connectors and the shape of Lampman seemed to come along. For durability, I had to solder the pipes together. Soldering had several steps to it and it was important to follow these steps for maximum durability.
The first step for soldering was cleaning the pipes with sand papers.
The second step was still cleaning the pipes but this time flux and a flux brush. I gently scrubbed in an outside of the pipe.
Then we were ready for actual soldering. I used a flame torch. I heat up the part of the pipe that I want to connect and touch the gap with solder. The solder will soon melt and the gap will be filled by the solder.
When all parts are soldered it is important to cool down the parts with damp cloth.
Then steel wool can polish the pipes for a lustrous look. This part is optional.
After soldering, we had to get the lamp cords through the pipes. My plan was to have the cords hang at the end of the leg so the cord had to go from the head to the foot. That was quite a challenge that took several trials.
We tried with a wire and a fish net. In the end, we got the cord passed all the way from the head to toe. Then the wire had to be connected to a socket in order for the lightbulb to light up. There are two holes that wires need to go through. So one end of the wire that is closer to the lightbulb was split into two, went into each holes then was tightened with a screwdriver.
The last step of making a lamp was creating a lamp shade. I wanted to give an unfinished and natural feel to the lampshade since the copper pipes looked beautiful with its remaining solder. So I used papers to cover the original lampshade I found in a pro room. I covered it in a way that the edges of the paper was still visible. It kind of looked like quilted piece or in a way like the pictures of Picasso. Then to add a human characteristic and disperse the light in a unique way, I cut the top part of the lamp to make it look like hair.
A collection of progress from 3D printing to arts and crafts, the lamp was finally ready to light up.


_t9PF3orMPd.png?auto=compress%2Cformat&w=40&h=40&fit=fillmax&bg=fff&dpr=2)
Comments