

Hardware components | ||||||
 |
| × | 1 | |||
 |
| × | 1 | |||
 |
| × | 1 | |||
 |
| × | 1 | |||
 |
| × | 1 | |||
 |
| × | 1 | |||
Software apps and online services | ||||||
 |
| |||||
 |
| |||||
 |
| |||||
Let's assume a situation, Let you be the CEO of an international agricultural organization which has fields around the globe and you have to make sure that all of them is well equipped by taking sufficient measures. What if a Simple Bolt module can lessen this burden of responsibility at a large scale? nice! isn't it? Yes, this project enables you to notifies you about the weather in the selected city even without using a sensor! and it's only one case, it can also be used in your personal life which prepares you for the weather by alarming when you are about to get out from the house and to post some beautiful thoughts automatically on social media when you are enjoying a beautiful rain!
1. INTRODUCTIONThis project is really helpful in the manner that it provides the current weather and notifies by an alert through a SMS and by a BUZZER alarm at different frequency for different weather condition and also, by powering up the LED at different intensity for different weathers. The twilio messaging service is used to send SMS to the user. The interesting factor is, here the weather data is collected without using any sensors but by an api provided by Openweathermap. We can get the weather of any place in the world by simply changing the name of the city in the api link. Here the Integromat app is used to create posts on twitter about different weathers on "what you think" by creating different scenarios. The Bolt Wi-fi module is connected by the python code written in terminal of the ubuntu OS in the system.
2. Working2.1 Openweather Map
Here we use an URL provided by this organisation which contains an api which helps us to collect the weather data of any place around the clock. The URL is given below,
url = https://api.openweathermap.org/data/2.5/weather?q=cityname,country-code&appid="your api id"You can simply sign-in to their portal here, with your credentials, then you will receive a mail with your api key,
Here you are also made available by different subscriptions with and without pay. Here we are using the free subscription. Once the URL is ready in hand we can simply apply it in our python code written in our ubuntu terminal.
2.2 Python coding
The code given below retrieves the weather data from the "OWM" and stores it in the variable weather,
json_data=requests.get(url).json()
weather = json_data['weather'][0]['id']
Another task is to detect the weather from the numerical value provided by the URL. That is the URL we used gives a numerical value which intends a particular weather condition to detect simply refer the link given below,
Link:- https://openweathermap.org/weather-conditions
here, we can see several values that represent particular weather conditions, for example 800 indicates clear sky, 502 indicates-heavy rain etc. So we can write the code according to the values, that is we can compare the value of the variable weather to these particular numerical values and determine the weather and then we can send SMS and set alarm according to this. The code for a single condition is given below,
if weather==200:
          print("Turning the Alert ON!")
          mybolt.analogWrite('1', '200') and mybolt.analogWrite('0', '220')
          print("Making request to Twilio to send a SMS")
          response = sms.send_sms("There is Light rain with Thunderstorm outside, sir" + str(weather))
          print("Response received from Twilio is: " + str(response))
          print("Status of SMS at Twilio is :" + str(response.status))
          time.sleep(5)
          mybolt.analogWrite('1', '0') and mybolt.analogWrite('0', '0')
Here LED and the buzzer is operated using the analogeWrite() function so that we can operate them in different intensity and frequency respectively between the values 0 and 255 and the SMS is send using the twilio messaging service. The SMS content and the values passed in the analogWrite function is different for each and every weather conditions.
The full python code given at bottom.
2.3 Applications used
Now the next task is to send an SMS according to the weather value to the user's mobile. For this we need to create an account on the online messaging platform called "twilio". The link is given below,
Link:- https://www.twilio.com/
and when you have successfully created an account, you can find a SID, AUTH_TOKEN and a Trial_NUMBER in the dashboard which should be added in the configuration file for the actual program. The api key of your Bolt cloud account and the DEVICE_ID of your Bolt Wifi module should also be added to the configuration file.
- Here is the BOLT_ID which can be found in your Bolt cloud:- https://cloud.boltiot.com/
- Below you can find the your Bolt cloud API key in the API section of your dashboard,
The final configure file will look like this(named as conf.py),
SID = 'your twilio SID'
AUTH_TOKEN = 'your twilio AUTH_TOKEN'
FROM_NUMBER = 'Your twilio trial number'
TO_NUMBER = 'Your mobile number regitered in twilio'
API_KEY = 'Your Bolt cloud API key'
DEVICE_ID = 'BOLT7XXXX' //Your Bolt module ID
Now, one more task is to link the integromat with this code for creating posts in the twitter. For that please create an account in the integromat website given below,
Link:- https://www.integromat.com/
now create a new scenario in your account by including webhooks and twitter. For that follow these steps,
- create a new scenario here,
- now add webhooks and twitter in it.
- Now press on the webhooks icon and press add, then you will get a URL which should be added in a function in the python code, also press in the twitter icon and press add, then login to your twitter account and type your message to be posted in the status field and save. The screenshots and the function to be written in the python code is given below
Code(function):-
def trigger_integromat_webhook():
    URL = "https://hook.integromat.com/xxxxxxxxxxx" # REPLACE WITH CORRECT URL
    reply = requests.request("GET", URL)
    print(reply.text)

//Here the URL given is the webhook URL from the Integromat.
Code(trigger):-
trigger_integromat_webhook()

//This calls the function defined above and thus the text given is posted on twitter.
If we need to get notification for different weather conditions then wee need to create different scenarios with different scenarios with different messages.
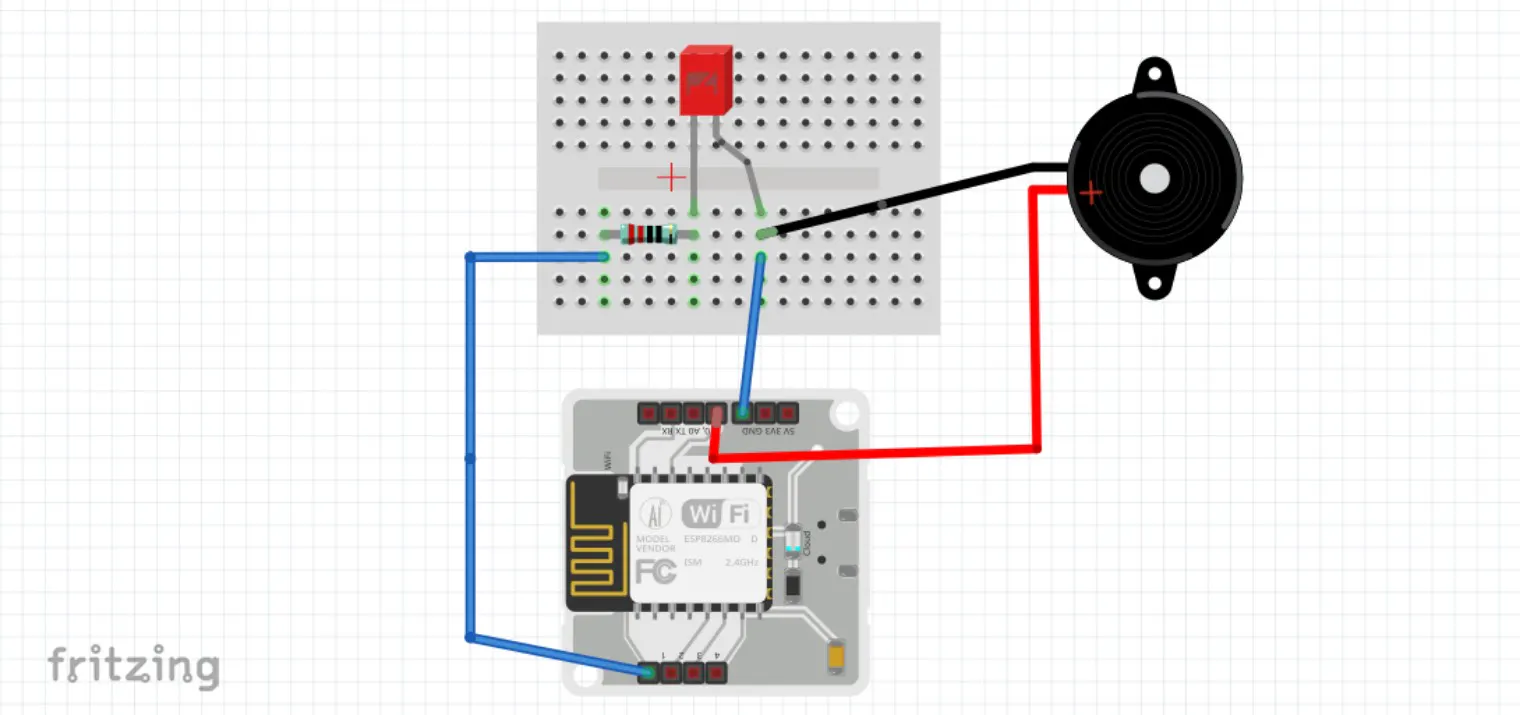
2.4 Hardware Connections
- First connect the Ground pin of the module to the bread board using a male to male jumper wire.
- Then connect the +ve end of the buzzer to the 0 pin of the module and -ve end to the Ground pin in the bread board using male to female wires.
- Now connect the -ve end of the LED to the ground pin and wrap the +ve end with a 330ohm resistor and connect the other end of the resistor to the 1 pin in the module with a male to male wire.
- Now power on the Bolt Wifi module and make sure that it is connected to the internet( green and blue led lighting constantly).
The schematic diagram is given at bottom.
3. DemonstrationThe output demonstration is given below,


Comments