


Hardware components | ||||||
 |
| × | 1 | |||
 |
| × | 1 | |||
 |
| × | 1 | |||
 |
| × | 1 | |||
| × | 1 | ||||
Software apps and online services | ||||||
| ||||||
| ||||||
| ||||||
| ||||||
| ||||||
I have to keep adjusting my heaters to maintain the right temperature. In addition, sometimes I forget to turn off my heater when I leave the house.
The SolutionSet up temperature and motion sensors to capture environmental data. Create a web app that allows the user to set their desired temperature, which will control how the heater is turned off or on.
Here is a diagram to show how everything will interact.
After getting the DHT11 temperature and PIR motion sensor, it's time to connect it to the Raspberry Pi.
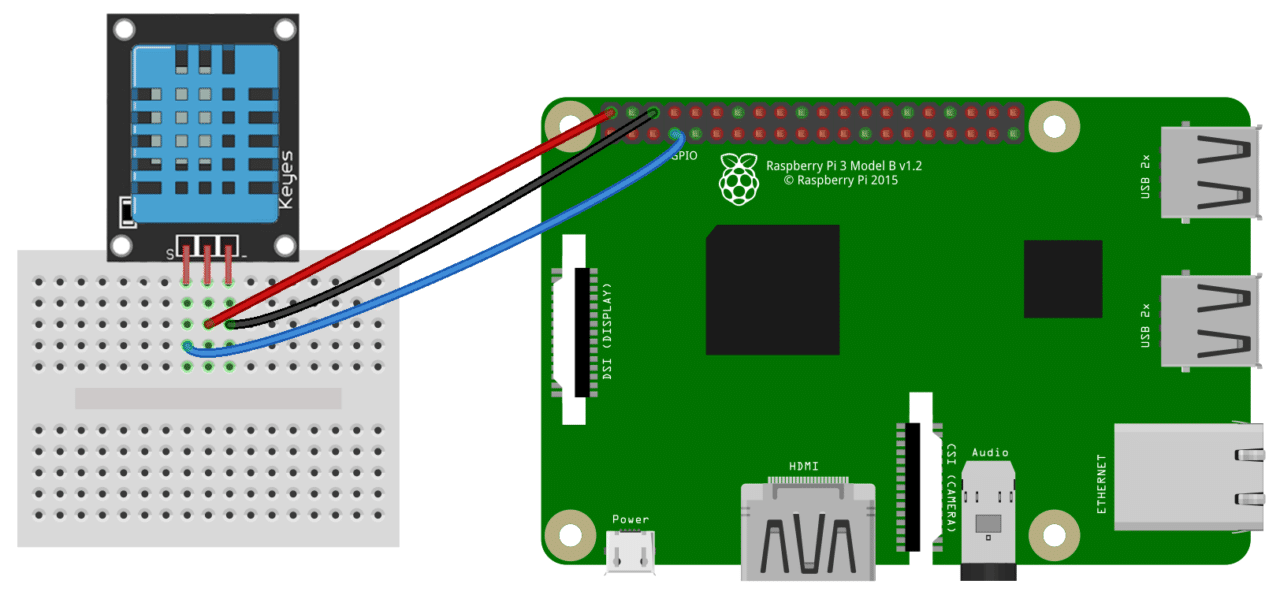
Below is how to connect the DHT11 temperature sensor. I deviated from the diagram by forgoing the breadboard and using pin 1 (3V3) for power instead of pin 2 (5V).
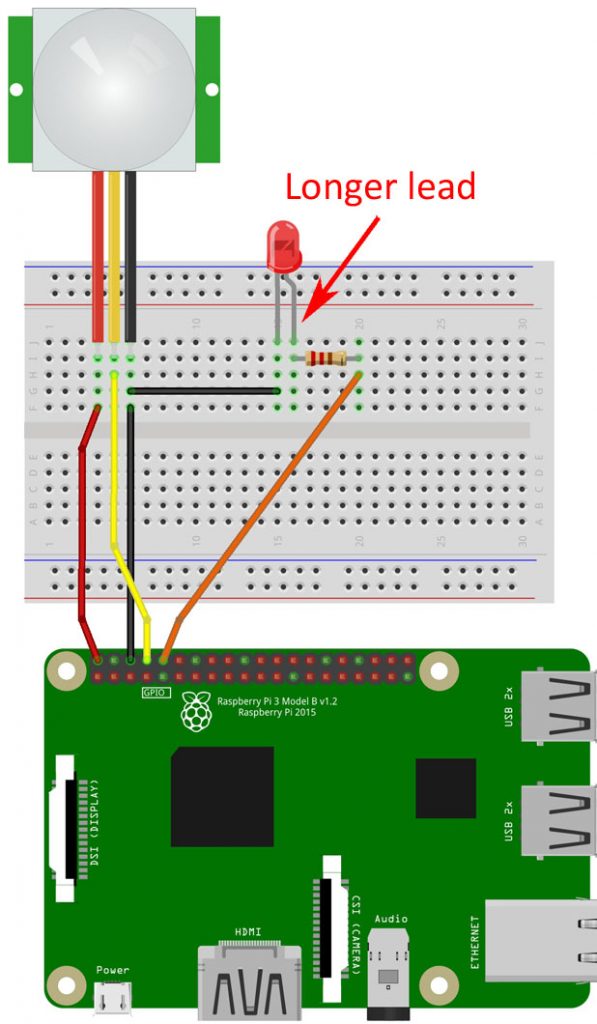
Below is how to connect the PIR motion sensor. The LED connection is completing optional. I deviated from the diagram by connecting Gnd to pin 20 (Ground) instead of pin 6 (Ground), Output to pin 36 (GPIO 16) instead of pin 8 (GPIO 14), and LED to pin 40 (GPIO 21) instead of pin 10 (GPIO 15).
The final result when both are connected:
Here my PIR sensor is connected to GPIO 16 and DHT11 is connected to GPIO4. The temperature sensor should be placed where you want to have the right temperature and the motion sensor should be facing towards where you normally are.
Step 2 - Write Code to Test the SensorsBelow is the Python code to test the motion sensor (don't forget to install RPi.GPIO here https://pypi.org/project/RPi.GPIO/):
import RPi.GPIO as GPIO
from time import sleep

GPIO.setmode(GPIO.BCM)

motion_pin = 16
led_pin = 21

GPIO.setup(motion_pin, GPIO.IN)
GPIO.setup(led_pin, GPIO.OUT)

print("Sensor initializing . . .")
sleep(2)

try:
    no_motion_count = 0

    while True:
        if GPIO.input(motion_pin) == True:
            print("Motion Detected!")
            GPIO.output(led_pin, True)
            sleep(4)
            GPIO.output(led_pin, False)
            no_motion_count = 0
        else:
            no_motion_count += 1

        print(f"No Motion Count: {no_motion_count}")

        sleep(1)

except KeyboardInterrupt:
    pass
finally:
    GPIO.output(led_pin, False)
    GPIO.cleanup()
Below is the Python code to test the temperature sensor (don't forget to install Adafruit_DHT here https://pypi.org/project/Adafruit_Python_DHT/):
import Adafruit_DHT
from time import sleep

temperature_humidity_sensor = Adafruit_DHT.DHT11
gpio_pin = 4

try:
    while True:
        humidity, temperature = Adafruit_DHT.read_retry(
            temperature_humidity_sensor, gpio_pin)
        if humidity is not None and temperature is not None:
            print(
                'Temp={0:0.1f}*C  Humidity={1:0.1f}%'.format(temperature, humidity))
        else:
            print('Failed to get reading. Try again!')
        sleep(0.5)
except KeyboardInterrupt:
    pass
Here is the code with both combined:
import RPi.GPIO as GPIO
import Adafruit_DHT
from time import sleep

GPIO.setmode(GPIO.BCM)

# Motion

motion_pin = 16
led_pin = 21
no_motion_count = 0

GPIO.setup(motion_pin, GPIO.IN)
GPIO.setup(led_pin, GPIO.OUT)


def handle_motion(no_motion_count):
    if GPIO.input(motion_pin) == True:
        print("Motion Detected!")
        GPIO.output(led_pin, True)
        sleep(4)
        GPIO.output(led_pin, False)
        no_motion_count = 0
        return 0
    else:
        return no_motion_count + 1


# Temperature + Humidity
temperature_humidity_sensor = Adafruit_DHT.DHT11
gpio_pin = 4


def handle_temperature():
    humidity, temperature = Adafruit_DHT.read_retry(
        temperature_humidity_sensor, gpio_pin)
    if humidity is not None and temperature is not None:
        print(
            'Temperature = {0:0.1f}*C  Humidity = {1:0.1f}%'.format(temperature, humidity))
        return temperature
    else:
        print('Failed to read Temperature/Humidity')

# Run Program


print("Sensor initializing . . .")
sleep(5)


try:
    no_motion_count = 0
    desired_temperature = 28
    desired_temperature_margin = 2

    while True:
        temperature = handle_temperature()
        no_motion_count = handle_motion(no_motion_count)

        if no_motion_count >= 20:
            print(f"No Human Detected.")
        elif temperature > desired_temperature + desired_temperature_margin:
            print(f"Temperature Too High")
        elif temperature < desired_temperature - desired_temperature_margin:
            print(f"Temperature Too Low")
        else:
            print(f"Temperature Just Right")

        print(f"No Motion Count: {no_motion_count}")

        sleep(0.25)
except KeyboardInterrupt:
    pass
finally:
    GPIO.output(led_pin, False)
GPIO.cleanup()After we can get sensors working, its time to serve is through an API, in this case, a Flask API. Below is the important code, but please refer to my GitHub repository here https://github.com/sometheasiekswx/smart-heater-api-flask to see all the code (don't forget to install Flask here https://flask.palletsprojects.com/en/2.0.x/quickstart/ and Flask-CORS here https://flask-cors.readthedocs.io/en/latest/):
from operator import itemgetter
from signal import signal, SIGINT
from sys import exit
from time import sleep

import RPi.GPIO as GPIO
from Adafruit_DHT import DHT11, read_retry
from flask import Flask
from flask_cors import CORS

GPIO.setmode(GPIO.BCM)

# Motion

motion_pin = 16
led_pin = 21
no_motion_count = 0

GPIO.setup(motion_pin, GPIO.IN)
GPIO.setup(led_pin, GPIO.OUT)

# Temperature + Humidity

temperature_humidity_sensor = DHT11
gpio_pin = 4

# Run Program

print("Sensor initializing . . .")
sleep(5)

app = Flask(__name__)
cors = CORS(app, resources={r"/api/*": {"origins": "*"}})

no_motion_count = 0
desired_temperature = 28
desired_temperature_margin = 2


@app.route("/api/v1/temperature")
def get_temperature():
    humidity, temperature = read_retry(
        temperature_humidity_sensor, gpio_pin)
    if humidity is not None and temperature is not None:
        return str(temperature)

    return 'Unknown'


@app.route("/api/v1/motion")
def get_motion():
    if GPIO.input(motion_pin):
        GPIO.output(led_pin, True)
        return "true"

    GPIO.output(led_pin, False)
    return "false"


def has_no_empty_params(rule):
    defaults = rule.defaults if rule.defaults is not None else ()
    arguments = rule.arguments if rule.arguments is not None else ()
    return len(defaults) >= len(arguments)


@app.cli.command()
def routes():
    'Display registered routes'
    rules = []
    for rule in app.url_map.iter_rules():
        methods = ','.join(sorted(rule.methods))
        rules.append((rule.endpoint, methods, str(rule)))

    sort_by_rule = itemgetter(2)
    for endpoint, methods, rule in sorted(rules, key=sort_by_rule):
        route = '{:50s} {:25s} {}'.format(endpoint, methods, rule)
        print(route)


@app.route("/")
def main():
    return """
        <h1>Smart Heater API</h1>
        <table>
          <tr>
            <th>Endpoint</th>
            <th>Method</th>
            <th>Rule</th>
          </tr>
          <tr>
            <td>get_motion</td>
            <td>GET</td>
            <td>/api/v1/motion</td>
          </tr>
          <tr>
            <td>get_temperature</td>
            <td>GET</td>
            <td>/api/v1/temperature</td>
          </tr>
        </table>
    """


def cleanup(signal, frame):
    print('Closing API...')
    GPIO.output(led_pin, False)
    GPIO.cleanup()
    exit(0)


signal(SIGINT, cleanup)
After adding your code on the Raspberry Pi, here is how to run the code and the results you should get when you visit the endpoints set up on the Raspberry Pi (Try to access the endpoint from a different device on the same network to test if the CORS policy is working correctly):
This step will vary based on which WI-FI-enabled smart plug brand you happen to pick. For me, I chose the Powertech Wi-Fi Smart Plug, which requires me to set up using the Smart Life app. Whatever brand you go with, follow the instructions to get the plug connected. Afterwards, go to IFTTT, create an account, and search for the IFTTT integration with your smart plug app. In my case, it was this https://ifttt.com/smartlife.
Set up two applets. The first trigger is if a GET request to turn off the heater is fired (event name temperature_high). The second trigger is if a GET request to turn on the heater is fired (event name temperature_low).
Calling https://maker.ifttt.com/trigger/{event}/with/key/{key} will trigger the events. In my case its https://maker.ifttt.com/trigger/temperature_low/with/key/{key} and https://maker.ifttt.com/trigger/temperature_high/with/key/{key}. You can find your key in the Documentation tab or when first creating a webhook.
Step 4 - Develop React Frontend to Control EverythingLastly, we will develop this beautiful frontend:
I used ReactJs and TailWindCss to create the web app, so it would help you have previous experience with these technologies. The official React https://reactjs.org/docs/getting-started.html and TailWindCss https://tailwindcss.com/docs/installation documentation are perfect resources to get you started. You could also build the website using any other framework (Angular, Laravel) or language (HTML + CSS + JSS) you like.
There are three cards: 1. Temperature Sensor where the current temperature is displayed and target temperature can be set 2. Motion Sensor where we can see if any motion is detected, if no motion is detected for too long, we can automatically turn off the heater 3. Heater status of off or on, it can also be manually controlled the Smart Heater system is turned off.
Here is my entire frontend codebase https://github.com/sometheasiekswx/smart-heater-frontend-react. Following the README is a must to running it properly. I will highlight some important code.
Here is our I make API calls from the frontend:
import axios from 'axios';

const sensorsApi = axios.create({
    baseURL: `http://${process.env.REACT_APP_API_HOST}:${process.env.REACT_APP_API_PORT}/api/v1/`,
});

const heaterApi  = axios.create({
    baseURL: `https://maker.ifttt.com/trigger/`,
});

export const turnOffHeater = async () => {
    try {
        await heaterApi.get(`temperature_high/with/key/${process.env.REACT_APP_IFTTT_WEBHOOK_KEY}`);
    } catch (error) {
        console.log(error.message);
    }
}

export const turnOnHeater = async () => {
    try {
        await heaterApi.get(`temperature_low/with/key/${process.env.REACT_APP_IFTTT_WEBHOOK_KEY}`);
    } catch (error) {
        console.log(error.message);
    }
}

export const getTemperature = async () => {
    try {
        const data = (await sensorsApi.get('temperature')).data;
        return parseFloat(data);
    } catch (error) {
        console.log(sensorsApi)
        console.log(error.message);
    }
}

export const getMotion = async () => {
    try {
        const data = (await sensorsApi.get('motion')).data;
        return data === 'true';
    } catch (error) {
        console.log(error.message);
    }
}
Here is an example of how I use these asynchronous functions. It also shows that the heater will be turned on and off based on if it is lower than or greater than the target temperature.
import {useEffect, useState} from "react";
import {getMotion, getTemperature, turnOffHeater, turnOnHeater} from "../utils/api";
import {CronJob} from "cron";

function Devices() {
    const [currentTemperature, setCurrentTemperature] = useState(0);
    const [targetTemperature, setTargetTemperature] = useState(25);
    const [targetTemperatureMargin] = useState(2);
    const [heaterOn, setHeaterOn] = useState(false);
    const handleTemperature = async () => {
        const temperature = await getTemperature();
        setCurrentTemperature(temperature);
        console.log(currentTemperature, targetTemperature);
        if (currentTemperature >= targetTemperature + targetTemperatureMargin && heaterOn) {
            await turnOffHeater();
            setHeaterOn(false);
        } else if (currentTemperature <= targetTemperature - targetTemperatureMargin && !heaterOn) {
            await turnOnHeater();
            setHeaterOn(true);
        }
    }
    const [jobTemperature] = useState(new CronJob("* * * * * *", handleTemperature()));
Here is how the motion logic is set:
const handleMotion = async () => {
    const newMotion = await getMotion();
    if (newMotion === false) {
        setNoMotion(noMotion + 1)
    } else {
        setNoMotion(0)
        setMotion(true);
    }

    if (noMotion > 50) {
        setMotion(false);
    }
}I only show important code here, you can find the entire frontend and backend codebases in the attachments as well as electronic devices and sensors you will need to complete this project. Good luck!


Comments