

Hardware components | ||||||
| × | 1 | ||||
| × | 1 | ||||
| × | 1 | ||||
RFID Door opener
This is a small project for those that always forgot their keys and want to be able to open a door with an RFID card.
You can also open your door remotely with this project.
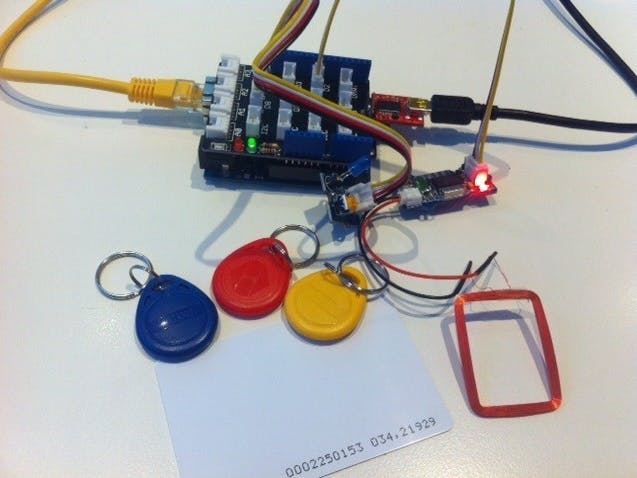
This project was made using the SmartLiving Arduino starter kit and a grove RFID sensor.
The RFID tags are read using with the grove receiver and used to open my door using a ZWave Smart lock in my apartment (Alternatively you can retro fit a servo/relay solution on the Arduino but this needs some pro maker skills - Something for another project ;) ). For this example I'll just fake it using an LED to simulate the door lock. Of course you can replace this with a relay contact or something you prefer.
I have set up the LED as an asset in SmartLiving, so I'm also able to control it from anywhere using my mobile or browser. This way i can give access to people when I'm not at home, such as the cleaning woman :-)
Ingredients :
- SmartLiving Starter Kit
- grove RFID reader (SEN11425P)
- RFID tags (RFR103B2B)
Recipe :
- Create an account in SmartLiving (if you don’t have one yet)
- create your device under your account (for example RFID reader)
- upload your sketch on the Arduino ethernet, i’ve added my example below
- Connect the Grove LED to PIN D8 on the Grove shield
- Connect the RFID reader on PIN D2 on the Grove Shield
When Running the sketch on the Arduino, both assets are created under your Device in SmartLiving.
To automate things, i have created a rule in SmartLiving which turns the LED on when the RFID from my card matches with the string i entered in my rule.
Untitled file
Warning: Embedding code files within the project story has been deprecated. To edit this file or add more files, go to the "Software" tab. To remove this file from the story, click on it to trigger the context menu, then click the trash can button (this won't delete it from the "Software" tab).
#include <Ethernet.h> //for loading components required by the iot device object.
#include <PubSubClient.h>

#include <allthingstalk_arduino_standard_lib.h> // SmartLiving for Makers Arduino Library
#include <SPI.h> //required to have support for signed/unsigned long type.
#include <Time.h>
#include <SoftwareSerial.h>
char deviceId[] = “”; // Your device id comes here
char clientId[] = “”; // Your client id comes here;
char clientKey[] = “”; // Your client key comes here;

ATTDevice Device(deviceId, clientId, clientKey); //create the object that provides the connection to the cloud to manager the device.
char httpServer[] = “api.smartliving.io”; // HTTP API Server host
char mqttServer[] = “broker.smartliving.io”; // MQTT(ATT1) Server IP Address

byte mac[] = { 0x90, 0xA2, 0xDA, 0x0D, 0x8D, 0x3D }; // Adapt to your Arduino MAC Address
time_t LED_time_on = 0;

int rfid = 2; // Digital 8 is the input pin, this corresponds with the number on the Grove shiled where the push button is attached to
int LED = 8; // Pin 8 is the LED pin and it’s also used to construct the AssetID

SoftwareSerial SoftSerial(2, 3);
// unsigned char buffer[64]; // buffer array for data recieve over serial port
char buffer[64]; // buffer array for data recieve over serial port
int count=0; // counter for buffer array
//required for the device
void callback(char* topic, byte* payload, unsigned int length);
EthernetClient ethClient;
PubSubClient pubSub(mqttServer, 1883, callback, ethClient);

void setup()
{

pinMode(LED, OUTPUT); // initialize the digital pin as an output.
Serial.begin(9600); // init serial link for debugging
SoftSerial.begin(9600); // the SoftSerial baud rate
Serial.begin(9600); // the Serial port of Arduino baud rate.

if(Device.Connect(mac, httpServer)) // connect the device with the IOT platform.
{
Device.AddAsset(rfid, “RFID”, “card reader”, false, “string”); // Create the asset for your device
Device.AddAsset(LED, “RFID LED”, “RFID LED Identifier”, true, “bool”);
Device.Subscribe(pubSub); // make certain that we can receive message from the iot platform (activate mqtt)
}
else
while(true); //can’t set up the device on the cloud, can’t continue, so put the app in an ethernal loop so it doesn’t do anything else anymore.
}

bool pbutton = false; //only send every x amount of time.
void loop()
{

// When the LED is on, turn it of after 5 seconds (simulation a door relay)

if (digitalRead(LED) == HIGH)
{
if (now() > LED_time_on+5) // here you can specify how long the LED is turned on
{
digitalWrite(LED, LOW); //change the LED status to false
Device.Send(“false”, LED); // send the updated actuator value to the cloud
}
}

if (SoftSerial.available()) // if date is comming from softwareserial port ==> data is comming from SoftSerial shield
{
while(SoftSerial.available()) // reading RFID data into char array
{
buffer[count++]=SoftSerial.read(); // writing RFID data into array
if(count == 64)break;
}

Device.Send(buffer, rfid); // Sned RFID dara to SmartLiving
clearBufferArray(); // call clearBufferArray function to clear the storaged data from the array
count = 0; // set counter of while loop to zero

}
if (Serial.available()) // if data is available on hardwareserial port ==> data is comming from PC or notebook
SoftSerial.write(Serial.read()); // write it to the SoftSerial shield

Device.Process();
}

void clearBufferArray() // function to clear buffer array
{
for (int i=0; i<count;i++)
{ buffer[i]=NULL;} // clear all index of array with command NULL
}

// Callback function: handles messages that were sent from the iot platform to this device.
void callback(char* topic, byte* payload, unsigned int length)
{
String msgString;
{ //put this in a sub block, so any unused memory can be freed as soon as possible, required to save mem while sending data
char message_buff[length + 1]; //need to copy over the payload so that we can add a /0 terminator, this can then be wrapped inside a string for easy manipulation.
strncpy(message_buff, (char*)payload, length); //copy over the data
message_buff[length] = ‘\0′; //make certain that it ends with a null

msgString = String(message_buff);
msgString.toLowerCase(); //to make certain that our comparison later on works ok (it could be that a ‘True’ or ‘False’ was sent)
}
int* idOut = NULL;
{ //put this in a sub block, so any unused memory can be freed as soon as possible, required to save mem while sending data
int topicLength = strlen(topic);

Serial.print(“Payload: “); //show some debugging.
Serial.println(msgString);
Serial.print(“topic: “);
Serial.println(topic);

if (topic[topicLength – 9] == (LED+48)) //warning: the topic will always be lowercase. The id of the actuator to use is near the end of the topic. We can only get actuator commands, so no extra check is required.
{
if (msgString == “false”) {
Serial.println(“LED uit”);
digitalWrite(LED, LOW); //change the LED status to false
idOut = &LED;
}
else if (msgString == “true”) {
Serial.println(“LED aan”);
digitalWrite(LED, HIGH); //change the LED status to true
Serial.print(“Time : “);Serial.println(now());
LED_time_on = now();
idOut = &LED;
}
}
}
if(idOut != NULL) //also let the iot platform know that the operation was succesful: give it some feedback. This also allows the iot to update the GUI’s correctly & run scenarios.
Device.Send(msgString, *idOut);
}
#include <Ethernet.h> //for loading components required by the iot device object.
#include <PubSubClient.h>

#include <allthingstalk_arduino_standard_lib.h> // SmartLiving for Makers Arduino Library
#include <SPI.h> //required to have support for signed/unsigned long type.
#include <Time.h>
#include <SoftwareSerial.h>
char deviceId[] = ; // Your device id comes here
char clientId[] = ; // Your client id comes here;
char clientKey[] = ; // Your client key comes here;

ATTDevice Device(deviceId, clientId, clientKey); //create the object that provides the connection to the cloud to manager the device.
char httpServer[] = api.smartliving.io; // HTTP API Server host
char mqttServer[] = broker.smartliving.io; // MQTT(ATT1) Server IP Address

byte mac[] = { 0x90, 0xA2, 0xDA, 0x0D, 0x8D, 0x3D }; // Adapt to your Arduino MAC Address
time_t LED_time_on = 0;

int rfid = 2; // Digital 8 is the input pin, this corresponds with the number on the Grove shiled where the push button is attached to
int LED = 8; // Pin 8 is the LED pin and its also used to construct the AssetID

SoftwareSerial SoftSerial(2, 3);
// unsigned char buffer[64]; // buffer array for data recieve over serial port
char buffer[64]; // buffer array for data recieve over serial port
int count=0; // counter for buffer array
//required for the device
void callback(char* topic, byte* payload, unsigned int length);
EthernetClient ethClient;
PubSubClient pubSub(mqttServer, 1883, callback, ethClient);

void setup()
{

pinMode(LED, OUTPUT); // initialize the digital pin as an output.
Serial.begin(9600); // init serial link for debugging
SoftSerial.begin(9600); // the SoftSerial baud rate
Serial.begin(9600); // the Serial port of Arduino baud rate.

if(Device.Connect(mac, httpServer)) // connect the device with the IOT platform.
{
Device.AddAsset(rfid, RFID, card reader, false, string); // Create the asset for your device
Device.AddAsset(LED, RFID LED, RFID LED Identifier, true, bool);
Device.Subscribe(pubSub); // make certain that we can receive message from the iot platform (activate mqtt)
}
else
while(true); //cant set up the device on the cloud, cant continue, so put the app in an ethernal loop so it doesnt do anything else anymore.
}

bool pbutton = false; //only send every x amount of time.
void loop()
{

// When the LED is on, turn it of after 5 seconds (simulation a door relay)

if (digitalRead(LED) == HIGH)
{
if (now() > LED_time_on+5) // here you can specify how long the LED is turned on
{
digitalWrite(LED, LOW); //change the LED status to false
Device.Send(false, LED); // send the updated actuator value to the cloud
}
}

if (SoftSerial.available()) // if date is comming from softwareserial port ==> data is comming from SoftSerial shield
{
while(SoftSerial.available()) // reading RFID data into char array
{
buffer[count++]=SoftSerial.read(); // writing RFID data into array
if(count == 64)break;
}

Device.Send(buffer, rfid); // Sned RFID dara to SmartLiving
clearBufferArray(); // call clearBufferArray function to clear the storaged data from the array
count = 0; // set counter of while loop to zero

}
if (Serial.available()) // if data is available on hardwareserial port ==> data is comming from PC or notebook
SoftSerial.write(Serial.read()); // write it to the SoftSerial shield

Device.Process();
}

void clearBufferArray() // function to clear buffer array
{
for (int i=0; i<count;i++)
{ buffer[i]=NULL;} // clear all index of array with command NULL
}

// Callback function: handles messages that were sent from the iot platform to this device.
void callback(char* topic, byte* payload, unsigned int length)
{
String msgString;
{ //put this in a sub block, so any unused memory can be freed as soon as possible, required to save mem while sending data
char message_buff[length + 1]; //need to copy over the payload so that we can add a /0 terminator, this can then be wrapped inside a string for easy manipulation.
strncpy(message_buff, (char*)payload, length); //copy over the data
message_buff[length] = \0; //make certain that it ends with a null

msgString = String(message_buff);
msgString.toLowerCase(); //to make certain that our comparison later on works ok (it could be that a True or False was sent)
}
int* idOut = NULL;
{ //put this in a sub block, so any unused memory can be freed as soon as possible, required to save mem while sending data
int topicLength = strlen(topic);

Serial.print(Payload: ); //show some debugging.
Serial.println(msgString);
Serial.print(topic: );
Serial.println(topic);

if (topic[topicLength  9] == (LED+48)) //warning: the topic will always be lowercase. The id of the actuator to use is near the end of the topic. We can only get actuator commands, so no extra check is required.
{
if (msgString == false) {
Serial.println(LED uit);
digitalWrite(LED, LOW); //change the LED status to false
idOut = &LED;
}
else if (msgString == true) {
Serial.println(LED aan);
digitalWrite(LED, HIGH); //change the LED status to true
Serial.print(Time : );Serial.println(now());
LED_time_on = now();
idOut = &LED;
}
}
}
if(idOut != NULL) //also let the iot platform know that the operation was succesful: give it some feedback. This also allows the iot to update the GUIs correctly & run scenarios.
Device.Send(msgString, *idOut);
}


Comments