

Hardware components | ||||||
| × | 1 | ||||
| × | 1 | ||||
 |
| × | 18 | |||
| × | 1 | ||||
 |
| × | 1 | |||
 |
| × | 1 | |||
| × | 1 | ||||
_ztBMuBhMHo.jpg?auto=compress%2Cformat&w=48&h=48&fit=fill&bg=ffffff) |
| × | 1 | |||
| × | 1 | ||||
Software apps and online services | ||||||
 |
| |||||
Hand tools and fabrication machines | ||||||
 |
| |||||
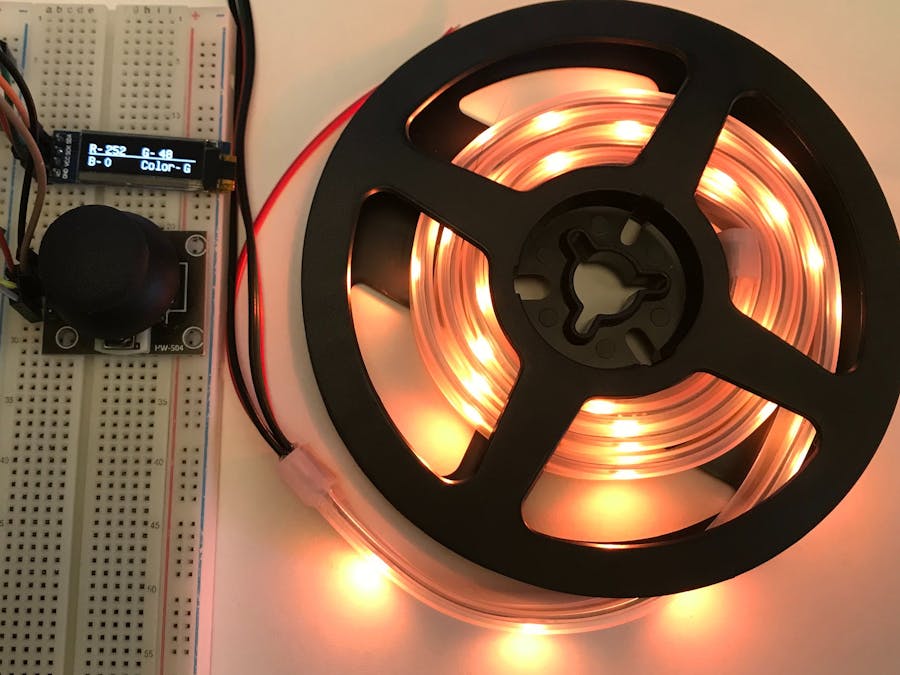
Hey, everyone!
This is a tutorial on how to create my version of a color mixer.
A joystick is the main form of control in this project. It controls the strip's RGB values, which determine the intensity of color of the LEDs on the strip. An OLED displays these values.
You can optionally include buttons of your own and code them to display certain patterns (you can find some neat patterns in the NeoPixel library examples folder).
I2c stands for Inter-Integrated Circuit. It's a bus interface connection protocol which is present in devices that require short-distance serial communication.
I2C devices are given an address written in hexadecimal (or hex). The OLED I will be using uses the I2C protocol, and has an address of 0x3C.
Note: The '0x' in the address only identifies it as a hex value.
In Arduino boards, the I2C pins vary:
Before connecting my components to the UNO, I removed the headers on the joystick and soldered new ones to it because I was uncomfortable with its orientation on the breadboard.
Before:
After:
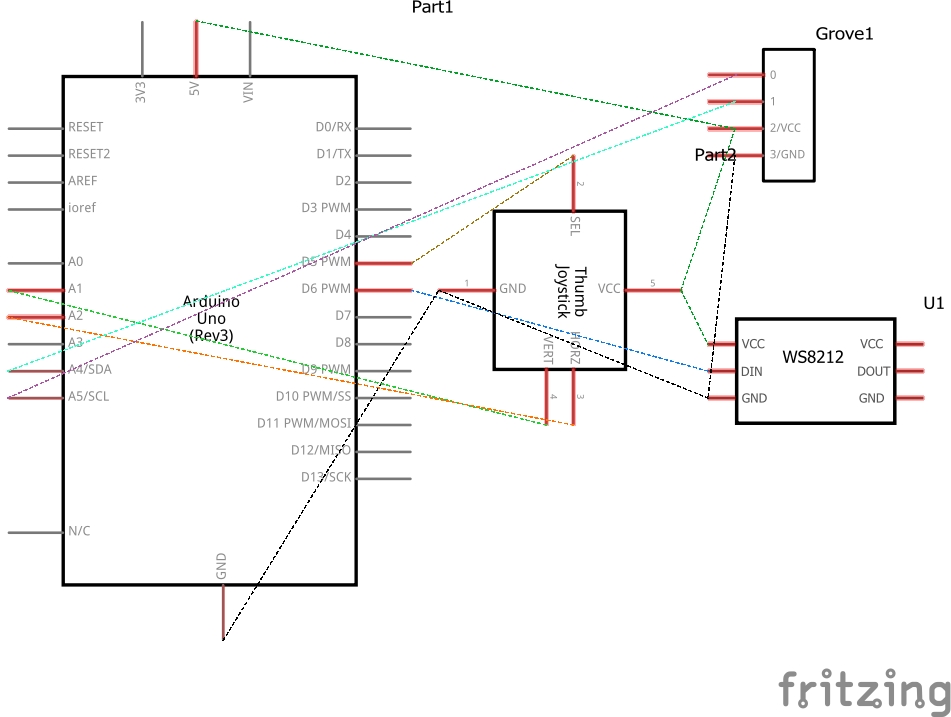
I then began by connecting the components to my UNO to test them. The connections I used were:
Joystick
GND - GND
VCC - +5V
VRx - A2
VRy - A1
SW - D5
`
OLED (I used an UNO)
GND - GND
VCC - +5V
SCL/SCK - A5 (SCL)
SDA - A4 (SDA)
Test Code //JOYSTICK TEST
#define joyX A2
#define joyY A1
const int SW_pin = 5; // digital pin connected to switch output
void setup() {
Serial.begin(9600);
pinMode(SW_pin, INPUT);
digitalWrite(SW_pin, HIGH);
Serial.begin(9600);
}
void loop() {
int X;
int Y;
int Xval;
int Yval;
X = analogRead(joyX);
Y = analogRead(joyY);
Xval = map(X, 0, 1023, 0, 255);
Yval = map(Y, 0, 1023, 0, 255);
Serial.print(Xval);
Serial.print("|");
delay(50);
Serial.print(Yval);
Serial.print("|")
delay(50);
Serial.print("Switch: ");
Serial.print(digitalRead(SW_pin));
Serial.println("");
delay(200);
}
Note: For this code, you can change the map values or remove it altogether, since it's only a test code.
Putting it all togetherAfter testing all of my components, I connected everything to the UNO at once using the breadboard.
Note:When I used a Nano, the LED strip was very unstable. I encourage you to use a board such as the MEGA or UNO so that the circuit remains stable.
The connections are the same, except here, I have included the LED strip.
Joystick
GND - GND
VCC - +5V
VRx - A2
VRy - A1
SW - D5
`
OLED (I used an UNO)
GND - GND
VCC - +5V
SCL/SCK - A5 (SCL)
SDA - A4 (SDA)
`
NeoPixel Strip
GND - GND
VCC - +5V
DATA - D6
The following code has been created for a 1 metre long 30 LED/metre Adafruit Neopixel strip and a 0.91 inch OLED.
Note: The LEDs take a maximum value of 255 and a minimum of 0 ; going above or below these limits may not make a difference to color intensity.
#include <Adafruit_NeoPixel.h>
#define LED_PIN    6
#define LED_COUNT 30
Adafruit_NeoPixel strip(LED_COUNT, LED_PIN, NEO_GRB + NEO_KHZ800);
#define joyX A2
#define joyY A1
#include "U8glib.h"
U8GLIB_SSD1306_128X32 u8g(U8G_I2C_OPT_NONE | U8G_I2C_OPT_DEV_0); //Initialize OLED display
int r = 0;
int g = 0;
int b = 0;//These three variables determine RGB values
int num = 1; //This variable helps switch between colors.
const int swpin = 5; //Defining switch button pin
int SW = 0;
void draw()
{
//READINGS-------------------------------------------------------------------
 int X;
 int Y;
 int Xval;
 int Yval;
 X = analogRead(joyX); //Reading off of VRx
 Y = analogRead(joyY); //Reading off of VRy
 Xval = map(X, 0, 1023, 10, 0);
 Yval = map(Y, 0, 1023, 255, 0); //mapping values
//COLOR SWITCHING-----------------------------------------------------------
 if(Xval < 9){   //This bit of code helps us switch between R, G and B.
   num = num + 1;
   }
 if(Xval > 1){
   num = num - 1;
   }
//LIMITS-------------------------------------------------------------------
 if(num > 3){ //This bit creates a cycle between colors
   num = 1;
 }
 if(num < 1){
   num = 3;
 }
//Red-value-----------------------------------------------------------------
char buf[8]; //Define buffer
if(r < 0){
 r = 255;
}
                  //Cycles red value
 if(r > 255){
 r = 0;
}
//Write text. (x, y, text)
u8g.drawStr(1, 16, "R-");
u8g.drawStr(20, 16, itoa(r, buf, 10)); //itoa(int1, buffer, int2) converts int1(base int2) to ASCII format. Buffer stores this data.
//Green-value---------------------------------------------------------------
if(g < 0){
 g = 255;
}
             //Cycles green value
 if(g > 255){
 g = 0;
}
u8g.drawStr(64, 16, "G-");
u8g.drawStr(84, 16, itoa(g, buf, 10));
//Blue-value----------------------------------------------------------------
if(b < 0){
 b = 255;
}
              //Cycles blue value
if (b > 255){
 b = 0;
}
u8g.drawStr(1, 32, "B-");
u8g.drawStr(20, 32, itoa(b, buf, 10));
//LINE (x1, y1, x2, y2)(This is optional)-----------------------------------
u8g.drawLine(1, 17, 128, 17);
//draw a line (x1, y1, x2, y2)
//SET COLOR-----------------------------------------------------------------
u8g.drawStr(64, 32, "Color-");
 switch(num) {
   /*This function converts the num values to R, G and B strings according to the current color being edited.
     This code makes sure that when editing value intensity, the 'Color' field actually switches to the correct color(R, G or B).*/
   case 1  :
       u8g.drawStr(115, 32, "R");
         if(Yval > 230){
             r = r+1;
         }
         if(Yval < 20){
             r = r-1;
         }
       break;
   case 2  :
       u8g.drawStr(115, 32, "G");
         if(Yval > 230){
            g = g+1;
           }
         if(Yval < 20){
            g = g-1;
           }
       break;
   case 3  :
       u8g.drawStr(115, 32, "B");
         if(Yval > 230){
            b = b+1;
             }
             if(Yval < 20){
             b = b-1;
             }
       break;
 }
}
void setup() {
 u8g.setFont(u8g_font_unifont); //Set text font
 pinMode(swpin, INPUT_PULLUP); //Define the pin mode for the switch button
 strip.begin();   //Initiate LED strip
 strip.show();    //Update Strip
 strip.setBrightness(50); //Set the brightness of each NeoPixel
}
void loop() {
 u8g.firstPage();
 do {draw();
 } while (u8g.nextPage()); //Draw loop (OLED)
 delay(10); //Delay before each loop begins
 if(SW < 1){ //Ensures that the strip stays on at all times; you can use the int SW and link it to input swpin to assign a different function to it.
    colorWipe(strip.Color(r,   g,   b), 5);//The variables r g and b are linked to the values you will see on the OLED. The number '5' defines the number of seconds it takes to fill up the entire strip (Neopixels turn on one at a time in this function).
   }
}
void colorWipe(uint32_t color, int wait) { //Defining a new function to display the color.
 for(int i=0; i<strip.numPixels(); i++) { // For each pixel in strip:
   strip.setPixelColor(i, color);         //  Set pixel's color
   strip.show();                          //  Update strip to match
   delay(wait);                           //  Pause for a moment
 }
}
If your connections and code are all correct, your color mixer is complete! Move the joystick in the vertical direction to increase/decrease the intensity of each primary color and move it horizontally to switch between primary colors. You can attach everything to a PCB or add cool patterns assigned to buttons to make it a more custom project!
Here are some pictures of the result:

Comments