

Hardware components | ||||||
_ztBMuBhMHo.jpg?auto=compress%2Cformat&w=48&h=48&fit=fill&bg=ffffff) |
| × | 1 | |||
 |
| × | 1 | |||
_wzec989qrF.jpg?auto=compress%2Cformat&w=48&h=48&fit=fill&bg=ffffff) |
| × | 1 | |||
| × | 1 | ||||
Steve Wozniak once said that creating the Apple 1 integer basic interpreter was the biggest professional challenge of his life. I tried to do what Steve did, write a BASIC interpreter from scratch without using any code from anyone else. I wanted something useful on a very small computer.
It turned out that it may be a nice tool for an Arduino. Interactive access to the I/O functions makes it easy to test electronics. All pins can be steered with BASIC commands. Programs and data can be stored in the EEPROM.I implemented most of the standard BASIC language including strings, floating point and most of the Dartmouth language set.
See my github page to find the code https://github.com/slviajero/tinybasic
Please use the code in Basic2/IoTBasic. This is the released code. Depending on the MCU board, it will be a BASIC interpreter with many features.
More about BASICThis text is part one of a multi part tutorial. It focuses on installing the BASIC interpreter and showing some of its features. As the project has grown quite a bit, I split the information into a set of texts. The first two sequels are.
Built-In examples show the Arduino I/O function in more detail. Writing and reading digital and analog I/O, pulseIn and tone are the focus here.
Using small displays shows elementary display functions typically used for text based LCD display applications.
Download and compile the BASIC interpreterDownload the code from https://github.com/slviajero/tinybasic/tree/main/Basic2/IoTBasic.
Store the code into your Arduino folder as IoTBasic and open it in the Arduino IDE.
The version 2.0 of the BASIC can be configured for many hardware configurations in the two file hardware.h and language.h. It has a heuristic to compile for your board, depending on the size of memory and flash.
In the following, I assume that an Arduino UNO is used. You can compile and upload the sketch without any configuration, using Arduino AVR UNO as a board specification.
The output of the compile would be something like this:
Sketch uses 27662 bytes (85%) of program storage space. Maximum is 32256 bytes.
Global variables use 1512 bytes (73%) of dynamic memory, leaving 536 bytes for local variables. Maximum is 2048 bytes.
You can now open the serial monitor to start the BASIC interpreter.
To enter your first program, use the serial monitor of the Arduino IDE with the settings 'Baudrate 9600' and ‘Newline’.
The interpreter should show a startup line like
Stefan's Basic 2.0 Memory 1827 EEPROM 1024
and then prompt for input.
You are ready to type in commands.
To give it a try, enter the “Hello World” program.
Congratulations, you just have entered your first BASIC program on an Arduino UNO.
NEW made sure that all old data is deleted. LIST shows the program and RUN starts it.
On an UNO by default the program is stored in the EEPROM space of the memory.
Programs can be up to 1kb long. The rest of the 1827 bytes of memory (EEPROM and free RAM combined) can be used for variables, on an UNO this is approximately 800 bytes.
This is a default setting for Arduinos with very small memory - the UNO, NANO, Pro or Leonardo. If you disconnect your board and continue at a later time, your program will still be there but the variables will be deleted as they are in RAM. Variables can be stored in EEPROM if needed.
Bigger boardsBy default BASIC is compiled to fit your board. Most boards that can get software via the Arduino IDE are supported. On bigger boards there will be more language features and the way BASIC integrated with the board hardware will be different. All of these settings are defaults and can be change. Here are some examples.
Arduino MEGA 256
The mega has 4kB of EEPROM and 8kB of memory. If you compile and upload with the default settings, it will show a different start message.
The full BASIC language has been uploaded. This means essentially the commands and features of an old day home computer like the legendary C64 including floating point arithmetic.
The main difference to the UNO is that on these larger boards the BASIC program is always kept in RAM and needs to be saved explicitly to the EEPROM. This is done with the SAVE command on the command line. It can be reloaded with the LOAD command. This is true for all boards bigger than the AVR382.
Arduino Nano Every
The Nano Every is a great board for BASIC. It has a lot of RAM. Like the Mega it has the full language set and 4kB of BASIC RAM. The EEPROM is a bit small with only 256bytes. This board is ideal to use with external EEPROM as file storage.
Arduino R4 boards
The best boards to get started with BASIC on Arduino are the R4 boards. They offer 26kB BASIC memory and their 8kB EEPROM is large enough to store bigger programs.
ESP8266 and ESP32 UNO form factor boards
Great for BASIC with many features, including an internal filesystem that can be used to store programs and DATA.
Please consult my Wiki on all the supported boards: https://github.com/slviajero/tinybasic/wiki/Hardware-Platforms
For the rest of this tutorial we will assume an Arduino UNO and explore the features of this really small board.
The blink programThe equivalent to "Hello World" on Arduinos is the blink program.
In BASIC it looks like this
10 PINM 13,1
20 DELAY 1000
30 DWRITE 13,1
40 DELAY 1000
50 DWRITE 13,0
60 GOTO 20
Type it in and start it with RUN command. The little LED on your Arduino should blink now in 1 second intervals. Sending the character '#' will interrupt the program and make the interpreter return to the command prompt.
'#' interrupts the program. All other input is ignored. Typing any other character than '#' will flood the serial buffer and the interrupt character will no longer be recognised.
The Arduino functions work pretty much as in C++. Check the manual for the ported commands. You can try them in interactive mode. This is one of the advantages of running BASIC on an Arduino. Again, you can save your work to the EEPROM by typing SAVE and reload the program at a later time using LOAD.
Autorun from EEPROMIf you have saved a program to EEPROM you can activate the autorun flag by typing SET 1, 1
If you reset the Arduino now using the reset button or disconnecting and connecting the power supply, the program is started automatically. No command prompt will appear.
Sending '#' from the serial console will interrupt the program.
If you type LIST now, no program will be shown. Autorun programs are not loaded to RAM but are executed directly from the EEPROM. This way, the entire RAM is available in autorun mode. The autorun flag can be removed by the command SET 1, 0.
The command prompt will appear after reset.
Reading dataYou need any analog sensor and a cable for this project. One nice example would be the photo sensor shown in the picture. It returns an analog value 1023 at absolute darkness and 0 at maximum brightness.
Connect the analog output pin of the sensor to the analog port A0 and the digital output to the digital port D2 of the Arduino. Then type in the BASIC program
10 PINM AZERO ,0
20 M0=1024:M1=0
30 FOR I=1 TO 10
40 L=AREAD (AZERO )
50 IF M0>L THEN M0=L
60 IF M1<L THEN M1=L
70 DELAY 1000
80 NEXT I
90 PRINT "Minimum ",M0
100 PRINT "Maximum ",M1
and save it to the EEPROM with SAVE. Running the program will record the value of the sensor read every second for 10 times and calculate the minimum and maximum values. AZERO is a constant containing the lowest analog pin A0. A1 would be AZERO+1.
Storing dataThe EEPROM of the Arduino can be used to store measurement data. The next measures the average light intensity for one minute and stores the result in the EEPROM:
10 PRINT "Previous measurement ",@E(1)
20 PRINT "Starting new measurement"
30 L=0
40 FOR I=1 TO 60
50 L=L+AREAD(AZERO)/10
60 DELAY 1000
70 NEXT
80 @E(1)=L/60
90 PRINT "Average = ",@E(1)
After activation of the autorun feature with SET 1, 1 the Arduino can be used without a computer to measure data. The value can be read the next time the Arduino is connected to a computer.
Terminal programsThe Arduino IDE has a simple serial monitor but cannot download and upload data. Many solutions for this exist. I recommend and use Roger Meier's CoolTerm.
Binaries for Windows, Linux and Mac exist. The program is a full featured serial terminal. I downloaded my Mac binary from MacUpdate.
Before connecting to the Arduino the terminal programs has to be configured in the Options menu:
Set the port to your serial port (the same as the Arduino IDE used), the baudrate to 9600, data to 8, parity to none and stop to 1. These are the default settings of Arduino serial and IoT BASIC. In the terminal configuration page chose these options:
Raw mode transfers every keystroke, key emulation has to be Unix style LF. In addition to this "Handle DEL and BS" is needed to delete data in a line and "Handle FF" enables clearing the screen from BASIC. These are the minimal terminal functions in the standard BASIC language set.
The terminal settings for the use of Stefan's BASIC on an Arduino can be downloaded here: CoolTerm settings. The program is not a full features vt52/100 compatible terminal program.
Uploading or downloading a programFor file upload goto the Connection menu in CoolTerm and select Send Text/ Binary File.
One nice example could the the letter guessing game from 101 BASIC games. It fit's into a 1k Arduino BASIC memory. Upload the program and enjoy 1975 gaming fun.
With the current settings of CoolTerm there is no flow control. Timing problems can cause the upload to fail as BASIC on the Arduino doesn't receive characters fast enough. A simple fix would be to add small delays in the Transmit page of CoolTerm's configuration menu. A 3ms line delay does the job.
A program can be downloaded from the Arduino using the Capture Text/ Binary File function. After starting the capture type LIST and then stop the capture. Edit the file on your computer to remove the last and first line.
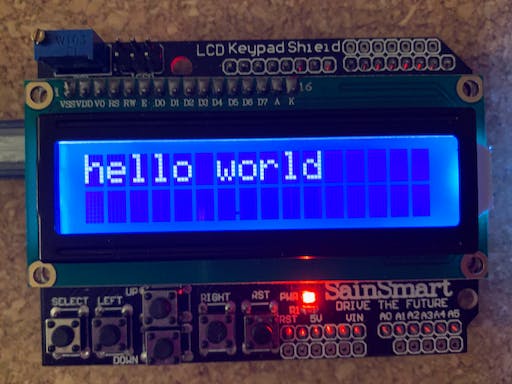
LCD shield based BASIC systemsOne of the nicest small hardware extensions for Arduino are the 16x2 LCD shield with 4 buttons. They can be used from BASIC programs easily. Compile the interpreter as before but change the line
#define PREDEFINEDBOARD "boards/dummy.h"in hardware.h to
#define PREDEFINEDBOARD "boards/avrlcd.h"This activates the display driver and the hardware code for the LCD shield. Compile and upload the script.Connect to the Arduino with the Serial Monitor or CoolTerm. Enter
PRINT &2, "hello world"
and look on the display. It should display the string in the upper left corner of the display.
The modifier &2 redirects the output of the print command to the display. With the settings above the display can be accessed as a mini terminal, capable of scrolling and a few terminal commands. Type PUT &2, 12 to clear the display screen. 12 is the ASCII code of Form Feed and is used to clear the screen.
Keypad functions of the LCD shieldType in the code
10 PUT &2, 12
20 PRINT &2,"LCD shield test"
30 PRINT &2,"Key code: ";
40 @X=8:@Y=1
50 GET &2,A
60 IF A<>0 THEN PRINT &2,A;
70 DELAY 10
80 GOTO 30
or upload it to the Arduino with CoolTerm using shield.bas. Type RUN to start the program then press one of the shield keys. The key code is displayed in the second line.
The keys are mapped to single character ASCII values - select = LF, right =2, left = 1, up = 3 and down = 4.
GET &2, A returns these values into the variable A whenever the key is pressed and 0 if no key is pressed. This code uses the special variables @X and @Y to position the cursor. They contain the horizontal and vertical position of the cursor starting at 0 and can be read or assigned by the program.
Display buffer arrayType in the following code then type RUN.
10 PUT &2, 12
20 X=0: Y=0
30 P=X+16*Y+1
40 @D(P)="X"
50 GET &2, A : IF A=0 THEN 50
60 A$=A
70 @D(P)=" "
80 IF A$="3" AND Y>0 THEN Y=Y-1
90 IF A$="4" AND Y<1 THEN Y=Y+1
100 IF A$="1" AND X>0 THEN X=X-1
110 IF A$="2" AND X<15 THEN X=X+1
120 IF A=10 GOSUB 200
130 DELAY 300
140 GOTO 30
200 PRINT "Selected", X, Y
210 DELAY 500
220 RETURN
You can move around the 'X' symbol with the keys. Pressing select outputs the position of the symbol on the screen.
The code uses the display buffer array @D(). Writing to it displays a character directly on the screen. @D() starts at array subscript 1 and counts cells from left to right and top to bottom. Note how the program converts strings to integers in line 40 and 60. In assignments strings yield the ASCII code of the first character as their integer values. This only works in assignments or on the right hand side of integer expressions. The program has the typical structure of Arduino sketches - line 10 and 20 are setup(), lines 30 to 140 are the loop and lines 200 to 220 are a function.
The stopwatchAn example for a standalone program is the stopwatch.
100 REM "A little stopwatch using the 16*2 shield"
200 REM "The setup()"
210 D=0:T=0:U=0:S=0:C=0
220 PUT &2,12 : PRINT &2;"Time = ";
230 GOSUB 600
300 REM "The loop()"
320 GET &2,A
330 IF A=10
340 IF C=10
350 IF A="l" THEN 500
360 DELAY 10
370 IF S=1 THEN T=MILLIS(10)-D
380 IF T<>U THEN U=T:GOSUB 600
390 GOTO 300
400 S=(S+1)%2:IF S=1 THEN D=MILLIS (10)
499 GOTO 300
500 END
600 @Y=0:@X=8:PRINT &2;"       ";
605 @Y=0:@X=8:PRINT &2;T;
610 RETURN
Type in the program or upload it with Coolterm. Then type SAVE : SET 1, 1 to activate autorun from the EEPROM. Powering up the Arduino from an external power source like a little power bar makes it a standalone stopwatch.
Timers and interruptsBASIC comes with built-in commands to process timers and interrupts. A blink program without delay would look like this.
10 S=0
20 EVERY 1000 GOSUB 1000
30 GOTO 30
1000 DWRITE LED, S
1010 S=(S+1)%2
1020 RETURN
The BASIC interpreters branches every 1000ms to line 1000, changes the LED state and then returns to the loop. This code can be used to poll for I/O events or refresh display while the Arduino does stuff in a loop.
Another timer function would be to interrupt a loop.
10 AFTER 3000 GOTO 1000
20 PRINT "In the loop"
30 DELAY 300
40 GOTO 10
1000 PRINT "Loop has ended"
The AFTER timer only reacts once while EVERY is periodic. AFTER and EVERY use independent timers and can both be used in a program.
Reacting to an interrupt is done with the command EVENT. This is demonstrated in the example program
10 PINM 2, 2
20 EVENT 2, 1 GOSUB 1000
30 GOTO 30
1000 PRINT "Interrupt": RETURN
The PINM command in the first line sets pin 2 to INPUT_PULLUP. EVENT reacts on interrupt type 2 which is CHANGE. Once the pin is connected to ground the interrupt code is started.
Allowed interrupt types in Arduinos are 0 (LOW), 1 (CHANGE), 2 (FALLING) and 3 (RAISING). Some MCUs have more interrupt modes.
Color displays and graphicsA number of displays are supported as part of the BASIC code. One of the most common is the parallel port TFT display with a 480x320 resolution.
These display are supported by the MCUFRIEND_kcb library which needs itself based on Adafruit_GFX. Make sure to install both libraries with the Arduino library manager.
I recommend my fork of the MCUFRIEND_kcb library in https://github.com/slviajero/MCUFRIEND_kbv as it has a few patches that can be useful.
An Arduino MEGA2560 or is needed for this application as the libraries need a lot of flash memory. On this MCU the full BASIC interpreter can be used.
Define
#define PREDEFINEDBOARD "boards/avrmcufriend.h"in hardware.h. Compile and upload.
Mount the shield on the Arduino MEGA2560 and upload the sketch.
On the serial monitor, type
PRINT &2, "hello world"
CIRCLE 100, 100, 50
and watch the display. The output should look like this:
To do a little more with graphics, upload the program
10 REM "Caculate the mandelbrot set"
20 REM "The iteration cutoff, threshold, and resolution"
30 N=24
40 T=4
50 R=100
100 C0=0: C1=0
110 CLS
200 REM "walk through the grid"
210 FOR J=2*R+1 TO 1 STEP -1
220 FOR I=1 TO 3*R+1
230 C0=-2+(I-1)/R: C1=-1+(J-1)/R
240 GOSUB 4000
250 GOSUB 5000
280 NEXT
300 NEXT
999 END
4000 REM "do an iteration on c"
4010 Z0=C0: Z1=C1
4020 FOR K=1 TO N
4030 S0=Z0*Z0: S1=Z1*Z1
4040 IF S0+S1>T THEN BREAK
4050 X0=S0-S1+C0
4060 X1=2*Z0*Z1+C1
4070 Z0=X0: Z1=X1
4080 NEXT
4090 RETURN
5000 REM "plot a point"
5010 IF K>N: COLOR 0: PLOT I,J: RETURN
5020 COLOR 255-INT(K/N*255)
5030 PLOT I,J
5040 RETURN
to your little BASIC computer. It calculates the Mandelbrot set.
This configuration can be extended to a full standalone computer.


Comments