

Hardware components | ||||||
| × | 1 | ||||
| × | 4 | ||||
| × | 4 | ||||
| × | 1 | ||||
| × | 5 | ||||
| × | 4 | ||||
| × | 4 | ||||
| × | 1 | ||||
| × | 1 | ||||
| × | 1 | ||||
| × | 4 | ||||
| × | 4 | ||||
| × | 1 | ||||
| × | 1 | ||||
| × | 1 | ||||
| × | 1 | ||||
| × | 1 | ||||
| × | 4 | ||||
Software apps and online services | ||||||
 |
| |||||
| ||||||
_4YUDWziWQ8.png?auto=compress%2Cformat&w=48&h=48&fit=fill&bg=ffffff) |
| |||||
Hand tools and fabrication machines | ||||||
| ||||||
 |
| |||||
| ||||||
| ||||||
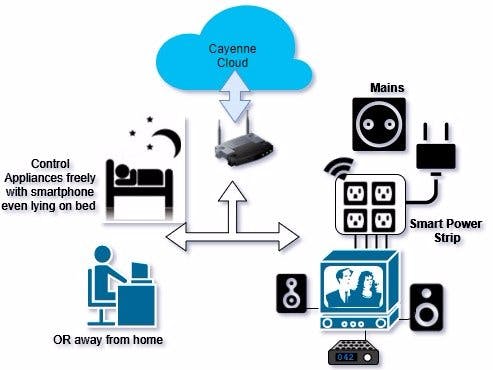
Daily we have to switch on/off appliances one by one.
Even sometimes we need to walk upstairs just to switch off fan or any device.
And just think when you're away from home.
Now, with Smart Power Strip, you can wirelessly switch them off in seconds.
Warning: This project includes working around high voltage up to 230V and current up to 5A. Electricity is dangerous, so please be careful! You must have knowledge of electricity or electrical wiring, otherwise attempting this project under the supervision of electrical expert. I will not be responsible for any damage caused.
Let’s begin…
Setup Arduino IDEWe need to setup Arduino IDE to program NodeMCU 12E v1.0 ESP8266 development board for this follow the tutorial link shown below.
YouTube Video tutorial:
Or use this step-by-step guide on Hackster link: Here. Once you are done, then you should be getting NodeMCU 1.0 board listed under Boards list in Tools section as shown below:
Also you need the library to connect ESP8266 to Cayenne cloud. For this follow below steps:
- Download this library as a zip file here.
- Install the downloaded zip library from Sketch -> Include Library -> Add.ZIP Library.
- Connect your ESP8266 module to your computer using a USB to Serial FTDI or console cable.
- Select your ESP8266 module and port from the Tools menu.
Once you are done, then you will find the example sketch for Cayenne-MQTT-ESP8266 in File -> Example -> section as below:
Visit on https://mydevices.com/ and sign up to create account on Cayenne Cloud.
Once done, log in to your account. Follow the below steps to connect ESP8266 Device on cloud:
After this we need to add switch widgets to control appliances. I am going to control 4 appliances with my power strip, so adding 4 button switches and one more for testing. Below are screenshots showing how to add them.
Now, we are ready to move on to the hardware section.
Hardware SectionPCB Design
I have designed my first version of a two layer PCB for project. I have used KiCad software to design PCB; it is free without restriction on the number of layers, as well as board size of PCB design.
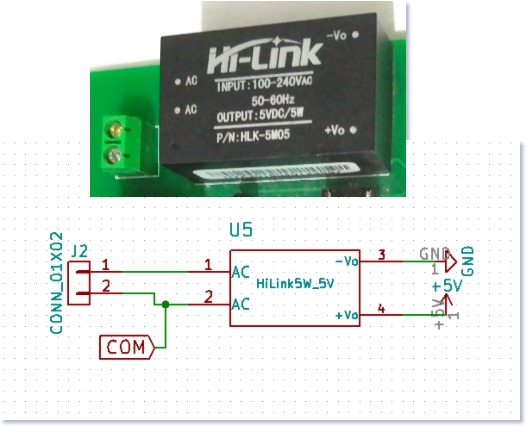
Download Gerber file from here. Use EasyEDA Online GerberViewer. KiCad library for Hi-Link AC-DC power module was not available. So I have a design which you can download here.
Youtube Tutorial on KiCad PCB Design:
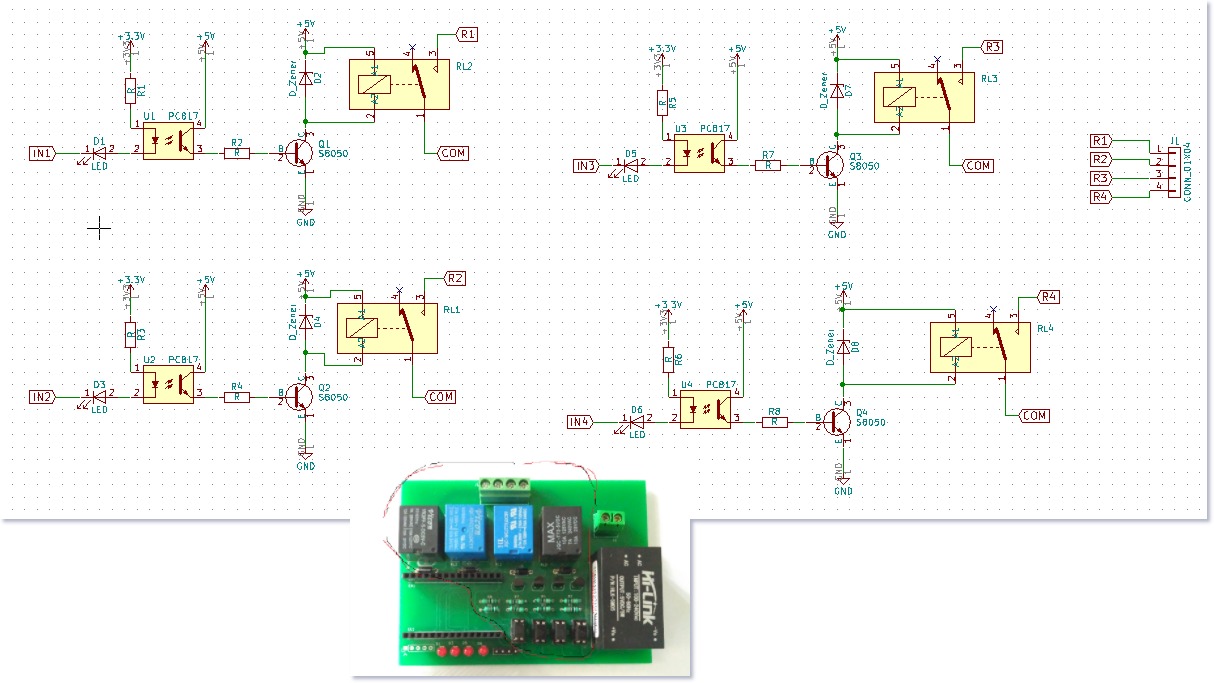
Component Soldering
Once done with soldering the components, we can start testing our board.
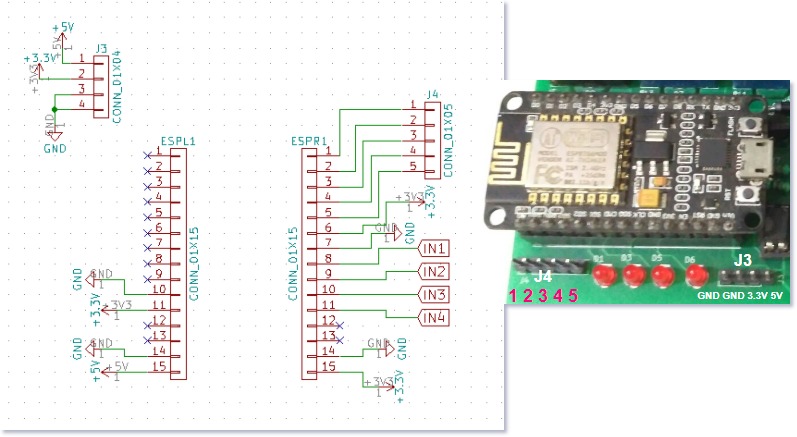
You can find some breakout pins (GPIOs and supply pins) on left on the board for connecting extra module or testing purpose.
Using the blue LED to test if the device is connected to the cloud.
Circuit Connection and Testing:Now upload the code available in the code section SmartPowerStrip.ino file.
You can see that once device is connected to the cloud, the blue LED will blink and will remain on. At any time you can send test commands from the cloud by pressing TestLED button widget. If received successfully, then it will blink.
And to check if the relay is working before the actual test, we can use a multimeter as a continuity tester. Here is video for both tests:
Electrical Connections and Packaging:For simplicity, let us use two different color wires (red and yellow) and we'll go through step-by-step connection in the electrical box. Let's begin:
Working of Smart Power Strip:
You can also control the device from a smartphone using an Android app available on Google Playstore.
Same widgets will be there on the app once you logged in to your account:
So we built a Smart Power Strip to switch ON/OFF appliances through the internet using Cayenne cloud service. No more keeping devices ON when not in use and we can save power usage.
I would like to share some tests which might be useful for further improvement. I have a design circuit using S8050 transistor and 1N4148 zener diode which you can find in the Circuit/Schematics section below. But I was not able to drive the relay properly, so I replaced those components with 2n2222 NPN transistors and 1N4007 diode.
The board is now working fine, still experimenting so more could be found out.
Please comment with any suggestions regarding the project or especially about PCB design. I still want to improve PCB to make it more compact considering electrical pad sizing for high current.
ESP8266 GPIO pins and Supply


_Ujn5WoVOOu.png?auto=compress%2Cformat&w=40&h=40&fit=fillmax&bg=fff&dpr=2)

Comments