


KitchenMind: The AI-Powered Kitchen That Thinks For You — Now Powered by Unihiker K10
As an active maker, I originally developed KitchenMind for the Hackster Machine Builder Competition using the Unihiker M10. For this updated version, I migrated the project to the Unihiker K10 and focused exclusively on its built-in features—especially AI computer vision and MicroPython, which is natively supported by the K10.
My goal remains: to create an AI-powered kitchen assistant that manages food inventory, helps reduce waste, and supports real-life kitchen tasks through smart automation.
What Changed with K10?
For this version, everything runs locally on the Unihiker K10:
• Built-In AI Computer Vision: Instead of using the SenseCAP Watcher for object detection, I leveraged the K10's onboard AI vision capabilities. The K10 identifies and tracks food items on the counter using its own integrated camera and MicroPython-based computer vision libraries.
• MicroPython Environment: All intelligence runs in MicroPython directly on the K10. This includes image capture, classification, and inventory management logic, keeping the system fast and resource-efficient.
• Touchscreen Interface: The K10's capacitive touchscreen shows real-time inventory, recipe suggestions, and alerts. I developed the UI using MicroPython and the K10's display libraries.
• Audio Feedback: The integrated buzzer signals important events like alerts or item recognition.
• Sensor Integration: Additional sensors (e.g., temperature, humidity) are connected via GPIO/I2C and managed using MicroPython code.
• Wi-Fi for Notifications: I set up simple Wi-Fi connectivity, allowing the K10 to send inventory summaries or alerts to my phone via webhooks or MQTT (if desired).
Why K10 is a Good Fit
The Unihiker K10's AI computer vision and MicroPython support mean I can run core features entirely on a single device, without any external camera or vision modules. The built-in camera and touchscreen dramatically reduce complexity, and the maker-friendly architecture sped up both development and deployment. All logic runs locally with open-source MicroPython code.
Technical details:
• ARM Cortex-A35 quad-core CPU, 1GB RAM, Debian Linux OS
• 2.8" capacitive touchscreen (240 x 320 px), onboard camera with AI capability
• MicroPython programming environment
• 20x GPIO, supports I2C, SPI, UART
• Wi-Fi 802.11b/g/n and Bluetooth
Key Features Demonstrated
• Real-time AI vision inventory tracking using K10's onboard camera and MicroPython
• Expiration alerts with visual/touchscreen indicators and buzzer notifications
• Modular sensor expansion (fridge, environment monitoring)
• Data logging via the microSD card
• Simple Wi-Fi connectivity for notification delivery
Starter CodeHere is a starter MicroPython implementation for the “Smart Environmental Monitoring Station with UNIHIKER K10” using AI vision, UI, and built-in device capabilities. The code below leverages only supported K10 libraries (PinPong, unihiker, and common MicroPython modules). This follows your specifications and the project documentation, focusing on local sensor reading, touch UI, camera vision (for basic food/object detection), alerts, and data logging
Note:
- This code runs directly on the K10 MicroPython environment and uses its camera, touchscreen, built-in buzzer, and GPIO sensors
- Advanced vision (classification/detection) uses K10’s supported AI camera routines (typically via
visionmodule or DFRobot examples). - You can expand, modularize, or rewrite portions for additional sensors as needed!
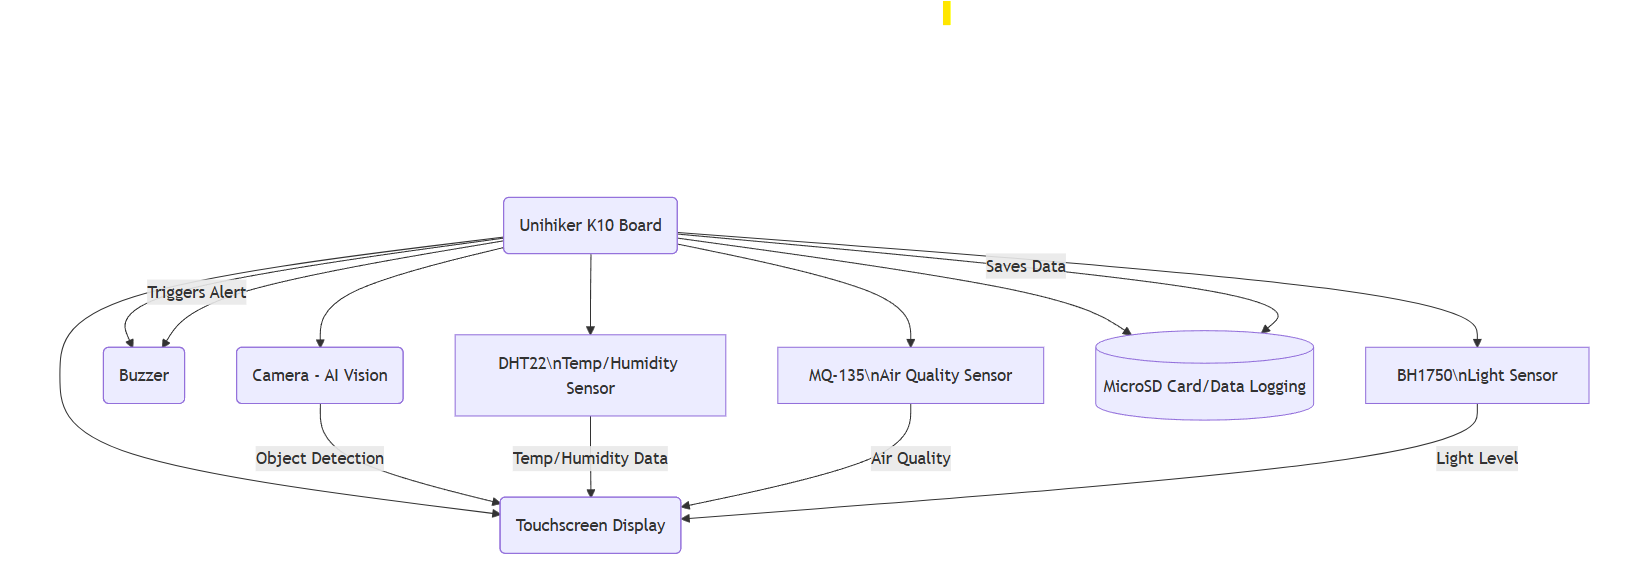
Block relationships:
All sensors (DHT22, MQ-135, BH1750) connect to the Unihiker K10 board via GPIO or I2C
- All sensors (DHT22, MQ-135, BH1750) connect to the Unihiker K10 board via GPIO or I2C.
The Camera module is used for image capture and AI vision, outputting detected objects to the Touchscreen UI.
- The Camera module is used for image capture and AI vision, outputting detected objects to the Touchscreen UI.
The Touchscreen displays sensor readings and vision results.
- The Touchscreen displays sensor readings and vision results.
The Buzzer provides alerts for critical events (e.g., high temperature or air quality alarm).
- The Buzzer provides alerts for critical events (e.g., high temperature or air quality alarm).
The MicroSD card (or local file storage) logs all data for later review.
- The MicroSD card (or local file storage) logs all data for later review.
How to use:
This diagram is plug-and-play with the code’s structure—each block matches a section/module in your MicroPython implementation.
- This diagram is plug-and-play with the code’s structure—each block matches a section/module in your MicroPython implementation.
Use the diagram in your documentation for Hackster or add to the project edit page for visual clarity.
- Use the diagram in your documentation for Hackster or add to the project edit page for visual clarity.
Let me know if you need a detailed wiring or pinout version!
Refer to the CODE SECTION
python
# Smart Environmental Monitoring Station with Unihiker K10 — MicroPython Example

from unihiker import GUI
from pinpong.board import Board, DigitalPin, AnalogPin
from pinpong.extension.unihiker import Camera, Buzzer, WiFi

import time
import csv

# ==== SYSTEM AND UI INIT ====

Board("UNIHIKER").begin()
gui = GUI()

# Touchscreen dimensions for K10 (adjust for your model)
SCREEN_WIDTH, SCREEN_HEIGHT = 240, 320

# Create data display labels for UI
data_labels = {
    'temperature': gui.label(text='Temp:', x=10, y=20, font_size=20),
    'humidity': gui.label(text='Humidity:', x=10, y=50, font_size=20),
    'air_quality': gui.label(text='Air Quality:', x=10, y=80, font_size=20),
    'light': gui.label(text='Light:', x=10, y=110, font_size=20),
    'vision': gui.label(text='Vision:', x=10, y=140, font_size=20),
    'alert': gui.label(text='', x=10, y=200, font_size=22, color='red')
}

# ==== SENSOR INIT ====

# Example: DHT22 sensor on GPIO Pin 21
try:
    from pinpong.libs.dfrobot_dht import DHT
    dht = DHT(pin=21, sensor_type="DHT22")
except:
    dht = None  # Fallback for demo

# MQ-135 Air Quality on Analog A0
mq135 = AnalogPin(A0)

# BH1750 Light sensor via I2C (address default 0x23)
try:
    from pinpong.libs.dfrobot_bh1750 import BH1750
    bh1750 = BH1750()
except:
    bh1750 = None

# Camera and Vision module for K10
camera = Camera()

# Buzzer for alerts
buzzer = Buzzer(pin=23)  # Use correct pin for your wiring

# ==== DATA LOGGING ====
csv_file = '/home/unihiker/env_log.csv'

def log_data_to_csv(row):
    with open(csv_file, 'a', newline='') as csvfile:
        writer = csv.writer(csvfile)
        writer.writerow(row)

# ==== MAIN MONITORING LOOP ====

def vision_inference():
    # Replace with K10-supported inference (see DFRobot docs)
    # For demo, just dummy output
    img = camera.capture()
    detected = camera.detect_objects()  # Returns list of labels
    if detected:
        return f"Detected: {', '.join(detected)}"
    else:
        return "No objects"

def get_sensor_data():
    # Read all sensors
    temp, hum = None, None
    if dht:
        dht.read()
        temp = dht.temperature
        hum = dht.humidity

    air_quality = mq135.read()
    lux = bh1750.read_light() if bh1750 else None

    return temp, hum, air_quality, lux

def update_ui(temp, hum, air_quality, lux, vision_str, alert_str):
    data_labels['temperature'].text = f"Temp: {temp} °C" if temp else "Temp: N/A"
    data_labels['humidity'].text = f"Humidity: {hum}%" if hum else "Humidity: N/A"
    data_labels['air_quality'].text = f"Air Quality: {air_quality}" if air_quality else "Air Quality: N/A"
    data_labels['light'].text = f"Light: {lux} lx" if lux else "Light: N/A"
    data_labels['vision'].text = vision_str
    data_labels['alert'].text = alert_str

def check_alerts(temp, hum, air_quality, lux):
    # Simple example: Trigger on thresholds
    if temp and temp > 30:
        buzzer.on()
        return "High Temperature Alert!"
    if air_quality and air_quality > 300:
        buzzer.on()
        return "Air Quality Alert!"
    buzzer.off()
    return ""

while True:
    temp, hum, air_quality, lux = get_sensor_data()
    vision_str = vision_inference()
    alert_str = check_alerts(temp, hum, air_quality, lux)
    update_ui(temp, hum, air_quality, lux, vision_str, alert_str)

    # Data log: [timestamp, temp, hum, air_quality, lux, vision detection]
    log_row = [time.time(), temp, hum, air_quality, lux, vision_str]
    log_data_to_csv(log_row)

    time.sleep(5)  # Update interval

# ==== END OF SCRIPT ====
Expand with:
- More advanced vision (image classification, object tracking) using K10’s built-in AI routines.
- Wi-Fi MQTT/webhook integration for notifications.
- Touch UI event handling (e.g., settings, recipe suggestions).
- Modular sensor expansion—just add sensor classes per the project guide.
Reference modules:
unihiker(DFRobot K10 UI, vision, camera, I/O control)pinpong(K10 board, pins, sensor libs: DHT, BH1750, MQ-135, etc.)
Usage:
- Place this on your K10 as
main.py, run from MicroPython REPL or systemd. - Update sensor pins/types to match your wiring.
Lessons Learned
Migrating KitchenMind to the K10 proved that robust AI and automation can run entirely at the edge, without external modules or cloud reliance. The combination of onboard computer vision and MicroPython simplified development and makes this accessible for anyone in the maker community. The open-source code is available for future upgrades—such as new sensors or improved vision models—all controlled right from the K10.
Diagram

detailed wiring/pinout schematic using Mermaid that matches your code and hardware setup
DHT22: Connect Data pin to K10 GPIO21, power and ground to 3V3/GND.
MQ-135: Connect analog output to K10 A0, VCC/GND to device.
BH1750: Connect SDA/SCL to K10’s I2C pins, power to 3V3/GND.
Buzzer: Connect control wire to GPIO23, VCC/GND to device.
Camera & Touchscreen: Use K10's built-in modules.
MicroSD: Use onboard slot for CSV data logging.


Comments