This activity was designed to be delivered as a workshop for high school age students to build a companion bot over a two day school holiday session. Students can choose from 4 styles of premade 3D printed chassis, including a tall shape, peabody, standard and shoulder fit. The smaller chassis use micro servo motors, and the larger two use standard servo motors. This activity will make it easy for your to build your own robot with a personality, or host the activity for a small class of students. If you've already got know-how for 3D printing and Arduino, this activity will be a breeze.
My example robot for this activity is a crow build using the peabody chassis type.
Over the two days, students learnt how to design their own motor attachment (like the key turning in the crow example) in TinkerCAD, how to assemble a circuit and upload code with Arduino. Lastly (and not least!) decorating the final build with crafting materials.
Step 1 - IdeationWhat do you want your bot to look like? If you don't have one already, consider starting a maker journal. Start sketching rough ideas, and when you're settled on a theme, pick a chassis to match and sketch your bot around the rough silhouette.
Lots of rough ideas to sift through
Sketch your concept around a rough chassis shape
Once your chassis type is chosen, 3D print out the shape from the STL files below.
Step 2 - 3D PrintingAdd a feature on your bot that moves with the turning of a servo motor. In my example above, I have a key winder attached to a servo motor. Use TinkerCAD to 3D model something, pulling the servo motor model from the library as a guide. 3D print out your final shape and attach it to a motor.
Use the motor examples under 'components' to size your shape to the motor fins.
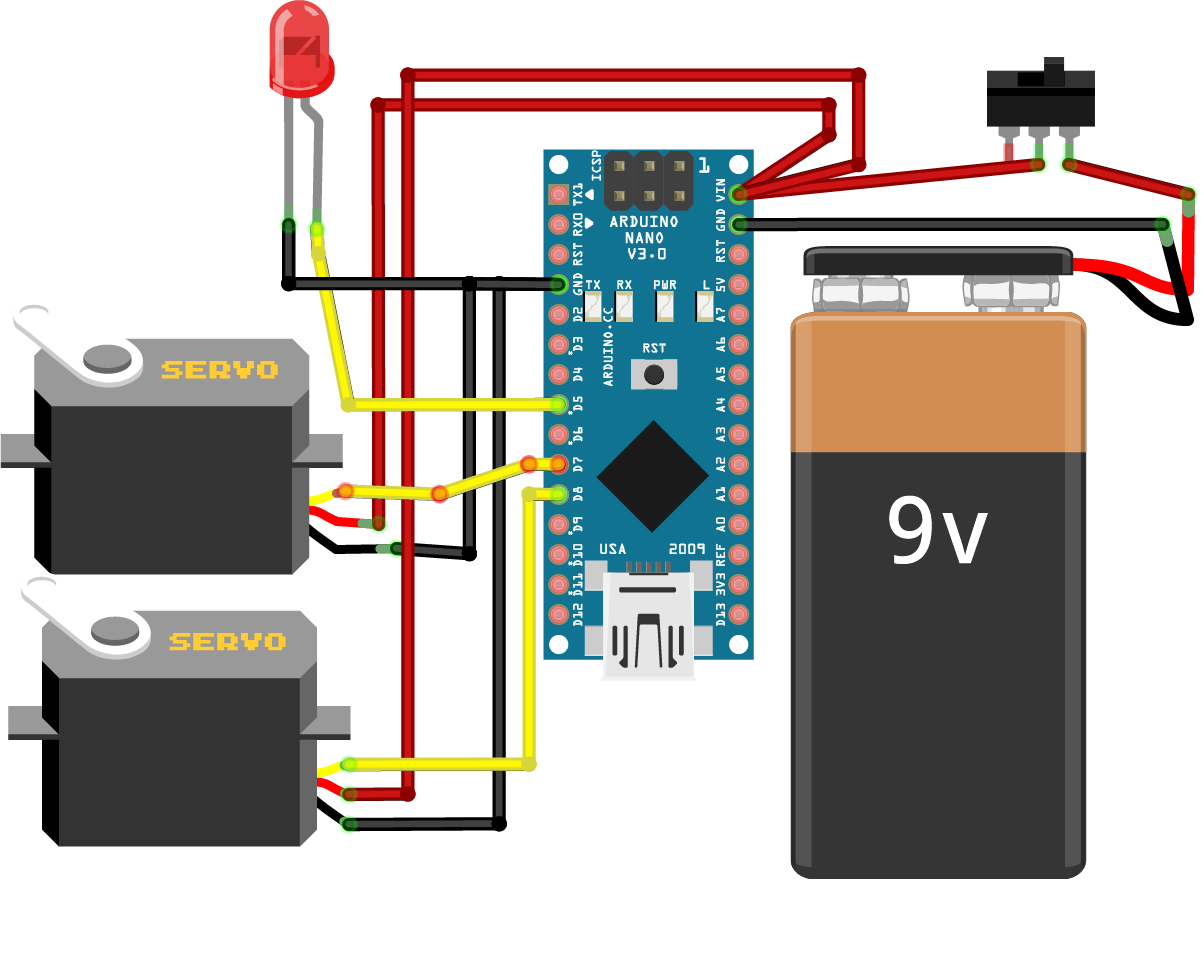
Pre-solder a slide switch to the 9V battery connector if you wish to easily turn your bot on and off. Otherwise, you can skip this step and just unplug it when you want to turn it off. Follow the circuit diagram below and attach the motors, LED light and 9V battery connector to the Arduino Nano. This step is easier if you have a Nano Screw terminal, simply put the wires into the slots rather than soldering.
Next, download and install the Arduino code to make the motors move and LED turn on. I had an issue at this step with the micro servos which were moving erratically with the code. The solution to this was making sure to purchase angled rotation servos rather than full 360 rotation servos.
After the circuit is working, install the parts into the chassis, screwing the motors and screw terminal into the slots.
Step 4 - DecorationThis step allows you to really build some character around the bot build, and I'd recommend allowing more time for this than you think you need. Start by using a thick gauge wire to bend any rough shapes you'd like (for example, the head on my crow build) and use crafting materials to cover the chassis.
I'd recommend looking around for locals who have scrap fabric / plastic parts to use for this, I have a collection of bits from my local Reverse Garbage store. I used scrap wool car seat fabric, faux leather scrap, wire, copper sheet and craft store eyes. Also recommend finding a tiny hat for your bot to wear.


Comments