

Hardware components | ||||||
 |
| × | 1 | |||
| × | 1 | ||||
| × | 1 | ||||
Software apps and online services | ||||||
| ||||||
 |
| |||||
 |
| |||||
Every smartphone continuously sends information about itself to the environment. This information can be used to count smartphones.
The open-source Project ESP32-Paxcounter on Github is such a counter and uses low-cost ESP32 boards as a basis. The principle of operation here is to sniff wireless networks for MAC addresses.
In the following tutorial, we will use a Pycom LoPy4, an ESP32 with a LoRaWAN module, to send the number of Smartphones found over the TTN network to an IoT platform for visualization.
Privacy Notice
The ESP32 Paxcounter firmware makes the information that smartphones send out unrecognizable before counting. No personal information is processed and definitely not stored.
Read here more:
https://github.com/cyberman54/ESP32-Paxcounter#privacy-disclosure
Legal Note
As stated on Github Repository: Depending on your country's laws it may be illegal to sniff wireless networks for MAC addresses. Please check and respect your country's laws before using this code!
See: https://github.com/cyberman54/ESP32-Paxcounter#legal-note
Things you will need:
- Pycom LoPy4
- Pycom Expansion Board (for programming)
- Free Datacake Account
- Visual Studio Code + PlatformIO
Don't have Time/Skill to do it yourself?
No problem. You can purchase a fully assembled and already programmed version of the Paxcounter from the Datacake Store.
PreparationSince we do not go into detail about the necessary steps of installing Visual Studio Code and PlatformIO, this tutorial assumes that you already have experience using Visual Studio Code and programming an ESP32 via PlatformIO.
Install Visual Studio Code
The next steps require that you have a current version of Visual Studio Code and the PlatformIO plugin installed.
Connect Extension Base
The easiest way to program and use your LoPy4 is to put it on an appropriate Extension Base. In this project, I am going to use the Pytrack 2.0 X Extension Base, which comes with an additional Quectel GPS module. The firmware of the ESP32 Paxcounter offers support for GPS modules, including the Pytrack 2.0 X.
Clone ESP32 Paxcounter Repository
For this project, we use the open-source firmware ESP32 Paxcounter for this project. You can find it under the following link:
https://github.com/cyberman54/ESP32-Paxcounter
Now, clone this GitHub repository on your computer and open the directory using Visual Studio Code. The repository already contains the necessary configuration for PlatformIO. All you have to do is open the project which should give you the following window:
As with all LoRaWAN devices, sending and receiving messages requires a LoRaWAN server. In this project, we use the open and community-powered TheThingsNetwork LoRaWAN Server. https://www.thethingsnetwork.org/
Things you need for the Paxcounter to run:
- A TTN Account
- A TTN Gateway or...
- ... TTN Network Coverage in your area
Not sure if you have TTN Network Coverage?
No Problem. You can check out https://ttnmapper.org/ to see if there is a TTN Network in your area.
You do not have TTN Network Coverage in your Area?
Well, then you need to get yourself a LoRaWAN Gateway and set up your own LoRaWAN Network in your area.
Create a TTN ApplicationTo create your LoPy4 on The Things Network, you must first create an application there.
In the following steps, we assume that you already have experience with The Things Network and that you know how to create applications there. Therefore you also need an account on the TTN network.
And what about payload decoding?
Decoding of Payload happens completely on Datacake as the platform has it's own payload decoding section as well as defining encoders for downlinks. This enables the platform to be compatible with all the other LNS and makes it easier for first time LoRaWAN user as there is no complicated programming required.
Add DeviceIn your application on TTN, we need to add a new device. Press on "Register Device" to create a new one.
Auto-Generate DevEUI
When you add a new device to TTN you have the option to let TTN generate a random but unique DevEUI for you. This is exactly what we are going to do here as we need a DevEUI for our Paxcounter.
When done please click on "register" in order to create the new device on your TTN application. You will then see something like this:
Now you have to copy and paste the Device EUI, Application EUI, and App Key into the configuration file on your Paxcounter Firmware. Only by providing these three IDs, the Paxcounter is able to connect to the TTN network.
To do so simply open up the file loraconf.h in Visual Studio Code and past the IDs into the preset variables.
static const u1_t DEVEUI[8] = { 0x00, 0x5B, 0xB1, 0xAB, 0x67, 0xCB, 0xCB, 0xE1 };
static const u1_t APPEUI[8] = { 0x70, 0xB3, 0xD5, 0x7E, 0xD0, 0x03, 0x12, 0x6C };
static const u1_t APPKEY[16] = { /* your key here */ };
Here's a screenshot showing you how:
When this is the first time you set up the project you might have to rename the file loraconf_example.h to loraconf.h. The ESP32 Paxcounter Repository contains a readme-file with a detailed tutorial on how to set this up.
It's also important to let the firmware know that you are using a LoPy4-Board. Simply open up the platformio.ini that you find in the root directory of the firmware repository and uncomment the line that sets the board-type to LoPy4.
halfile = lopy4.hIf you are using the LoPy4 in combination with a Pytrack 2.0 X expansion board, you can optionally activate the GPS functionality. Simply open up the /src/hal/lopy4.h file.
// uncomment this only if your LoPy runs on a PYTRACK BOARD
#define HAS_GPS 1
#define GPS_I2C GPIO_NUM_25, GPIO_NUM_26 // SDA (P22), SCL (P21)
#define GPS_ADDR 0x10The Paxcounter firmware can be used to sniff those packages that are used by Covid 19 Apps (like the German "Corona Warn App").
To enable your Paxcounter to listen to these packages you need to enable Bluetooth and the counting for ENS packages.
To enable ENS Counting please set the following flags in the paxcounter.conf file.
#define COUNT_ENS 1
#define BLECOUNTER 1
#define HAS_SENSOR_1 1The Paxcounter firmware has a list of known Smartphone ID Prefixes. This list can be used as a filter for the count of WiFi and Bluetooth devices. With this option enabled, wireless mouse, router, or computer are filtered out, which would otherwise also be included in the count.
To enable this option simply open up the file /src/paxcounter.conf and set the following Option line to 1:
// Set this to include BLE counting and vendor filter functions, or to switch off WIFI counting
#define VENDORFILTER                    1       // set to 0 if you want to scan all devices, not filtering smartphone OUIs
Using Covid-19 ENS
Please Note: If you want to sniff Covid-19 ENS packets you have to disable the vendor filter.
Can I set this via Downlink?
Unfortunately at the time of writing the Paxcounter Software does not yet support setting the vendor filter via Downlink. This will hopefully change in a future release.
Set Payload VersionIn the paxcounter.confwe need to set the payload encoder that is used on the device to generate the LoRaWAN Messages. We need to set it to "Plain" as this is what the IoT Platform Datacake requires.
#define PAYLOAD_ENCODER 1 // payload encoder: 1=Plain, 2=Packed, 3=Cayenne LPP dynamic, 4=Cayenne LPP packedAlmost all options in this configuration file, for example like setting the external antenna, can be set using downlinks later.
Flash the DeviceNow we are ready to build the firmware and flash the device.
EnterBootloader Mode
To be able to program the LoPy4 with PlatformIO we need to bring the device into the bootload mode before.
To put the device into bootloader mode to update the firmware, you will need to connect P2 to GND. We recommend connecting a button for this.
More details can be found here: https://docs.pycom.io/gettingstarted/programming/usbserial/
https://www.thethingsnetwork.org/labs/story/program-your-lopy-from-the-arduino-ide-using-lmic
Compile and Upload Firmware
When your device is Bootload Mode you can start uploading the firmware. PlatformIO has some commands that you can call directly from the sidebar.
This will automatically build and upload the code to your LoPy4 device.
Exit Bootloader Mode
If the upload was successful you need to restart the LoPy4. This will also exit the bootload mode. If you have used wires to enter bootloader mode please make sure that they are removed.
Check online StatusIf you have set all settings correctly and the programming of LoPy4 was successful, you should now see the first data packets of the device in the TTN Console.
Now you are ready for connecting your device to the Datacake Platform and have a beautiful Dashboard up and running within just a very few minutes.
Create Account on DatacakeFor the visualization and configuration of the ESP32 Paxcounter, we need an IoT Platform. We are using the Datacake low-code IoT Platform, which comes with a preset for the ESP32 Paxcounter project and offers the following advantages:
- Dashboard Template available
- Build your own payload decoder (you don't have to write a payload decoder to TTN)
- Downlinks which can be triggered by a button (for the configuration of the device)
- Free use for the first two devices
- Invite unlimited members via e-mail
- Multi-Tenancy capability and white label as an option
You can find out more about Datacake on their Homepage:
Register on Datacake
To create a new device on Datacake, you must first register. Registration is free and does not require a credit card or other information. Simply open the following link to register:
https://app.datacake.de/signup
Add your First DeviceAfter successful registration, the Datacake Portal opens up and shows you your first workspace (your personal tenant).
Now you can create a new device. Just click on the "Add Device" button on the right side of the device list. A setup dialog will be displayed, which will guide you through the necessary steps. The first step is to select a template for LoRaWAN devices.
Select TemplateDatacake offers a wide range of presets for common LoRaWAN devices, which come with dashboard, decoder, and other pre-built components. You only need to select the template, the rest will be created automatically.
There is also a template for the ESP32 Paxcounter. So now find the template from the list or enter ESP32 in the search field.
Once you have found the template, click on it to confirm your selection.
Now you have to select the LoRaWAN network server. Since we will use TTN here and the device has already been created in a TTN application, simply select "The Things Network" (which is the second entry on the list) here.
To create a device it is necessary to choose a payment plan. Since Datacake allows you to create up to two devices for free, you can choose the "Free" plan.
If you want to know more about the available plans or pricing in general please have a look at the pricing page: https://datacake.co/pricing
To enable Datacake to recognize your device you have to define the DevEUI of your Paxcounter in the final step. Please enter the same DevEUI that you have entered on the Paxcounter and in TTN.
To allow data from TheThingsNetwork to flow into Datacake and send Datacake downlinks to the device, a Webhook integration must be added to your TTN application.
The necessary steps are relatively simple. Navigate in TTN to the overview of your application and click on the tab "Integration".
Adding an integration opens a new window that asks you to choose an integration type. Please select "HTTP Integration".
A ready-to-use integration should then be set up according to the following screenshot:
Datacake has a detailed tutorial that shows step by step what things are needed to do this.
https://docs.datacake.de/lorawan/lns/thethingsnetwork
And forsending downlinks?
Once data is sent to Datacake via this Webhook integration, the device in Datacake will receive all necessary information for sending downlinks from TTN. So you no manual steps needed here.
And what about other LoRaWAN Network Server?
Datacake does support integrations for almost all LoRaWAN Network Server. Please use the following link to have a look at the documentation of Datacake LoRaWAN Integration if you are looking for a different LNS.
https://docs.datacake.de/lorawan/get-started
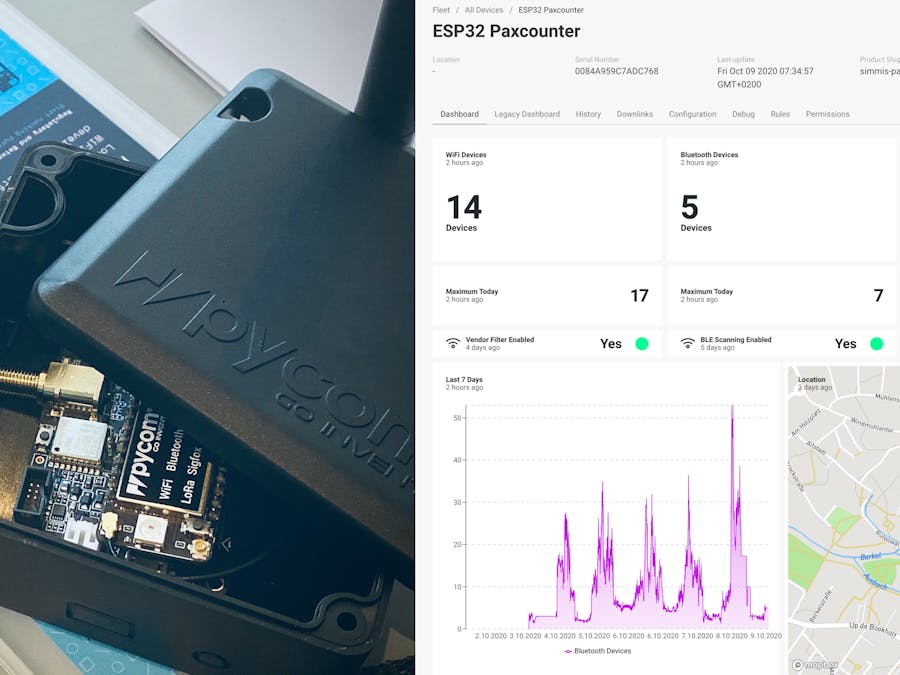
Wait for DataAfter you have specified the DevEUI and finalized the creation via a button you will see the Dashboard of your Paxcounter on Datacake.
You will not see any content for the time being. All values should be set to "0". Only when your Paxcounter sends data again will it be displayed on the dashboard.
If your device is already connected to TTN and you see data flowing into the TTN-console already, you simply have to wait for the next data messages to arrive. You can accelerate that by pressing the reset button on your LoPy4 so it will rejoin the TTN Network and send data right after that was successful.
Once Data has arrived the Dashboard will automatically show the values according to the template.
If you don't see any data on the dashboard in Datacake, you can use Datacake's debugging feature to see if data has arrived at all.
To do this, navigate to the Debug tab in Datacake. You should see the following view:
I am seeing data on TTN but not on Datacake
In this case, it's most likely a missing or false set up Webhook Integration on TTN - or - the DevEUI was entered wrong. Please double-check this and refer to the documentation on how to set up a Webhook integration once more:
https://docs.datacake.de/lorawan/lns/thethingsnetwork
And how do I change the DevEUI?
In case you have entered a wrong DevEUI and need to change this, you simply delete the Datacake Device and add it once more.
Exploring the Datacake PlatformDatacake comes with a handful of features that are so extensive that it would go beyond the scope of this tutorial. Therefore, we will only deal with the respective points here in keywords and provide some links to them.
- Data export to Excel or CSV
- Open rest API
- Multi-client capability and white label
It will be best if you play around with the platform yourself. And you can do this with the free version. There are no limitations (except for White Label).
Invite MembersEven on the free version of Datacake, you can invite an unlimited amount of collaborators via E-Mail. To do this simply head over to the member section and press on "Add Member".
To send an invitation simply provide an E-Mail address and choose the permissions of that user.
The ESP32 Paxcounter allows some settings for fine-tuning the count as well as general functions like GPS status, transmission times, etc. This configuration can be sent to the device via LoRaWAN downlink.
Datacake has an editor for creating downlinks and the Datacake preset of the ESP32 Paxcounter comes with some premade downlinks.
To view these downlinks, navigate to the "Downlinks" menu item in the Device View using the tab bar and select the appropriate downlink.
The nice thing about the downlinks via Datacake is that they have access to the historical data stored in the Database of your device. This allows the storage of status-setting and complex automation processes to be developed.
Create a Public DashboardOn your Datacake Workspace, you have the option to create a global dashboard that shows measurement data of all your devices within your workspace. These dashboards can be made public by creating a link that you can share. People without a Datacake account can open this link.
Make it waterproofPycom has some really nice accessories and one of them is an IP67 box that offers plenty of room for the LoPy4 + Extension Board. It also comes with pre-punched holes that you need to punch through in order to have some holes for the antenna and power supply.
We are using this box to make an IP67 waterproof version of the Paxcounter. Simply mount everything into the box and bring pieces together.
The power supply is done via cable extension and using a cable gland on one of the pre-punched holes.
Buy it from StoreIf you don't have the time, skills and/or both to complete the manual steps all by yourself, you can purchase a ready-made Paxcounter in an IP67 enclosure directly from the Datacake Online Store.


Comments