

Hardware components | ||||||
_ztBMuBhMHo.jpg?auto=compress%2Cformat&w=48&h=48&fit=fill&bg=ffffff) |
| × | 1 | |||
 |
| × | 1 | |||
 |
| × | 2 | |||
 |
| × | 1 | |||
 |
| × | 2 | |||
| × | 1 | ||||
 |
| × | 1 | |||
 |
| × | 2 | |||
Software apps and online services | ||||||
 |
| |||||
Hand tools and fabrication machines | ||||||
 |
| |||||
 |
| |||||
 |
| |||||
 |
| |||||
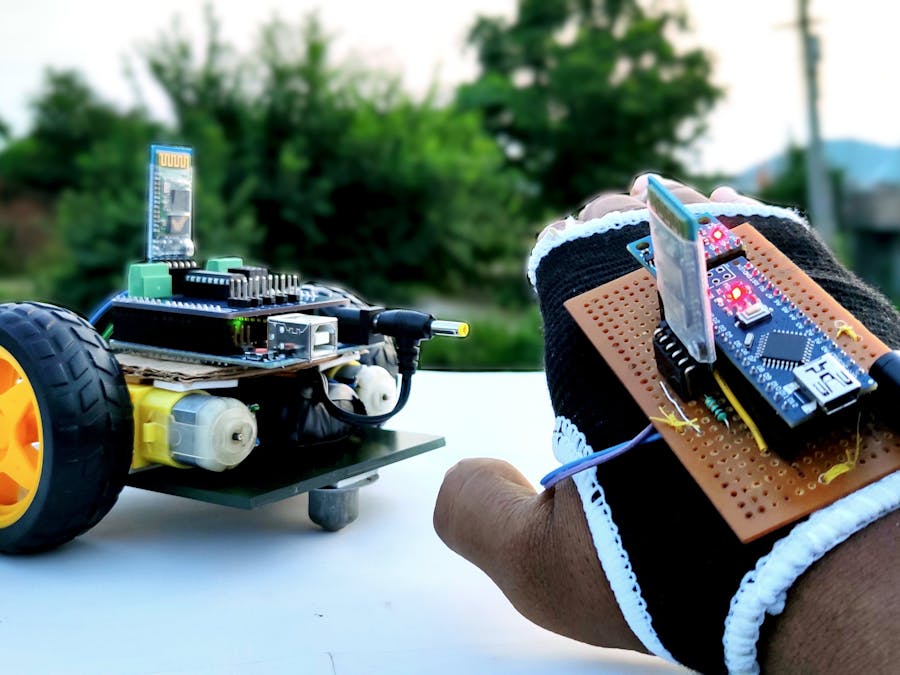
This is about how to make a gesture-controlled car by yourself. Basically this is a simple application of MPU-6050 3-axis Gyroscope, Accelerometer. You can do many more things. by understanding how to use it, how to interface it with Arduino and how to transfer its data over the Bluetooth modules. in this writeup, I will be focusing on Bluetooth to Bluetooth communication, in between two HC-05 Bluetooth modules.
Follow the video to build a robot body and connections for this project.
connection diagram for robot and transmitter unit are given below, you can refer them.
Direct order PCB used in this project from PCBway: https://www.pcbway.com/project/shareproject/How_to_Make_Arduino_Based_Edge_Avoiding_Robot.html
Now let's talk about Bluetooth module configuration. basically, HC-05 Bluetooth module comes with a slave module factory setting. that means we can send data to module jus by plug it in. no need to do any other setting to send data from mobile devices to the HC-05 module. just enter its default password (1234/0000)to connect it with. but what if we want to send data using this module to some other same module or to a mobile device.
in this project, we doing the same thing sending data through the Bluetooth module. collected by the mpu-6050 gyro sensor to the another Bluetooth module.
so to do this First we need to configure these two Bluetooth modules. so that they can get automatically bind with each other after power on. Here the first module is acting as a slave device, which will receive signals from the remote unit and will be mount on the car. And configure the second one as a master device which will act as transmitter units and will send data to the slave device,
So first configure the first bluetooth module as slave device. to do this connect it with Arduino as per this wiring diagram.
And upload the code by name configure.
#include <SoftwareSerial.h>
SoftwareSerial BTSerial(10, 11); // RX | TX
void setup()
{
Serial.begin(9600);
Serial.println("Enter AT commands:");
BTSerial.begin(38400); // HC-05 default speed in AT command more
}
void loop()
{
// Keep reading from HC-05 and send to Arduino Serial Monitor
if (BTSerial.available())
Serial.write(BTSerial.read());
// Keep reading from Arduino Serial Monitor and send to HC-05
if (Serial.available())
BTSerial.write(Serial.read());
}
Disconnect module. Press and hold the ky on the module and connect it back. You will see the led on module is blinking slower. Once every 2 seconds. This means HC-05 is in the AT command mode. Now open serial monitor change the baud rate to 9600 and output type as both NL & CR. Now type AT in send box and send it. if it replies with ok, it means all Is well. But if it not, and replies with some error, Send AT again. Until it replies with ok or chek connections and send AT again …
after getting OK responce from module enter the following commands one by one,
AT+ORGL and send it. this command will set the module in the factory setting.
AT+RMAAD this command will release module from any previous pairing
AT+UART? check the current baud rate of the module
AT+UART=38400, 0, 0 set the baud rate as 38400
AT+ROLE? check the role whether it is slave or master. it replies with 0 or 1. if the module is slave it replies 0 and if it is master device then it will reply with 1
set role as a slave device. enter AT+ROLE=0
AT+ADDR? check the module address.
Note down this address. replied by module. after getting this address, configuration for the slave module is done.
Now its time to configure the second Bluetooth module as master device. Connect this module with the Arduino board and enter it into the AT mode. as we did with the previous one.
Enter these AT commands by given sequence.
AT+ORGL
AT+RMAAD
AT+UART?
AT+UART=38400, 0, 0
AT+ROLE?
set the role of this module as the master device. AT+ROLE=1
AT+CMODE=0 so that the module will connect only single device. default setting is 0
now bind this module with slave device to do this enter,
AT+BIND=" the address of the slave module" and all done
now install libraries for MPU-6050 sensor an I2C communication. Since MPU-6050 gyro sensor has I2C interface. download libraries and Source code from here: http://www.mediafire.com/file/l8mru5emulb8x93/gesture_control_robot.rar/file
if you have preinstalled these libraries, skip this.
Now connect the car unit with pc using a USB cable. select correct com port and board type. And upload theprogram by name "Gesture_controled_Robot__car_unit_". Make sure the battery and Bluetooth module is not connected with the car while uploading the program.
//program by Shubham Shinganapure on 3-10-2019
//
//for Gesture controled Robotic Car
int lm1=8; //left motor output 1
int lm2=9; //left motor output 2
int rm1=10;  //right motor output 1
int rm2=11;  //right motor output 2
char d=0;
void setup()
{
pinMode(lm1,OUTPUT);
pinMode(lm2,OUTPUT);
pinMode(rm1,OUTPUT);
pinMode(rm2,OUTPUT);
Serial.begin(38400);
sTOP();
}
void loop()
{
if(Serial.available()>0)
{
d=Serial.read();
if(d=='F')
{
ForWard();
}
if(d=='B')
{
BackWard();
}
if(d=='L')
{
Left();
}
if(d=='R')
{
Right();
}
if(d=='S')
{
sTOP();
}
}
}
void ForWard()
{
digitalWrite(lm1,HIGH);
digitalWrite(lm2,LOW);
digitalWrite(rm1,HIGH);
digitalWrite(rm2,LOW);
}
void BackWard()
{
digitalWrite(lm1,LOW);
digitalWrite(lm2,HIGH);
digitalWrite(rm1,LOW);
digitalWrite(rm2,HIGH);
}
void Left()
{
digitalWrite(lm1,LOW);
digitalWrite(lm2,HIGH);
digitalWrite(rm1,HIGH);
digitalWrite(rm2,LOW);
}
void Right()
{
digitalWrite(lm1,HIGH);
digitalWrite(lm2,LOW);
digitalWrite(rm1,LOW);
digitalWrite(rm2,HIGH);
}
void sTOP()
{
digitalWrite(lm1,LOW);
digitalWrite(lm2,LOW);
digitalWrite(rm1,LOW);
digitalWrite(rm2,LOW);
}
Do the same with the remote unit. open program by name remote. and upload it to the remote unit.
//program modified on 3/10/19 by // by Shubham Shinganapure.
//
//for Gesture controled Robotic Car (remote  )
#include "I2Cdev.h"
#include "MPU6050_6Axis_MotionApps20.h"
//#include "MPU6050.h" // not necessary if using MotionApps include file
// Arduino Wire library is required if I2Cdev I2CDEV_ARDUINO_WIRE implementation
// is used in I2Cdev.h
#if I2CDEV_IMPLEMENTATION == I2CDEV_ARDUINO_WIRE
#include "Wire.h"
#endif
// class default I2C address is 0x68
// specific I2C addresses may be passed as a parameter here
// AD0 low = 0x68 (default for SparkFun breakout and InvenSense evaluation board)
// AD0 high = 0x69
MPU6050 mpu;
#define OUTPUT_READABLE_YAWPITCHROLL
// MPU control/status vars
bool dmpReady = false;  // set true if DMP init was successful
uint8_t mpuIntStatus;   // holds actual interrupt status byte from MPU
uint8_t devStatus;      // return status after each device operation (0 = success, !0 = error)
uint16_t packetSize;    // expected DMP packet size (default is 42 bytes)
uint16_t fifoCount;     // count of all bytes currently in FIFO
uint8_t fifoBuffer[64]; // FIFO storage buffer
VectorFloat gravity;
Quaternion q;
float ypr[3];           // [yaw, pitch, roll]   yaw/pitch/roll container and gravity vector
uint8_t teapotPacket[14] = { '$', 0x02, 0,0, 0,0, 0,0, 0,0, 0x00, 0x00, '\r', '\n' };
volatile bool mpuInterrupt = false;     // indicates whether MPU interrupt pin has gone high
void dmpDataReady() {
mpuInterrupt = true;
}
#include <SoftwareSerial.h>
SoftwareSerial BTSerial(10, 11); // RX | TX
int bt=8;
int x =1;
void setup() {
#if I2CDEV_IMPLEMENTATION == I2CDEV_ARDUINO_WIRE
Wire.begin();
TWBR = 24; // 400kHz I2C clock (200kHz if CPU is 8MHz)
#elif I2CDEV_IMPLEMENTATION == I2CDEV_BUILTIN_FASTWIRE
Fastwire::setup(400, true);
#endif
// initialize serial communication
// (115200 chosen because it is required for Teapot Demo output, but it's
// really up to you depending on your project)
Serial.begin(115200);
BTSerial.begin(38400);
// while (!Serial); // wait for Leonardo enumeration, others continue immediately
Serial.println(F("Initializing I2C devices..."));
mpu.initialize();
// verify connection
Serial.println(F("Testing device connections..."));
Serial.println(mpu.testConnection() ? F("MPU6050 connection successful") : F("MPU6050 connection failed"));
// wait for ready
// load and configure the DMP
Serial.println(F("Initializing DMP..."));
devStatus = mpu.dmpInitialize();
// supply your own gyro offsets here, scaled for min sensitivity
mpu.setXGyroOffset(220);
mpu.setYGyroOffset(76);
mpu.setZGyroOffset(-85);
mpu.setZAccelOffset(1788);
// make sure it worked (returns 0 if so)
if (devStatus == 0) {
// turn on the DMP, now that it's ready
Serial.println(F("Enabling DMP..."));
mpu.setDMPEnabled(true);
// enable Arduino interrupt detection
Serial.println(F("Enabling interrupt detection (Arduino external interrupt 0)..."));
attachInterrupt(0, dmpDataReady, RISING);
mpuIntStatus = mpu.getIntStatus();
// set our DMP Ready flag so the main loop() function knows it's okay to use it
Serial.println(F("DMP ready! Waiting for first interrupt..."));
dmpReady = true;
// get expected DMP packet size for later comparison
packetSize = mpu.dmpGetFIFOPacketSize();
} else {
// ERROR!
// 1 = initial memory load failed
// 2 = DMP configuration updates failed
// (if it's going to break, usually the code will be 1)
Serial.print(F("DMP Initialization failed (code "));
Serial.print(devStatus);
Serial.println(F(")"));
}
// configure LED for output
pinMode(bt,INPUT);
}
// ================================================================
// ===                    MAIN PROGRAM LOOP                     ===
// ================================================================
void loop() {
if(digitalRead(bt)==HIGH)
{
x++;
delay(150);
}
if((x%2)==0){
// if programming failed, don't try to do anything
if (!dmpReady) return;
// wait for MPU interrupt or extra packet(s) available
while (!mpuInterrupt && fifoCount < packetSize) {
// other program behavior stuff here
// .
// .
// .
// if you are really paranoid you can frequently test in between other
// stuff to see if mpuInterrupt is true, and if so, "break;" from the
// while() loop to immediately process the MPU data
// .
// .
// .
}
// reset interrupt flag and get INT_STATUS byte
mpuInterrupt = false;
mpuIntStatus = mpu.getIntStatus();
// get current FIFO count
fifoCount = mpu.getFIFOCount();
// check for overflow (this should never happen unless our code is too inefficient)
if ((mpuIntStatus & 0x10) || fifoCount == 1024) {
// reset so we can continue cleanly
mpu.resetFIFO();
Serial.println(F("FIFO overflow!"));
// otherwise, check for DMP data ready interrupt (this should happen frequently)
} else if (mpuIntStatus & 0x02) {
// wait for correct available data length, should be a VERY short wait
while (fifoCount < packetSize) fifoCount = mpu.getFIFOCount();
// read a packet from FIFO
mpu.getFIFOBytes(fifoBuffer, packetSize);
// track FIFO count here in case there is > 1 packet available
// (this lets us immediately read more without waiting for an interrupt)
fifoCount -= packetSize;
#ifdef OUTPUT_READABLE_YAWPITCHROLL
// display Euler angles in degrees
mpu.dmpGetQuaternion(&q, fifoBuffer);
mpu.dmpGetGravity(&gravity, &q);
mpu.dmpGetYawPitchRoll(ypr, &q, &gravity);
Serial.print("ypr\t");
Serial.print(ypr[0] * 180/M_PI);
Serial.print("\t");
Serial.print(ypr[1] * 180/M_PI);
Serial.print("\t");
Serial.println(ypr[2] * 180/M_PI);
if((ypr[1] * 180/M_PI)<= -25)
{BTSerial.write('F');
}
else if((ypr[1] * 180/M_PI)>= 25)
{BTSerial.write('B');
}
else if((ypr[2] * 180/M_PI)<= -25)
{BTSerial.write('L');
}
else if((ypr[2] * 180/M_PI)>= 20)
{BTSerial.write('R');
}
else{
BTSerial.write('S');
}
#endif
}
}
else{
BTSerial.write('S');
}
}
Insert the slave Bluetooth module on the car unit and master the Bluetooth module on the remote unit. And all done.
Let's power it on and it is ready to play…….
Hope you find this useful. if yes, like it, share it, comment your doubt. For more such projects, follow me! Support my Work and Subscribe to My Channel on YouTube.
Thank you!


_3u05Tpwasz.png?auto=compress%2Cformat&w=40&h=40&fit=fillmax&bg=fff&dpr=2)


Comments