


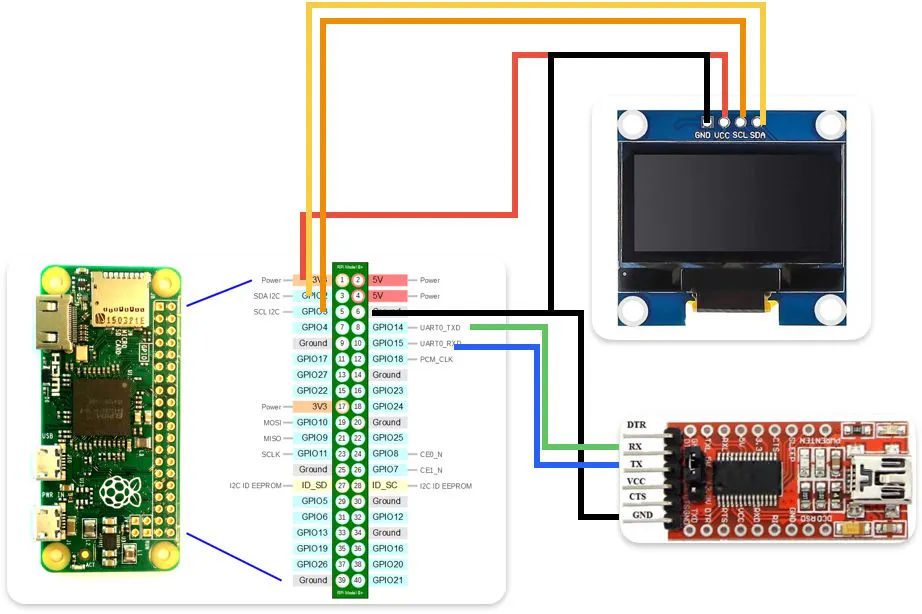
Hardware components | ||||||
 |
| × | 1 | |||
 |
| × | 1 | |||
 |
| × | 1 | |||
Software apps and online services | ||||||
 |
| |||||
Many of the modern devices that I've came across usually consisted of a custom OS, running within it. I began realizing it when I got to know that my WiFi router had its own OS when I was trying to configure it.
The goal of this project was to develop a custom embedded Linux distribution for the Raspberry Pi Zero W using Buildroot. The system was designed to include only the essential components required for the application, such as Wi-Fi connectivity, SSH and SCP access, I2C support, and Python. An SSD1306 OLED display was integrated to provide a menu-driven dashboard capable of displaying system information and network status.
By carefully selecting the required packages and optimizing the boot process, the final system achieved a memory footprint of approximately 25 MB RAM after boot and reached the application startup stage in approximately 6.77 seconds. This project demonstrates how Buildroot can be used to create a lightweight, efficient, and customizable Linux platform for embedded applications.
BuildrootBuildroot is an open-source build automation framework that simplifies the development of custom embedded Linux systems. It provides an easy and efficient way to generate a complete Linux image for a target device by automating the process of downloading, configuring, compiling, and integrating all required software components.
For this project, Buildroot was used to create a custom Linux distribution for the Raspberry Pi Zero W. The Buildroot environment was configured and built on a Raspberry Pi 5 equipped with 8 GB of RAM and 64 GB of storage, which served as the host development platform. Using Buildroot, a customized Linux image was generated containing only the components required for the application, including Python support, Wi-Fi connectivity, SSH access, SCP for file transfer, OLED display support, and a custom menu-driven dashboard application. The resulting image provided a lightweight embedded Linux environment optimized for fast startup and low resource consumption while maintaining all the functionality required by the project.
Follow the steps to create a Buildroot configuration on the Raspberry Pi 5:
1. Obtain Buildroot
$git clone https://github.com/buildroot/buildroot.git
$cd buildroot
2. Load Raspberry Pi Zero W config:This sets the Correct CPU (ARM1176), Kernel config and Bootloader settings
$make raspberrypi0w_defconfig3. Customize the configuration
$make menuconfigPython Support:Packages installed are:
- python3-pip
- python3-pillow
- python3-setuptools
Python 3 was enabled to support boot_manager.py, OLED display application, Wi-Fi initialization scripts and Menu-driven interface. Additional Packages are installed using pip(explained below).
OpenSSHSSH server support was enabled to allow:
- Remote login
- Menu control through SSH
- Remote debugging and monitoring
Wireless NetworkingWi-Fi support was configured through:
wpa_supplicant- Wireless firmware packages
This enabled the Raspberry Pi Zero W to connect to wireless networks automatically at boot.
OLED Display LibrariesPython packages required for the SSD1306 OLED display were included, allowing:
- Boot status messages
- IP address display
- Menu rendering
I2C SupportI2C support was enabled for communication with the SSD1306 OLED display.Key components enabled:
- I2C subsystem
- BCM2835 I2C controller driver
This allowed the OLED display to be accessed through /dev/i2c-*.
Wireless LAN SupportKernel support for the Raspberry Pi Zero W wireless chipset was enabled.Relevant drivers:
cfg80211brcmutilbrcmfmac
Initially these were built as kernel modules and loaded during boot by the boot manager.
Device Tree SupportDevice Tree support was enabled to allow:
- Raspberry Pi hardware detection
- Peripheral configuration
- Overlay support
This was necessary for proper initialization of Wi-Fi, I2C and GPIO peripherals
Raspberry Pi FirmwareLinux firmware support was included to provide:
- Broadcom Wi-Fi firmware
- Required firmware blobs for the Pi Zero W wireless chipset
Without these firmware files, the brcmfmac driver could not initialize the wireless interface.
Follow the sequence of commands for configuration.
1. Setup buildroot configuration
#make menuconfig2. Save the config
#make3. Configure Linux kernel Configuration
#make linux-menuconfig4. Build
#make -j4The build time on the raspberry pi 5 took almost 2-3 hours. Once the build is complete, the image is available in output/images/sdcard.img
Follow the steps below to flash the image on the SD card on a Mac OS. I have copied the image(using scp) from my pi 5 to my Mac.
1. Identify the SD Card Device
The storage devices connected to the system were listed using:
#diskutil listThis command was used to identify the device node corresponding to the microSD card. Assuming /dev/disk2 in this case.
2. Unmount the SD Card
Before writing the image, the SD card was unmounted to prevent filesystem corruption:
#diskutil unmountDisk /dev/disk23. Write the Buildroot Image
The generated Buildroot image was flashed to the SD card using the dd utility:
#sudo dd if=sdcard.img of=/dev/rdisk2 bs=1mwhere:
if=sdcard.imgspecifies the input image file.of=/dev/rdisk2specifies the raw SD card device.bs=1muses a 1 MB block size to improve write performance.
The raw device (rdisk2) was used instead of the buffered device (disk2) to achieve faster transfer speeds.
4. Synchronize Pending Writes
After the image was written, all buffered data was flushed to the SD card using:
#syncThis ensured that the image was completely written before removing the card.
5. Safely Eject the SD Card
The SD card was safely ejected using:
#diskutil eject /dev/disk2Since the custom Buildroot image is a minimal Linux system without a GUI, the Raspberry Pi Zero W cannot be interacted with through a monitor and desktop environment. Instead, the primary method of accessing the system during development and debugging is through the serial console.
The Raspberry Pi Zero W provides a UART (Universal Asynchronous Receiver-Transmitter) interface that allows direct communication with the operating system during the boot process. This interface is particularly useful for viewing kernel messages, monitoring boot progress, and accessing the command-line shell.
The root filesystem does not currently show a mounted /boot partition. The /boot partition is a small FAT32 partition that contains everything needed to start the system before the Linux kernel takes over. For this use case, I will need to modify config.txt to enable I2C peripheral(explained below).
Verify the partition
#ls /dev/mmcblk*Usually, p1 is the FAT boot partition and p2 is the Linux root filesystem.
Mount the boot partition(p2) manually using the following:
#mkdir /boot
#mount -t vfat /dev/mmcblk0p1 /boot
Then check the boot directory,
The wifi stack of the pi zero w i.e. brcmfmac is available as a linux kernel module. Hence, it has to be loaded manually to access the wifi.
#modprobe brcmfmacUpon verification, wlan0 should pop up to indicate that the WiFi driver is successfully initialized and Linux detected the onboard Wi-Fi chip.
Next, wlan0 should be set to active to enable the WiFi. By default, its state is DOWN.
#ip link set wlan0 upOnce the WiFi is up, it is available to scan and connect to a new connection. I have manually configured my WiFi setup by creating a wpa_supplicant configuration file. Create a file wpa_supplicant.conf in the directory /etc/. The file must contain the following:
network={
ssid="<SSID"
psk="<PASSWORD>"
}
Connect it using the following:
#wpa_supplicant -B -i wlan0 -c /etc/wpa_supplicant.confCheck the status using the following:
#iw dev wlan0 linkNote that this does not enable access to the internet as its IP is not assigned. To obtain its IP address, enable DHCP to set an IP address:
#udhcpc -vv -f -i wlan0Test the internet using a simple ping command(for e.g. ping 8.8.8.8).
A minimal Buildroot Linux image does not include many of the background services commonly found in desktop Linux distributions. As a result, the system does not automatically synchronize its clock with Internet time servers after connecting to a network.
When the Raspberry Pi Zero W boots for the first time, the system clock is typically initialized to a default date and time. Since the board does not contain a Real-Time Clock (RTC) module with battery backup, it cannot retain the correct time when power is removed. Consequently, the date and time must be set manually before performing tasks that depend on accurate timestamps, such as logging, file management, or secure network communication.
The current date and time can be configured using the following command:
#date -u -s "YYYY-MM-DD HH:MM:SS"Automating Time Synchronization
Once wireless networking is configured and the Raspberry Pi successfully connects to the Internet, the process of setting the date and time can be automated. A Python script can be executed during boot to contact a Network Time Protocol (NTP) server and retrieve the current time.
In this project, time synchronization was integrated into the custom boot manager. After establishing a Wi-Fi connection and obtaining an IP address, the script communicates with an NTP server and updates the system clock automatically.
Setting up I2C driverThe standard buildroot configuration did not initially load any I2C kernel driver. Upon checking the device tree(ls /proc/device-tree/soc/), the i2c sockets initially disabled.
To enable I2C peripheral, first enable enable I2C in Raspberry Pi firmware config. Add the following on config.txt in /boot/.
dtparam=i2c_arm=onIt tells the Raspberry Pi firmware to turn on the dedicated I2C pins as well as configures the Device Tree to recognize I2C peripherals.
After performing the file modification, perform a reboot and verify the I2C peripheral connected.
The custom boot script serves as the primary startup application for the Buildroot-based Linux system and is executed automatically during boot through the S99boot_manager init script. Its purpose is to initialize the embedded platform and prepare the system for operation. During startup, the script first initializes the SSD1306 OLED display and presents boot status messages to provide visual feedback to the user. It then loads the required Wi-Fi kernel modules: cfg80211, brcmutil, and brcmfmac, starts wpa_supplicant to connect to the configured wireless network, and obtains an IP address using DHCP. Once network connectivity is established, the script synchronizes the system time with an NTP server to ensure accurate date and time information. Throughout this process, the OLED display is updated with connection status and network information, including the assigned IP address.
Perform the following to run the boot script:1. Create an init script: /etc/init.d/S99bootmanager The boot script must contain the python boot script :
#!/bin/sh

case "$1" in
    start)
        python3 /root/boot_manager.py &
        ;;
esac

exit 0
2. Make an executable of the boot script
#chmod +x /etc/init.d/S99bootmanagerThis enables Busybox to automatically execute it upon next boot.
Reduce Boot TimeDuring initial testing of the Buildroot-based Linux system, the boot process experienced a delay at the networking initialization stage, displaying the message:
Starting network: Waiting for interface wlan0 to appear.....The delay occurred because the Buildroot networking service (S40network) was configured to automatically bring up the wlan0 interface during boot through the /etc/network/interfaces file. However, the Wi-Fi driver (brcmfmac) and associated networking components were loaded later by the custom boot_manager.py script(since these are available as modules and not kernel drivers). As a result, the network service waited for the wlan0 interface to become available, increasing the overall boot time.
The following configuration in /etc/network/interfaces caused the system to wait for the wireless interface:
auto wlan0
iface wlan0 inet dhcp
  wait-delay 15
Since Wi-Fi initialization and network configuration were already being handled by the custom boot_manager.py script, the automatic network configuration was redundant. By commenting out these lines, the boot process no longer waited for wlan0 during system startup.
As a result, the delay was eliminated, reducing the overall boot time and allowing the boot manager application to start immediately after the required system initialization steps were completed.
When running a minimal Buildroot-based Linux distribution on a Raspberry Pi Zero W, I expected most of the board's 512 MB RAM to be available to Linux. However, initial testing showed that only about 364 MB of memory was visible to the operating system. This prompted an investigation into how the Raspberry Pi firmware allocates memory and how the GPU memory split affects the available system RAM.
After booting a freshly built Buildroot image, the system reported:
# free -m
              total        used        free
Mem:            364          32         307
The kernel boot log showed:
# dmesg | grep Memory
Memory: 305120K/393216K available
This indicated that Linux was receiving only:
393216 KB = 384 MBof physical memory from the firmware.
Since the Raspberry Pi Zero W contains 512 MB RAM, approximately 128 MB appeared to be missing before Linux even started. Since the Raspberry Pi shares system RAM between the ARM CPU and VideoCore GPU, my goal is to allocate less memory to GPU as I am not using a desktop linux version, nor I have a camera related application.
Solution
The Buildroot-generated config.txt initially contained: gpu_mem_512=100 MB. Upon changing it to 16 MB, Linux still saw only about 384 MB of RAM.
To verify whether the firmware was honoring GPU memory settings, several values were tested.
gpu_mem=256
Result:
Mem: 238 MBThis confirmed that the firmware was reading and applying the configuration.
gpu_mem=64
Result:
Mem: 428 MBgpu_mem=32
Result:
Mem: 459 MBgpu_mem=16
Result:
Mem: 364 MBUnexpectedly, reducing GPU memory below 32 MB caused available RAM to drop dramatically. This suggests that the firmware enforces a minimum supported GPU allocation and falls back to a different memory split when an unsupported value is used.
By experimenting with the gpu_mem setting, it was possible to increase Linux-visible memory to approximately 459 MB. This reclaimed nearly 100 MB of RAM while maintaining stable system operation.
For this project, I will be comparing the buildroot minimal linux build with standard 32-bit Raspberry Pi OS Lite as it is not a desktop version. I will be comparing its boot time, memory usage, average CPU load. I have the Raspberry pi OS Lite on a 32-GB SanDisk Ultra Class-10 SD card(faster) and the buildroot version on a 16 GB Class-4 SD card.
The objective of this experiment was to compare the boot performance of a custom Buildroot-based Linux distribution against Raspberry Pi OS Lite running on a Raspberry Pi Zero W.
Two metrics were evaluated:
- Kernel Boot Time
- Boot Manager Start Time
Kernel Boot Time represents the duration required for the Linux kernel to initialize and start the init process. Boot Manager Start Time represents the elapsed time from power-on until the user application (boot_manager.py) begins execution.
In Buildroot linux, the boot manager was configured as a SysV init script:
/etc/init.d/S99boot_managerand the kernel boot time was obtained using:
dmesg | grep "Run /sbin/init"Boot manager start time was measured using:
with open("/proc/uptime") as f:
    print("Boot time at script start:", f.read().split()[0])
On the Raspberry Pi OS Lite, the boot manager was configured as a systemd service:
/etc/systemd/system/boot_manager.serviceKernel boot time was obtained using:
systemd-analyze timeBoot manager start time was measured using the same Python script.
Results
- Buildroot Linux Kernel Boot time: 4.60 seconds
- Raspberry Pi OS Lite Boot time: 11.967 seconds
- Buildroot Linux Boot Manager Start Time: 6.77 seconds
- Raspberry Pi OS Lite Boot Manager Start Time: 113.07 seconds
The Buildroot image demonstrated significantly faster startup performance due to its minimal architecture. Buildroot includes only the packages and services required by the application, resulting in a reduced initialization workload.
The Raspberry Pi OS Lite image includes numerous additional services such as:
- systemd
- NetworkManager
- cloud-init
- D-Bus services
- Hostname and network configuration services
Analysis using systemd-analyze indicated:
Startup finished in 11.967s (kernel) + 1min 45.294s (userspace)and
multi-user.target reached after 1min 41.682sindicating that most of the delay originates from userspace service initialization rather than kernel startup.
The Buildroot system reached application execution approximately 2.17 seconds after kernel initialization, whereas Raspberry Pi OS Lite required more than 100 seconds before the application started. In conclusion, Buildroot achieves faster startup because it contains only the services required for the application, while Raspberry Pi OS Lite initializes a larger userspace environment including systemd, NetworkManager, and cloud-init.
2. RAM UsageMemory utilization was evaluated after the systems completed booting and established network connectivity.
Metric
The Buildroot-based system consumed only 25 MB of RAM after boot, whereas Raspberry Pi OS Lite consumed 107 MB. This represents a reduction of approximately 76.6% in memory usage.
Additionally, Buildroot left 426 MB of memory available for application execution compared to 319 MB on Raspberry Pi OS Lite.
The reduced memory footprint is primarily due to the minimal Buildroot configuration, which excludes services such as NetworkManager, cloud-init, D-Bus, and other userspace components commonly present in Raspberry Pi OS Lite.
The results demonstrate that Buildroot provides a significantly lighter runtime environment and is better suited for resource-constrained embedded systems requiring low memory consumption.
3. CPU Load comparisonSystem load was evaluated using the Linux uptime command after booting both operating systems and allowing them to remain idle.
On the Pi OS lite:
shubham@shubham:~$ uptime
10:56:00 up 3 min, 1 user, load average: 0.77, 1.25, 0.60
shubham@shubham:~$ uptime
11:02:33 up 10 min, 1 user, load average: 0.03, 0.36, 0.40
On the Buildroot OS:
# uptime
16:07:30 up 1 min, load average: 0.22, 0.09, 0.03
# uptime
16:08:34 up 2 min, load average: 0.33, 0.15, 0.05
# uptime
16:11:33 up 5 min, load average: 0.28, 0.18, 0.08
# uptime
16:16:41 up 10 min, load average: 0.09, 0.14, 0.08
During the initial few minutes after boot, Raspberry Pi OS Lite exhibited a higher system load due to the execution of additional background services such as NetworkManager, Bluetooth, and systemd-related processes. In contrast, the Buildroot image ran only the services required for the application, resulting in lower overall system activity.
After approximately 10 minutes, both systems reached a largely idle state. However, the 5-minute and 15-minute load averages remained lower on Buildroot, indicating reduced background processing and a lighter runtime environment. These results demonstrate that the custom Buildroot image maintains a lower system overhead while providing the required functionality for the embedded application.
4. Root filesystem size comparisonOn the Pi OS lite:
shubham@shubham:~$ df -h /
Filesystem Size Used Avail Use% Mounted on
/dev/mmcblk0p2  29G 2.3G  26G  9% /
On the Buildroot linux:
# df -h /
Filesystem Size Used Available Use% Mounted on
/dev/root  107.0M  77.3M  21.2M 78% /
The Buildroot image occupies only a fraction of the storage required by Raspberry Pi OS Lite because it contains only the packages required by the application.
5. Running ServicesOn the Pi OS Lite:
shubham@shubham:~$ systemctl list-units --type=service --state=running
UNIT  LOAD  ACTIVE SUB  DESCRIPTION
avahi-daemon.service  loaded active running Avahi mDNS/DNS-SD Stack
bluetooth.service loaded active running Bluetooth service
cron.service  loaded active running Regular background program processing daemon
dbus.service  loaded active running D-Bus System Message Bus
getty@tty1.service  loaded active running Getty on tty1
NetworkManager.service  loaded active running Network Manager
serial-getty@ttyS0.service loaded active running Serial Getty on ttyS0
ssh.service loaded active running OpenBSD Secure Shell server
systemd-journald.service  loaded active running Journal Service
systemd-logind.service  loaded active running User Login Management
systemd-timesyncd.service loaded active running Network Time Synchronization
systemd-udevd.service loaded active running Rule-based Manager for Device Events and Files
user@1000.service loaded active running User Manager for UID 1000
wpa_supplicant.service  loaded active running WPA supplicant
Legend: LOAD  → Reflects whether the unit definition was properly loaded.
ACTIVE → The high-level unit activation state, i.e. generalization of SUB.
SUB → The low-level unit activation state, values depend on unit type.
14 loaded units listed.
On the Buildroot linux:
# ls /etc/init.d
S01seedrng S02sysctl  S50crond rcK
S01syslogd S11modules S50dropbear  rcS
S02klogd S40network S99bootmanager
Buildroot boots with a significantly smaller service set, reducing memory usage and startup time.
Application: Custom DashboardTo provide an interactive user interface for the custom Buildroot Linux system, a menu-driven dashboard application was developed and displayed on the OLED display connected to the Raspberry Pi Zero W via the I2C interface. Since the Buildroot image is designed as a lightweight embedded Linux system without a graphical desktop environment, the OLED-based dashboard provides a simple and efficient way for users to interact with the device.
Features
The dashboard presents a hierarchical menu structure that allows users to navigate between various system functions and utilities. Menu navigation is controlled remotely through an SSH terminal session, enabling interaction without requiring a dedicated keyboard, mouse, or display.
The application integrates several useful features, including:
System Information
- Display of the device IP address
- Current date and time
- Network status information
Weather Information
- Retrieval and display of current weather conditions
- Weather icons rendered on the OLED display
- Temperature and environmental information
Wi-Fi Connectivity
- Display of network connection status
- Verification of successful wireless connectivity
Interactive Menu Navigation
- Scrollable menu interface
- Selection of menu options using keyboard input through SSH
- Dynamic screen updates on the OLED display
This project successfully demonstrated the development of a custom embedded Linux distribution for the Raspberry Pi Zero W using Buildroot. The primary objective was to create a lightweight Linux system capable of supporting essential embedded functionalities such as Wi-Fi connectivity, SSH and SCP access, I2C communication, Python applications, and an OLED-based user interface while maintaining a small memory footprint and fast boot time.


Comments