DemoPart 1To enable a NodeMCU to control any device through Alexa, a fauxmo server has to hosted. This fauxmo server simulates the NodeMCU to act like a Wemo switch (not to be confused with Wemos).
If you are using the NodeMCUs or any ESP devices for the first time, paste the following link in the preferences as shown below: http://arduino.esp8266.com/stable/package_esp8266com_index.json
Next, ESP boards must be installed. This can be done from the board manager as shown below:
Part 2Next, the required libraries must be added to the Arduino IDE. The libraries can be downloaded from the following links:
Once, the libraries are installed, you can make desired changes to the program attached and then upload it on to the board. After the program is uploaded, reset the NodeMCU once first and then discover smart home devices using the Alexa App or through voice commands.
/**********************************************************************************
  Code for controlling RGB Strip using Amazon Echo and NodeMCU
  Written by Sid for Sid's E Classroom
  https://www.youtube.com/c/SidsEClassroom
*********************************************************************************/
#include <Arduino.h>
#include <ESP8266WiFi.h>
#include "fauxmoESP.h"
#include <Adafruit_NeoPixel.h>
#define WIFI_SSID "abcd"//Set your Wifi name
#define WIFI_PASS "efgh"//Set your Wifi Password
#define SERIAL_BAUDRATE                 115200
fauxmoESP fauxmo;
//declare switching pins
#define RGBCTL D1 //Change pins according to your NodeMCU/ESP pinouts
int numPixels = 12;
int i;
//-----------------------------------------------------------------------------------------------
//Pixel initialization for Google's Colours
//Divide the total number of pixels in the stip by 4 and set pixel increments starting from zero
//If num of Pixels is not perfectly divisible by 4, consider the nearest multiple of 4
//eg: 28 in case of 29,30 and 31 pixels, 32 in case of 33,34 and 35 pixels.
//-----------------------------------------------------------------------------------------------
int start1 = 0;
int start2 = 3;
int start3 = 6;
int start4 = 9;
// Parameter 1 = number of pixels in strip
// Parameter 2 = Arduino pin number (most are valid)
// Parameter 3 = pixel type flags, add together as needed:
//   NEO_KHZ800  800 KHz bitstream (most NeoPixel products w/WS2812 LEDs)
//   NEO_KHZ400  400 KHz (classic 'v1' (not v2) FLORA pixels, WS2811 drivers)
//   NEO_GRB     Pixels are wired for GRB bitstream (most NeoPixel products)
//   NEO_RGB     Pixels are wired for RGB bitstream (v1 FLORA pixels, not v2)
//   NEO_RGBW    Pixels are wired for RGBW bitstream (NeoPixel RGBW products)
Adafruit_NeoPixel strip = Adafruit_NeoPixel(numPixels, RGBCTL, NEO_GRB + NEO_KHZ800);
// -----------------------------------------------------------------------------
// Wifi Setup
// -----------------------------------------------------------------------------
void wifiSetup() {
 // Set WIFI module to STA mode
 WiFi.mode(WIFI_STA);
 // Connect
 Serial.printf("[WIFI] Connecting to %s ", WIFI_SSID);
 WiFi.begin(WIFI_SSID, WIFI_PASS);
 // Wait
 while (WiFi.status() != WL_CONNECTED) {
   Serial.print(".");
   delay(100);
 }
 Serial.println();
 // Connected!
 Serial.printf("[WIFI] STATION Mode, SSID: %s, IP address: %s\n", WiFi.SSID().c_str(), WiFi.localIP().toString().c_str());
}
// -----------------------------------------------------------------------------
// Device callback and printing response in serial monitor
// -----------------------------------------------------------------------------
void callback(uint8_t device_id, const char * device_name, bool state) {
 Serial.print("Device "); Serial.print(device_name);
 Serial.print(" state: ");
 if (state) {
   Serial.println("ON");
 } else {
   Serial.println("OFF");
 }
 //------------------------------------------------------------------------------
 //Switching action on detection of device name
 //------------------------------------------------------------------------------
 //Turns strip RED
 if ( (strcmp(device_name, "RED LIGHTS") == 0) ) {
   if (state) {
     i = 1;
   }
   else {
     allOff();
     i = 0;
   }
 }
 //Turns strip GREEN
 if ( (strcmp(device_name, "GREEN LIGHTS") == 0) ) {
   if (state) {
     i = 2;
   }
   else {
     allOff();
     i = 0;
   }
 }
 //Turns strip BLUE
 if ( (strcmp(device_name, "BLUE LIGHTS") == 0) ) {
   if (state) {
     i = 3;
   }
   else {
     allOff();
     i = 0;
   }
 }
 //RAINBOW pattern on the strip
 if ( (strcmp(device_name, "RAINBOW LIGHTS") == 0) ) {
   if (state) {
     i = 8;
   }
   else {
     allOff();
     i = 0;
   }
 }
 //Turns strip WHITE
 if ( (strcmp(device_name, "LIGHTS") == 0) ) {
   if (state) {
     i = 4;
   }
   else {
     allOff();
     i = 0;
   }
 }
 //Turns strip into Google's colours
 if ( (strcmp(device_name, "GOOGLE LIGHTS") == 0) ) {
   if (state) {
     i = 9;
   }
   else {
     allOff();
     i = 0;
   }
 }
}
void setup() {
 //Initialize pins to Low on device start
 pinMode(RGBCTL, OUTPUT);
 digitalWrite(RGBCTL, LOW);
 // Init serial port and clean garbage
 Serial.begin(SERIAL_BAUDRATE);
 Serial.println("FauxMo demo sketch");
 Serial.println("After connection, ask Alexa/Echo to 'turn <devicename> on' or 'off'");
 // Wifi
 wifiSetup();
 // Device Names for RGB Patterns
 fauxmo.addDevice("GREEN LIGHTS");
 fauxmo.addDevice("RED LIGHTS");
 fauxmo.addDevice("BLUE LIGHTS");
 fauxmo.addDevice("RAINBOW LIGHTS");
 fauxmo.addDevice("LIGHTS");
 fauxmo.addDevice("GOOGLE LIGHTS");
 fauxmo.onMessage(callback);
 strip.begin();
 strip.show();
 strip.setBrightness(5);
 i = 0;
}
void loop() {
 fauxmo.handle();
 startShow(i);
}
//Case for strip patterns. Add a new case or pattern if you wish
void startShow(int i) {
 switch (i) {
   case 0: colorWipe(strip.Color(0, 0, 0), 50);          // Black/Off
     break;
   case 1: colorWipe(strip.Color(255, 0, 0), 50);        // Red
     break;
   case 2: colorWipe(strip.Color(0, 255, 0), 50);        // Green
     break;
   case 3: colorWipe(strip.Color(0, 0, 255), 50);        // Blue
     break;
   case 4: colorWipe(strip.Color(255, 255, 255), 50);    // White
     break;
   case 5: theaterChase(strip.Color(127, 127, 127), 50); // White Chase
     break;
   case 6: theaterChase(strip.Color(127,   0,   0), 50); // Red Chase
     break;
   case 7: theaterChase(strip.Color(  0,   0, 127), 50); // Blue Chase
     break;
   case 8: rainbow(20);
     break;
   case 9: google();
     break;
   case 10: theaterChaseRainbow(50);
     break;
 }
}
// Fill the dots one after the other with a color
void colorWipe(uint32_t c, uint8_t wait) {
 for (uint16_t i = 0; i < strip.numPixels(); i++) {
   strip.setPixelColor(i, c);
   strip.show();
   delay(wait);
 }
}
//Rainbow pattern
void rainbow(uint8_t wait) {
 uint16_t i, j;
 for (j = 0; j < 256; j++) {
   for (i = 0; i < strip.numPixels(); i++) {
     strip.setPixelColor(i, Wheel((i + j) & 255));
   }
   strip.show();
   delay(wait);
 }
}
//Rainbow equally distributed throughout
void rainbowCycle(uint8_t wait) {
 uint16_t i, j;
 for (j = 0; j < 256 * 5; j++) { // 5 cycles of all colors on wheel
   for (i = 0; i < strip.numPixels(); i++) {
     strip.setPixelColor(i, Wheel(((i * 256 / strip.numPixels()) + j) & 255));
   }
   strip.show();
   delay(wait);
 }
}
//Theatre-style crawling lights
void theaterChase(uint32_t c, uint8_t wait) {
 for (int j = 0; j < 10; j++) { //do 10 cycles of chasing
   for (int q = 0; q < 3; q++) {
     for (int i = 0; i < strip.numPixels(); i = i + 3) {
       strip.setPixelColor(i + q, c);  //turn every third pixel on
     }
     strip.show();
     delay(wait);
     for (int i = 0; i < strip.numPixels(); i = i + 3) {
       strip.setPixelColor(i + q, 0);      //turn every third pixel off
     }
   }
 }
}
//Theatre-style crawling lights with rainbow effect
void theaterChaseRainbow(uint8_t wait) {
 for (int j = 0; j < 256; j++) {   // cycle all 256 colors in the wheel
   for (int q = 0; q < 3; q++) {
     for (int i = 0; i < strip.numPixels(); i = i + 3) {
       strip.setPixelColor(i + q, Wheel( (i + j) % 255)); //turn every third pixel on
     }
     strip.show();
     delay(wait);
     for (int i = 0; i < strip.numPixels(); i = i + 3) {
       strip.setPixelColor(i + q, 0);      //turn every third pixel off
     }
   }
 }
}
//Fill strip with Google's Colour
void google() {
 //Set initial couple of pixels to match Google Blue
 for ( int i = start1; i < start1 + 3; i++ ) {
   strip.setPixelColor(i, 23, 107, 239 );
 }
 //Set initial couple of pixels to match Google Red
 // next 3 pixels = color set #2
 for ( int i = start2; i < start2 + 3 ; i++ ) {
   strip.setPixelColor(i, 255, 62, 48 );
 }
 //Set initial couple of pixels to match Google Orange
 // next 3 pixels = color set #3
 for ( int i = start3; i < start3 + 3; i++ ) {
   strip.setPixelColor(i, 247, 181, 41 );
 }
 //Set initial couple of pixels to match Google Green
 // last 3 pixels = color set #3
 for ( int i = start4; i < start4 + 3; i++ ) {
   strip.setPixelColor(i, 23, 156, 82 );
 }
 strip.show();
}
//Turns all pixels OFF
void allOff() {
 for ( int i = 0; i < numPixels; i++ ) {
   strip.setPixelColor(i, 0, 0, 0 );
 }
 strip.show();
}
// Input a value 0 to 255 to get a color value.
// The colours are a transition r - g - b - back to r.
uint32_t Wheel(byte WheelPos) {
 WheelPos = 255 - WheelPos;
 if (WheelPos < 85) {
   return strip.Color(255 - WheelPos * 3, 0, WheelPos * 3);
 }
 if (WheelPos < 170) {
   WheelPos -= 85;
   return strip.Color(0, WheelPos * 3, 255 - WheelPos * 3);
 }
 WheelPos -= 170;
 return strip.Color(WheelPos * 3, 255 - WheelPos * 3, 0);

}
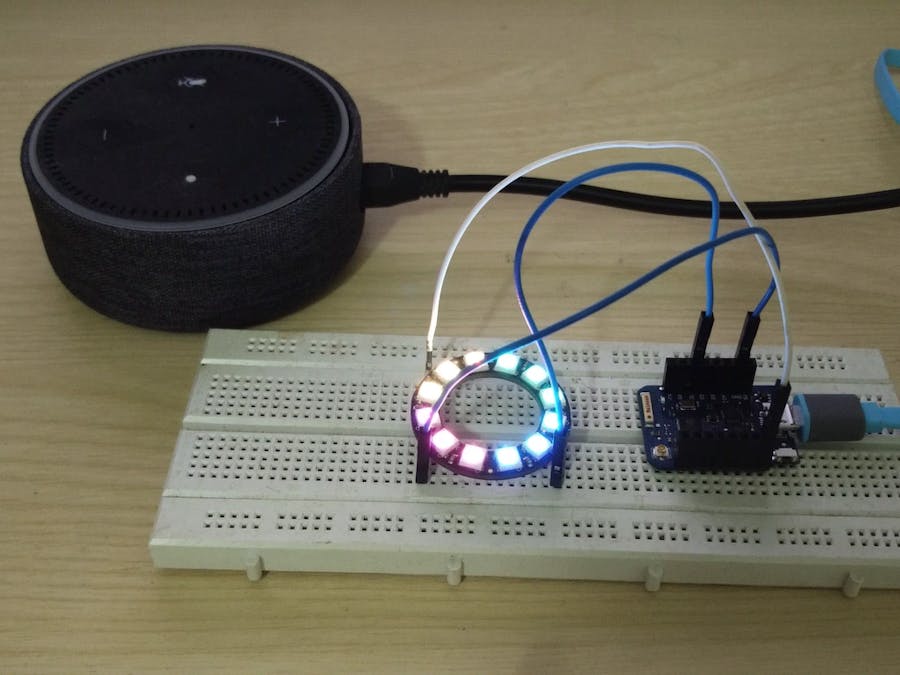
Wire the data and power lines of the RGB strip and now, you can control the strip using Alexa.


Comments