


Hardware components | ||||||
 |
| × | 1 | |||
| × | 1 | ||||
 |
| × | 4 | |||
 |
| × | 1 | |||
 |
| × | 1 | |||
| × | 1 | ||||
 |
| × | 1 | |||
 |
| × | 1 | |||
 |
| × | 2 | |||
 |
| × | 2 | |||
 |
| × | 3 | |||
 |
| × | 2 | |||
| × | 3 | ||||
| × | 1 | ||||
Software apps and online services | ||||||
| ||||||
| ||||||
 |
| |||||
Hand tools and fabrication machines | ||||||
 |
| |||||
 |
| |||||
 |
| |||||
| ||||||
Elevator pitch: A pocket arcade cabinet built around the Arduino UNO Q, where a joystick, buttons, and three onboard sensors (motion, sound, light) control a four-weapon shoot-'em-up whose enemy AI adapts to your playstyle in real time.
A note before you dive in: This project is tagged "Advanced" because I built everything from scratch — custom PCB, custom enclosure, and a full game engine. But you don't have to do any of that to get ARDU-cade running. If you're comfortable with basic wiring and copy-pasting a few terminal commands, you can have the full game playable on a breadboard in 2–3 hours, sensors and all — no PCB fabrication or 3D printing required to start.
The Step-by-Step Build above is written so each stage is testable on its own: wire the joystick, flash the sketch, confirm it moves on screen — then add the next sensor, and so on. If something doesn't light up, you'll know exactly which step to recheck instead of debugging the whole build at once.
I'd genuinely love for people to build their own version of this — swap the game for something else, skip the PCB and prototype on a breadboard, use different sensors, whatever fits what you have on hand. If you do replicate it (fully or partially), or even just try wiring up one sensor mechanic, drop a comment or reach out — feedback, forks, and "here's what I changed" are exactly what I'm hoping this project leads to.
Why I built thisMost beginner-friendly handheld gaming kits fall into one of two camps: dumb button boxes with zero intelligence, or a full separate microcontroller-plus-single-board-computer pairing that's a pain to wire and bridge together. Commercial options are limited, and with the corporate space leaning harder into emulating games you don't actually own but have it rented to, I wanted to make something with the tactile, ownable feel of a device like the PSP 3000, but with a modern twist: real sensors feeding a genuinely adaptive game, not just nostalgia in a 3D-printed shell.
Every visual and sound in Space-Racer is original — every sprite is hand-drawn as an 8-bit pixel grid (pixel_art.py), and every sound effect is procedurally generated in code, with no external art or audio assets anywhere in the project. The protagonist is Space Racer, a minor, rarely-adapted character from Invincible — I wanted a lead who hadn't already been drawn a hundred times, not another generic space-marine sprite
Taking inspiration from "PC-in-a-controller" handhelds like the Techno pocket go, ARDU-cade packs multiple peripherals, three sensors feeding an on-device AI, and a custom shooter — inspired by Space Racer from Invincible — with adaptive, learning enemy behavior, all from one board, one sketch, and one Python game process talking over the built-in Bridge.
It also gave me a reason to actually use both halves of the UNO Q at once — the microcontroller side for rock-solid, low-latency I/O, and the Linux/MPU side for something the MCU alone could never run: a full pygame game engine with a statistical model quietly profiling how I play.
The result is ARDU-cade, running Space-Racer: The Journey Beyond, a horizontal shoot-'em-up starring a little green alien racer.
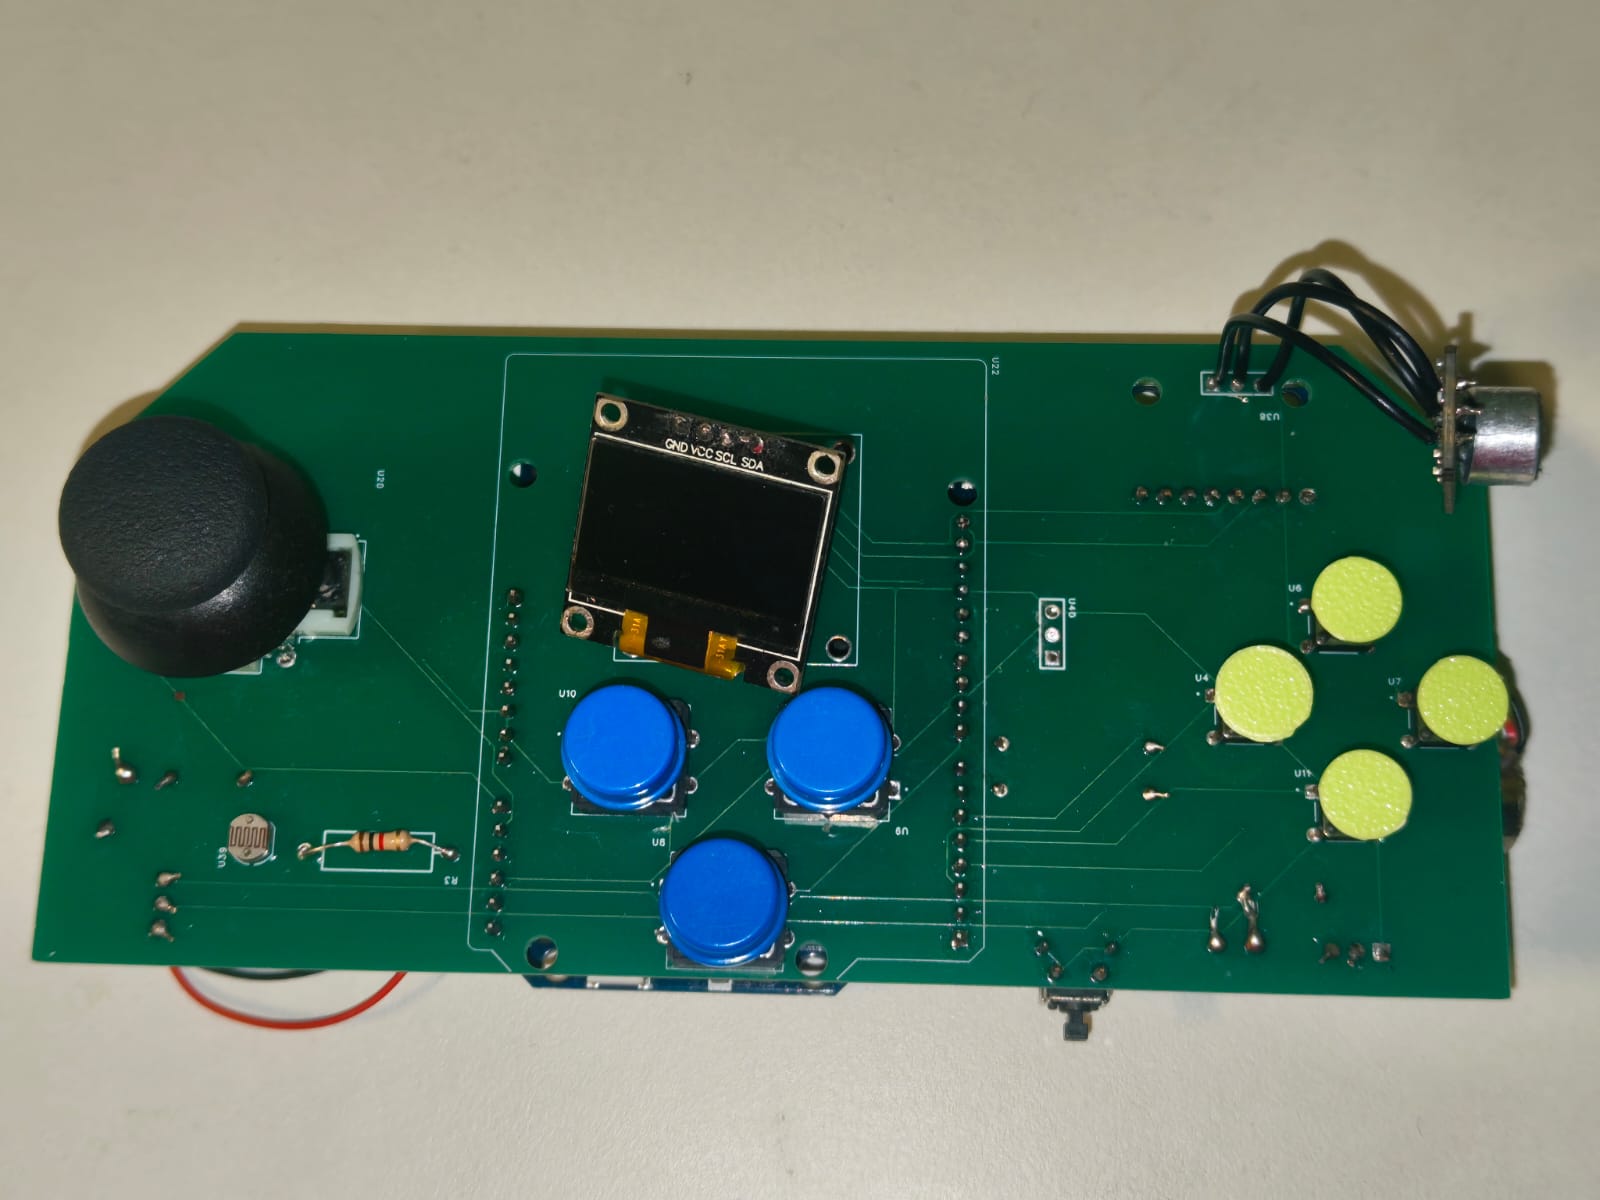
What it actually does- A joystick and 7 tactile buttons drive movement, four distinct weapons, pause, and menu navigation.
- An MPU6050 turns physical tilts into a dodge-roll and hard shakes into a screen-clearing panic bomb.
- A MAX9814 mic means you can shout at the console to overcharge your next shot.
- A photoresistor quietly reads the room and eases wave difficulty (never boss fights) if you're playing somewhere dim/late at night.
- Combine a big tilt with a loud shout in the same instant and you unlock a secret, free-of-charge Infinity Ray blast — never explained in-game, just waiting to be found.
- An SSD1306 OLED shows a boot-time control guide, then flips to a live "AI LEARNING" dashboard showing how much the enemy AI has profiled you, your favorite weapon, and your aggression score.
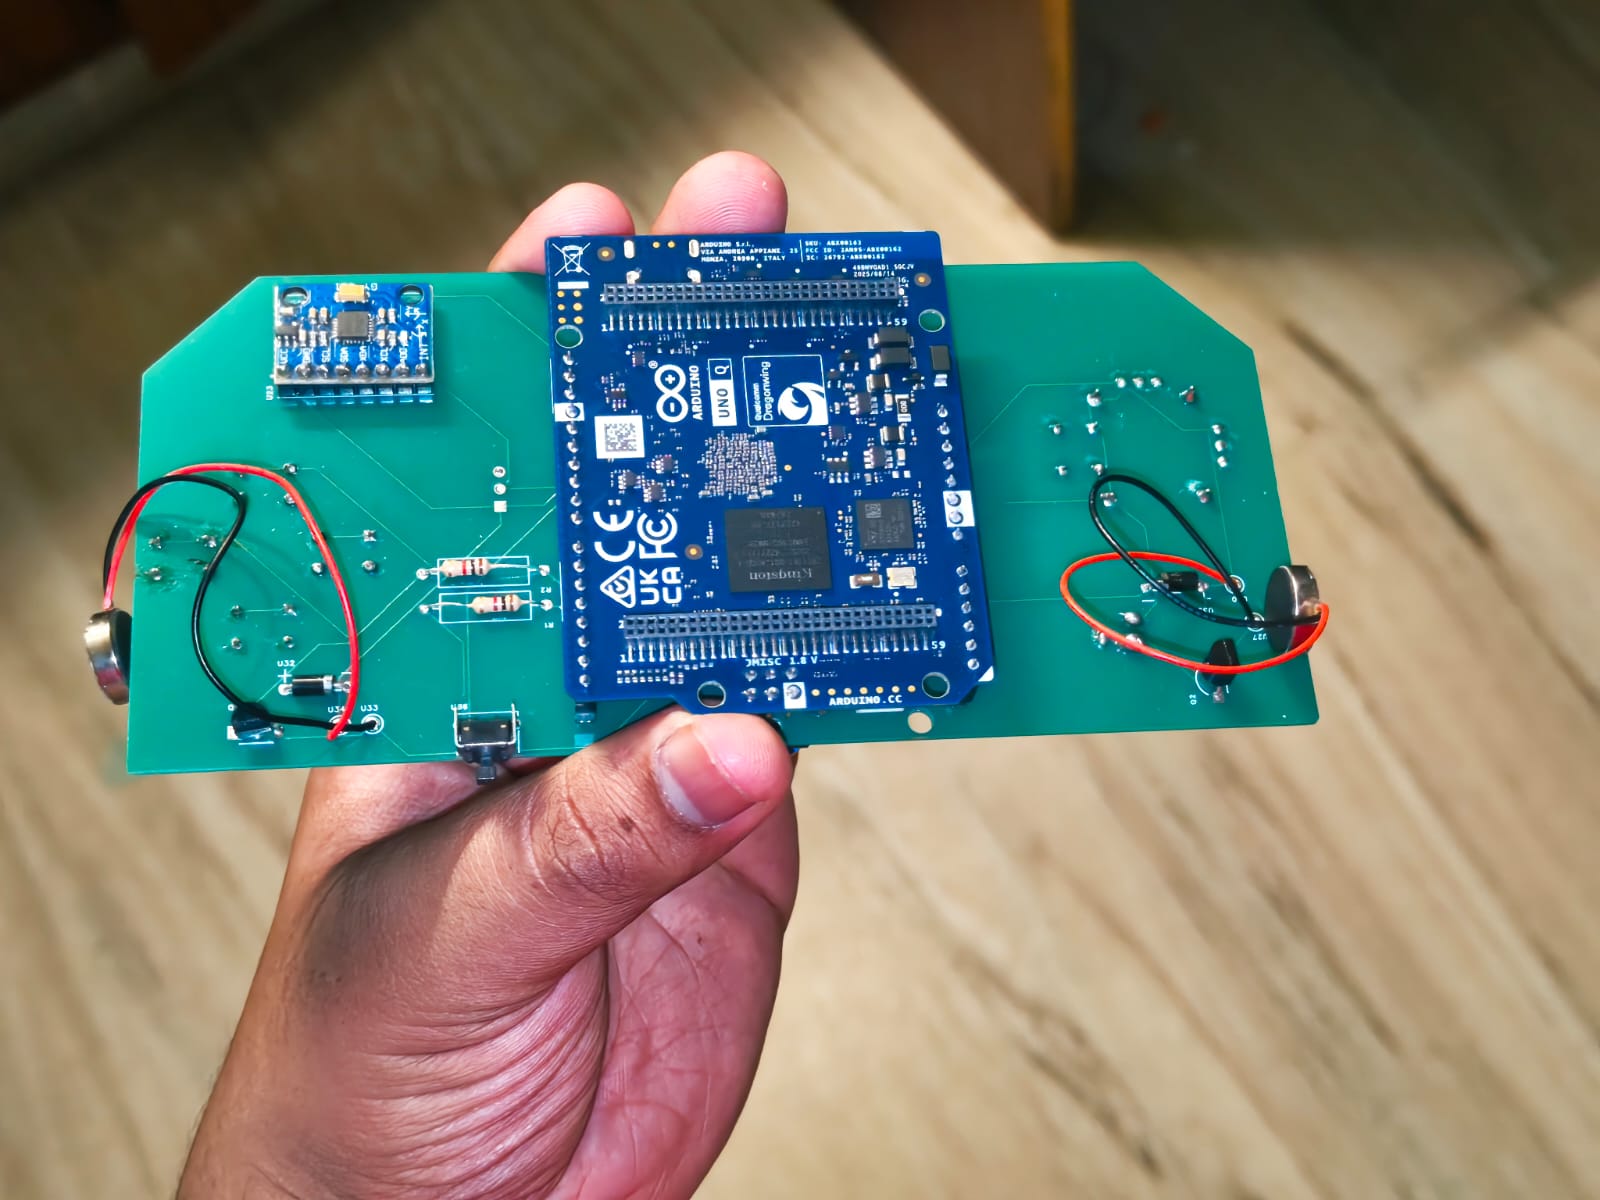
- Two coin vibration motors give haptic feedback on hits and big moments.
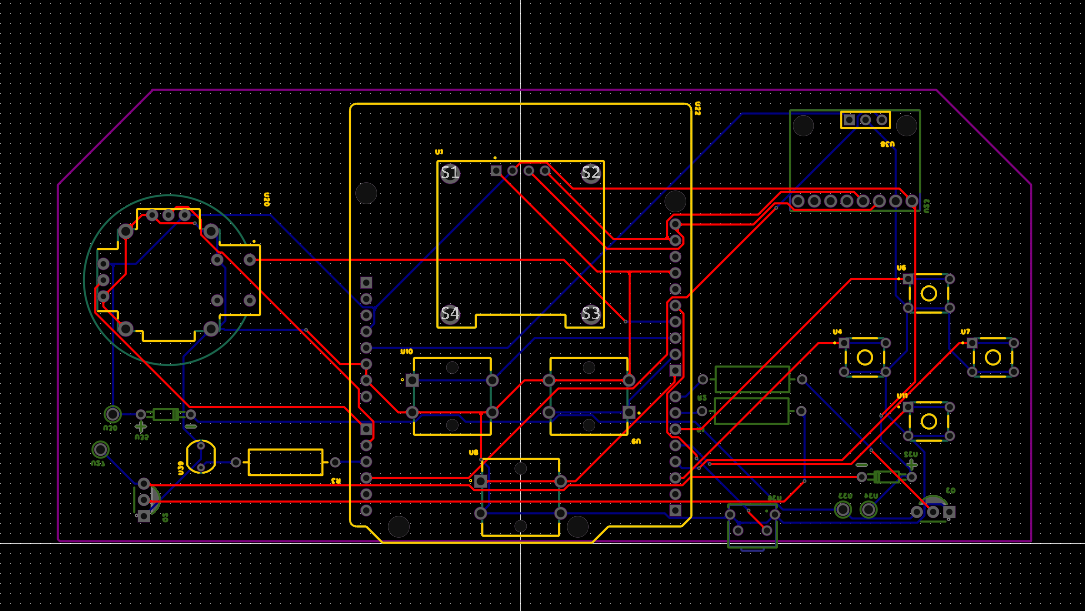
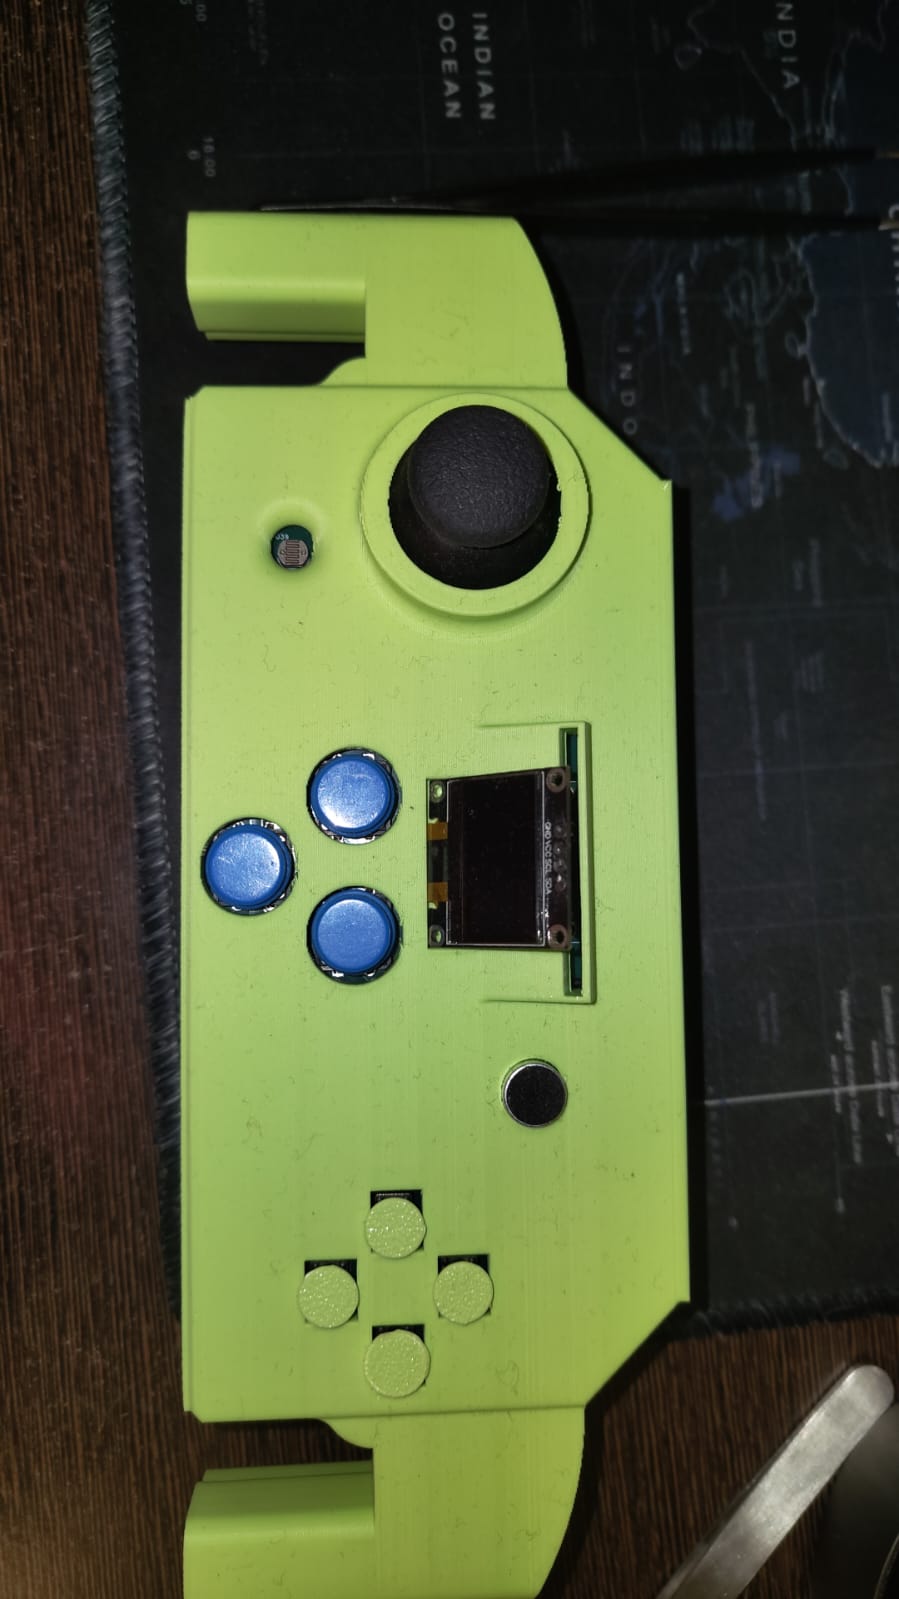
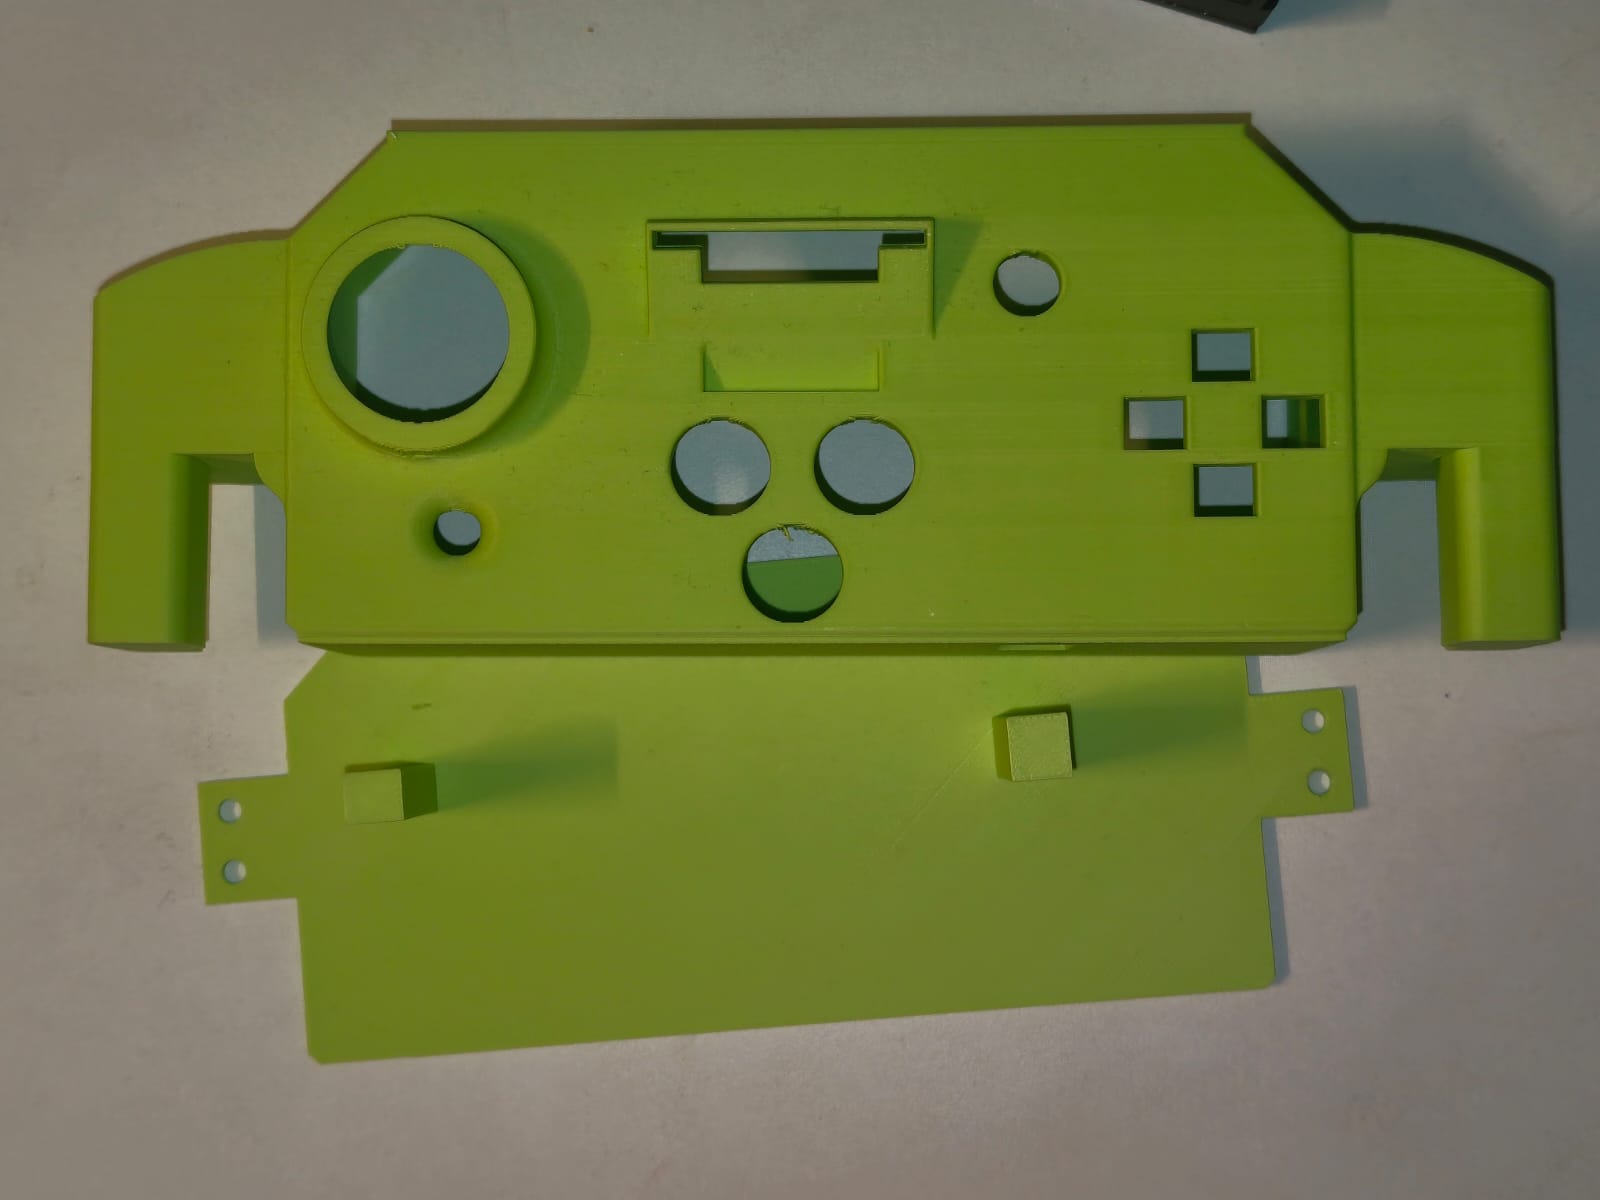
- Everything is housed in a custom 3D-printed shell around a 2-layer PCB I designed in EasyEDA Pro.
Before wiring anything up, make sure you have:
Hardware
- Arduino UNO Q
- USB-C cable (data-capable, not charge-only)
- All components listed in the BOM above
- Soldering iron + the custom PCB (or a breadboard if you're prototyping first)
Software / accounts
- Arduino App Lab —
<<v1.x>>— used once, to flash the MCU sketch - Python
<<3.x>>on the UNO Q's Linux side (comes preinstalled on the board's OS image, but confirm withpython3 --versionover SSH or a terminal on the board) - Python packages:
pygame-ce,<<any others — e.g. numpy, pyserial>>(seerequirements.txtin the repo) - RustDesk — only needed if you want to watch the game running on the board's own screen instead of a PC (see "Two ways to run it" below)
- A GitHub account isn't required, just clone the repo:
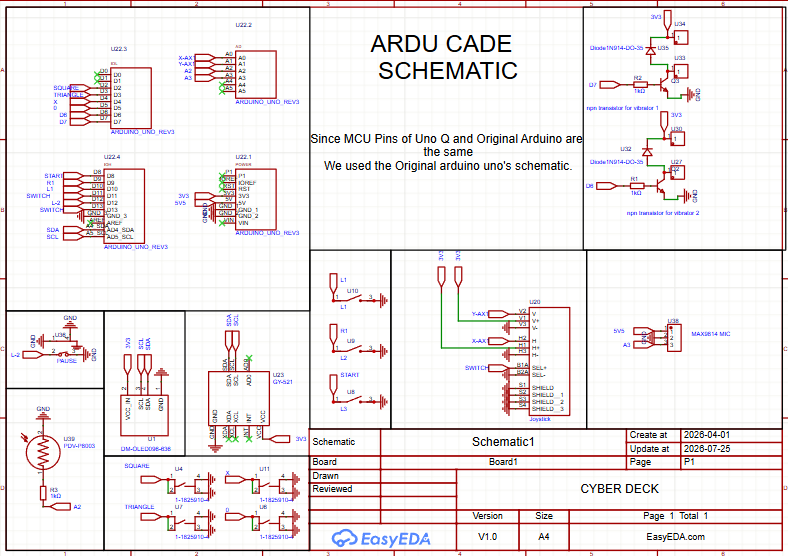
git clone https://github.com/shantambose3/Ardu-boii-previously-arducade-.gitSince the UNO Q's MCU pins map the same as a classic Arduino UNO, I based the schematic directly on the original UNO reference layout, then added the OLED, joystick, MPU6050, photoresistor, MAX9814 mic, and two transistor-driven vibration motor channels (with flyback diodes) around it.
D2  – Bomb (Y) / menu confirm
D3  – Infinity Ray (X) / menu back
D4  – Vacuum Nails (A), held
D5  – Mjolnir (B)
D6  – Left vibration motor
D7  – Right vibration motor
D8  – OLED guide: confirm/start
D9  – OLED guide: page next
D10 – OLED guide: page back
D12 – Sleep/wake: tap = pause, double-tap = hide/show OLED stats
A0  – Joystick X
A1  – Joystick Y
A2  – Photoresistor (light/fatigue sensor)
A3  – MAX9814 mic envelope output
I2C – SSD1306 OLED (0x3C) + MPU6050 (0x68)
One build quirk worth mentioning: the joystick module isn't mounted "upright" relative to how the case is held, so raw X/Y axes didn't line up with actual up/down/left/right. Rather than patch that downstream in three different places (the local game, the networked PC client, and the board server), I corrected it once at the source in the sketch with a single rotation function — a 90° axis swap-and-flip. There's no in-between to tune: it's either clockwise or counter-clockwise, and you can verify which in one push of the stick.
Step-by-Step BuildWire up the sensors and controls following the pin map above. If you're prototyping on a breadboard before committing to the PCB, do it in this order so you can test incrementally:
- Joystick → A0 (X), A1 (Y)
- 7 tactile buttons → D2–D5, D8–D10 (per pin map)
- Photoresistor (with 1kΩ pulldown) → A2
- MAX9814 mic envelope out → A3
- MPU6050 + SSD1306 OLED → I2C bus (SDA/SCL) — MPU6050 at
0x68, OLED at0x3C - Two vibration motors, each through an NPN transistor + flyback diode → D6, D7
- Wire up the sensors and controls following the pin map above. If you're prototyping on a breadboard before committing to the PCB, do it in this order so you can test incrementally:
Joystick → A0 (X), A1 (Y)
7 tactile buttons → D2–D5, D8–D10 (per pin map)
Photoresistor (with 1kΩ pulldown) → A2
MAX9814 mic envelope out → A3
MPU6050 + SSD1306 OLED → I2C bus (SDA/SCL) — MPU6050 at0x68, OLED at0x3CTwo vibration motors, each through an NPN transistor + flyback diode → D6, D7 - Solder the PCB (or finish your breadboard wiring) and double-check continuity before powering on — especially the flyback diodes on the motor lines, since a reversed diode there is the easiest way to fry a transistor.
- Flash the MCU sketch. Open
sketch/sketch.inoin Arduino App Lab, select the UNO Q, and hit flash. This is the only step App Lab is used for in this build — see the "App Lab runs games headless" note below for why. - Set up the Python environment on the board's Linux side. Over SSH or a terminal on the board:
bash
cd Ardu-boii-previously-arducade-/python
   python3 -m venv venv
   source venv/bin/activate
pip install -r requirements.txt- Run the game standalone:
bash
python3 main.pyYou should see the OLED flip from the boot control guide to the live "AI LEARNING" dashboard, and the game window should appear on the board's actual display output (not through App Lab — see below).
(Optional) Set up remote viewing with RustDesk, if you want to see the game on a separate screen instead of hooking a monitor directly to the board:
- Install RustDesk on the UNO Q's Linux side:
<<insidethe github readme>> - Install RustDesk on your viewing PC/phone from rustdesk.com
- Start the RustDesk service on the board, note its ID/password, and connect from the other device. Because RustDesk attaches to the board's existing desktop session, launch
main.pyfirst (or leave it running) and the game window will just show up in the remote view. - (Optional) Set up remote viewing with RustDesk, if you want to see the game on a separate screen instead of hooking a monitor directly to the board:
Install RustDesk on the UNO Q's Linux side:<<sameas before>>Install RustDesk on your viewing PC/phone from rustdesk.com
start the RustDesk service on the board, note its ID/password, and connect from the other device. Because RustDesk attaches to the board's existing desktop session, launchmain.pyfirst (or leave it running) and the game window will just show up in the remote view.
(Optional) Set up split mode, if the board is dropping frames on its own:
- On the PC:
python3 pc_client.py - On the board:
python3 network/board_server.py - In
board_server.py, setDEFAULT_PC_IPto your PC's actual LAN IP — and give that PC a DHCP reservation or static IP first, since a stale IP here fails silently (see "Challenges"). - Controls, weapons, and AI behavior are identical to standalone mode — only rendering/physics/AI computation moves to the PC.
- (Optional) Set up split mode, if the board is dropping frames on its own:
On the PC:python3 pc_client.pyOn the board:python3 network/board_server.pyInboard_server.py, setDEFAULT_PC_IPto your PC's actual LAN IP — and give that PC a DHCP reservation or static IP first, since a stale IP here fails silently (see "Challenges").
Controls, weapons, and AI behavior are identical to standalone mode — only rendering/physics/AI computation moves to the PC. - Mount everything in the 3D-printed case. Print
back-plate.stlandfront_plate.stl(linked in Custom Parts below), seat the PCB on the back plate's mounting towers, route the joystick/buttons through the front plate cutouts, and close the shell.
Note on axis orientation: because the joystick isn't mounted "upright" relative to how the case is held, verify direction with one push of the stick after final assembly. If it's inverted, flip the rotation direction in the single rotation function in the sketch (see "Pin map" section) rather than patching it in multiple places downstream.Software architecture
The whole point of the UNO Q here is the split between its two halves, connected by the Bridge:
sketch/sketch.ino  (MCU side)
   – reads joystick, 7 buttons, MPU6050, photoresistor, mic
   – drives the OLED (boot instructions, then live AI status)
   – drives haptics
   – exposes get_controller_state / set_ai_status /
     trigger_vibration / set_oled_visibility over the Bridge
        │
        │  Arduino_RouterBridge (msgpack, request/response)
        ▼
python/main.py  (Linux/MPU side)
   – polls controller state once a frame
   – turns buttons/joystick into synthetic pygame key events
   – pushes AI status + haptic requests back over the Bridge
   – runs galactic_raiders/ (the actual pygame game) unchanged
galactic_raiders/ is a self-contained pygame-ce engine (game/game.py, player.py, enemy.py, boss.py, bullets.py, formation.py, adaptive_ai.py, sound.py, particles.py, background.py, pixel_art.py) with everything hand-drawn as 8-bit sprite grids and every sound effect procedurally generated — no external art or audio assets.
Weapons
Weapon          Button          Behavior
--------------------------------------------------------------------------------
Vacuum Nails    A (D4, held)    Fast, cheap, low-damage stream -- your bread and
                                 butter
Mjolnir         B (D5)          A boomerang throw that hits on the way out AND
                                 the way back
Infinity Ray    X (D3, held)    Screen-clearing beam, limited charges per layer,
                                 refills on layer entry
Bomb Y (D2) Lobbed arc, blast radius, never friendly-fires you- Layer I — Viltrum Invasion: armored grunts (melee) and brutes (laser), boss General N.
- Layer II — Terrible Twins: fast, fragile gunners; a two-part boss fight (Gunner Eye + Melee Eye) with a shared regeneration window — down one and don't finish the other in time, and it heals back up.
- Layer III — Beast Among Beasts: chaotic, tanky space beasts that even friendly-fire each other; boss Skull O'Cthulhu. This layer intentionally skips the adaptive AI — its identity is chaos, not learned tactics.
You can see a small clip of the gameplay here: https://drive.google.com/file/d/151po-Zc7XlkHIn6E8msD0v551Wncu9uL/view
Sensor-driven mechanicsSensor Reads Mechanic
--------------------------------------------------------------------------------
MPU6050 Sharp tilt Dodge-roll burst with brief
invulnerability
MPU6050 Hard shake "Panic bomb" -- clears nearby bullets,
chips boss damage
MAX9814 Sustained shout Next shot fired comes out overcharged
Photoresistor Ambient light Dim room slightly eases wave difficulty
(never bosses, capped)
Tilt + shout together Combined Secret bonus Infinity Ray blast, not
explained in-gameThe game tracks aggression, accuracy, reaction time, favorite weapon, and risk tolerance per layer, and biases enemy spawn formations and dive rates to counter your habits as a run goes on — persisted to disk (game/persistence.py) so the AI keeps learning across sessions and reboots, not just within one run. After a run, an AI Report Card summarizes what it picked up on. Live adaptation is also called out mid-game with on-screen toasts ("AI ADAPTED: COUNTERING NAILS"), and bosses taunt you mid-fight based on whichever weapon has hurt them most.
There's also a scaffolded Edge Impulse integration (game/edge_impulse.py) with two swap-in points: a feature-vector classifier for play style (aggression/accuracy/reaction time/risk), and a shout-gesture/audio classifier for the mic mechanic. Both default to a rule-based stub with the exact same interface, so the game runs identically with or without a trained Impulse plugged in — flip EI_BACKEND=eim once a real exported model is wired up.
- Standalone (
python/main.py) — everything runs on the UNO Q itself. - Split mode (
network/board_server.py+python/pc_client.py) — if the board struggles to hold framerate, the UNO Q just streams controller + sensor state over UDP to a PC, which does all the rendering/physics/AI and streams AI status + haptic requests back. Controls and mechanics are identical either way.
If the UNO Q struggles to hold a good framerate running the full game locally, ARDU-cade can also run split across two machines. The board keeps doing what it's good at — reading the joystick, buttons, photoresistor, and MPU6050 over the Bridge — but instead of turning that into local pygame key events, it streams the raw controller/sensor state over UDP to a PC. The PC does all the actual work: rendering, physics, and the adaptive AI, using its own CPU/GPU instead of the board's. The PC then streams AI status (for the OLED) and haptic-buzz requests back to the board every tick, so physical feedback stays in sync even though no game logic runs on the board anymore. No RustDesk needed in this mode — the game window opens directly on the PC's own screen.
Two scripts carry this: board_server.py runs on the UNO Q and is the only file that needs to physically live on the board; pc_client.py runs on the PC right next to the unmodified galactic_raiders/ game code. Communication uses two UDP ports — board→PC controller/sensor state at ~60Hz, PC→board AI status and haptics — so control mechanics and difficulty behavior (the photoresistor still only eases wave difficulty, never boss fights) are identical either way.
Setup:
On your PC, you only need the python/ folder (it already contains both pc_client.py and galactic_raiders/ side by side). Install the game's two core deps:
bash
pip install pygame-ce numpyOn the UNO Q, run the board-side script from the network/ folder (works from a plain venv or inside App Lab):
bash
python3 network/board_server.py --pc-ip <YOUR_PC_IP>On your PC, run the game client, pointing it at the board:
bash
python3 python/pc_client.py --board-ip 192.168.1.22Order doesn't matter much — whichever side starts first just waits for the other's packets.
Ports used (both UDP, change the constants at the top of both files if either is already in use on your network):
5551— board → PC, controller + sensor state5552— PC → board, AI status (OLED) + haptic buzz requests
The one sharp edge: since UDP is fire-and-forget, if your PC's IP changes (DHCP lease renewal after a reboot, driver update, or router restart) and the board's hardcoded fallback IP goes stale, the board keeps sending packets successfully into the void with zero errors on either side — the joystick and buttons just silently stop responding. This was the single most common "it stopped working" report during testing, and it's almost always this, not a code bug. To fix it: run ipconfig (Windows) on the PC, compare the IPv4 address of the active adapter to DEFAULT_PC_IP in board_server.py, and update it if they don't match — or always launch with an explicit --pc-ip. To stop it recurring altogether, set a DHCP reservation for your PC's MAC address in your router, or assign the PC a static IP.
Adds RustDesk-based screen streaming for the UNO Q, so you can play or watch Galactic Raiders on your own computer without a working HDMI hookup to the board.
Why RustDesk instead of xrdp or x11vnc: xrdp is Arduino's other officially-documented option, but it spins up a second desktop session on connect, which fights the one LightDM already started on boot over D-Bus — this usually shows up as a black screen that disconnects immediately. x11vnc works but is slow (CPU-only framebuffer diffing) and its password field is capped at 8 characters. RustDesk attaches to the existing desktop session instead of creating a new one, and was noticeably snappier for both video and keyboard input.
Setup:
bash
scp -r remote-display arduino@<board-ip>:~/
ssh arduino@<board-ip>
chmod +x ~/remote-display/setup_rustdesk.sh
~/remote-display/setup_rustdesk.sh
The script installs RustDesk, asks whether a real monitor is attached (if not, it sets up xserver-xorg-video-dummy so Xorg has a virtual display to render into, since RustDesk refuses to attach to a session with zero enumerable displays), autostarts RustDesk on login, enables LightDM autologin so the board reaches a usable desktop with no monitor/keyboard attached, and disables the idle screen lock.
Then reboot:
bash
sudo rebootAfter 30–60 seconds, open the RustDesk client on your PC (rustdesk.com) — the board shows up automatically on the same network. The first time in, run DISPLAY=:0 rustdesk & on the board itself once to set a permanent password (Settings → Security), so you skip the one-time code on every future connection.
Playing the game over the stream — once connected via RustDesk, open a terminal in the remote session:
bash
cd ~/ArduinoApps/ardu-cade/python
python3 main.py
Important: running via App Lab won't show a window. If you launch through Arduino App Lab's Run button, it executes inside a Docker container with no access to the host's X11 display — pygame silently falls back to a dummy driver, so the game runs (you'll see log output, Bridge/AI-status messages, audio underrun spam) but no window ever appears, even over RustDesk. This isn't documented anywhere in Arduino's official App Lab docs, and I couldn't find it discussed anywhere else, so here's the full fix:
- Flash the sketch via App Lab at least once. App Lab's Run button is what actually compiles and uploads
sketch.inoto the MCU side — a plain venv only ever runs the Python side, so if the sketch was never flashed this way, Bridge calls likeget_controller_statefail with "method not available," no matter how the Python side is launched. Open the app in App Lab, click Run once, then stop it — the flash sticks. - Pull
arduino.app_utilsout of the container. This is the Bridge/App runtimemain.pyimports; it isn't on PyPI, it's baked directly into App Lab's Docker image:
bash
sudo docker ps   # find the running ardu-cade container ID
   sudo docker cp <container_id>:/usr/local/lib/python3.13/site-packages/arduino /tmp/arduino_pkg
sudo cp -r /tmp/arduino_pkg ~/myenv/lib/python3.13/site-packages/arduino- Install the rest of
python/requirements.txtinto that same venv (coverspygame-ce/numpyfor the game, plusmsgpack,requests, andwatchdog, which the Bridge runtime needs internally and which come pre-installed in App Lab's image but not in a plain venv):
bash
source ~/myenv/bin/activate
   cd ~/ArduinoApps/ardu-cade/python
pip install -r requirements.txt- Run with the display explicitly set:
bash
DISPLAY=:0 python3 main.pyYour physical buttons and joystick keep working as normal throughout — they're wired to the MCU side via the Bridge, which RustDesk doesn't touch; RustDesk only mirrors the display and forwards keyboard/mouse into the session.
Known tradeoff: this is desktop mirroring, not a dedicated low-latency game-streaming pipeline — expect a bit more input lag than a direct HDMI hookup.
Joystick mounted "sideways" on the PCB. The joystick module doesn't sit upright relative to how the case is actually held, so raw X/Y axes didn't line up with real up/down/left/right. Rather than patch that in three separate places (the local game, the networked PC client, and the board server), I corrected it once at the source in the sketch with a single rotation function — a 90° axis swap-and-flip.
App Lab runs games headless. Launching through Arduino App Lab's Run button executes inside a Docker container with no access to the host's X11 display, so pygame silently falls back to a dummy driver — the game runs (you can see log output, Bridge/AI-status messages, audio underrun spam) but no window ever appears, even over RustDesk. This isn't called out anywhere in Arduino's official App Lab docs, and I couldn't find it discussed anywhere else. See "Remote Display over WiFi" above for the full fix chain (flashing via App Lab once, then pulling arduino.app_utils out of the container for a plain-venv run).
Why RustDesk over xrdp or x11vnc. I tried Arduino's officially documented xrdp route first, but it spins up a second desktop session on connect, which fights the one LightDM already started on boot over D-Bus — this usually shows up as a black screen that disconnects immediately. x11vnc works but is slow (CPU-only framebuffer diffing) and its password field is capped at 8 characters. RustDesk attaches to the existing desktop session instead of creating a new one, and was noticeably snappier for both video and keyboard input, so that's what I shipped with.
Split processing mode exists for a reason. If the UNO Q can't hold a good framerate running the full game locally, ARDU-cade can run split across two machines instead: board_server.py stays on the UNO Q reading the joystick, buttons, photoresistor, and MPU6050 over the Bridge, then streams that raw state over UDP to pc_client.py on a PC, which does all the rendering, physics, and adaptive AI with its own CPU/GPU and streams AI status/haptics back. No RustDesk needed here — the game window opens directly on the PC's screen.
Stale PC IP in split mode.
UDP is fire-and-forget, so a stale DEFAULT_PC_IP in board_server.py after a DHCP lease renewal makes the board send controller/sensor packets into the void with zero errors on either side — buttons and joystick just silently stop responding. This was the single most common "it stopped working" report during testing. See "Split Processing Mode" above for the fix (checking/updating the IP, or setting a DHCP reservation).
Button debounce. Testing surfaced (but didn't yet fix) that there's no software debounce on the button edge logic, so a bouncy physical switch can occasionally register more than one tap per press. Flagged for a future pass.
Every part on the BOM is through-hole. OLED, joystick, MPU6050, and MAX9814 are all breakout modules with pin headers; the rest — tactile switches, resistors, transistors, diodes, photoresistor — are all through-hole components. No SMD soldering, hot air station, or reflow oven required anywhere in the build, so it's buildable with just a basic iron and solder wire.
Testing38 automated tests across tests/test_adaptive_ai.py, tests/test_controller_input.py, and tests/test_game_logic.py cover deadzone boundaries, tap-vs-held buttons, simultaneous presses, malformed controller packets, state-machine transitions, the wave-11/boss handoff, the real defeat path, and a full headless playthrough smoke test (SDL_VIDEODRIVER=dummy) through every layer, a boss fight, defeat, and every sensor mechanic.
The report card is generated straight from the same PlayerProfile that drives adaptation during the run: a histogram of favorite weapon and screen positioning gets summarized into a play-style label (e.g. "Balanced Raider"), alongside aggression, accuracy, and risk-tolerance bars and a running count of observed data points.
- Train a real Edge Impulse model on logged telemetry (
game/telemetry.pyalready logs runs tologs/telemetry.jsonl) to replace the rule-based play-style classifier stub. - Fix the button-debounce gap surfaced in testing.
- A fourth layer, if the first three land well with players.
- A live demo would be available on the github soon (as of now im recovering so would take a couple of weeks so look out for it)
Full source (sketch, Python game, network split mode, remote-display setup) and the EasyEDA schematic/PCB source are included with this project via Github.
Built for the Arduino UNO Q Challenge — Gaming category.

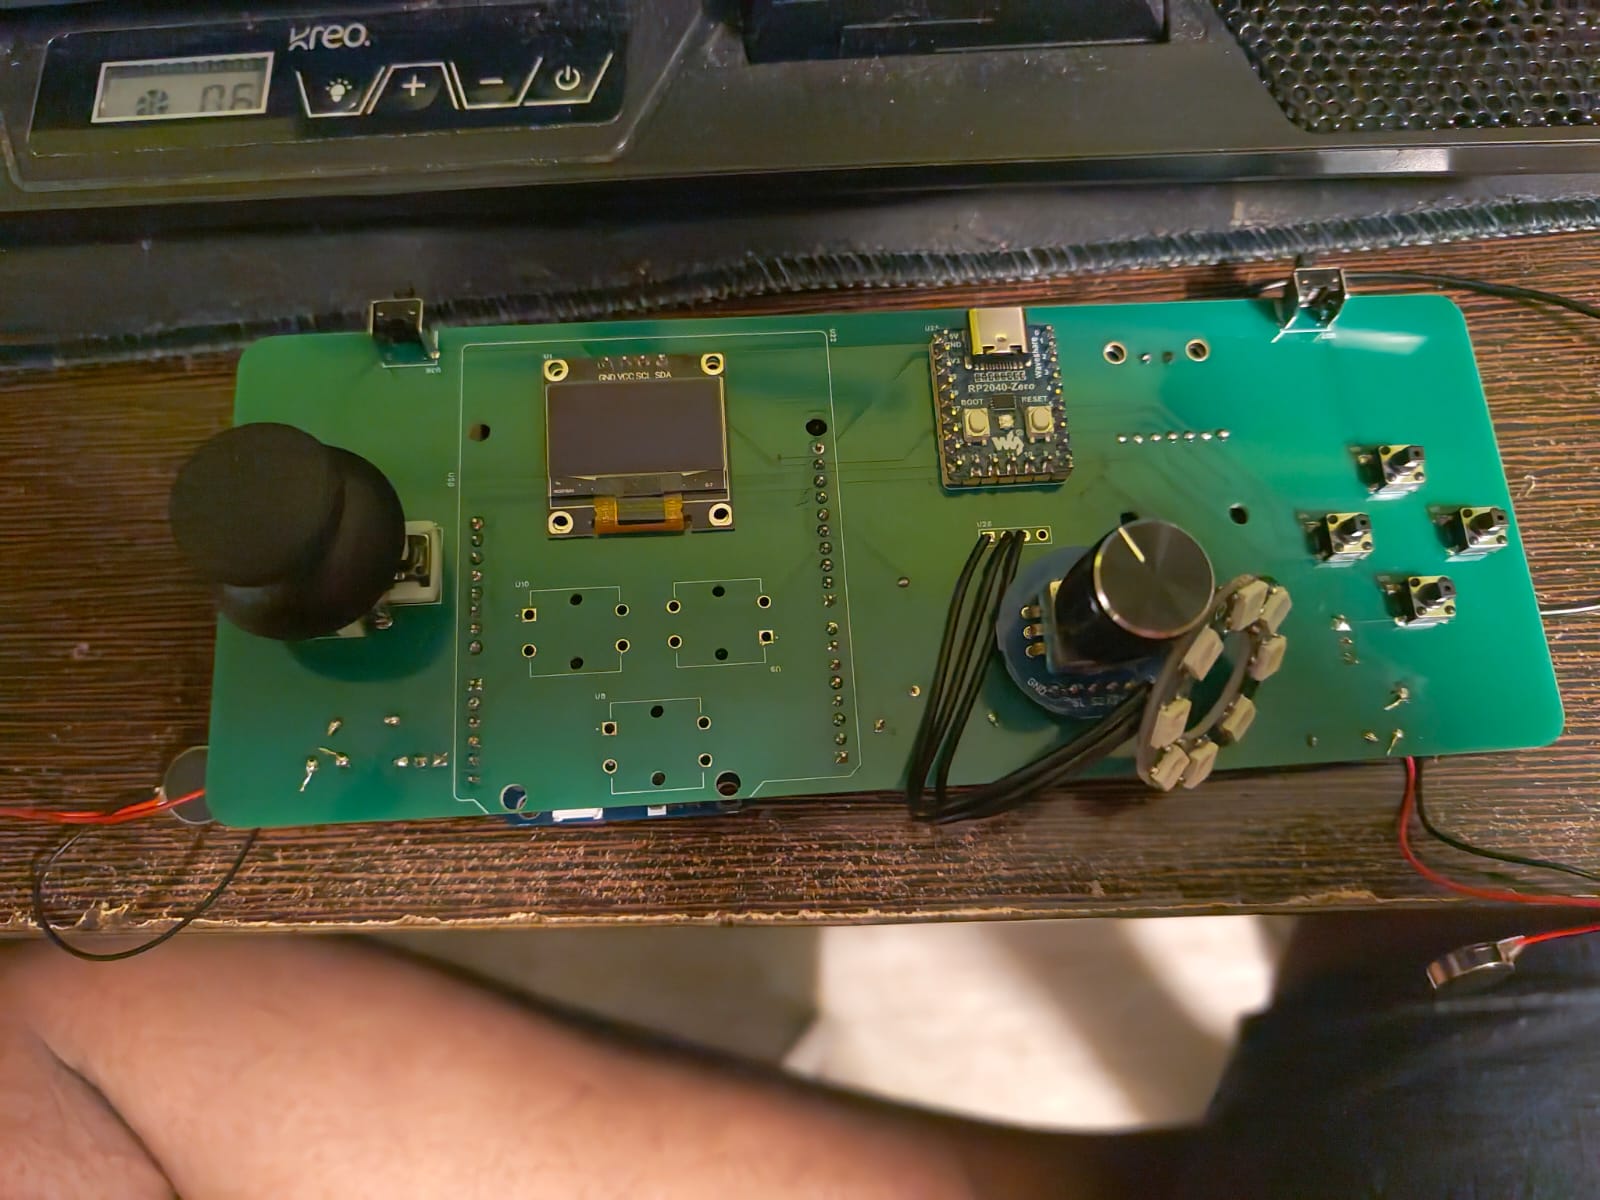
first failed prototype


Comments