Semere Beyene
Published © GPL3+

Automatic Room Temperature Controller

The project maintains the temperature of a room in [20, 25] degree Celsius.

IntermediateFull instructions provided30 minutes36,504
Automatic Room Temperature Controller

Things used in this project

Hardware components

Resistor 221 ohm
Resistor 221 ohm
I used these resistors for surge current protection.
×3
Standard LCD - 16x2 White on Blue
Adafruit Standard LCD - 16x2 White on Blue
×1
LED (generic)
LED (generic)
I used the green version from tinkerCAD. This component is used in place of a radiator (heater) just for demonstration.
×1
General Purpose Transistor NPN
×1
Temperature Sensor
Temperature Sensor
In particular, the TMP36 has been used.
×1
1N4007 – High Voltage, High Current Rated Diode
Here the normal diode rectifier also called signal rectifier is used.
×1
DC motor (generic)
This DC motor plays the role of a FAN.
×1

Software apps and online services

Arduino IDE
Arduino IDE

Story

Read more

Custom parts and enclosures

Automatic Room Temperature Controller

This is a BRD file exported from the tinkerCAD.

Schematics

Automatic Room Temperature Controller

This is the picture snipped from tinkerCAD.

Code

Automatic Room Temperature Controller

C/C++
This is my final project for the course: Arduino Programming and Hardware Fundamentals with Hackster. As it can be seen from the design, it consists of the LCD, the heater (LED), FAN (DC motor) as its main output blocks, and the potentiometer and temperature sensor (TMP36) as the input control blocks. In addition, it contains the signal conditioning and component protection elements such as a transistor, diode, and the resistors. Here the temperature of a room is needed to be in [20, 25] Celsius.
Once the tinkerCAD circuitry is accessed one can execute the code by pressing on the button named "Start Simulation". Then while it's running, the person needs to move the slider, which appears whenever a mouse click is made on the temperature sensor (TMP36) so as to simulate the temperature variations. Then either the heater (LED) or the FAN (DC motor) responds to the changes brought by the slider, and the LCD displays the changes and the sensor readings step by step. Thus, a brief summary of the controller is as follows:
1. If the temperature exceeds the maximum of the aforementioned "desired" range, then the LCD displays that the temperature is higher and tells to turn on the FAN. Then the FAN starts its rotation, and after the temperature is in the range the LCD order the FAN to turn off.
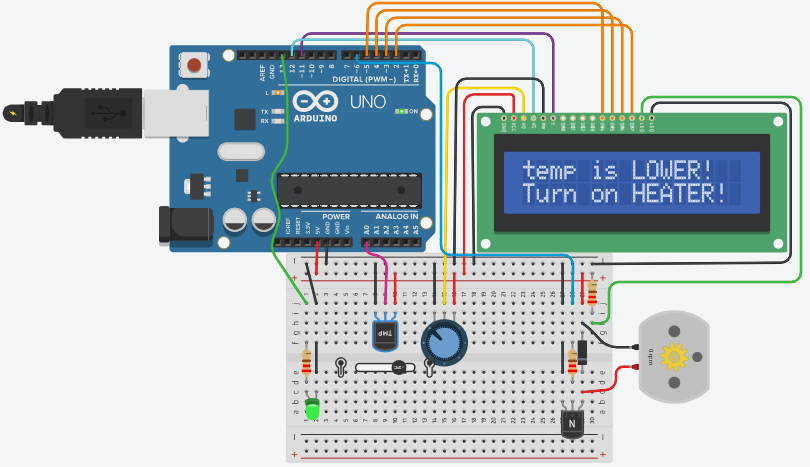
2. Whenever the sensor's temperature reading goes down below the minimum temperature in the range, the LCD notifies that the temperature is LOWER and tells the heater to be turned on, and after the temperature is in the range it displays that it is ok and orders the heater to be switched off.
3. The last condition is whenever the temperature is within the desired range, the LCD tells that the temperature is normal. Thus, it asks to turn off everything. This condition can, for instance, be observed if you run the code and wait without affecting the slider's position. That tells one that the default slider position is within the desired room temperature range (i.e. the default is 24.78 dg C).
System iterates forever unless it gets terminated by the user due to the behavior of the loop ( ) function.
/*
  Final project
  Course: Arduino-programming and Hardware-fundamentals
          with Hackster
  Title: Room Temperature Regulator  
  Written by: SEMERE BEYENE TEAME
  Written on: 26-11-2018
*/

 // Declare/assign Arduino IO-pins

  const int temp_trans_pin = A0, Heater_pin = 13, FAN_pin = 6;
 /*FAN_pin: here I used DC motor in stead of FAN because 
  I couldn't find the symbol for it. Similarly,for the
   Heater (Heater_pin), I used LED.*/

// Set the range of the desired temperature

   float MinTemp = 20, MaxTemp = 25;/*Room temperature is [20,25] degree C */

// Include the LCD library code

  #include <LiquidCrystal.h>

 // Initialize the library with the numbers of the interface pins
   
  LiquidCrystal LCD(12, 11, 5, 4, 3, 2);

  void setup() {
  
  // System initialization
    
    LCD.begin(16, 2);
    pinMode(Heater_pin, OUTPUT);//LED in our case
    pinMode(FAN_pin, OUTPUT);
    
  // Display the desired range of temperature
    
    LCD.print("Room temp(C):");
    LCD.setCursor(2,1);
    LCD.print(MinTemp); LCD.print("-");LCD.print(MaxTemp);
    
    delay(2000);
 }

 void loop() {
   
   float Eqv_volt, SensorTemp;
 
 // Read voltage and convert to temperature (Celsius)
   
   Eqv_volt = analogRead(temp_trans_pin) * 5.0 / 1023;
   SensorTemp = 100.0 * Eqv_volt-50.0;
    
  // Display the sensor reading
   
    LCD.clear();
    LCD.print("Sensor reading:");
    LCD.setCursor(2,1);
    LCD.print(SensorTemp); LCD.print(" C");
   
    delay(2000);
  
 /*Compare the sensor reading with the range of
  acceptable temperatures*/
  
   if(SensorTemp > MaxTemp){
      LCD.clear();
      LCD.print("temp is HIGHER!");//higher than the max
     
      /*Turn on FAN (dc motor)! to regulate the temp.
       Increase FAN speed at a slow rate*/
     
      LCD.setCursor(0, 1);LCD.print("Turn on FAN!");
      for( int i = 0; i <= 255; i++ ) {
        analogWrite(FAN_pin, i);
       }
       delay(2000);
     
       LCD.clear();
       LCD.print("Now temp is OK!");
       LCD.setCursor(0, 1);
       LCD.print("Turn off FAN!");
     
  // Turn off FAN slowly
       for( int i = 255; i >= 0; i-- ) {
        analogWrite(FAN_pin, i);
       }
        delay(2000);
       }
  else if(SensorTemp < MinTemp){
      LCD.clear();
      LCD.print("temp is LOWER!");//Less than the mini
      LCD.setCursor(0, 1);
      LCD.print("Turn on HEATER!");
    
     //Turn the heater ON, LED in our case 
    
      digitalWrite(Heater_pin, HIGH);
    
      delay(3000);
    
      LCD.clear();
      LCD.print("Now temp is OK!");
      LCD.setCursor(0, 1);
      LCD.print("Turn off HEATER!");
    
      delay(1000);
    
      digitalWrite(Heater_pin, LOW);
      LCD.clear();
      }
  else if(SensorTemp > MinTemp && SensorTemp < MaxTemp){/*Now temperature is perfect.
       That is,it is in the desired range. Hence no need of changes!!*/
      LCD.clear();
      LCD.print("Temp is NORMAL!");LCD.setCursor(2,1);
      LCD.print("Turn off all!");
    
      delay(1000);
      LCD.clear();
   }
  else {
      LCD.clear();
      LCD.print("Something went");
      LCD.setCursor(2,1); LCD.print("WRONG in the ckt");
      delay(1000);
      LCD.clear();
    }
    delay(1000);
   } 

Credits

Semere Beyene

Semere Beyene

1 project • 1 follower

Comments