// This #include statement was automatically added by the Particle IDE.
#include <neopixel.h>
/*-------------------------------------------------------------------------
Spark Core, Particle Photon, P1, Electron and RedBear Duo library to control
WS2811/WS2812/WS2813 based RGB LED devices such as Adafruit NeoPixel strips.
Supports:
- 800 KHz WS2812, WS2812B, WS2813 and 400kHz bitstream and WS2811
- 800 KHz bitstream SK6812RGBW (NeoPixel RGBW pixel strips)
(use 'SK6812RGBW' as PIXEL_TYPE)
Also supports:
- Radio Shack Tri-Color Strip with TM1803 controller 400kHz bitstream.
- TM1829 pixels
PLEASE NOTE that the NeoPixels require 5V level inputs
and the Spark Core, Particle Photon, P1, Electron and RedBear Duo only
have 3.3V level outputs. Level shifting is necessary, but will require
a fast device such as one of the following:
[SN74HCT125N]
http://www.digikey.com/product-detail/en/SN74HCT125N/296-8386-5-ND/376860
[SN74HCT245N]
http://www.digikey.com/product-detail/en/SN74HCT245N/296-1612-5-ND/277258
Written by Phil Burgess / Paint Your Dragon for Adafruit Industries.
Modified to work with Particle devices by Technobly.
Contributions by PJRC and other members of the open source community.
Adafruit invests time and resources providing this open source code,
please support Adafruit and open-source hardware by purchasing products
from Adafruit!
--------------------------------------------------------------------*/
/* ======================= includes ================================= */
#include "Particle.h"
#include "neopixel.h"
/* ======================= prototypes =============================== */
void colorAll(uint32_t c, uint8_t wait);
void colorWipe(uint32_t c, uint8_t wait);
void rainbow(uint8_t wait);
void rainbowCycle(uint8_t wait);
uint32_t Wheel(byte WheelPos);
/* ======================= extra-examples.cpp ======================== */
SYSTEM_MODE(AUTOMATIC);
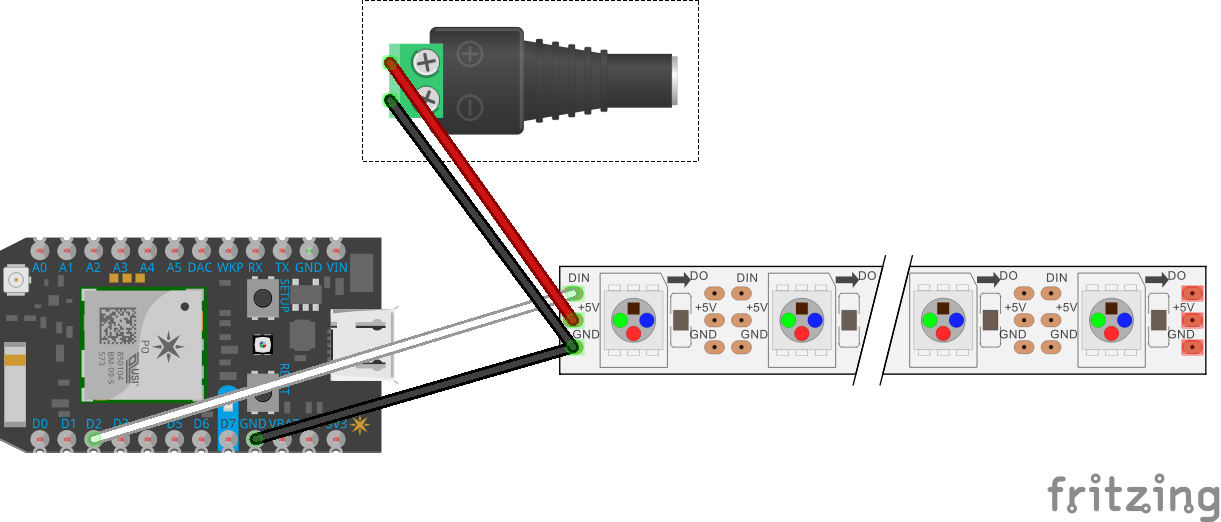
// IMPORTANT: Set pixel COUNT, PIN and TYPE
#define PIXEL_COUNT 145
#define PIXEL_PIN D2
#define PIXEL_TYPE WS2812B
// Parameter 1 = number of pixels in strip
// note: for some stripes like those with the TM1829, you
// need to count the number of segments, i.e. the
// number of controllers in your stripe, not the number
// of individual LEDs!
// Parameter 2 = pin number (most are valid)
// note: if not specified, D2 is selected for you.
// Parameter 3 = pixel type [ WS2812, WS2812B, WS2812B2, WS2813, WS2811,
// TM1803, TM1829, SK6812RGBW, WS2812B_FAST,
// WS2812B2_FAST ]
// note: if not specified, WS2812B is selected for you which
// is the same as WS2812 or WS2813 in operation.
// note: RGB order is automatically applied to WS2811,
// WS2812/WS2812B/WS2812B2/WS2813/TM1803 is GRB order.
// note: For legacy 50us reset pulse timing on WS2812/WS2812B
// or WS2812B2, select WS2812B_FAST or WS2812B2_FAST
// respectively. Otherwise 300us timing will be used.
//
// 800 KHz bitstream 800 KHz bitstream (most NeoPixel products
// WS2812/WS2813 (6-pin part)/WS2812B (4-pin part)/SK6812RGBW (RGB+W) )
//
// 400 KHz bitstream (classic 'v1' (not v2) FLORA pixels, WS2811 drivers)
// (Radio Shack Tri-Color LED Strip - TM1803 driver
// NOTE: RS Tri-Color LED's are grouped in sets of 3)
Adafruit_NeoPixel strip(PIXEL_COUNT, PIXEL_PIN, PIXEL_TYPE);
// IMPORTANT: To reduce NeoPixel burnout risk, add 1000 uF capacitor across
// pixel power leads, add 300 - 500 Ohm resistor on first pixel's data input
// and minimize distance between Arduino and first pixel. Avoid connecting
// on a live circuit...if you must, connect GND first.
void setup() {
Particle.subscribe("ToddOn008", myHandler);
strip.begin();
strip.show(); // Initialize all pixels to 'off'
}
void loop() {
// Some example procedures showing how to display to the pixels:
// Do not run more than 15 seconds of these, or the b/g tasks
// will be blocked.
//--------------------------------------------------------------
//strip.setPixelColor(0, strip.Color(255, 0, 255));
//strip.show();
//colorWipe(strip.Color(255, 0, 0), 50); // Red
//colorWipe(strip.Color(0, 255, 0), 50); // Green
//colorWipe(strip.Color(0, 0, 255), 50); // Blue
//rainbow(20);
//rainbowCycle(20);
//colorAll(strip.Color(0, 255, 255), 50); // Cyan
}
// Set all pixels in the strip to a solid color, then wait (ms)
void colorAll(uint32_t c, uint8_t wait) {
uint16_t i;
for(i=0; i<strip.numPixels(); i++) {
strip.setPixelColor(i, c);
}
strip.show();
delay(wait);
}
// Fill the dots one after the other with a color, wait (ms) after each one
void colorWipe(uint32_t c, uint8_t wait) {
for(uint16_t i=0; i<strip.numPixels(); i++) {
strip.setPixelColor(i, c);
strip.show();
delay(wait);
}
}
void rainbow(uint8_t wait) {
uint16_t i, j;
for(j=0; j<256; j++) {
for(i=0; i<strip.numPixels(); i++) {
strip.setPixelColor(i, Wheel((i+j) & 255));
}
strip.show();
delay(wait);
}
}
// Slightly different, this makes the rainbow equally distributed throughout, then wait (ms)
void rainbowCycle(uint8_t wait) {
uint16_t i, j;
for(j=0; j<256; j++) { // 1 cycle of all colors on wheel
for(i=0; i< strip.numPixels(); i++) {
strip.setPixelColor(i, Wheel(((i * 256 / strip.numPixels()) + j) & 255));
}
strip.show();
delay(wait);
}
}
// Input a value 0 to 255 to get a color value.
// The colours are a transition r - g - b - back to r.
uint32_t Wheel(byte WheelPos) {
if(WheelPos < 85) {
return strip.Color(WheelPos * 3, 255 - WheelPos * 3, 0);
} else if(WheelPos < 170) {
WheelPos -= 85;
return strip.Color(255 - WheelPos * 3, 0, WheelPos * 3);
} else {
WheelPos -= 170;
return strip.Color(0, WheelPos * 3, 255 - WheelPos * 3);
}
}
void myHandler(const char *event, const char *data)
{
/* Particle.subscribe handlers are void functions, which means they don't return anything.
They take two variables-- the name of your event, and any data that goes along with your event.
In this case, the event will be "buddy_unique_event_name" and the data will be "intact" or "broken"
chars just don't play that way. Instead we're going to strcmp(), which compares two chars.
If they are the same, strcmp will return 0.
*/
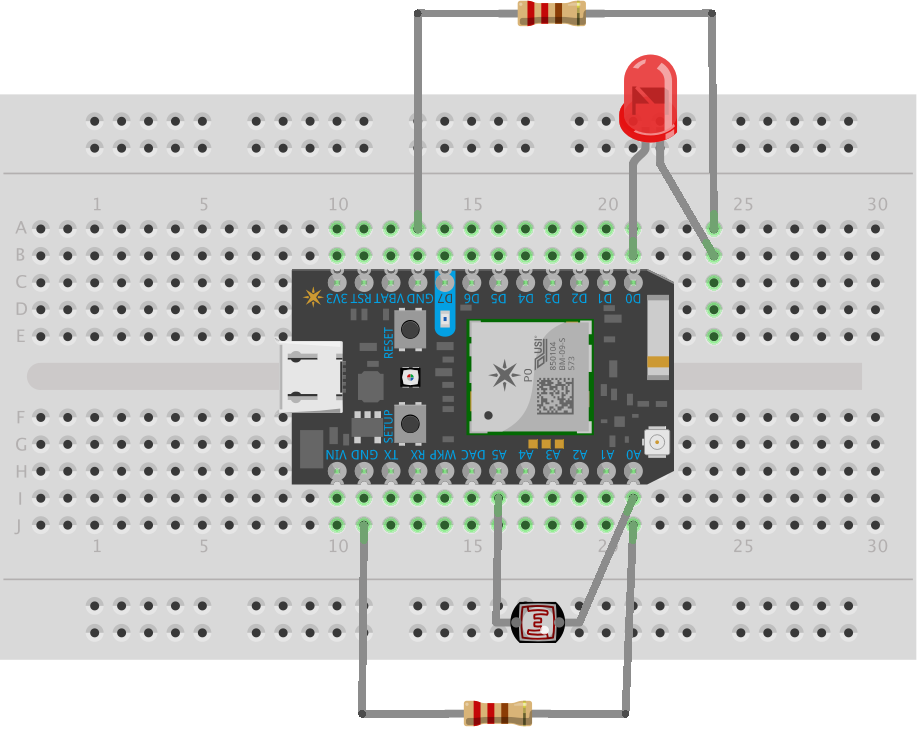
if (strcmp(data,"on")==0) {
// if your photoresistor detects the lights are not on, turn on the LED's and publish event saying success
colorWipe(strip.Color(255, 0, 0), 50); // Red
strip.show();
Particle.publish("SeanSuccess008","On");
}
else if(strcmp(data,"off")==0) {
Particle.publish("SeanSuccess008","Off");
colorAll(strip.Color(0, 0, 0), 50); // Cyan
// if the data is something else, don't do anything.
// Really the data shouldn't be anything but those two listed above.
}
}


Comments