

Hardware components | ||||||
 |
| × | 1 | |||
| × | 18 | ||||
| × | 18 | ||||
| × | 5 | ||||
| × | 3 | ||||
Software apps and online services | ||||||
| ||||||
| ||||||
 |
| |||||
| ||||||
| ||||||
Hand tools and fabrication machines | ||||||
 |
| |||||
| ||||||
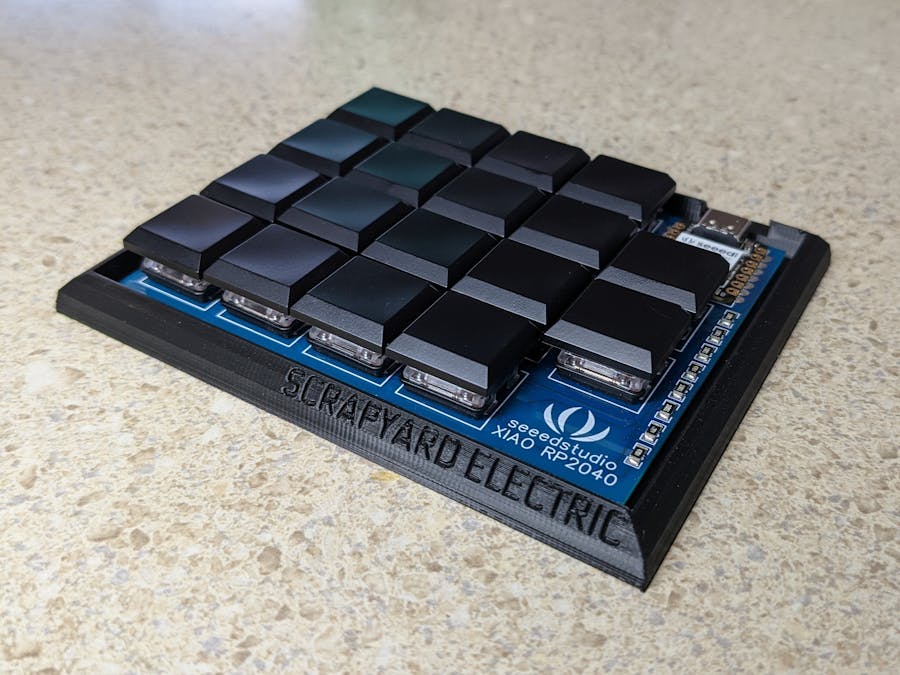
If you're anything like me, you have a relatively modern and compact laptop as your main computing device - but it doesn't have a numpad, it has a row of keys along the top. This is frustrating, as I do quite of bit of number input for both my day job and hobbies. So, I could buy a relatively cheap (and potentially wireless) numpad, I could buy a new laptop - or I could make a project out of it and design my own!Documented below is how I went about it, with the included files if you wish to make your own. It's a real pleasure to use, and could be used for other purposes as well! Macropads are quite common nowadays, for gaming streaming, design, and more, and having a pad to suit your specific use case is very handy.
There are many custom-made keyboards and macropad examples out there, and for years people have used the Arduino Micro, due to it's onboard USB capability and small size. However, with the introduction of the Raspberry Pi RP2040 micrcontroller in 2021, keyboards have begun to appear using it. Comparitively, it has a lot more processing power, memory, and peripherals. For this project I went with the Seeed Studio XIAO RP2040, as it is the smallest RP2040 board on the market. Seeed Studio were kind enough to sponsor this project, and I used their FusionPCB assembly service to create the finished, gorgeous PCBs. I can highly recommend them!
Given the number of keys I wanted, compared to the relatively limited number of pins on the Seeed Studio XIAO RP2040 (due to it's crazy small size) and wanting to have spare pins available for future expansion, I opted for a resistor network - this allows for variations in voltage observed at one of the RP2040's analogue pins caused by key presses, to be assigned to specific keyboard inputs. Each key results in a different combination of resistance through the resistor network, and thus voltage, which the RP2040 reads and assigns a value from 0-1023 through its ADC (Analgoue to Digital Converter). Anyway, there are many examples of this found across the internet, and mine is no different. ADCs are very useful hardware features found in many microcontrollers that allows for interfacing with anything that produces an analogue signal, such as thermistors, pressure sensors, and more. The RP2040 has a 12-bit ADC, meaning 1024 degrees of resolution. You can read more about ADCs at this Wikipedia link:
https://en.wikipedia.org/wiki/Analog-to-digital_converter
Once the key layout was decided upon, it was time to arrange everything on a PCB in prepartion for manufacturing. Using EasyEDA, I arranged the footprints in such a way so that the keys are ergonomically comfortable, as well as spaced appropriately to fit the keycaps later. Importantly, as this is intended to be a USB keyboard, the placement of the XIAO R2040 needs to be such that the USB port is easily accessible. As seen below, the USB-C port is facing outwards in the top right corner, making it easy to connect and program. The keys are connected to the A0 analogue pin on the XIAO RP2040, and the remaing pins have both large pads and standard 0.254 drill holes, so accessing further functions is easy. I also wanted to make the layout of the components evident, for their aesthetic value. The rear of the PCB has the pinouts marked. Lastly, four 3mm holes were placed between SW1-2-5-6, SW3-4-7-6, SW9-10-13-14, and SW11-12-15-16, for mounting into the case. This prevent the PCB moving around whilst in use, and gives it some clearance beneath for the through pins of the key switches and for any further expansion.
Once the PCB layout has been finalised, I had to go through the components in EasyEDA and confirm I had selected the correct part number, and manufacturer - this is essential for the ordering process, otherwise your components may not fit, be rated for the intended purpose, or be suitable for SMD assembly!
For all your PCB manufacturing needs, please visit Seeed Studio's FusionPCBA website.
Step Three: The HousingGiven the intened purpose of the device, and the aesthetic I had in mind, I opted to design and 3D print a housing that supported the PCB in such a way that it left some of the components exposed. Using Tinkercad, I created a Torus with dimensions large enough to place the PCB inside it, with a 5mm clearance around it's circumference. I then reduced the number of sides on the torus to make it more beveled, created a similary sized rectangle, and grouped them. This gave me the basic external shape I was after - a beveled box. Then I used a negative cube just big enough to delete the remainder, leaving a 2mm thick base. From here, I used my calipers to take some accurate measurements of the location of the USB-C port, and the four mounting holes, and created a cut out for the port, and stand offs to mount the PCB. I printed this in black Overture PLA Professional (PLA+) on my Ender 3 V2, at 195/45°C and 20% infill. It took about 3 hours. The stand offs are 2.5mm in diameter, which is about right to compensate for the differences between the printed product and design for a nice interference fit.
The RP2040 does not have as extensive library support as other, older, chips, and so the code is only functional on 16 keys (Escape and Backspace are yet to work). I have used the USBKeyboard.h library, which doesn't support sending commands for the Escape keypress. As such, those keys have placeholder text. In time, as more libraries support the RP2040, this sketch could be recompiled, or another library could be used. Alternatively, you could program with MicroPython; unfortunately I'm not familiar with it!
The sketch I've provided is a good starting point, however. It uses a basic if-else if structure, determining which key press to print based upon the resistance of the resistor network, and reports the detected ADC value (good for troubleshooting erroneous key presses). It also has the necessary libraries and pins set high for using the onboard WS2812 RGB LED, with it set to a simple blue colour to indicate that the device is operating. Future iterations of this project could see RGB LEDs beneath each key, as is often seen in top-tier aftermarket keyboards.
Here is the code:
/* Seeed Studio XIAO RP2040-based 18 key numpad, using one
   analogue input pin and resistor network.

   Written by Scrapyard Electric, May 2022.

   This table gives averaged ADC values for the keys on my
   device, and may differ to yours. It is recommended to use
   a simple analogRead(A0) sketch to determine to appropriate
   values for your device.
   _____________________________________________________
   |7 = 152, 8 = 1023, 9 = 139, X = 101                 |
   |4 = 128, 5 = 120,  6 = 107, / = 95,  Clear(Esc)= 524|
   |1 = 90,  2 = 315,  3 = 163, + = 783, Backspace = 393|
   |. = 236, 0 = 205,  = = 182, - = 278                 |
   -----------------------------------------------------

   If flashing code fails:
   1) Hold Reset, then hold Boot, relese Reset.
      This will open a folder with INDEX & IFO_UF2 files.
   2) Place file blink.ino.elf.uf2 in the folder,
      which should flash the board and close the folder.
   3) You may need to press Reset again, but the Xiao
      should be visible in the Arduino IDE under Ports again.

      ***WS2812 RGB Neopixel on Pin 12***
       ***Requires Pin 11 to be HIGH***

*/

#include <USBKeyboard.h>
#include <PluggableUSBHID.h>
#include <Adafruit_NeoPixel.h>

#define NUMPIXELS 1

int Power = 11;
int PIN  = 12;
int keyPin = A0;
int keyValue = 0;

USBKeyboard Keyboard;
Adafruit_NeoPixel pixels(NUMPIXELS, PIN, NEO_GRB + NEO_KHZ800);

void setup() {

  pinMode(Power, OUTPUT);
  digitalWrite(Power, HIGH);

  pixels.begin();
  pixels.clear();
  pixels.setPixelColor(0, pixels.Color(15, 25, 205));
  pixels.show();

  Serial.begin(115200);

}

void loop() {

  keyValue = analogRead(keyPin);

  if ((keyValue >= 80) && (keyValue <= 90)) { //90, 1
    Keyboard.printf("1");
    Serial.println(keyValue);
    delay(150);
  }

  else if ((keyValue >= 95) && (keyValue <= 97)) { //95, /
    Keyboard.printf("/");
    Serial.println(keyValue);
    delay(150);
  }

  else if ((keyValue >= 98) && (keyValue <= 102)) { //101, X
    Keyboard.printf("*");
    Serial.println(keyValue);
    delay(150);
  }

  else if ((keyValue >= 104) && (keyValue <= 109)) { // 107, 6
    Keyboard.printf("6");
    Serial.println(keyValue);
    delay(150);
  }

  else if ((keyValue >= 116) && (keyValue <= 122)) { //120, 5
    Keyboard.printf("5");
    Serial.println(keyValue);
    delay(150);
  }

  else if ((keyValue >= 125) && (keyValue <= 130)) { //128, 4
    Keyboard.printf("4");
    Serial.println(keyValue);
    delay(150);
  }

  else if ((keyValue >= 133) && (keyValue <= 141)) { //139, 9
    Keyboard.printf("9");
    Serial.println(keyValue);
    delay(150);
  }

  else if ((keyValue >= 145) && (keyValue <= 154)) { //152, 7
    Keyboard.printf("7");
    Serial.println(keyValue);
    delay(150);
  }

  else if ((keyValue >= 159) && (keyValue <= 165)) { //163, 3
    Keyboard.printf("3");
    Serial.println(keyValue);
    delay(150);
  }

  else if ((keyValue >= 175) && (keyValue <= 184)) { //182, =
    Keyboard.printf("=");
    Serial.println(keyValue);
    delay(150);
  }

  else if ((keyValue >= 198) && (keyValue <= 207)) { //205, 0
    Keyboard.printf("0");
    Serial.println(keyValue);
    delay(150);
  }

  else if ((keyValue >= 230) && (keyValue <= 238)) { //236, .
    Keyboard.printf(".");
    Serial.println(keyValue);
    delay(150);
  }

  else if ((keyValue >= 270) && (keyValue <= 280)) { //278, -
    Keyboard.printf("-");
    Serial.println(keyValue);
    delay(150);
  }

  else if ((keyValue >= 308) && (keyValue <= 319)) { //315, 2
    Keyboard.printf("2");
    Serial.println(keyValue);
    delay(150);
  }

  else if ((keyValue >= 380) && (keyValue <= 410)) { //393, Backspace
    Keyboard.printf("Backspace");
    Serial.println(keyValue);
    delay(150);
  }

  else if ((keyValue >= 515) && (keyValue <= 540)) { //524, Escape
    Keyboard.printf("Escape");
    Serial.println(keyValue);
    delay(150);
  }

  else if ((keyValue >= 765) && (keyValue <= 785)) { //783, +
    Keyboard.printf("+");
    Serial.println(keyValue);
    delay(150);
  }

  else if (keyValue > 1000) { //1023, 8
    Keyboard.printf("8");
    Serial.println(keyValue);
    delay(150);
  }

}
Uploading this code, and opening the serial monitor on the correct port at 115200 baud, will give this result when testing the keys:
And that's it! I thoroughly enjoyed this project, as it yields a real world item that you can make good use of. The Seeed Studio XIAO RP2040 is the perfect companion for such a project, as well as any other project where you need a powerful MCU in a tiny form factor, onboard RGB and the versatility of USB-C.
If you're looking at getting something created, I can highly recommend Seed Studio's Fusion PCBA service - it's fast, and produces excellent quality boards. They have access to thousands of parts for SMD assembly, and their engineers will work with you to create exactly what you want.
_t9PF3orMPd.png?auto=compress%2Cformat&w=40&h=40&fit=fillmax&bg=fff&dpr=2)
Comments