


Hardware components | ||||||
 |
| × | 1 | |||
 |
| × | 1 | |||
 |
| × | 1 | |||
| × | 6 | ||||
 |
| × | 3 | |||
 |
| × | 3 | |||
Software apps and online services | ||||||
 |
| |||||
| ||||||
 |
| |||||
Today the internet is not only to connect human to human but also to connect human to things or things to things. And this is called as Internet of Things.
Internet of Things is one of the most important topic for today's world. The whole world depends on internet. So, project on Internet of Things seems to be one of the most interesting for all. Keeping that in my mind, I have created my project on IoT where I have made Home Automation system, in which we can control our home appliances from any where in the world.
This project has many real time examples and use cases.
Steps for building the projectHardware Section -Step 1. Hardware Component
We need the following components to build the whole project:
- Bolt WiFi Module v2
- Connecting wires x 6 (Male to Male)
- LED x 3 units
- Resistors: 330 Ohm x 3 units
- Breadboard
- Micro-USB Cable ( mobile charger can also be used )
- Power Source ( power bank can also be used )
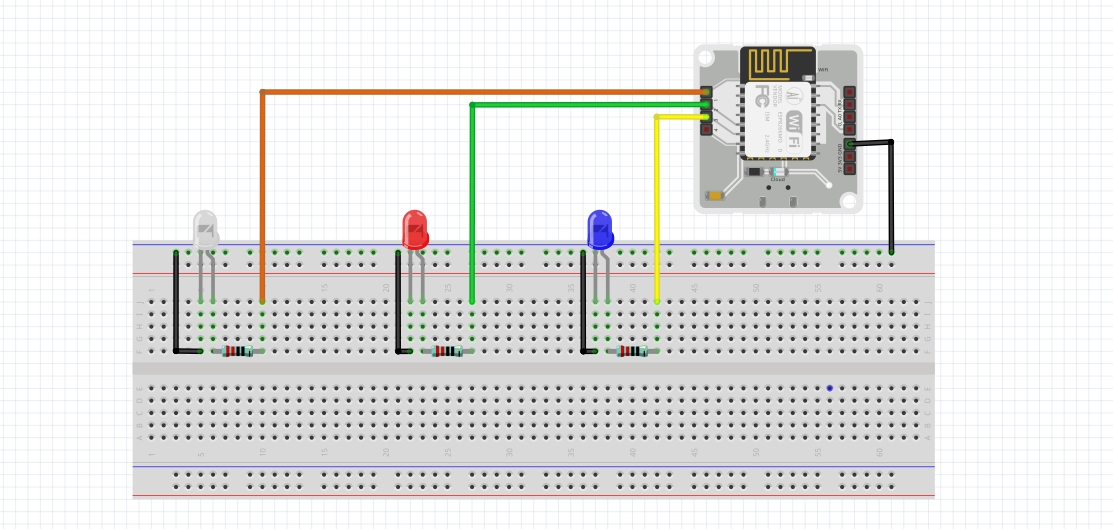
Step 2. Hardware Configuration
- Connect a jumper wire from GPIO pin 1 & GND pin to breadboard.
- Attach a led on breadboard.
- The negative terminal of led is connected to GND &
- The positive terminal is connected to one end of resistor
- And other end of resistor is connected to GPIO pin 1.
- Now Connect two more jumper wires from GPIO pin 2 & 3 to the breadboard.
- Attach two more LED on breadboard.
- Make the same connection which we done previously.
- Final circuit connection will look like this.
Step 1. AWS Cloud Server Setup
1a. Creating an account on AWS (Amazon Web Service) :
First, we need to create a AWS account. Please Click Here and create a new account.
Fill the signup form :
- Email address
- Password
- Confirm password
- AWS account name
And Click on Continue
Now fill Contact Information and Click on Create Account and Continue
Now fill Payment Information and Click on Verify and Add.
Note: You will be charged INR 2.00 as part of card verification.
Now, Confirm your identity enter your phone number and click on Send SMS.
We will receive an message with verification code. Enter verification code and click on Verify.
Once Your identity has been verified successfully click on Continue.
Now, We will have to select a plan here we Select Basic Plan and click on Free.
Now, We will redirected to AWS home page here we have to personalize our AWS account. Here we will Select My role is- Student and I am interested in- Internet of Things and click on Submit in Personalize your experience section. Next, Click on Sign in to the Console button.
On the Sign in page enter email address and click on Next.
Next, Enter password and click on Sign in.
We will receive an welcome email this means we are done with account creation.
Now Our account is ready. Let’s create Cloud Server.
1b. Creating Cloud Server (EC2 Instance)
EC2 Instance -
Amazon Elastic Compute Cloud (Amazon EC2) provides scalable computing capacity in the Amazon Web Services (AWS) cloud.
In the AWS Management Console search EC2 and click on EC2.
On EC2 Dashboard, Select Instances.
Click on Launch Instance to create new instances.
In this step, we will choose the appropriate machine image(OS) of instance for this project I choose 64-bit Ubuntu server 18.04 LTS. Click on Select.
On the Choose an Instance Type page, you can select the hardware configuration of your instance. Select the t2.micro type, which is selected by default. Notice that this instance type is eligible for the free tier. Click on Next: Configure Instance Details
On this page keep every things by default. Click on Next: Add Storage
On this Add Storage page will see by default Root has storage size of 8 GB, we can increase it upto 30 GB if we want. Click on Next: Add Tags.
On Add Tags page we can add key & value, here we will add key: Name & Value:Ubuntu.
Now click on Next: Configure Security Group.
On the Configure Security Group page, ensure that Create a new security group is selected and by default SSH is added, then choose Review and Launch.
On the Review Instance Launch page, choose Launch
When prompted for a key pair, Select Create a new key pair, enter a name for the key pair, and then choose Download Key Pair. This is the only chance for us to save the private key file, so be sure to download it. Save the private key file in a safe place. We'll need this key to generate a private key from which we can connect to the server.
When we are ready, select the acknowledgement check box, and then choose Launch Instances. A confirmation page lets us know that your instance is launching. Choose View Instances to close the confirmation page and return to the console.
On the Instances screen, we can view the status of the launch. It takes a short time for an instance to launch. When you launch an instance, its initial state is "pending". After the instance starts, its state changes to "running" and it receives a public DNS name.
It can take a few minutes for the instance to be ready so that we can connect to it. Check that our instance has passed its status checks; we can view this information in the Status Checks column.
An Elastic IP address is a static IPv4 address designed for dynamic cloud computing.
To allocate an Elastic IP address-
In the navigation pane, choose Elastic IPs.
Choose Allocate Elastic IP address.
For IPv4 address pool, choose Amazon pool.
Choose Allocate, and close the confirmation screen.
We will see an ip address, now we have to associate this ip address to our server to do so click on Associate This Elastic IP address.
On the next screen we will choose Instance and select our instance and private ip address of that instance. and click on Associate button.
Go back to Instances dashboard we will now see an Elastic IP address which we require to connect to server. Now let’s log into our server.
1c. Logging Into the Server (ec-2 instance)
We created a server and got the login key and server IP. Now, we will need a tools/software for ssh(login to the server) into our server. for windows os we can use putty to write the code and to execute.
First we need to generate a private ssh key from previously downloaded key while creating server.
To generate private key we need a tool called PuTTY Key Generator.
Open this tool and click on Load button to load downloaded key.
Once you select your key click on Save private key and save that key.
Now we have our server ip address and ssh private key. Open PuTTY and enter our server ip address and select port at 22 and Connection type as SSH.
Now to load ssh private key click on Connection and then click on SSH and then under SSH click on Auth.
Now we have to browse our generated private key to do so Click on Browse.
And then click on Open.
Now we will seen this screen this means we logged into our server.
Step 2. Bolt Python Library
The Bolt Python library makes it easy to interact with the Bolt cloud API from our Python application.
We can control or fetch the data from Bolt cloud to our server(Here Ubuntu from AWS), Bolt Python library will help us in building the IoT product.
Before we proceed to this step, first ssh(login) to Ubuntu server and follow the below steps to use Bolt Python library in code.
2a. Update the packages on Ubuntu
Execute the command below so that the packages on Ubuntu are updated to the latest version.
sudo apt-get -y update2b. Install pip3
pip3 is a package manager for python3 used to install and manage packages and python libraries. It is system independent.
Install pip3 using the following command,
sudo apt install python3-pip2c. Installing boltiot Library Using pip
Now we will install the boltiot python library on your Ubuntu server.
Type the below command in terminal to install boltiot python library.
sudo pip3 install boltiotNow we are done with boltiot python library installation.
Step 3. Telegram Configuration
On the Instances screen, we can view the status of the launch. It takes a short time for an instance to launch. When you launch an instance, its initial state is pending". After the instance starts, its state changes to "running" and it receives a public DNS name.
receive messages along with files also. It is FREE to use. You can access the platform via your Android/iOS/Windows phone and also your PC or Mac.
3a. Telegram Setup
- Go to the Playstore or App Store on phone and search for Telegram.
- Download and Install the latest version of Telegram app.
- Signup for a new account or sign in to Telegram by providing your mobile number.
- Telegram will call you OR send you a SMS to verify your mobile number.
- Get our account verified and approve any permissions if required.
- We will be logged in to Telegram and will be shown a screen similar to the one below.
- You have successfully installed Telegram and setup your account.
- Next, we will have to create a Channel and Bot.
3b. Creating a Telegram channel
A channel is to Telegram what Groups are to Whatsapp. Channels are a tool for broadcasting your messages to large audiences. They can have an unlimited number of subscribers, they can be public with a permanent URL and each post in a channel has its own view counter.
Steps to create a channel
- Go to the home screen of the Telegram app.
- Swipe from the left side to reveal the menu.
- Click on "New Channel".
- It will ask for a Name and Description for our channel. Give a suitable name and description. Adding photo is optional.
- In the next screen set the channel as Public.
- On the same screen, it will ask to enter a permanent link for our channel. We can use lowercase letters and numbers 0-9 to create the channel link.
- Please note that the channel link name is global and we will be able to create a channel link only if the link name is available.
- Keep a note of this Channel permanent link name. It will be required later on to send messages to this channel. For example, the channel link name in the screenshot below is "sauravganguly_home_automation".
- In the next screen it will ask to Add Members to channel, if want to add then select that member or simply click next to skip adding member.
- Congratulations! We have created a new channel.
- Next we will need to create and add a Bot to the channel so that it can post alerts for us in this channel.
3c. Creating a Telegram bot
Bots are third-party applications that run inside Telegram. Users can interact with bots by sending them messages, commands and requests. We will be using Bots to send alerts on our channel.
Steps to create a new bot
Telegram allows us to create a new bot with the help of a bot called as "BotFather". It is a single bot to create and manage other bots.
- On the Home screen of the app, click on the search icon on the top right and type in "botfather"
- In the search results, click on the correct result for "BotFather" as shown below.
- The chat will have a few items already and will display you a list of commands to get started.
- Since we need to create a new Bot, go ahead and type in "/newbot" in the window
- It will ask us to type in few more details like Bot name and Bot username.
- When our bot is created successfully, we will be shown a screen similar to the one below and will contain the Bot Token. This token is used to control your Bot as well as send messages on behalf of it. Please keep this token secure as it will allow anyone to access your Bot.
- In the screenshot above, the Bot token is "894346529:AAhuJ2XJQy5dlEtLYF0sc0Z_qu0fSqihSSc". Please save it as telegram_bot_id. The telegram_bot_id is saved as "bot" followed by the bot token. So, in this example, the telegram_bot_id will be "bot894346529:AAhuJ2XJQy5dlEtLYF0sc0Z_qu0fSqihSSc".
- The telegram_bot_id will be used in the python code to send messages and fetch message.
- Congratulations, We have created a new Bot. Now, we will need to add it to the channel we have created previously so that we can send alerts.
3d. Adding the bot to channel
- From the App home screen, open the channel we have created earlier.
- In the screen, click on the channel name on the top to open the information for the Channel.
- Click on the Administrators button so that we can add the newly created bot to the channel.
- Search for the bot that we have created using the Bot's username. Once you have found the correct Bot click on it to add it to the channel.
- We will be asked to confirm the rights for the bot. Press on the tick mark on the top right to continue adding the bot to the channel. Make sure that the bot has the rights to "Post Messages".
- We will now see the newly created Bot in the list of administrators for the channel.
- Now we will code for sending messages and fetching message to the channel via the Bot.
Step 4. Generating API in Bolt Cloud
4a. Device ID
we can find the device id under device section.
4b. API Key
We have to generate Bolt API key as the following in Bolt cloud:
Step 5. Code
1. Make the same circuit connections as described before.
2. Once you are done with that, log in to server and create a new folder to hold the files for this topic.
3. We can create a new folder and enter it using the following command.
mkdir Home_Automation
cd Home_Automation
4. Create a configurations file for this project, using the following command.
sudo nano conf.pyAfter the editor is open, type in the following configuration parameters
"""Configurations for home_automation.py"""
# Bolt IoT Credentials
api_key = "f18c7b40-xxxx-xxxx-xxxx-xxxxxxxxxxxx"     #API Key of Bolt Cloud
device_id  = "BOLTxxxxxx"                            #Device ID
# Telegram Credentials
telegram_chat_id = "@telegram_chat_id"
telegram_bot_id = "bot1_telegram_bot_id"
Press CTRL + x key and y and then enter to save file and exit from editor.
Note: We have to replace all the above value with our credentials. We can find the first in Bolt Cloud dashboard and second two we got in the telegram configuration section.
5. Now create one more file named home_automation.py, using the following command
sudo nano home_automation.pyAfter the editor is open, type in the following configuration parameters
import json, requests, time
from boltiot import Bolt
import conf

URL = "https://api.telegram.org/" + conf.telegram_bot_id

mybolt = Bolt(conf.api_key, conf.device_id)

light_pin = "1"
fan_pin = "2"
tv_pin = "3"
last_message_id = None
last_text = None

def check_device_status():
    try:
        response = mybolt.isOnline()
        response = json.loads(response)
        if response["value"] == "online":
            print("Device is Online")
            return True
        else:
            print("Device is offline")
            send_telegram_message("Device is offline")
            return False
    except Exception as e:
        print("An error occurred in Checking device status.")
        print(e)
        return False

def send_telegram_message(message):
    """Sends message via Telegram"""
    print("Sending telegram message .....")
    url = URL + "/sendMessage?text=" + message + "&chat_id=" + conf.telegram_chat_id
    try:
        response = requests.get(url)
        content = response.content.decode("utf8")
        js = json.loads(content)
        if js["ok"] == True:
            print("Messgae sent successfully.")
            return True
        else:
            print("Message on sent. Response: " + str(js["ok"]))
            print(js)
            return False
    except Exception as e:
        print("An error occurred in sending message via Telegram")
        print(e)
        return False

def get_last_message():
    """Gets last message from Telegram"""
    print("Getting last message .....")
    url = URL + "/getUpdates"
    try:
        response = requests.get(url)
        content = response.content.decode("utf8")
        js = json.loads(content)
        num_updates = len(js["result"])
        last_update = num_updates - 1
        message_id = js["result"][last_update]["channel_post"]["message_id"]
        text = js["result"][last_update]["channel_post"]["text"]
        print("This is the last message : " + text)
        return (text, message_id)
    except Exception as e:
        print("An error occurred in getting message from Telegram")
        print(e)

while True:
    # Step 1 : Check Device Status
    print("Checking device Status .....")
    response = check_device_status()
    if response != True:
        time.sleep(10)
        continue
    # Step 2 : Sending Welcome message with options.
    message = "Welcome to Smart Home Project\nMade with ❤ by Saurav Ganguly\n" + "-" * 55 + "\nSelect Option -\n1. Light on\n2. Light off\n3. Fan on\n4. Fan off\n5. TV on\n6. TV off"
    response = send_telegram_message(message)
    if response != True:
        continue
    time.sleep(10)
    # Step 3 : Getting last message from telegram
    text, message_id = get_last_message()
    # Step 4 : Checking with previous message & message_id
    if (text !=last_text) or (message_id != last_message_id):
        if (text == "1") or (text == "Light on") or (text == "light on"):
            mybolt.digitalWrite(light_pin,"HIGH")
            message = "Light turned on"
            print(message)
            send_telegram_message(message)
        elif (text == "2") or (text == "Light off") or (text == "Light off"):
            mybolt.digitalWrite(light_pin,"LOW")
            message = "Light turned off"
            print(message)
            send_telegram_message(message)
        elif (text == "3") or (text == "Fan on") or (text == "fan on"):
            mybolt.digitalWrite(fan_pin,"HIGH")
            message = "Fan turned on"
            print(message)
            send_telegram_message(message)
        elif (text == "4") or (text == "Fan off") or (text == "fan off"):
            mybolt.digitalWrite(fan_pin,"LOW")
            message = "Fan turned off"
            print(message)
            send_telegram_message(message)
        elif (text == "5") or (text == "TV on") or (text == "tv on"):
            mybolt.digitalWrite(tv_pin,"HIGH")
            message = "TV turned on"
            print(message)
            send_telegram_message(message)
        elif (text == "6") or (text == "TV off") or (text == "tv off"):
            mybolt.digitalWrite(tv_pin,"LOW")
            message = "TV turned off"
            print(message)
            send_telegram_message(message)
        last_text = text
        last_message_id = message_id

# Step 5 : Wait for 10 second
time.sleep(10)
Press CTRL + x key and y and then enter to save file and exit from editor.
This file will contain the main code. The algorithm for the code can be broken down into the following steps:
5.1) Check device status -
- If device is offline, send telegram message, wait for 10 seconds, and get back to check status again.
- if the device status is online it will continue to next
5.2) Sends a welcome message to select options.
5.3) After the message successfully sent, wait for 10 seconds.
5.4) Get last message from telegram and message_id.
5.5) Check if message or message_id is same as previous.
- If same go back and repeat from step 5.1
- If not continue next
5.6) Next, we check the message with correct option.
5.7) If option is satisfied do task according to option.
5.8) Wait for 10 second.
5.9) Repeat from step 5.1.
6. Here we will start writing the code. Let us start with the imports.
import json, requests, time
from boltiot import Bolt
import conf
json is a python library used for handling all operations on JSON objects. requests is used for making HTTP requests. time module is used for sleep operation. Importing Bolt from boltiot module. Import config file to get configuration credentials.
URL = "https://api.telegram.org/" + conf.telegram_bot_idCreating a url variable using telegram_bot_id from conf.py file.
mybolt = Bolt(conf.api_key, conf.device_id)The above code will automatically fetch your API key and Device ID that you have initialized in conf.py file
light_pin = "1"
fan_pin = "2"
tv_pin = "3"
last_message_id = None
last_text = None
Creating variable for GPIO pins 1, 2 & 3. creating two variable last_message_id = None & last_text = None which we will use later in program.
def check_device_status():
    try:
        response = mybolt.isOnline()
        response = json.loads(response)
        if response["value"] == "online":
            print("Device is Online")
            return True
        else:
            print("Device is offline")
            send_telegram_message("Device is offline")
            return False
    except Exception as e:
        print("An error occurred in Checking device status.")
        print(e)
        return False
Now, we will defining a function named check_device_status() which checks status of the device.
Code of this function is encased in a try-except block so that any errors are caught and it returns a False if any error is present in the try block.
This function check status using mybolt.isOnline() function, the response received will stores in response.
The line `response = json.loads(response)` converts the response to a JSON object and stores it in response.
Now we will check value from response, if it is online return True, if not send a telegram message that ’Device is offline’ & return False.
def send_telegram_message(message):
    """Sends message via Telegram"""
    print("Sending telegram message .....")
    url = URL + "/sendMessage?text=" + message + "&chat_id=" + conf.telegram_chat_id
    try:
        response = requests.get(url)
        content = response.content.decode("utf8")
        js = json.loads(content)
        if js["ok"] == True:
            print("Messgae sent successfully.")
            return True
        else:
            print("Message on sent. Response: " + js["ok"])
            print(js)
            return False
    except Exception as e:
        print("An error occurred in sending message via Telegram")
        print(e)
        return False
Next, we define a new function called send_telegram_message(message), which sends message to telegram when it will called.
Code of this function is encased in a try-except block so that any errors are caught and it returns a False if any error is present in the try block.
This function takes the message which we want to send (message). It then calls the sendMessage API command, passing message and the telegram_chat_id as URL parameters, thus asking Telegram to send the message.
We add the decode("utf8") part for extra compatibility, and store it in content.
The line js = json.loads(content) converts the response to a JSON object and stores it in js.
Now we will check “ok” from js, if it is True return True, if not then return False.
def get_last_message():
    """Gets last message from Telegram"""
    print("Getting last message .....")
    url = URL + "/getUpdates"
    try:
        response = requests.get(url)
        content = response.content.decode("utf8")
        js = json.loads(content)
        num_updates = len(js["result"])
        last_update = num_updates - 1
        message_id = js["result"][last_update]["channel_post"]["message_id"]
        text = js["result"][last_update]["channel_post"]["text"]
        print("This is the last message : " + text)
        return (text, message_id)
    except Exception as e:
        print("An error occurred in getting message from Telegram")
        print(e)
Next, we define a new function called get_last_message(), which gets last message from telegram when it will called.
We create url from URL with /get_updates which, calls the API command that retrieves a list of "updates" (messages sent to our Bot).
Code of this function is encased in a try-except block so that any errors are caught and it returns a False if any error is present in the try block.
Since /get_updates will always gets all the messages that were recently sent to our bot, this is not ideal, as we will always download a whole bunch of messages when we only want the last one.
We add the decode("utf8") part for extra compatibility, and store it in content.
The line js = json.loads(content) converts the response to a JSON object and stores it in js.
In the next line we get “result” from js & store it length in num_updates variable. Then in the next line “ last_update = num_updates - 1 “ we get the last update.
In the next two line we filter message_id and text.
message_id = js["result"][last_update]["channel_post"]["message_id"]
text = js["result"][last_update]["channel_post"]["text"]
This function will return message_id & text.
Next, we use while loop to continuously run the program. Under while loop there is 5 sub sections.
# Step 1 : Check Device Status
    print("Checking device Status .....")
    response = check_device_status()
    if response != True:
        time.sleep(10)
        continue
In step 1 we will check device status. Here we call check_device_status() function which we have defined earlier, the return value will we stored in response variable.
Then we check “ if response!= True “ then waits for 10 second and get back to program starting point.
# Step 2 : Sending Welcome message with options.
    message = "Welcome to Smart Home Project\nMade with ❤ by Saurav Ganguly\n" + "-" * 55 + "\nSelect Option -\n1. Light on\n2. Light off\n3. Fan on\n4. Fan off\n5. TV on\n6. TV off"
    response = send_telegram_message(message)
    if response != True:
        continue
    time.sleep(10)
In this step we have created a welcome message with option-
1. Light on
2. Light off
3. Fan on
4. Fan off
5. TV on
6. TV off
The message is stored in message variable. Then we call “ send_telegram_message(message)” function by passing message as argument. Returns of the function is stored in response.
Then we check if “ response != True “ then return back to starting of program, if not then wait 10 second and continue to next.
# Step 3 : Getting last message from telegram
    text, message_id = get_last_message()
In the step 3 we call “ get_last_message() “, which get the last message from telegram.
The return from “ get_last_message() ” is the message & message_id which is stored in text & message_id variables.
# Step 4 : Checking with previous message & message_id
    if (text !=last_text) or (message_id != last_message_id):
        if (text == "1") or (text == "Light on") or (text == "light on"):
            mybolt.digitalWrite(light_pin,"HIGH")
            message = "Light turned on"
            print(message)
            send_telegram_message(message)
        elif (text == "2") or (text == "Light off") or (text == "Light off"):
            mybolt.digitalWrite(light_pin,"LOW")
            message = "Light turned off"
            print(message)
            send_telegram_message(message)
        elif (text == "3") or (text == "Fan on") or (text == "fan on"):
            mybolt.digitalWrite(fan_pin,"HIGH")
            message = "Fan turned on"
            print(message)
            send_telegram_message(message)
        elif (text == "4") or (text == "Fan off") or (text == "fan off"):
            mybolt.digitalWrite(fan_pin,"LOW")
            message = "Fan turned off"
            print(message)
            send_telegram_message(message)
        elif (text == "5") or (text == "TV on") or (text == "tv on"):
            mybolt.digitalWrite(tv_pin,"HIGH")
            message = "TV turned on"
            print(message)
            send_telegram_message(message)
        elif (text == "6") or (text == "TV off") or (text == "tv off"):
            mybolt.digitalWrite(tv_pin,"LOW")
            message = "TV turned off"
            print(message)
            send_telegram_message(message)
        last_text = text
        last_message_id = message_id
In the step 4 we check message & message_id which if stored in text & message_id with last text & message_id. If the (text !=last_text) or (message_id != last_message_id)
then check if -
- text = "1" or "Light on" or "light on" then,
do “HIGH” to the light_pin and send telegram message “Light turned on”
- text == "2" or "Light off" or "Light off" then,
do “LOW” to the light_pin and send telegram message “Light turned off”
- text == "3" or "Fan on" or "fan on" then,
do “HIGH” to the fan_pin and sends telegram message “ Fan turned on “
- text == "4" or "Fan off" or "fan off" then,
do “LOW” to the fan_pin and sends telegram message “ Fan turned off “
- text == "5" or "TV on" or "tv on" then,
do “HIGH” to the fan_pin and sends telegram message “ TV turned on“
- text == "6" or "TV off" or "tv off" then,
do “LOW” to the fan_pin and sends telegram message “TV turned off “
At last we stores the content of text & message_id to last_text and last_message_id.
At the first iteration of while this step will always runs because we set last_text and last_message_id to None.
# Step 5 : Wait for 10 second
time.sleep(10)
Wait for 10 second and return at starting of program & repeat again from step 1.
Step 6. Project Output
Now that we have written the code for home automation lets run the code using the following command
sudo python3 home_automation.pyThis is the complete project. Thanks everyone!


Comments