

Hardware components | ||||||
| × | 1 | ||||
| × | 1 | ||||
 |
| × | 1 | |||
 |
| × | 2 | |||
 |
| × | 2 | |||
 |
| × | 1 | |||
 |
| × | 5 | |||
 |
| × | 1 | |||
 |
| × | 1 | |||
Software apps and online services | ||||||
 |
| |||||
Hand tools and fabrication machines | ||||||
 |
| |||||
 |
| |||||
 |
| |||||
My project name is Luma, it's an interactive ambient pixel object. So originally the project Luma was going to be built as the "Most Useless Re Invention of Sand Clock". During this time I was looking at products that can be kept next your monitor or on your desk which were aesthetic and beautiful to look at. I had this beautiful WS2812B 8x8 Matrix, and I wanted to create something with this. So, I combined that 8x8 Matrix and Sand Clock idea and created the first iteration for the idea.
After successfully creating the sand clock logic successfully and testing it, and later adding opening animations and closing animations to it. I had few ideas on how I should take this project further. With the ESP32 I wanted Luma to host a web server and anyone could just select the timer on the web page and it would start on the device. While I was working on it, I hit a lot of roadblocks and eventually put the project on hold.
Then I came across this Junk Drawer Competition luckily it had a section for Illuminated Interaction. So it was time to bring the project back but as per the criteria the device needs illumination based on user action. Luma did not had that earlier, so I reworked on what should the Luma be.
I had reprogrammed Luma for a completely different application. It went from being just a Sand Clock to an Interactive Ambient Pixel Object.
Luma v1 - An Interactive Ambient Pixel ObjectBy the name of it you could already guess that you are going to get to see some beautiful visuals. Selecting the visuals took a lot of time, to feel the visuals. There were moments where I kept watching the same visual over and over again and some visuals would just click right away, that would give me goosebumps and make me want to see it again and again.
Hardware Iteration
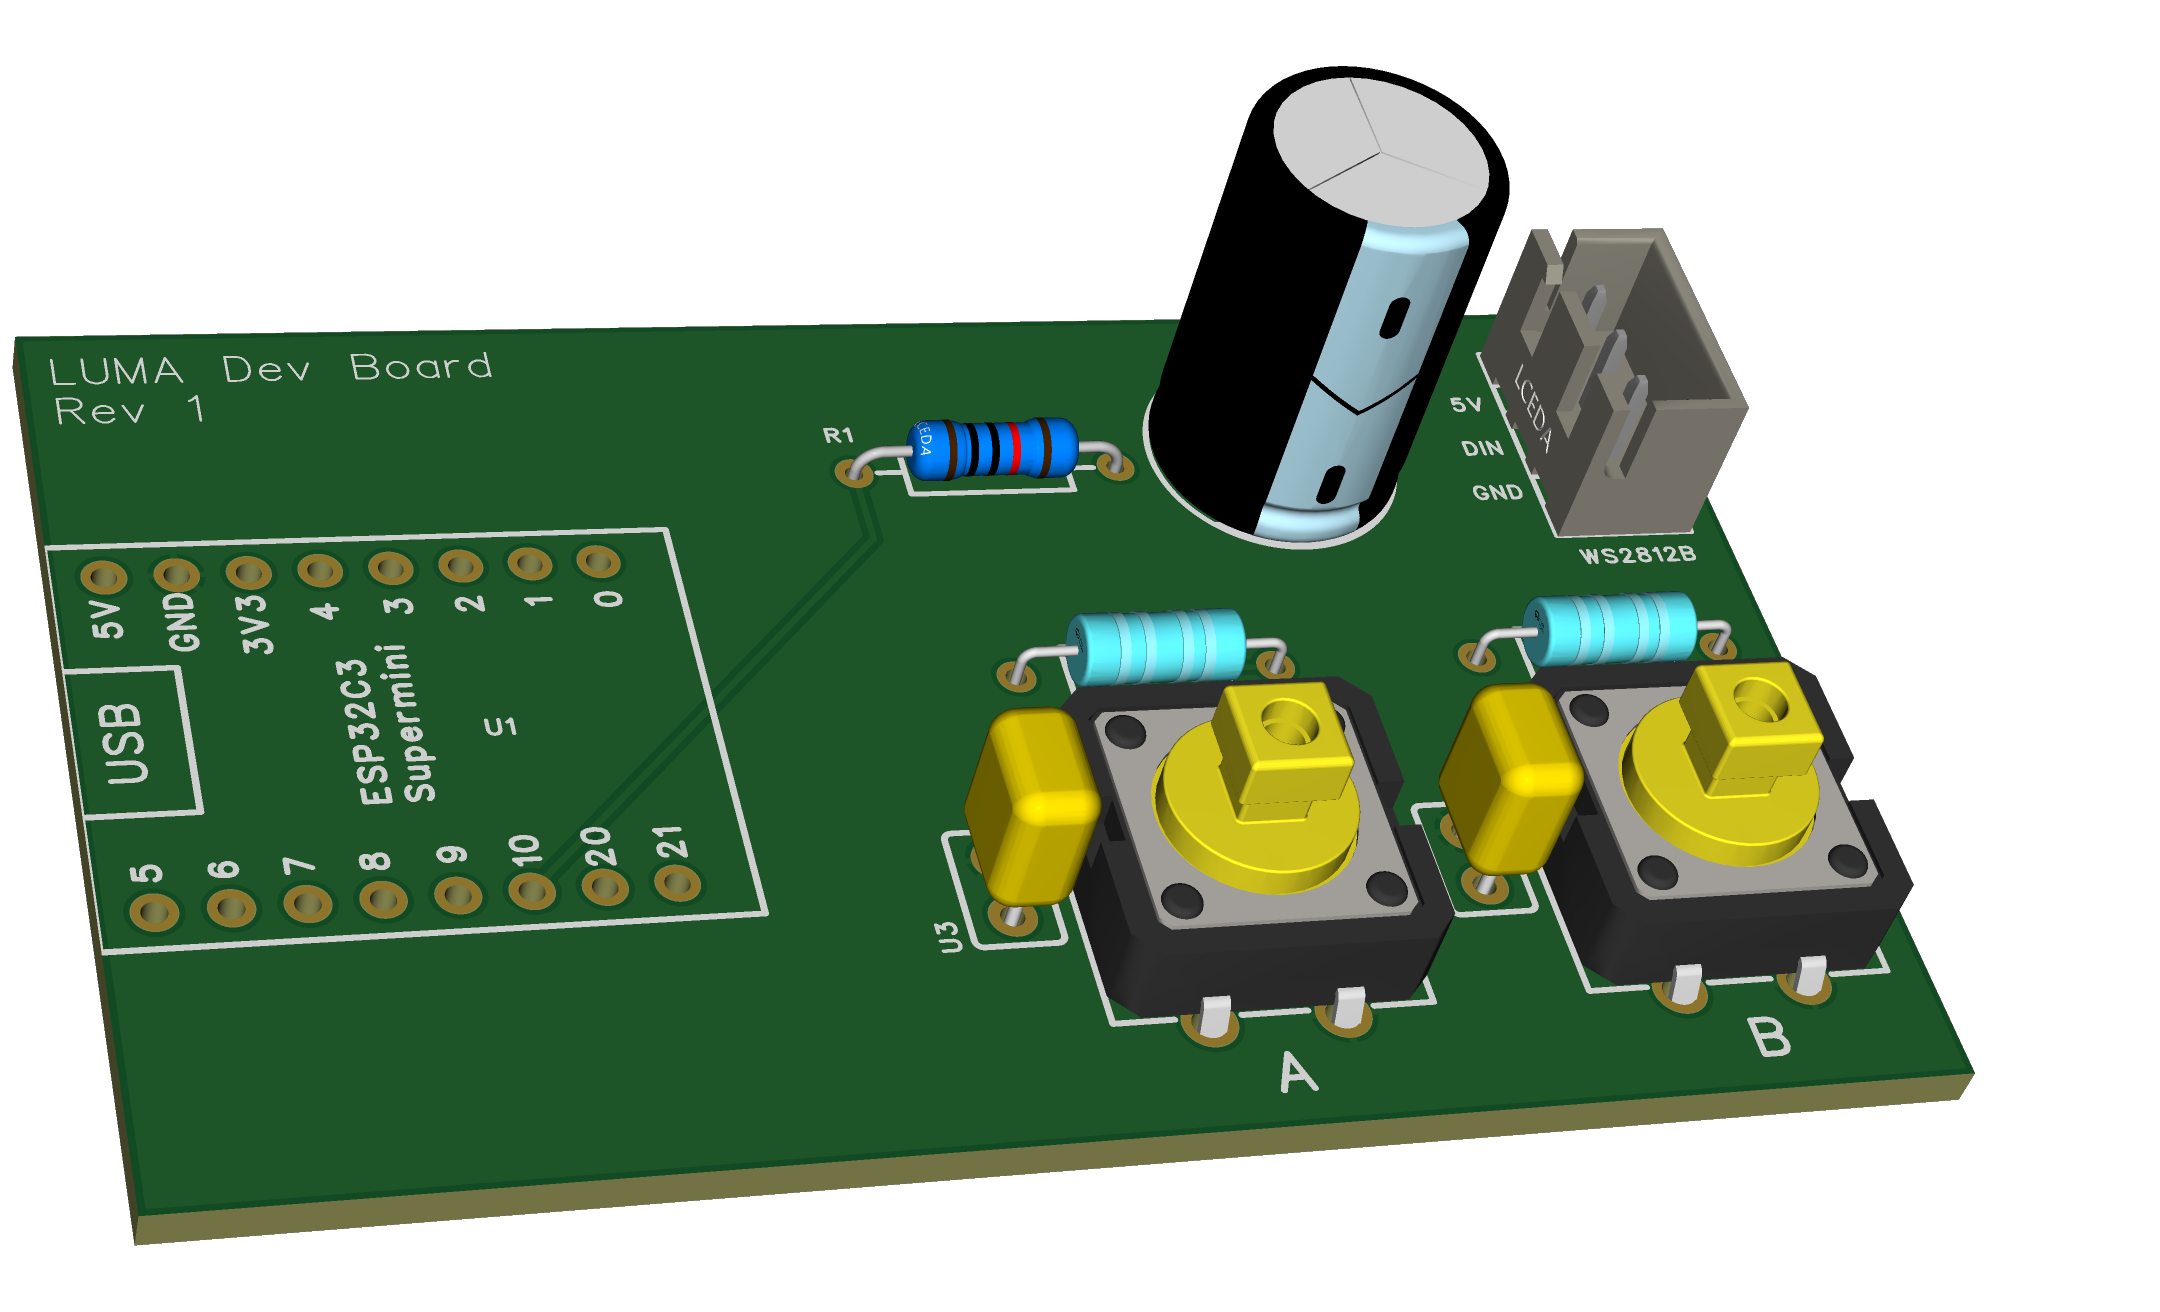
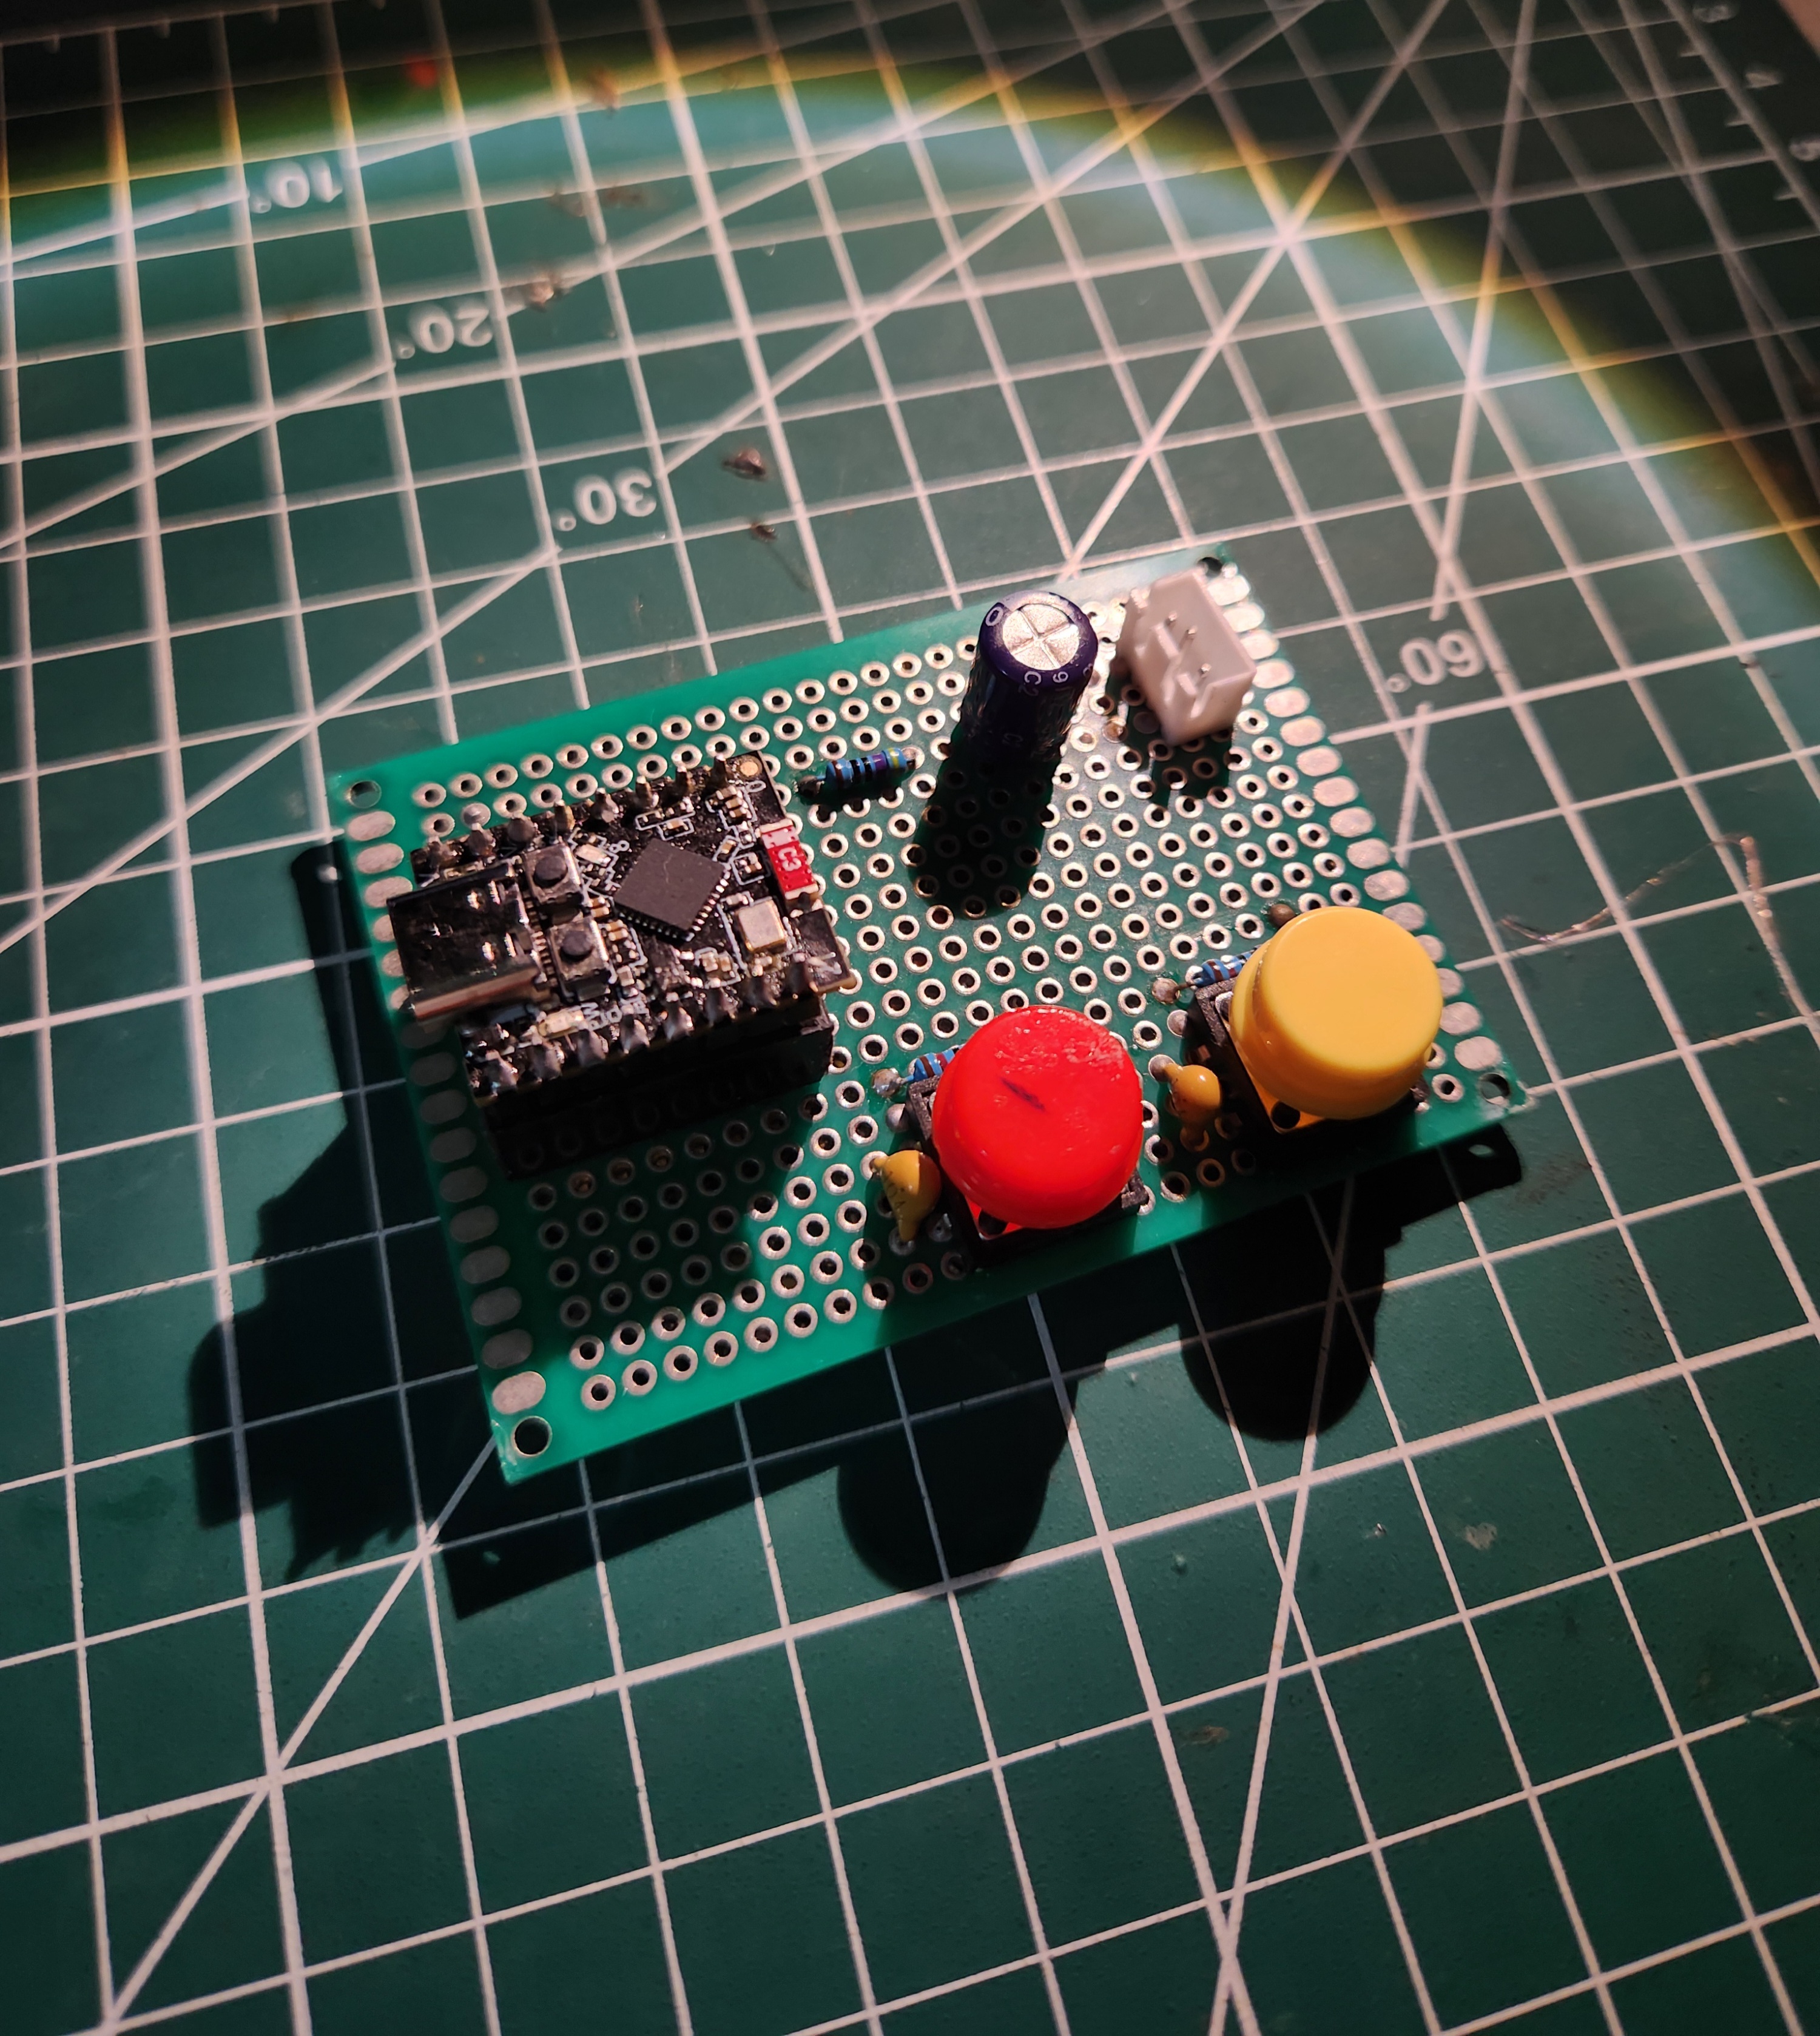
I reworked the hardware and created much neater Luma Dev Board.In the first iteration, I used a different power supply for the WS2812B 8x8 Matrix. This time I just powered the matrix using the USB Power Rail of the ESP32C3 SuperMini board.From a UX perspective, powering up the device from 2 different wires felt painful. I wanted 1 solution just 1 wire, well this works perfectly for my application. Some might say I won't be able to power the matrix in full brightness, and that is fine by me.
User Experience & Interactions
Let's get into what you will actually experience. Luma has 2 buttons which are used to navigate the menu options and interact with the visuals.
On device boot up, you will be greeted with an old scanline-style color bar opening animation which will dissolve into a black screen.
On that black screen a small pixel or I like to call it an orb moves around the screen left to right and wraps around infinitely.
This is the screensaver. Yes, you can play this screensaver
Just press the yellow button, and the orb explodes, reappears with a new random color, and starts again from a random location. This goes on endlessly...
Menu Interactions & Previews
To see the other features of Luma press the red button. This opens up a Menu Page, which shows the live preview animations of the current interactions available on Luma.
Interaction 1: Color Flood
You will see the colors covering the entire matrix and right before it covers the full matrix and new color pops up randomly and takes over the first color. Colors layer over each other and the process continues infinitely - it’s very beautiful to look at.
Pressing the yellow button cycles through the Menu Options.
Interaction 2: Pixel Rain (Falling Pixels)
In this interaction, you’ll see pixels falling with subtle trails.
These are just preview pages.To actually play with an interaction, you need to long press the yellow button on the preview page.
Playing the Interactions
Color Flood (Interactive Mode)
Every time the yellow button is pressed, a new color flood starts from a Random Position. If you keep pressing the button, multiple color floods overlap each other, creating subtle color interaction when they meet.
Pixel Rain (Interactive Mode)
Pixel Rain has two user interactions:
Short Press Yellow Button -- Drops a single pixel
Long Press Yellow Button -- Drops multiple pixels at once.
Watching 8 pixels falling together, each with different colors and trails, is pleasing to the eyes. Now the question is what happens when the entire matrix is full?
THE BEST PART COMES HERE
This is honestly my favourite part of the whole project.When the matrix fills up, it clears itself in a way that always makes me want to watch it again. The pixels goes like beams of light baam zaap to the top row, slow at first and by the end pixels goes zap zap zap flying away..
What's Next?
I know Color Flood is a bit simpler compared to Pixel Rain - but not just yet. I will be working on Luma v2 firmware, with more changes to Color Flood and additional interactions. And who knows.. maybe the Sand Clock will make a comeback in a future version of Luma
If you have any cool ideas for Luma v2, drop them in the comments - I’d love to explore them.
Did not read any of the above content..Good Job even I would not have read those. Why to read when you have a video...take a look at it ;)
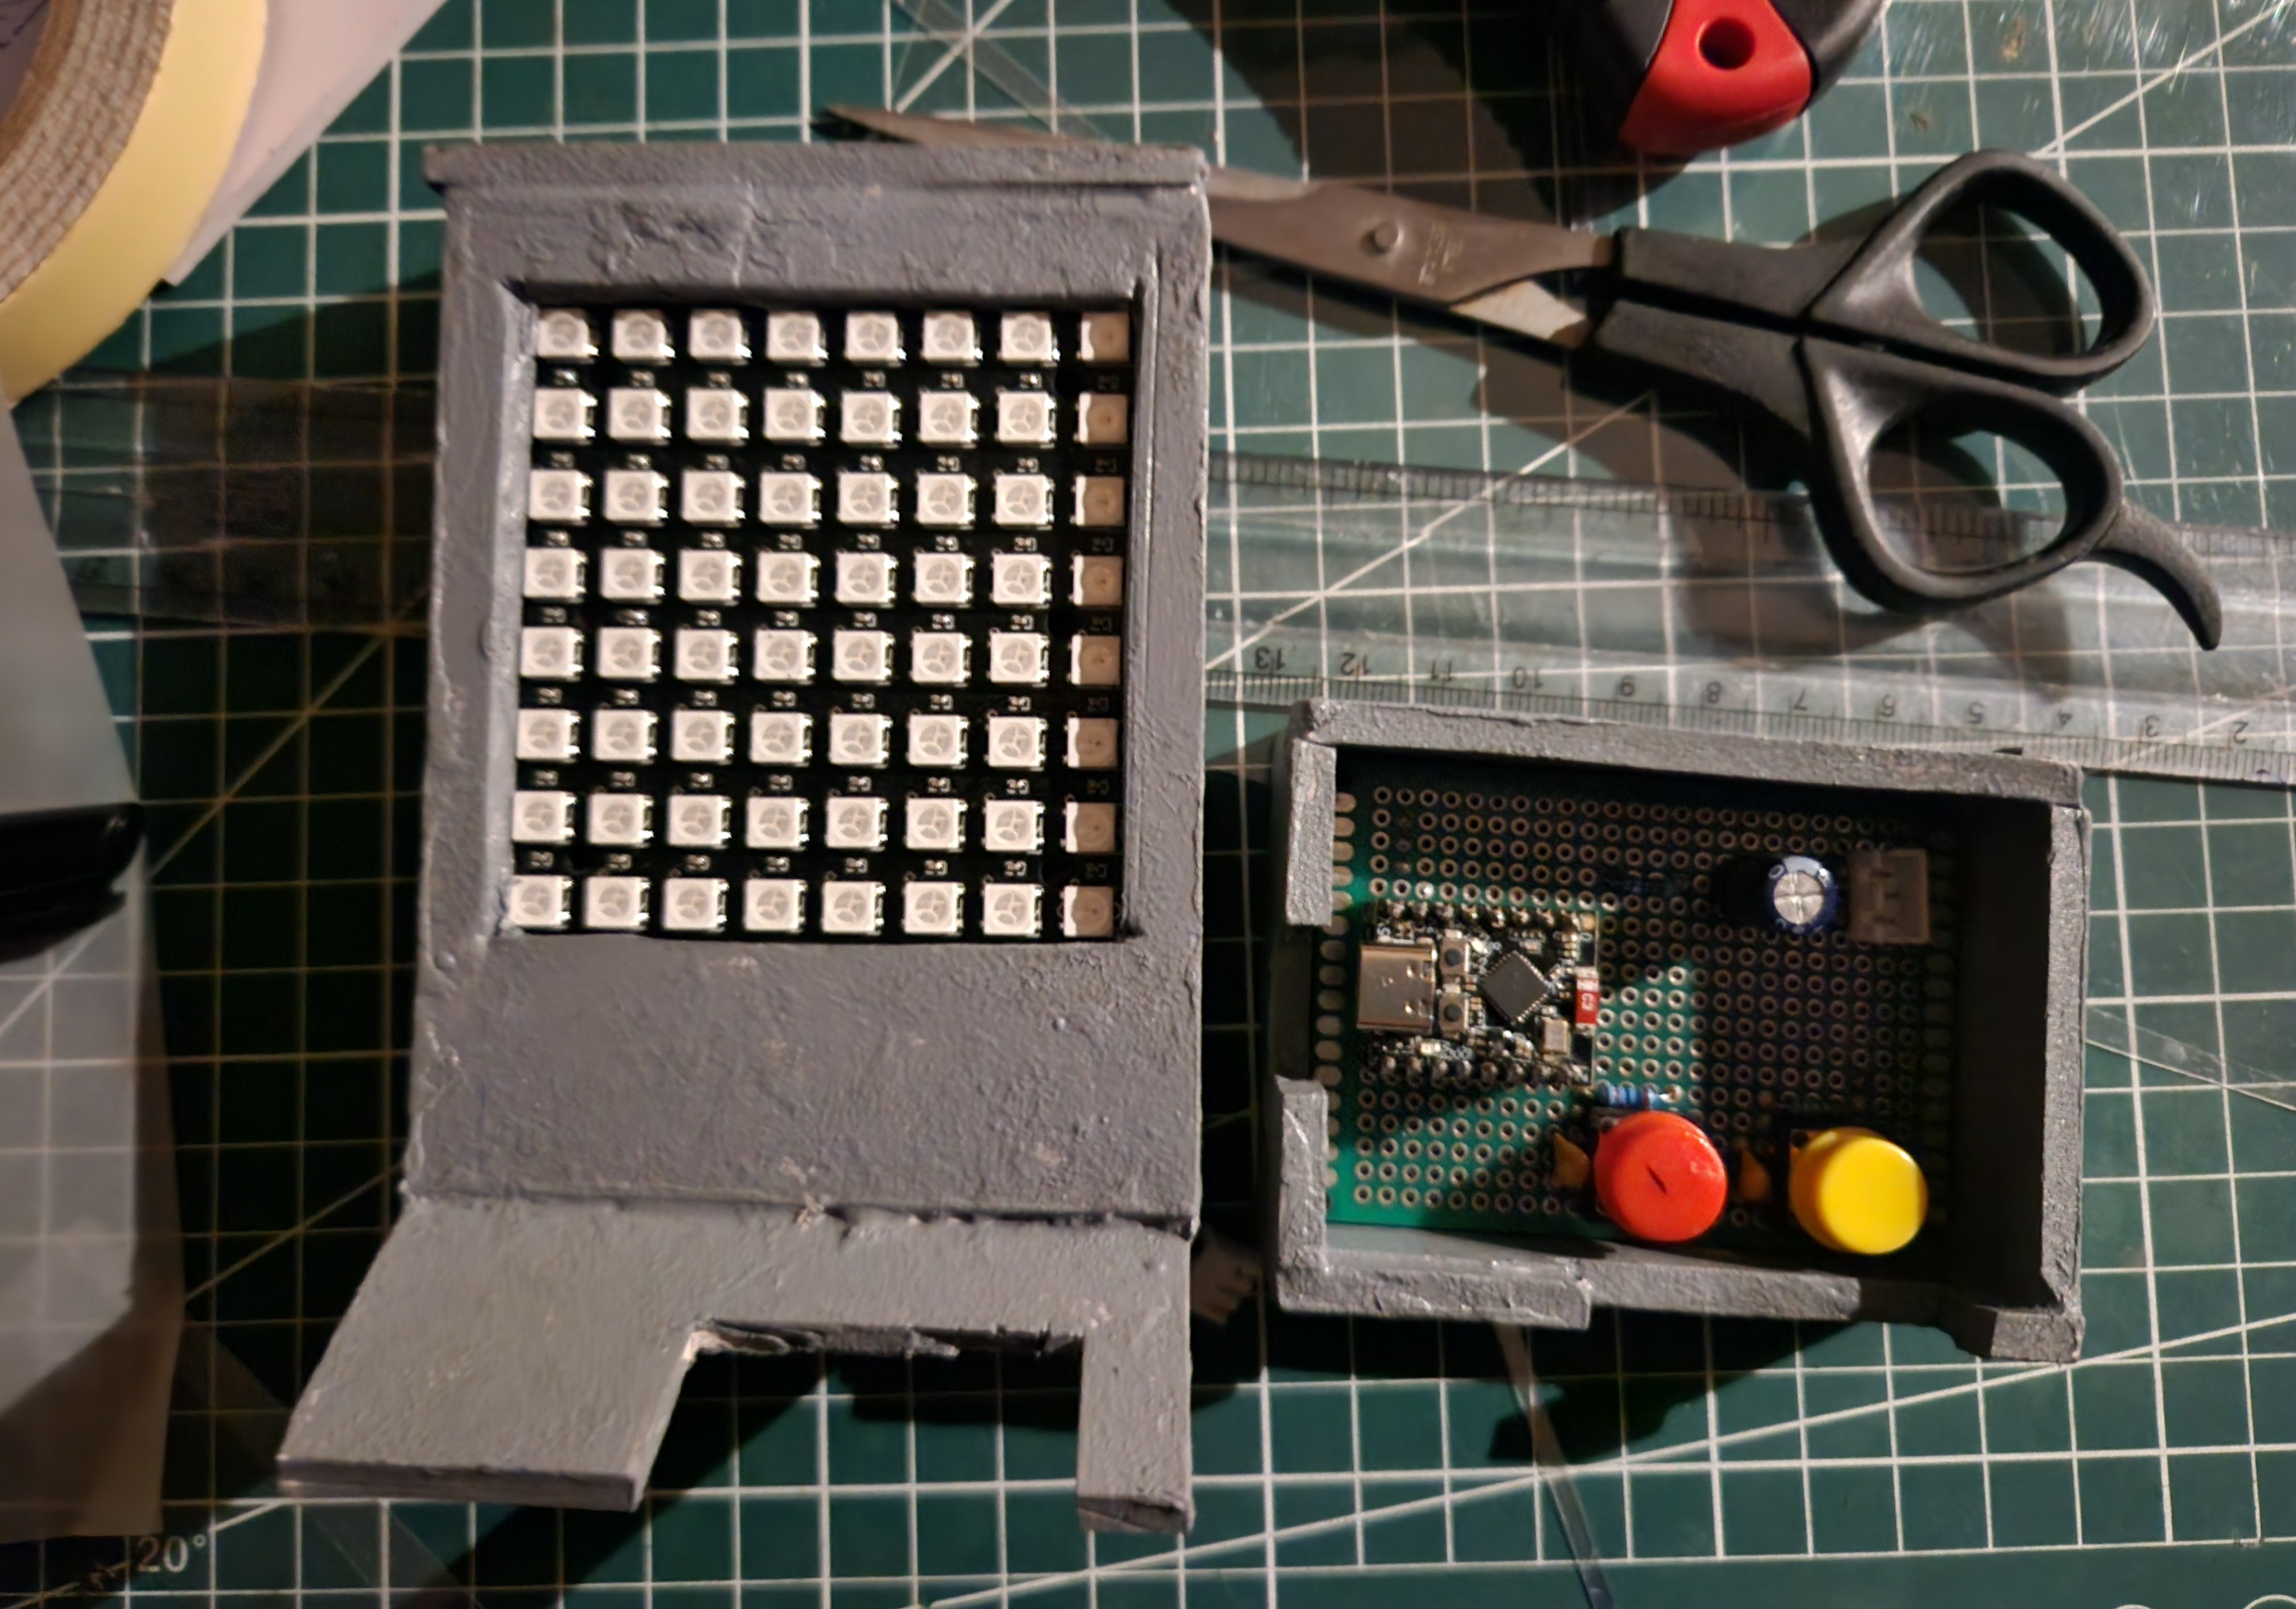
How This Project Can Be RecreatedThis project is very simple to re create, one must not have a lot of components in hand to make this project circuit with all the casing enclosure. Lets go one by one steps to re create your own Luma.
Hardware Assembly
- Use an ESP32C3 SuperMini board as the main controller. Here if you don't have SuperMini version of the board you can use the normal ESP32C3 Devkit by Espressif. The firmware will work fine on that board.
- Wire up the WS2812B 8x8 Matrix, it just needs 3 connections V+ Din V-. In my case I have used 3 pin JST Connectors Male - Female to get a solid connection and no chances of loose connections, and it looks cool to use JST Connectors.
- Add 2 Buttons to navigate and interact with the Luma. I have used 2 Tactile 4-pin Push Button
- Now regarding the passive components it is recommended to add those, especially the Power Filtering Capacitor at the WS2812B Input - it will protect both the Matrix and the Controller. If suddenly there is a large draw of current by the Matrix having a capacitor at the terminal will help manage those voltage spikes. Since we are using Tactile buttons chances of debouncing are high one can either solve this issue by software handling or hardware handling aka A Debouncing Circuit which I have added as seen on the schematic its best to not miss that as Luma is Button driven. Each button press causes something so missing those button presses will be bad.
- Luma is powered by Type C Connector on the SuperMini Board which is used to program Luma and also power Luma
Firmware Setup
- I have attached Git Repository named Project-Luma. In that repository check the Releases section and download the Luma v1 source code from there.
- On downloading the source code you will find a PlatformIO Project Folder.
- Simply install PlatformIO extension on VS Code and then Open the Luma Folder in VS Code. It will automatically activate the extension.
- Build and Flash the firmware on your circuit.
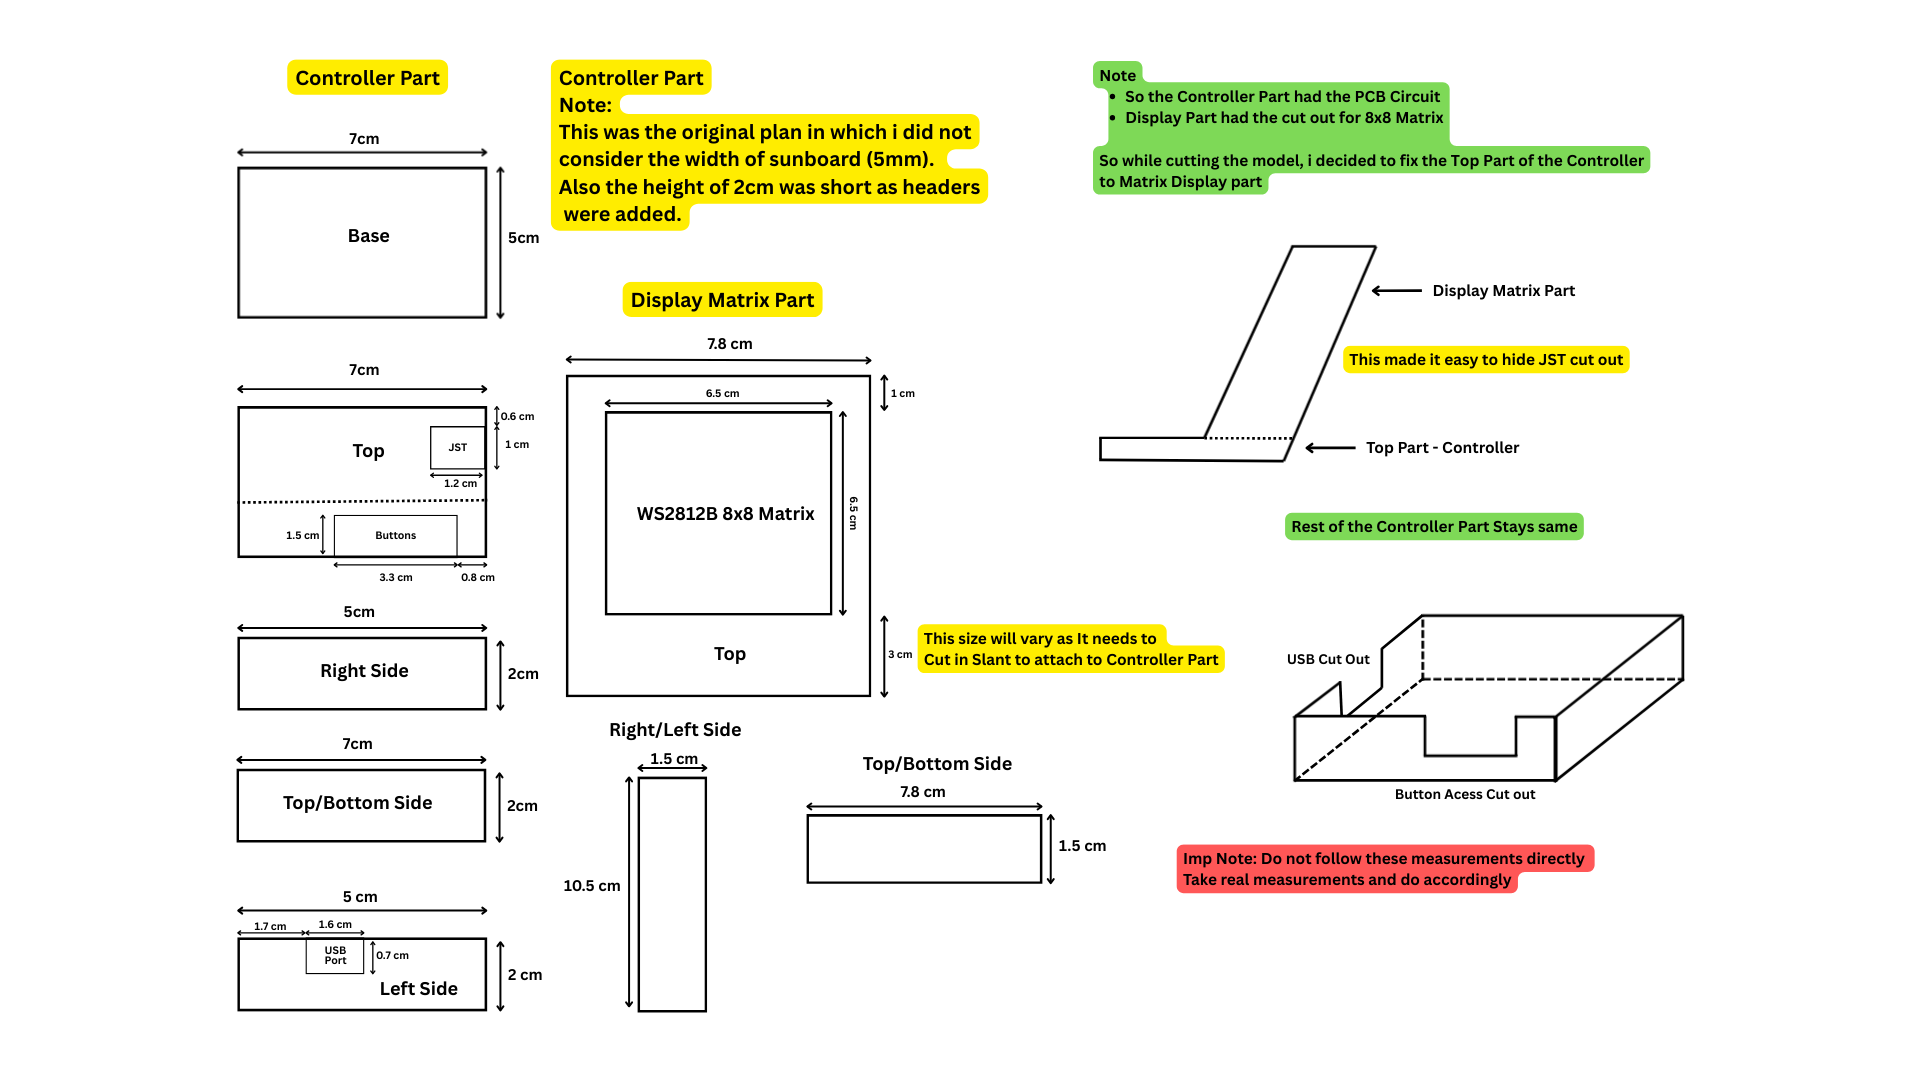
Enclosure & Assembly
- The enclosure for Luma was designed through hand drawn sketches to quickly iterate proportions and visual balance before fabrication. Well this is half truth honestly I found those CAD software too complex to quickly create a 2D engineering drawing for me.
- I used sunboard to make my enclosure its pretty good you can choose whatever material you want. Best would be 3D print this which I will do in the next iteration.- Make sure you take real measurements so you have clear idea. Do not follow my measurements exactly
- I did a lot of changes to the model while I was creating it. Like bring out your creative side. You don't have to follow the same enclosure I made it like this coz this is how I envisioned it, bring out your own creativity make it how you want.
Power & Interactions
- Luma is powered by the Type C USB Connector on ESP23C3 SuperMini, use suitable cable for that.
- Use the 2 Buttons to Navigate Menu and Interact with the Visuals.
- No additional configuration required.
Now, Enjoy your Luma...


_3u05Tpwasz.png?auto=compress%2Cformat&w=40&h=40&fit=fillmax&bg=fff&dpr=2)
Comments