

Hardware components | ||||||
_ztBMuBhMHo.jpg?auto=compress%2Cformat&w=48&h=48&fit=fill&bg=ffffff) |
| × | 1 | |||
 |
| × | 1 | |||
In this simple Arduino project, we will explore how to control a servo motor using a potentiometer. Servo motors are widely used in various applications, from robotics to remote-controlled vehicles, due to their ability to precisely control angular position.
### Required Components2. **Standard RC Servo Motor**
3. Potentiometer (Any value, such as 4.7K ohms)
4. **Connecting wires**
5. **Breadboard**
6. **Resistor (220 ohms, optional)**
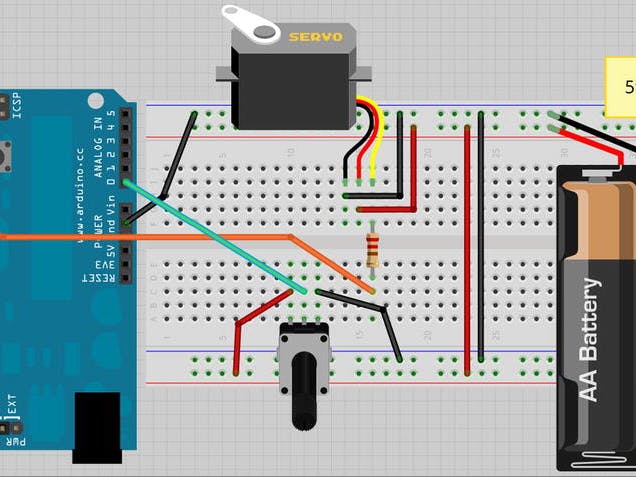
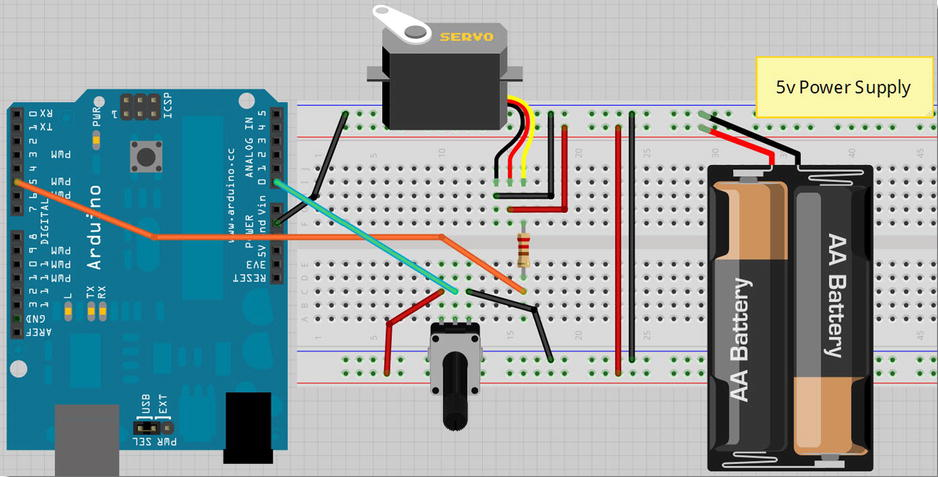
Circuit DiagramTo set up the circuit:
- Connect the **red wire** of the servo motor to **+5V** on the Arduino or an external power supply.
- Connect the **black or brown wire** of the servo motor to **GND** on the Arduino or the power supply.
- Connect the **signal wire** (white, yellow, or orange) of the servo motor to **digital pin 5** on the Arduino through a **220-ohm resistor** (optional).
- Connect the **outer pins** of the potentiometer to **+5V** and **GND** respectively.
- Connect the **middle pin** of the potentiometer to **analog pin 0** on the Arduino.
The Arduino code below reads the position of the potentiometer and maps its values to control the angle of the servo motor:
#include <Servo.h>
Servo servo1; // Create a servo object
void setup() {
servo1.attach(5); // Attaches the servo on Pin 5 to the servo object
}
void loop() {
int angle = analogRead(0); // Read the potentiometer value (0 to 1023)
angle = map(angle, 0, 1023, 0, 180); // Map the potentiometer value to servo angle (0 to 180 degrees)
servo1.write(angle); // Write the angle to the servo
delay(15); // Delay to allow the servo to reach the position
}1. **Servo Library**: We include the `Servo.h` library which simplifies servo motor control.
2. **Servo Object**: We create a servo object `servo1` which is attached to digital pin 5 of the Arduino.
3. **Setup Function**: In the `setup()` function, `servo1.attach(5);` initializes the servo motor on pin 5.
4. **Loop Function**:
- `analogRead(0);` reads the analog value (0 to 1023) from the potentiometer connected to analog pin 0.
- `map(angle, 0, 1023, 0, 180);` maps the potentiometer value to an angle between 0 and 180 degrees, suitable for the servo motor.
- `servo1.write(angle);` sets the servo motor to the calculated angle.
- `delay(15);` provides a small delay to allow the servo motor to reach the desired position smoothly.
### Further LearningIf you're interested in exploring more Arduino projects and expanding your knowledge, here are some suggestions:
- **Advanced Servo Control**: Experiment with advanced servo techniques such as multi-servo control, precise positioning, and integrating feedback mechanisms.
- **Arduino Robotics**: Dive into robotics projects that involve servos for motion control, such as robot arms or walking robots.
- **Sensor Integration**: Learn to combine servo control with sensors like ultrasonic sensors or IR sensors for autonomous behaviors.
- **Arduino Programming Books**: Explore resources like "Beginning Arduino" to deepen your understanding of Arduino programming and electronics.
**This book will help you to gain more knowledge about Arduino Beginning Arduino.**
Final NoteControlling a servo motor with Arduino is a fundamental skill for anyone interested in robotics and automation. With this project, you've learned the basics of connecting a servo motor, using a potentiometer for control, and writing code to interact with these components. Experiment further, modify the code, and explore more complex projects to enhance your skills in Arduino programming and electronics.

Comments