

Hardware components | ||||||
 |
| × | 1 | |||
 |
| × | 2 | |||
 |
| × | 1 | |||
 |
| × | 2 | |||
 |
| × | 1 | |||
 |
| × | 3 | |||
 |
| × | 6 | |||
 |
| × | 1 | |||
Software apps and online services | ||||||
| ||||||
| ||||||
 |
| |||||
From many years we have here the news of big Chemical industries or Thermal Power house had faced a huge accident. Manly blast of Furnace, Boiler, Heater. It usually and commonly occurred due to over heating or access of heat given to the container by machine(Heater).
Keeping this in mind I had buildup a project that monitor and also control automatically the Machine(heater/boiler) through Bolt IoT. and even build the Machine Learning program to detect and predict the future temperature through sensor.
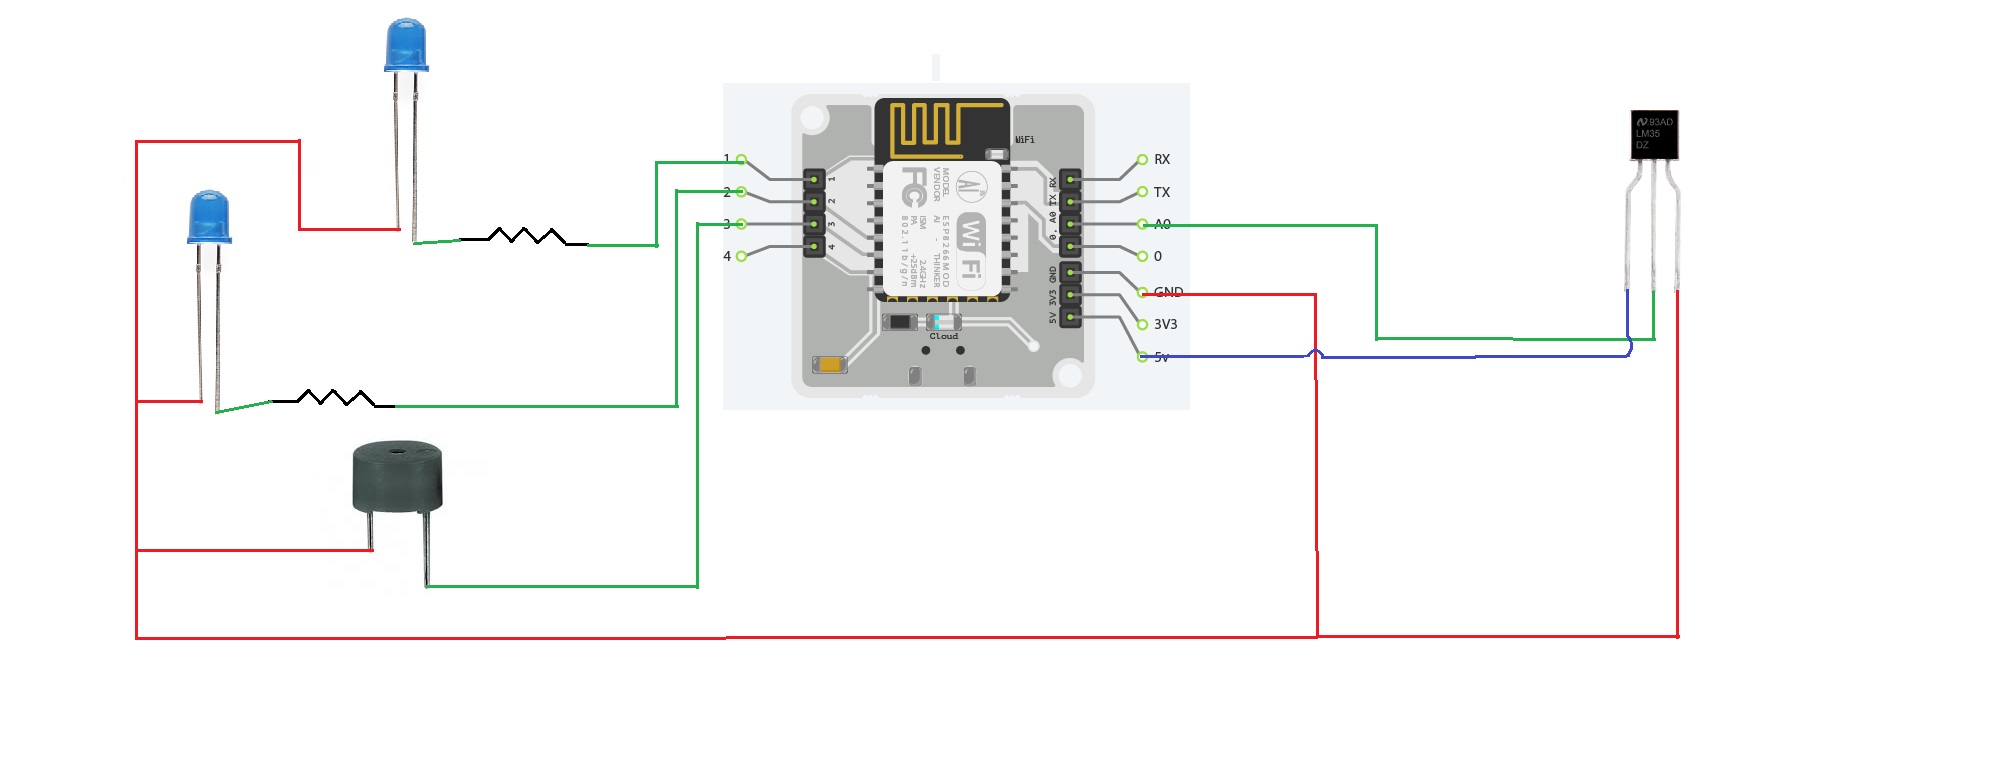
STEP ONE: Hardware Setup
STEP ONE: Hardware SetupGet the Bolt Iot Module and bread board which had come with kit. use jumper wire or any shorting wire. take any point of breadboard(use middle points of both the side) and short it in breadboard. so your one column of both the section of bread board will be in continue.
Fixed that shorting connection as Ground. get a jumper and connect to bolt iot module GND pin. Connect the shortest leg of both the LED into any two point of GND column. connect long leg of both the LED with 330 ohm resistor and placed at any suitable point on breadboard. from each of the point with respective row connect the jumper (male-male) with bolt module pin no 1&2.
Connect the short leg of buzzer into GND column of bread board and log leg at any point, and from that respective point column connect jumper wire and extend it to bolt module pin no 3.
Connect LM35 as same as given in the online training program.
- VCC pin of the LM35 connects to 5v of the Bolt Wifi module.
- Output pin of the LM35 connects to A0 (Analog input pin) of the Bolt Wifi module.
- Gnd pin of the LM35 connects to the Gnd.
Here is the complete setup.
Login to cloud.boltiot.com and note the ID of your Bolt WiFi Module.
Now click on the API Tab and under the section for Generate Key, click on Enable.
Next click on the copy button to copy your API key. Your API key will may look something like this: f1f9jdbe9-d92frs2-4e5b-aed0-b7ihb8f774cf.
STEP THREE: Creating the GPIO.Since LED is a digital output device, we will need to get a Digital Write command that can be sent to Bolt over the Internet to switch on the LED.
Click here Bolt Cloud go to Docs Tab -> API Documentation -> GPIO Commands API -> Write Digital Output, to understand how to create a API command link to turn on or turn off a pin of the Bolt.
The structure of the command is:
https://cloud.boltiot.com/remote/API_KEY/digitalWrite?pin=PIN_NUMBER&state=HIGH/LOW&deviceName=DEVICE_ID
The parameters that you need to replace are:API_KEY: You can get it from API tab on cloud dashboard.PIN_NUMBER: Pin to which you have connected the LED. Values can be either 0, 1, 2, 3 or 4HIGH/LOW: This value indicates if you want to turn on/off the LED. HIGH will turn it on, LOW will turn it off.DEVICE_ID: The id of your device. You can get it from cloud dashboard.
The sample command to turn the led ON connected to device having ID BOLT13819450 to PIN 0 is:
https://cloud.boltiot.com/remote/f1f9jdbe9-d92frs2-4e5b-aed0-b7ihb8f774cf/digitalWrite?pin=1&state=HIGH&deviceName=BOLT13819450
Make sure that you change the API Key to your own API Key and device ID which you got in the previous step.If you have connected the LED to any other pin other then Pin 0 then make a suitable change in the pin no in your code.
For Buzzer, it is Analog output device we will need to get a Analog Write command that can be sent to Bolt over the Internet to switch on the Buzzer.
STEP FOUR: IFTTT integration via Google Assistant and WebhooksGo to IFTTT to create a new applet by clicking here
Login using your Gmail account. Make sure you use same account which you'll be using on your mobile to interact with Google Assistant.
Click on '+This' to create the trigger.
Choose Google Assistant -> Say Specific Phrase
Type the phrase you want to trigger the action. Make sure to specify the trigger command in different ways for example I used
a) Turn the Machine 1 ON
b) Turn on the Machine 1
c) Machine 1 on
and so on. you can add any command, that you want to create.
Click on 'Create Trigger'
Click on '+That'
Select Webhooks and then Make a web request.
Enter the API URL you got in the previous Step. Make sure that you change the API Key and device name.
Method will be GET
Content type will be Application/json
Here is how your screen will look like
Click on 'Create Action' and then Click on 'Finish'
Stepsto turn OFF the Machine 1
Now do the same process for a command to switch of the LED. Here you will change the state to LOW i.e. state=LOW in your code. Here is a sample of the code. Also, add a suitable phrase to switch off the LED.
repeat the same process for every combination as show in above 9 triggers.
- Predicting Temperature using Polynomial Regression
Step 1: Make the same connections as 'Hardware connections for temperature monitor' screen, in the 'Interfacing sensor over VPS' topic of the 'Cloud, API and Alerts' module.
Step 2: Power up the circuit and let it connect to the Bolt Cloud. (The Green LED of the Bolt should be on)
Step 3: Go to cloud.boltiot.com and create a new product. While creating the product, choose product type as Input Device and interface type as GPIO. After creating the product, select the recently created product and then click on configure icon.
Step 4: select the radio button next to the A0 pin. Give the pin the name 'temp' and save the configuration using the 'Save' icon.
Step 5: Move to the code tab, give the product code the name 'predict', and select the code type as js.
Step 6: Write the following code to plot the temperature data and run the polynomial regression algorithm on the data, and save the product configurations.
setChartLibrary('google-chart');
setChartTitle('Polynomial Regression');
setChartType('predictionGraph');
setAxisName('time_stamp','temp');
mul(0.0977);
plotChart('time_stamp','temp');
Step 7: In the products tab, select the product created and then click on the link icon. Select your Bolt device in the popup and then click the 'Done' button.
Step 8: Click on 'deploy configuration' button and then the 'view this device' icon to view the page that you have designed. Below is the screenshot of the final output.
That's it. You are done.Here I had put complete video of working project.
I try to developed an Industrial Automation system to monitor Temperature and control them automatically as well as by Google Assistance and Taking Intelligent decisions using BoltIoT.


Comments