IoT boat connected to the Cloud IoT with Arduino Nano 33 IoT
We set up this project to present the Cloud IoT Arduino with the Arduino Nano 33 IoT board and develop the skills of aquatic maker projects, where knowledge of buoyancy in water, movement and tightness are very important.
In the video below, there is the presentation of the boat navigating through the control by the dashboard assembled by Eliezer Neto on the Arduino Cloud IoT, we tested the control by making the boat rotate on its own axis and the navigation forwards and turns to the right. The control of forward navigation was to be desired because one engine was spinning faster than the other, thus compromising the route in a straight line, if your project has the same problem it can be solved by software with a PDI code to compensate for the rotation or hardware with a voltage limiter on the motor pole.
Test and presentation of the IoT boat project
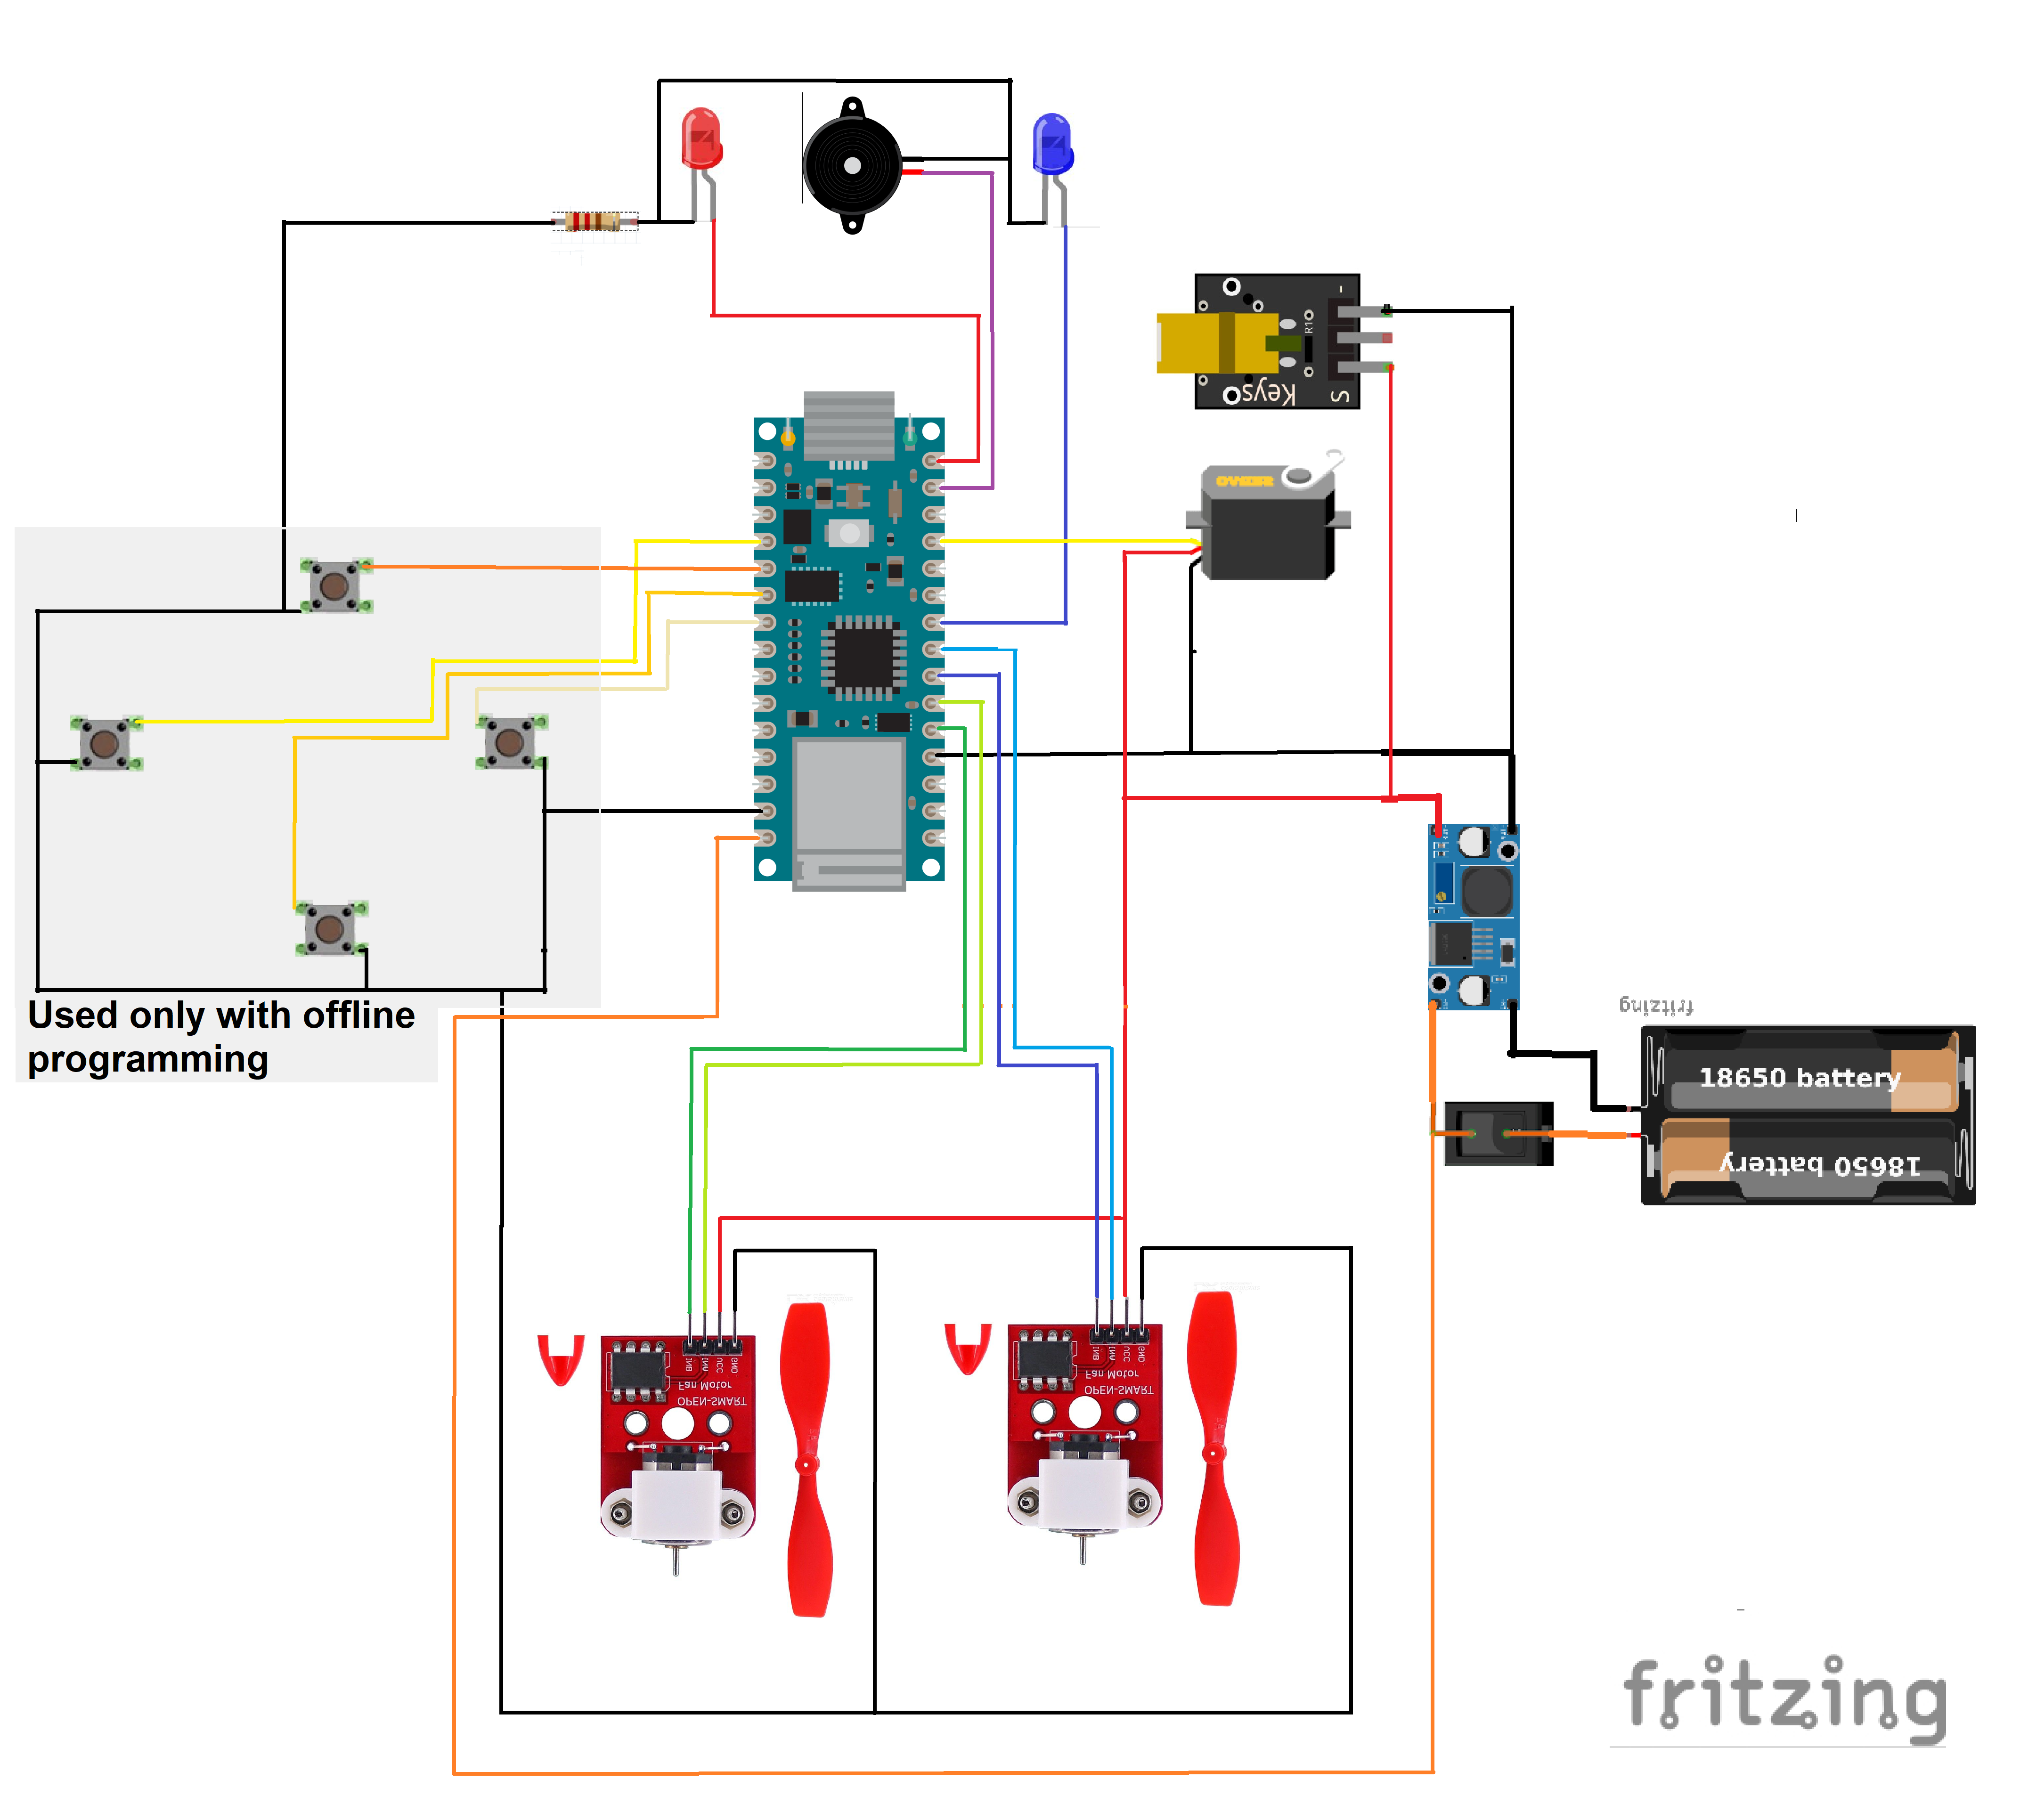
In the assembly schematic there is a gray box with some buttons connected to the analog port of the Arduino nano 33 IoT, this part of the circuit is only to be taken into account if you want to do an offline control by buttons connected by cable, so, thinking about answering this audience that does not have IoT skills, I also provide the code in the Arduino IDE for offline control of the Boat.
Buttons for offline control.
Attention when programming the direction of rotation of the propellers, for the boat to go forward they must rotate in opposite directions, I also advise to lengthen the motor axis so that the propeller is 100% immersed in the water, so the propulsion will be better and the more efficiently developed speed.
Direction of rotation of the engines for the boat to go forward
All electronics at first were assembled with a protoboard for future adjustments, as you need to study the weight and position of each component inside the boat, anything that is unbalancing the weight will make the boat tip over or sail wrong.
Testing balance and water line
That's it, anything I'm available you can ask here in this post or search me on my instagram: @profsandromesquita.
This code is the control base of the online code in the Arduino IoT cloud, however the control that this code does is by physical button the cloud receives an online instruction from the cloud dashboard.
/* * Design of a WiFi-controlled boat with the Arduino * Nano 33 IoT Board * Start: 23/11/2020 * Finish: 28/11/2020 * Release: 29/11/2020 * Servo Motor included * Developers: Specialist Prof. Sandro Mesquita * Mestre Eliezer Neto * Country: Brazil * State: Cear * City: Fortaleza */#include<Servo.h>Servolaser;//Variables of pinsbyteINBRight=2,INARight=3,INBLeft=4,INALeft=5,btFront=A1,btLeft=A0,btBack=A2,btRight=A3,blueLed=6,redLed=12;//Button state variablesboolfront,left,back,right,Status=0;unsignedlongTime;intswitchTime=0,toneVal;floatsinVal;voidsetup(){laser.attach(9);Serial.begin(9600);for(bytex=2;x<13;x++){pinMode(x,OUTPUT);//Declares pins as output}pinMode(btFront,INPUT_PULLUP);//Declares the pin A1 as input pulluppinMode(btLeft,INPUT_PULLUP);//Declares the pin A0 as input pulluppinMode(btBack,INPUT_PULLUP);//Declares the pin A2 as input pulluppinMode(btRight,INPUT_PULLUP);//Declares the pin A3 as input pullupdigitalWrite(redLed,Status);digitalWrite(blueLed,!Status);Time=millis();}voidloop(){flashes(Status);siren();control();engine();}voidcontrol(){front=digitalRead(btFront);//Read the button forwarleft=digitalRead(btLeft);//Read the button leftback=digitalRead(btBack);//Read the button backright=digitalRead(btRight);//Read the button right}voidengine(){if(!front){//Clockwise right enginerotationSenseRight(0,1);//Clockwise left enginerotationSenseLeft(0,1);}elseif(!left){//Clockwise right enginerotationSenseRight(0,1);//Counterclockwise left enginerotationSenseLeft(1,0);}elseif(!back){//Counterclockwise left enginerotationSenseRight(1,0);//Counterclockwise left enginerotationSenseLeft(1,0);}elseif(!right){//Counterclockwise left enginerotationSenseRight(1,0);//Clockwise right enginerotationSenseLeft(0,1);}else{//Engine stoppedrotationSenseRight(0,0);//Engine stoppedrotationSenseLeft(0,0);}}voidrotationSenseRight(boolINB,boolINA){digitalWrite(INBRight,INB);digitalWrite(INARight,INA);}voidrotationSenseLeft(boolINB,boolINA){digitalWrite(INBLeft,INB);digitalWrite(INALeft,INA);}boolflashes(boolled){switchTime=millis()-Time;if(switchTime>1000){led=!led;digitalWrite(redLed,led);digitalWrite(blueLed,!led);Time=millis();Status=led;returnStatus;if(led){servo.write(0);}elseservo.write(180);}}voidsiren(){for(intx=0;x<260;x++){//converts degrees to radianssinVal=(sin(x*(3.1412/180)));//now generates a frequencytoneVal=3500+(int(sinVal*200));//touches the value in the buzzertone(11,toneVal);//2ms delay and generates new tonedelay(2);}}
Cloud IoT Arduino online code
This is the code to control the boat remotely by the Arduino IoT Clod


_3u05Tpwasz.png?auto=compress%2Cformat&w=40&h=40&fit=fillmax&bg=fff&dpr=2)
Comments