

Hardware components | ||||||
 |
| × | 1 | |||
 |
| × | 1 | |||
 |
| × | 1 | |||
Software apps and online services | ||||||
 |
| |||||
 |
| |||||
 |
| |||||
 |
| |||||
 |
| |||||
Okay! One more Raspberry Pi + AWS IoT + Alexa document….
Yes. But not really.
This is a documentation of my struggle and success story that might help you in your journey and troubleshooting to emerge as a champion. My plan here is to provide detailed documentation of instructions, common errors, areas to focus on and reference links to help you in your learnings.
It always excites you when you see a project on hackster.io, github.com or in medium.com to implement that by yourself to have something that would satisfy the Person’s creation of its own toy. And of course, the journey would teach you new things whether that is a programming language or any other tool for that matter.
There are awesome documents available over the internet, but I would mainly divide those into two categories, one, which talks about an idea, overall implementation on a specific topic but not progressive implementation. Others, which are providing step by step implementation are lacking in the area of integrating with other components to execute overall project ideas. There would be very limited information available in those documents especially when it comes to troubleshooting. Then ultimately people like me depend on help from an internet search, websites like StackOverflow and spend hell lot of time in explaining your situation to everyone and seeking help.
So….. this document is not for any specific task to make your Pet feeder, home automation or robot but a very common document that you can use to start your learning and to implement your own ideas. Of course, I will use an example to explain the configuration ;-) “Fish Feeder”
I am providing step by step guide with the code that you can use it to create something similar that I did and use this basic knowledge to build something of your own.
Prior-Knowledge:Nothing exceptional. The only requirement for this project is interest and enthusiasm as the main purpose of these type of project is to create curiosity to learn something new. And now you are reading this document, it means you have it in you :-)
Concept:It is completely okay if you don’t understand everything at the start, you can still make it with the help of step by step detailed information. For me, the main purpose was to have an understanding and learning the basics which makes the life much easy.
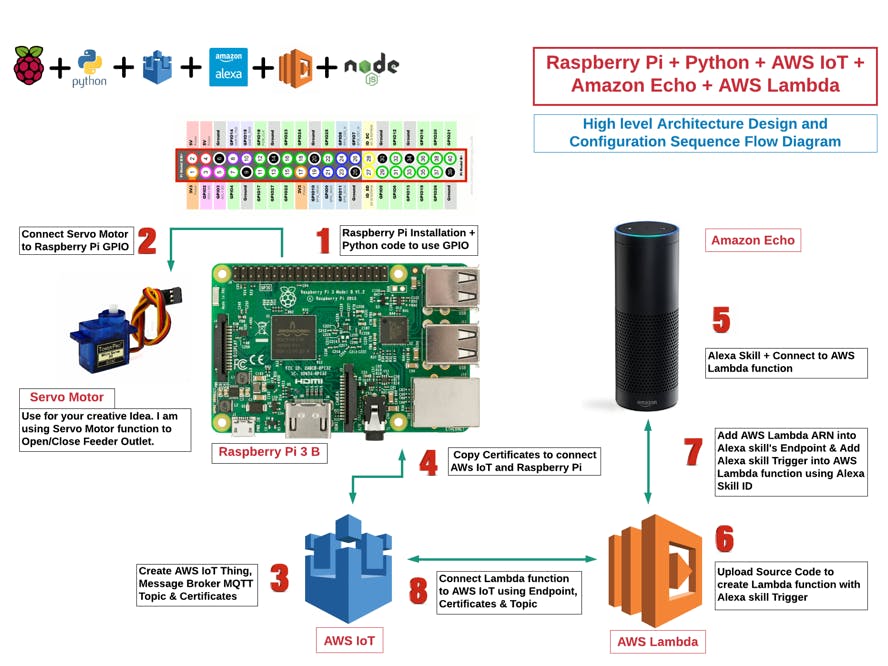
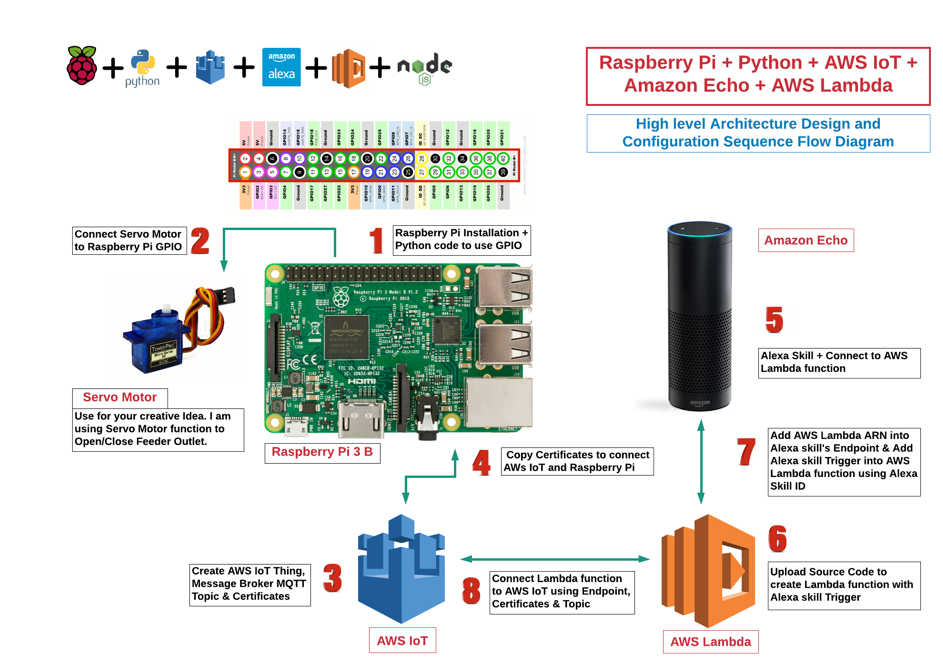
The block diagram shown below is my attempt to explain to you the concept over which this project is based. I might not be completely right here but this might serve the purpose.
Few links for your reference.
Raspberry Pi GPIO — https://www.raspberrypi.org/documentation/usage/gpio/
Message Broker for AWS IoT — https://docs.aws.amazon.com/iot/latest/developerguide/iot-message-broker.html
Topics — https://docs.aws.amazon.com/iot/latest/developerguide/topics.html
X.509 certificates and AWS IoT — https://docs.aws.amazon.com/iot/latest/developerguide/device-certs-create.html
Components Used:There are 9 components and overall 8 sequential steps that we will discuss next in this document:
1. Raspberry pi 3 B
2. Python code (aquarium.py, GPIO_Test_code.py)
3. General Purpose Servo Motor (SG90)
4. AWS IoT (Message Broker with use of MQTT Protocol)
5. X.509 Certificates
6. Amazon Echo
7. Alexa skill (aquarium_alexa_skill.json)
8. AWS Lambda
9. Node.js code (aquarium_lambda_upload.zip)
How the final project looks:I am asking help from my Hippo Man to feed my fish. You are right, I am using Invocation word as a “Hippo Man”
There are mainly 8 steps for the configuration and additional details on creativity :-) These steps are explained below with all required details.
I am using Raspberry Pi 3 B as an IoT device for this project.
I have used NOOBS OS install manager for my Pi. Here is the link for the guide.
If you are first time user, you might face problem to enable WiFi or to setup your WiFi connection. In that case, please connect your Raspberry pi to wire network and refer this link for help.
Once your machine is up and running, hence it’s time for setup. We are using python code, so it is very important to check and install other required packages and libraries on your Pi. Python 2.7 is by default installed and you can check that with terminal command python — -version You will get a complete list of default installed packages using apt-mark showauto
Other than Python, we are referring 4 other packages for our code, which are, time, openssl, rpi.gpio and paho.mqtt.client. Out of those 4, the only paho.mqtt.client is not available by default. You can install it by using the following terminal command.
pip install paho-mqtt
Now our IoT device is ready to use.
You can find my “GPIO_Test_code.py” in the code link which is mentioned at the end of the document. Copy it on your Pi.
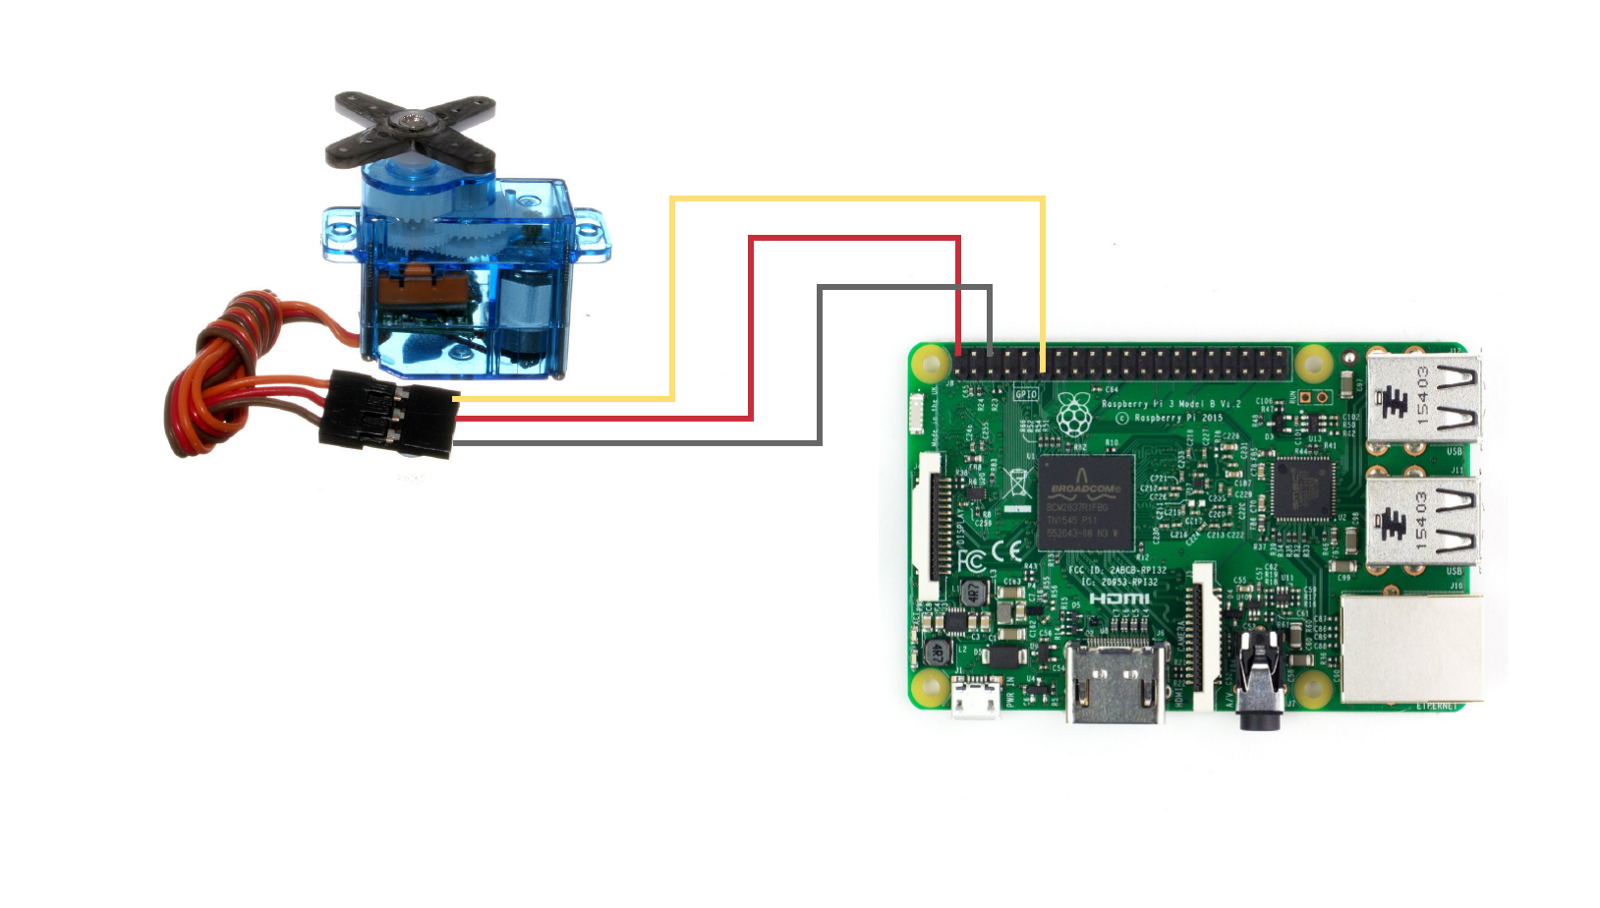
Step 2: Python code and GPIO testWe need to understand how GPIO pins works, small reading about that would really help. In this project, we are using 3 pins from GPIO which are, PWR (For powering our Servo Motor), GND, and signal pin 11. If you are doing it first time, please double check your connections and wiring before powering your Pi.
Now it’s time to run your program and see if your Servo Motor responses. Don’t forget to exit code to stop it ;-)
python GPIO_Test_code.py
Congratulations. You have completed the first and important part.
Step 3: AWS IoTThe ultimate aim of for this part is to get following details by creating your Thing:
o Custom AWS IoT Endpoint — example: “xxxxxxxxxxxxxx-ats.iot.eu-west-1.amazonaws.com”
o Region — example: “us-east-1”
o Device ID — example: “aquarium”
o Certificates — “cert.pem, private.key and AmazonRootCA1.key”
Below link would help you to understand how AWS IoT MQTT works using Node js
https://www.youtube.com/watch?v=y6W9QfiEY2E
Login to your AWS account if you don’t have, then it's right time to open new.
https://console.aws.amazon.com/
From Services, search and open “IoT Core” Service. Word of caution, please select the region that you would prefer and use the same region when you create your Lambda function. Not necessary but it will reduce the complications for the first time.
Once you are in the “IoT Core” Service, navigate to “Things” through “Manage” tab
Click on “Create” to create your Thing.
Once you hit on “Next” it will take you to the next page to create and add the certificate to your Thing “aquarium” in this case
Very Very important page. Please download the certificate, private key and AWS provided root CA key. You also need to activate the certificate and move forward to attach a policy.
Root Certificate
https://docs.aws.amazon.com/iot/latest/developerguide/managing-device-certs.html
I have used RSA 2048 bit key: Amazon Root CA 1
Save the certificate with “AmazonRootCA1.key” this certificate we would need with “cert.pem.crt” and “private.pem.key” at two places. On raspberry pi and with the Lambda code.
But if you don’t see your policy here or yet to create it then “Cancel” it and go through the following steps.
Under “Secure” navigate it to “Policies” to create a new policy.
Now go back to “Secure” navigate to “Certificates” and select the new certificate that you have created.
We need to verify two things here, the first certificate is “Active” and second “Attach Policy”.
To find our custom IoT endpoint or “host” name, navigate to “Interact”. Please note down it as we need to put into to “aquarium.py” and “index.js”
Come back to your Raspberry Pi and create folder “certs” and copy three certificates which are “private.pem.key”, “certificate.pem.crt” and “AmazonRootCA1.key”. Pay attention to the folder location and file names as you need to mention that in our code. I have created “certs” folder on Desktop.
Now it’s time for the test. We need to verify if our Raspberry Pi can communicate with AWS IoT. You can use openssl s_client command for this purpose.
openssl s_client -connect xxxxxxxxxxxxxx-ats.iot.us-east-1.amazonaws.com:8443 -CAfile./AmazonRootCA1.key -cert./cert.pem.crt -key./private.pem.key
Pay attention, you need to replace xxxxxxxxxxxxxx and region name according to your unique custom Rest API Endpoint. Also, check your certificates stored location.
Now it’s time to add our main python code to control our servo motor. I have kept the file into Desktop, you can choose any place but accordingly make changes in the required places. “aquarium.py” file is provided in the shared code. link of the code repository is given at the end of the document.
Main changes that you focus on “aquarium.py” are:
o “cert_path” = example: “/home/pi/Desktop/certs/”
o “host” = example: “xxxxxxxxxxxxxx-ats.iot.us-east-1.amazonaws.com”
o “topic” = example: “$aws/things/aquarium/shadow/update”
o Names of the root cert, cert file and key file
Step 5: Alexa SkillWe Sign in to Amazon developer console. Mostly, you will use your same Amazon account credentials here.
https://developer.amazon.com/alexa/
Below are the screenshots that would help you to understand the configuration steps.
I have provided the Alexa skill json file “aquarium_alexa_skill.json” in the code. You can use that directly and update as per your requirements.
Please remember to “Save Model” first and then “Build Model”
Please note Your skill ID. We would need it in the next stage, when we will create Lambda function. We will revisit this Alexa configuration once we have Lambda ARN to add it into “Default Region”
From your AWS console login, please navigate to Lambda service.
Name your lambda function. We are using here existing role, “lambda_basic_execution”
I have provided the “aquarium_lambda_upload.zip” file in the code that you can use it. Unzip and zip it again with your updates. Please remember to replace dummy “cert.pem.crt” and “private.pem.key” with your keys. Also do the changes in “index.js” as per your configuration.
Main changes that you focus in “index.js” are:
o “host” = example: “xxxxxxxxxxxxxx-ats.iot.us-east-1.amazonaws.com”
o “topic” = example: “$aws/things/aquarium/shadow/update”
o “app_id” = example: “amzn1.ask.skill.xxxxxxxx-xxxx-xxxx-xxxx-xxxxxxxxxxxx”
o “deviceName” = example: “aquarium”
o “keyPath” = example: “./certs/private.pem.key”
o “certPath” = example: “./certs/cert.pem.crt”
o “caPath” = example: “./certs/AmazonRootCA1.key”
o “region” = example: “us-east-1”
Runtime = Node.js 4.3
Please note down your AWS Lambda ARN that we need to mention in Alexa “Endpoint”
Now it’s time to add trigger to your Lambda. And we are using our Alexa Skills Kit “aquarium” that we created before.
The philosophy of this document is to tell you not only the configurations but also the troubleshooting. To test whether everything is fine with your function, click to “configure the events” tab.
Select the “AlexaStartSession” and update “applicationId” as per your Alexa skill ID.
Save it and use this test event for your testing.
Sign in to Amazon developer console again. Edit your skill and navigate to “Endpoint”. Here, add your AWS Lambda ARN and “Save Endpoints”.
It is very important to test your every stage to make your troubleshooting easy. For that we need to do mainly two things, enable “Display Interface” under “Interfaces” tab and enable test (“Development”) under “Test” section.
If everything is well configured, we will be able to test the skill in a way shown below. If not, go back and check if everything is correct, especially Lambda ARN at the “Endpoint”
There are mainly three things that will connect AWS IoT thing and Lambda functions together. And these configuration changes you need to do it in “index.js
o “host” = example: “xxxxxxxxxxxxxx-ats.iot.us-east-1.amazonaws.com”
o “topic” = example: “$aws/things/aquarium/shadow/update”
o “deviceName” = example: “aquarium”
Final Step: Practical use and BeautificationWell well, you guys have come in a long way. Now it just matters to use this configuration for your fun purpose. As I mentioned it before, I am using this thing to make a voice-controlled fish feeder to make may fishes happy :-)
The first thing that you need to do is to add your code in Autostart of your Raspberry Pi to make sure that your device would work every time without any human intervention
There are many ways you can add your script in Autostart, but here is a simple way that I have used.
From your raspberry pi terminal, use below command.
sudo vi /home/pi/.config/lxsession/LXDE-pi/autostart
add a below-mentioned line at the end of the file and save it. Please pay attention to your code location.
@lxterminal -e python /home/pi/Desktop/aquarium.py
Here are a few photos of my creativity to give you a clue.
Use of AWS and Nordcloud stickers for Raspberry Pi case beautification.
Testing, if it really works ;-)
Congratulations guys !
You have done it!
Additional info regarding Privacy: Check regularly your recording and delete it.Amazon says your voice recording activates only when a person says the “wake” word. Amazon Echo device only hear you when you say “Alexa” or any other wake words that you configured such as “COMPUTER” OR “ECHO”. But there is a possibility that your device would accidentally hear something which sounds like “Alexa” or wake word from the background noise and woke up to receive command. There would be next few seconds voice recording to understand and react on it.
Few precautions that I took to avoid any privacy breach.
1. Strong password for my Amazon account.
2. Regular check of my voice recording history and deletion.
You can access your voice history from your mobile device using the Alexa app
Open Alexa App -> Settings -> Alexa Account -> History
3. No Amazon Echo device in Bedroom or Bathroom ;-)
Link to GitHub repository where you will find all the code.https://github.com/deepj29/raspberrypi-awsiot-alexa-lambda
Hope this document would help you in your projects even though it will be your first project with Voice control or with RaspberryPi.


Comments