

Hardware components | ||||||
 |
| × | 1 | |||
| × | 1 | ||||
 |
| × | 1 | |||
 |
| × | 1 | |||
Software apps and online services | ||||||
 |
| |||||
INTRODUCTION
In today's most of the things we produce have a very important factor affecting it ie. Temperature.
If this temperature is not properly managed
- It can affect the production of plants
- It can cause huge losses to the Pharmaceutical companies as the drugs must be manufactured within a perticular Temperature level so as to maintain its Quality.
So it is highly Preferable to install a Temperature Monitoring System that can monitor the temperature inside the production facility and can send Alerts in case of an Anomality detected.
By using the Bolt IoT Platform we can Built our very own Temperature Monitoring System.
Advantages of using a Temperature Monitoring System
There are a number of advantages to using a temperature monitoring system, below we have put together 5 key factors why they have been proved such an effective method for keeping conditions stable.
1) Save moneyEmploying a temperature monitoring system will save you money in the long run, on wasted stock, product recalls etc. If there is a potential problem, you will be notified immediately, before it is too late.
2) Efficient and convenientAll reports are put together for you automatically so you don’t have to lift a finger. These will be collated and sent to you each morning via email.
3) Accessible from anywhereReports can be sent directly to you via email, SMS or App so you don’t need to waste time checking each individual logger (or even going to the site for that matter).
4) User friendlyThe Bolt Module is user friendly and can be easily programmed to use it as a TEMPERATURE MONITORING SYSTEM.
5) More affordable than you thinkWith Bolt you can build your own TEMPERATURE MONITORING SYSTEM which doesn’t cost as much as you’d think to ensure your peace of mind.
All in all temperature monitoring systems offer a low cost but reliable solution for those who need to monitor indoor conditions continuously.
Apparatus Required
1. Bolt Wifi Module
By using the Bolt WiFi module we can connect our Hardware connection to Bolt Cloud.
2. LM35 Temperature Sensor
LM 35 IC is a Temperature Sensor IC which measure the amount of heat energy or even coldness that is generated by an object or system, allowing us to “sense” or detect any physical change to that temperature producing either an analogue or digital output.
3.USB to Micro USB Cable
Using the USB to Micro USB Cable we supply power to the Bolt WiFi Module.
4. Jumper Wire (generic)
Jumper Wire are used to connect the LM35 IC to the Bolt WiFi Module.
Before making connections I recommend you to check that the Blue and Green pin of the Bolt IoT Module is glowing as shown in the Below image as it means that your Bolt Wifi Module is connected to your Bolt Cloud Account and you are ready to make connections for your project.
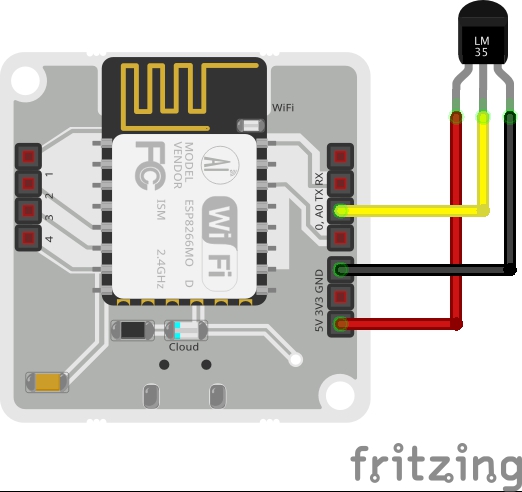
Step 1. Connecting Bolt Module to LM35 sensor.
For connecting the LM35 sensor we will make use of the Jumper Wire.
Connect the 3 terminal of the LM35 sensor as stated below.
1. Make sure you have not powered on your Bolt Module white connecting the circuit. This will ensure that in case we make any mistake, it will not short circuit your device. Switch off the power if it is connected.
2. Connect the VCC pin of LM35 to 5V pin of the Bolt device.
3. Connect the GND pin of LM35 to GND pin of the Bolt device.
4. Connect the analog output pin of LM35 to A0 pin of the module.
Step 2. Visualising the Data(plotting Graph) on the Bolt Cloud.
Follow these steps for Visualising the data collected by LM35 sensor using Bolt cloud:
1. Login into cloud.boltiot.com and click on the 'Product' tab.
2.Create a new product for your temperature monitoring system. Products are created once and can be used for multiple Bolt devices. This ensures scalability for your IoT products you build on Bolt.
3.Click on Configure this product to configure the product. This will open a popup where you can configure your products hardware setting and write the software code.
4.Click on the "A0" pin of the Bolt and give it a name in the right side naming section. Finally, click on the "Save" icon to save your change and wait for the page to reload.
5.Click on the Code Section and after giving it a suitable name and file extension which in this case is .js , we have to write the Javascript code for our product.
Now let me explain each line of the code so that you could make suitable changes as you wish.
setChartLibrery function sets the Data Visualisation Library you would use. The most commonly used one on Bolt Cloud is the Google Library. However, you could use any other JavaScript or HTML code here to visualise the data.
setChartTitle function sets the Title of the Chart/Graph. Give a suitable name for your graph here which will be shown in the heading of the page. This is different from the name of the code file.
setChartType function is where you choose which type of chart you want i.e. Line Graph, Bar Graph etc.
setAxisName will set the name for the X Axis and Y Axis
plotChart is where you choose which variable you want to choose in your chart.
Next, we will need to convert the raw sensor value received to degrees. For this, we will need to multiply the raw sensor value with 0.0977. I have given an explanation for this towards the end of the project.
For multiplication, we use the 'mul' function. Just enter the line mul(0.0977) before the plotChart function. This will multiply the sensor value received with the multiplication factor.
6. Finally, click on the "Save" icon to save the changes to the product.
7. Now, our product configuration is ready, but we need to "link" a bolt device to the product so that the Bolt can actually start sending temperature data.
8. Now, we need to deploy the code to the Bolt device. Deploying will transfer the code and configuration to the Bolt device. Its similar to programming an hardware device like an Arduino. Except here the programming happens over the internet.
9.That's great you say. Now how do I see the temperature? For this, you will need to click on the "Computer Monitor" icon on your Bolt device.This will open up a new page which will have a graph. Every 5 minutes, the Bolt will send a temperature reading to the Bolt Cloud.
If you see a blank graph, wait for a few minutes for the device to send the sensor reading to the cloud. If you don't want to wait then you could press the push configuration button again. Every time you click on that button it sends the current sensor value to the graph. It's a manual method that can be used for testing.
Output PlotAs the cloud collects more data, the graph gets plotted and you will be able to see the temperature variations across the day.
Working principleThe working principle of the system is quite easy. Let understand it.
Here in our system, LM35 is the sensor that senses the temperature of its environment and based on it's value it generates an analog output voltage. This analog voltage produced by the LM35 is then given as input to the Bolt A0 pin. The Bolt then converts the analog value into a 10 bit digital value that varies from 0-1023. This digital data is sent to the cloud via Bolt device.
Hence, while plotting the temperature, it is required to convert the raw sensor values into the actual temperature value, which is done using the given formula:
temp = (analog_value*100)/1023
The converted digital data is then plotted for visual representation.
For the Purpose of Illustration I am attaching a video of Demonstration of my project.
Working principle
The working principle of the system is quite easy. Let understand it.
Here in our system, LM35 is the sensor that senses the temperature of its environment and based on it's value it generates an analog output voltage. This analog voltage produced by the LM35 is then given as input to the Bolt A0 pin. The Bolt then converts the analog value into a 10 bit digital value that varies from 0-1023. This digital data is sent to the cloud via Bolt device.
Hence, while plotting the temperature, it is required to convert the raw sensor values into the actual temperature value, which is done using the given formula:
temp = (analog_value*100)/1023
The converted digital data is then plotted for visual representation.


Comments