


Hardware components | ||||||
 |
| × | 1 | |||
 |
| × | 4 | |||
| × | 1 | ||||
| × | 2 | ||||
| × | 1 | ||||
| × | 1 | ||||
| × | 1 | ||||
| × | 1 | ||||
| × | 1 | ||||
Software apps and online services | ||||||
| ||||||
| ||||||
Hand tools and fabrication machines | ||||||
| ||||||
| ||||||
Most of us only think about emergency communication when something goes wrong — like when the phone network is down, or during a hike with no coverage. That’s exactly when devices like Meshtastic become really useful. But the problem is, people don’t carry a separate gadget every day “just in case.”
What we all do carry, almost without fail, is a power bank. That gave me the idea — what if the Meshtastic node lived inside a power bank enclosure? Then it’s always with you, without needing to remember another device.
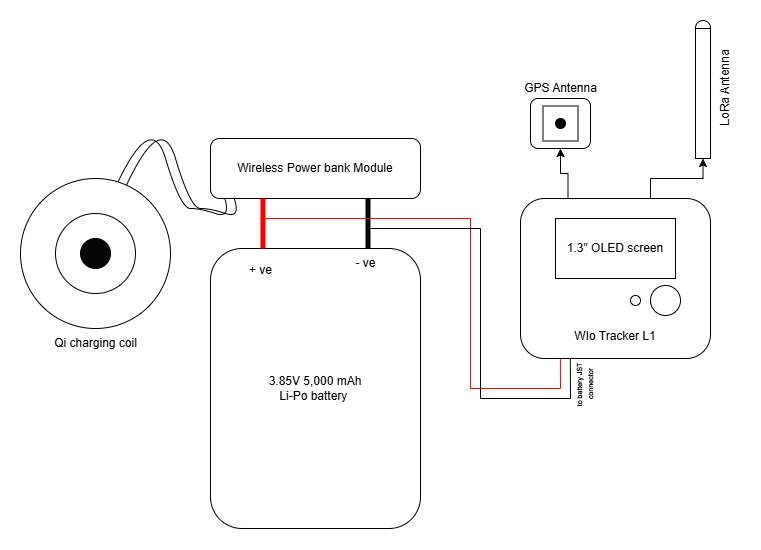
So I designed PocketMesh Bank, which combines a Wio Tracker L1 Meshtastic board with a 10, 000 mAh wireless power bank. In normal daily use it just charges your phone, but in emergencies or off-grid situations it turns into a LoRa communicator with GPS location sharing.
The enclosure is made so it’s practical to carry, has space for the antenna and GPS patch, and is weather-resistant for outdoor use. I wanted it to feel like an everyday object you already carry, but one that can quietly act as a lifeline when you need it most.
Real Motivation: I'm a HAM radio licensee, part of an armature radio community, with a bunch of HAM hobbyist who are passionate to work when emergency situations occurs. So I noticed how difficult it is to carry the HAM radio equipment's all the time and keeping it workable so we can use when it crucial and needed. so as a solution to the similar problem in Meshtastic this thought led me to the design of PocketMesh Bank.
DesignWith the provided 3D file of the Wio Tracker L1, I've designed an awesome enclosure around it in Fusion 360.
I've added the antenna which is removable and the menu button, Joystick knob for the Integrated L1. And the Meshtastic power switch is on the left side, the backside of the device is having the magsafe magnets and wireless charging, so the user can attach it to an iPhone easily
Design IntegrationThe Wio Tracker L1 is mounted to the main body with the 4 M2 screws as per the design Integration, and the wired antenna of the Wio Tracker L1 is place at the top right corner as per the aesthetic and user friendliness. I did not integrated the Qi Coil and the power bank module yet but I've seen some of them so added the space in the design which will be occupy later when the project completes. the 1.3" OLED screen is visible to through the added Smoke acrylic glass.
Here are some key features of the Project
- 10, 000 mAh power bank – reliable capacity for daily charging needs
- USB-C PD fast charging – supports modern devices with high-speed power delivery
- MagSafe wireless charging – snap it onto the back of your phone for quick, cable-free charging
- Built-in Meshtastic node – long-range LoRa communication for off-grid messaging
- 1.3" OLED display – shows battery status, connectivity, and mesh info at a glance
- GPS tracking – share your live location with your group over the mesh network
- Everyday carry design – looks and works like a regular power bank, always ready in your pocket
- Outdoor ready – compact, durable, and weather-resistant enclosure for real adventures
I feel great full to see that my little project selected for the Meshtastic challenge among other 9 contenders. So I Didn't wait much to execute the project by turning the concept int a real prototype. what I shows above the in the concept design just an imagination which I wanted to achieve through this project.
No more thinking lets gets to work!!
I’ve ordered the Wio tracker L1 device which is the heart of the MeshBank from the Seed’s Store. it was out of stock at the time I ordered but I reached our Seeed’s support team and they helped me by managing to send the Wio tracker L1 to Kochi, India. So just waited to reach the device. during the waiting I’ve started to prepare the rest of the components as I mentored in the concept design
- Power Bank module with QI charging coil
- Magsafe ring magnet
- Li-Ion Battery ( 10,000 mAh)
- Type C cable
- M2 Screws
As I was searching for the rest of the components I’ve realised that the power bank module I’m searching for is not available in the Indian market and I’m notable to source it in time, So I thought finding a good power bank and Hack into it to collect the necessary components that solve my components sourcing issue for the magsafe magnets, battery and the Module.
So I found a good Power bank with 10000 mAh battery and wireless charger from amazon for 1400 rupees
I saw this device with one of my friend, during the concept design, I’ve taken some inspiration from this model already. elegant design and value for the money, they even added a kick stand which is super nice
Here is the Power bank module that I got from AliExpress with a wireless Charging coil, while is not delivering to India, and will take long time even if it deliver
after a thought process, I’ve been having a doubt is this rally possible, I know the idea is so simple, but integrating everything in a small enclosure, which is compact enough to carry and easy to use, and aesthetically pleasing? may be , maybe not. leaving the questions to be answered through Iteration, no need to achieve everything, but close enough will serve the concept..
So I got the power bank the next day from amazon and unboxed it till its last screw : D
After I opened the power bank and saw the battery inside, realized its size is too big for Meshbank, which will make the device even bulkier, its a Lithium Polymer battery with 10000 mAh battery capacity and I need to find new battery which is less in the size at least slim enough to fit in my design.
I found a small size battery which is slim and smaller in width, but its only 5000mAh so I ordered 2 of them and waited for its arrival may take 4-5 days. mean while I’ve got my Wio tracker L1, ordered from seed studio, only took 4 days!! I paid extra money for the Import duty (50% +) and processing fee at DHL
Didn't wait, I opened the package and unboxed my Wio tracker L1. it included the Wio tracker L1 Module with OLED sticked on top of it, a GPS antenna and a SMA Lora antenna with its SMA connector.
with the all the delivered components, I’ve started to iterate the design with DFM I’ve got 2 Bambu Lab A1 printers, So the design rules is followed with 3D printing which I know well from my printers.
Let's begin!! 🥳
➿Iteration 1:Basic prototype to test component layout and wiring
As I mention during iteration 1, its little hard to follow up with the projection design and get great results from the 3D printer I’ve to improve the lid design and make it simple and 3D printing friendly
I measure the dimensions from the power bank’s enclosure and from the module then I did test print to see if the alignments are correct or not and the led lights are coming out or not. got some success. but its a start
Then I draw the power bank module with the necessary components from it especially the switch and the type C ports, the screw hols and PCB dimensions are obtained exactly just using a vernier caliper
I’ve added the power bank module in a fresh design and added the Wio tracker L1 3D models and the antenna SMA connector. then I cut the bottom part in the design to perform a test print and final fit , which I was able to achieve in few try
You can see how good the Module fits in the 3D printed test part. Now that being set I moved to the rest of the design, after adjusting few things on the file I’ve just printed out the design to see how it turns up, I’ve not fully completed the design just to see the mounting of the tracker module and the SMA antenna connector.
This only took less than an hour to print and the fit for the Wio tracker was good but the SMA antenna struggling to fit in as u can see the above test results, I also forgot to add a room for the GPS antenna, and what about the battery and size?!!
Omg the size of the 10000 mAh Li-po battery from the protronics powerbank is huge and will increase the bulkiness. my mind didn't allow for this settlement and the 5000mAh li-po battery which I ordered yet to deliver, I got the dimension from the site and where I ordered they’ve given the dimension with proof.
But still thickness of the original design needs to be compromised and I didn't see a room for the GPS antenna. after few days the battery I ordered delivered to me, it was one day late from the estimated delivery date.
I’ve just quickly tested the battery with the power bank module to see its working perfectly, it got charged and also performing the wireless charging to my phone but after I plugged via usb the power bank module started to blink, that’s how I noticed a biggest misunderstanding
The Li-po battery comes in the power bank are not a normal 3.7 V rated batteries, the manufacturers use the 3.85V Li-Po battery nowadays for achieving the fast charging and PD outputs. this knowledge was new to me that there is a different voltage level batteries are used in our everyday products.
these batteries are called high-voltage (LiHV) lithium polymer battery which are designed for improved performance over standard 3.7V batteries. Compared to the 4.2V maximum charging voltage of standard LiPo cells, a 3.85V LiPo can be charged to a higher maximum voltage of around 4.4V. This results in a higher energy density, meaning more energy can be stored in the same size battery Source link. And for my bad these batteries not available in Indian market to buy which can be fit in my size, I need to proceed with the bulky 10000 mAh Li-Po battery which I already got from the power bank
with a bit of sadness I continue the design with the bulky battery, I had to increase the thickness and the length of the design to integrate all of them together, also given a corner for the GPS antenna
I didn't complete the entire design till the lid, but I did a test print again, at this point, it good to see how the fits and size of the device turned out. You can see that the battery fitting inside and both the SMA antenna connector, GPS antenna are fit inside perfectly
Here is how it looks when I holding it in hand, You can see the Display placed a bit offset which is not centered because of the Lora antenna. For a working prototype that's totally okay for me, I still need to add more things at the front of the device like Joystick and the button, front glass . and also need to design the lid of the device which holds the magsafe magnets and the QI charging coil.
I’ve taken the dimensions from online references and the Portronics powerbank which I “hacked”, and added to the lid design. for closing the lid i didn't use screw, I went for the 3D printed snap fit
here is the video which help me make the snap fir joint:
I ended up printing the lid multiple time to get good results, like upside down, 45 degree and etc.., what I understood that this design is not that 3D printing friendly also the black filament is not that good at the results.
I moved with the front side of the device, by adding the Joystick knob and the menu/back button and left a rectangular hole at the top for the acrylic glass which comes later. and added the Meshtastic logo for honouring the Meshtastic project . I realised that I made a small mistake at the possible design which the logo was upside down
I dint realize it was upside down, this time I placed logo correctly and also added the green colour of Meshtastic logo to my design instead of the orange-red colour I chose earlier in the concept design
then I 3D printed the enclosure completely and assembled to see how it turned out, omg look at the bulkiness!! : (
I’m able to integrate everything inside the enclosure but I wasn't happy about the size, the print wasn't that good as well there was noticeable wrapping happened , but I got the side switches are working, and I’m able to attach the type C cable to it, I can attach the lora antenna even the lid is closing perfectly all works except the size which I didn't like
The next day after I finish my Frist meshbank prototype the Hackster officials changed the deadline of the challenge which means there is a plenty of time for iterating this design and try to achieve what i expected for.
Again I searched online and found a different power bank which is slimmer in size but only have 5,000 mAh battery capacity, but it was cheaper in price because of the sale happening in India but the review of the power bank is not that great, anyways I bought one what if I can use my 3.7v 5000 mAh battreis instead of its battery,
- here is the amazon link of the product https://www.amazon.in/dp/B0DDCKJ1WM
the product arrived the the next day, as usual didn't wait much unboxed and teared the power bank apart. and I after I saw the battery I understand that my intention using the power bank module with the 3.7v 5,000 mAh battery is not happening, because all the power bank which has fast charging comes with a high voltage Li- Po battery works 3.85 nominal voltage
As you can see the comparison between the 10,000 mAh battery and 5,000 mAh battery in the above picture the new Li-Po is smaller in thickness , the rest of the sizes are same, so there is chance for me to make a reduced size version of the prototype.
As I explore many things from my first prototype I’m closing this as a Iteration 1, and moving with second design or second iteration by sacrificing the 10,0000 mAh feature for the MeshBank : (
🤔Iteration 2:Foldable antenna added, battery layout improved, refined enclosure structure
when I realized that I cant make the slimmest device possible during the iteration 1 I already saved a copy of the design as version 3 in my fusion 360 folder, so I started my iteration 2 with the saved file
I’ve adjusted the height for the 5,000 mAh high voltage Li-Po battery and also reduced the entire hight in to a compact size
Then I printed a test to see how the battery fit inside and how much I need to adjust in the design. This time I used white filament for testing, to save the remining black filament in stock for the final. And I ended up some realisation that I cant keep the battery over the power bank module which will over complicates things also bad placement for the battery because its flammable and need to secure without harming much, not only that the thickness again will add up like the iteration 1,
the battery cant fit there because of the GPS an and Lora antennas, So I started thinking about how can I get rid of the antennas or shrink into the design, I’ve seen Lora antenna in small enclosure before, there is tracker product series available by Seeed studio, SenseCap T1000 LoRaWAN GPS tracker
this above image referred from Seeed studio Wiki where they showing how seeed integrated the GNSS and Lora antenna in the tiny package. Incredible, this product is amazing inspiration
links
- https://www.seeedstudio.com/sensecap-t1000-tracker
- https://wiki.seeedstudio.com/faq_for_SenseCAP_T1000/
What is Inside the Antenna Lets hack into it
Here is what I found Inside the Lora antenna actually a thin PCB which is not bigger than Mesh bank. after seeing this one of my friend asked me that “why don't you hid the tiny PCB antenna in the Design, so the device will be compact and no need any additional accessories to make it work
My friend got a point it dose fit inside and I can get rid of the antenna and the SMA connecter that gives me some idea to secure the Li-Po placement, I just need to figure out to place the GPS antenna without losing much space or increasing the height of the design.
But wait… if this such a small antenna made out of PCB why Having it as an external Antenna why didn't seed embed this in their device ?, there must be a reason
the Short answer to the question I got from chat GPT is “yes”, but there are consequences of losing range, missing signals and especially we need to be carful about the placing of the antenna. Sources saying that need to be avoided any battery source, magnets , ground plane near the antenna at least 3-4 CM
these recommendations are not so practical for my design to integrate So I spend more time on it to find way for the best integration and ended up having an unexpected idea
what If I can make the antenna go inside and lock then push it outside when needed? I drilled a hole at the SMA connector and tested the idea to see how it turn up. Cool!!, now I need some kind of push lock mechanism to Like I have it in my Samsung S22 Ultra for the S pen. I worked around it and found a unique component that I inspired from my Xiaomi’s Screwdriver set
Its a PR-001 Small Door Lock Switch Lock, used for small doors, electronics etc… I already have it lying around in my inventory, jut bought put of curiosity, : )
After taking measurements from the Push lock component I’ve added a placement holding walls in the design right under the power bank module
The component is perfect fit as you can see in the picture. I moved to the locking attachment design that can attached to the antenna’s rubber covering.
I design a small attachment in fusion as a separate design. And started test it out
It was perfectly working on its first print. It still have a problem that coming out from the main body because of the antenna not arrested anywhere when It released from the lock. So it need some kind of linear covering in its movement axis. the test results promising it's great design improvement
as You see in the above pictures I’ve added a linear guide for the attachment to move back in forth then also added a hole at the bottom for a small magnet to fit in.
Here is the animation in cad to see how it gonna preform in real, adding animation joints in fusion 360 is very simple. and useful
then I printed them out to test the results , it was perfect and awesome!!. I only printed the left side of the design to save time and material in 3D printing
I’ve also checked the Push lock fitting in place underneath the power bank module well enough , and printed a small portion for checking it is not colliding with the power bank module
This image tell the story of this Hidden antenna feature mesh back , I’m excited for the final result now!!
😬Mistake Mistake MistakeWhile messing with the antenna and the Wio tracker board, I accidently broke the antenna PCB connector on the lora module
I fixed the issue by replacing the connector which is borrowed from a old faulty Xiao Board which matches the same connector for the antennas. You can see the pictures of the broken antenna connector and the xiao,
I’ve noticed that if I can some how manage to place the GPS antenna correctly I can have room for the 5,000 mAh battery perfectly so I did some adjustment and also modified the front side, Just like the Iteration 1,
Again I did a test print to see how the front looks like, ( i didn't added the logo while printing ) to avoided the support issue on the print I used the acrylic sheets while printing , by pausing the print just at the height and inserting the acrylic pics at the screen place and the Joystick place. it wasn't that practical results are came out bad with warpage issues, the fit was good, But I miss judged the size of the GPS antenna, which needs to be adjusted in the length of the Meshbank
But I’m more confident and happy than the previous version of the product, its time for me to move with the aesthetics and color schemes of the device and finish it better, So I’m gonna conclude the Iteration 2 here and moving with iteration 3
✨Iteration 3:Lid design, Integrated MagSafe, and final color schemes designed
I saw this kind of Coaster design in maker world that people making , came out Beautiful with multi colour printing , and I followed the design curiously then found a YouTube video explaining how to design in fusion
Credits Links:
- https://makerworld.com/en/models/826002-coster-spider-man?from=search#profileId-769615
- https://www.youtube.com/watch?v=CiKTtSWDXGI&t=38s
then I added the similar technique in My Lid design and this is how it looks like. also avoided side, corner fillets. this can be print on a 3D printer with AMS support easily without any additional support
Here is how it came out , very cool I tested this with the White and Black filaments You can see that it fits well enough with the iteration 2 model , neat and cool!!
The MagSafe magnets fit well as well as you can see in the above picture and it sticks to my phone well enough. Now I need to finalize the entire design and finish the project.
The above single picture can tell the effort behind the iteration, and it dose speak the journy to the final step.
💯 Final designI’ve adjusted all the errors in the final design which learn from the test prints and iterations, and Completed the design in fusion 360 with the colour of Meshtastic Green or close to it. I’ve selected a black tint acrylic sheet for the screen, which is enough to see through the OLED display and giving the product a gorgeous look
🏗️ FabricationAs I have issues with the 3 printing the design with the support before This time, I tried out the multi material print Which allow users to remove the support easily, its combination of PETG and PLA , I’ve seen several videos online for this I followed a YouTube video to try this out.
Video link:
3D Printing
The print came out so neatly and I’m able to remove all the Support without damaging the Design and got the part very clean that where the Smoked acrylic screen goes.
I’ve 3D printed all the design parts and removed the support, I chose the Black and white for now. all of them together took under 4 hours to print in my Bmbu lab A1and A1 mini printers.
Laser Cutting:
The screen cut out from a black tinted transparent acrylic sheet, aka Smoke acrylic sheet. at a Super Fablab, Nearest available to me, the machine I use here is trotec Speedy 400.
other Components
Here are the other components for the Mesh bank, all collected and arranged for assembly and testing
🛠️ AssemblyFirst step of the assembly is to solder the Li-Po and power bank module, including the JST connector and the Qi charging coil
I soldered the battery to the power bank module and also added the JST connector for the Wio tracker L1, then I just plugged everything except the antennas, and it seems to be powering up perfectly
💰 The BOMIt's total of 105 USD and nearly 10K In INR. For accessing the links in the BOM, Click here .
Here is the Stop motion video of the full assembly to the Final!!. Watch and enjoy.. 🥳
And this how it came from the assembly , I didn't imagine that the white colour and black combo has an unique look. Its look cool!!, and the foldable antenna works well too
Here is my Meshtastic Edition of the PocketMesh Bank Its not the exact Meshtastic green but Close enough and my friends are saying this look eye-catching. I want to dedicate this Peek green version to the Meshtastic community,
But the green on Black combo is my favourite, it was very fun for me to mix and test all the filament color I have and with Bambu lab A1 and AMS these result are very easy if you really knows to 3D print.
I’ve tried this when I got the device first just to check it out there is a goof Wiki available from seed studio to get started with the Wio tracker L1 serries .
I used the “2.7.7.5ae4ff9 Alpha Firmware” to flash my PocketMesh Bank. Flashing with the Meshtastic web flasher is very easy
Links:
I’ve installed the Meshtastic Android application in my phone, and added my device even tested the device with one of my friend who has the Meshtastic device already.
Now it's become an ecosystem, the pocketMesh bank allows the user to carry it and use it as a power bank,
The Protornics power bank, which I used for this project, came with a Type C cable special that Gives the user to carry the power bank like this.
the Powebank module has 2 Type C connectors, so the special Type C cable can attach to it always and the Meshbank can weigh like a keychain. the user never miss the Type C cable Here are some other Images
🔬 TestingDoes this really work?!!
I gave Mesh Bank to one of my friends to play with to see how he operates through it.
The above video shows how the Magsafe functionality works with both theSamsung S22 Ultra and my friend's iPhone.
The PocketMesh Bank brings the power of off-grid communication and everyday utility into one compact form. By merging a Meshtastic node with a portable power bank, it bridges the gap between adventure gear and daily tech essentials. This project demonstrates how open-source hardware and creative design can make resilient communication tools more accessible to everyone.
I invite you all to explore what I’ve built with this little project and take inspiration for your own ideas. I dedicate this work to all the makers who dream of creating their own signature products that make everyday life a little better. I’m truly happy to share this project with you all — thank you to everyone who supported me along the way.
Happy making! ✌

_t9PF3orMPd.png?auto=compress%2Cformat&w=40&h=40&fit=fillmax&bg=fff&dpr=2)


Comments