

Hardware components | ||||||
 |
| × | 1 | |||
 |
| × | 1 | |||
Software apps and online services | ||||||
 |
| |||||
 |
| |||||
ZYMKEY4i is the fourth generation of the Zymbit security module designed specifically to work with Raspberry Pi. It connects to the GPIO header of the PI and uses the I2C bus and GPIO-4 to communicate with the Pi CPU via an encrypted channel.
ZYMKEY4i can also be used with other I2C configurations, including the Nvidia Jetson Nano. Click here for Getting Started with ZYMKEY4i for Jetson Nano.
SUMMARY OF SETUP STEPSIn this Getting Started Guide we describe how to install your Zymkey 4i to a Raspberry Pi running Rasbian or Ubuntu. The installation process is the same for both of these Linux distributions.
Learn about Linux OS support for Zymkey.
0. HARDWARE & CONNECTORSYour Zymkey 4i can be fitted with a 3V CR1025 coincell battery that is used to maintain operation of the real-time-clock (RTC) and tamper detect features in the event that main power (from the GPIO header) is lost.
If you choose not to fit a battery, then these important security features will not function in the event main power is removed.
Battery installation is highly recommended if your device is vulnerable to physical access !
Use a high quality 3V CR1025 coincell battery such as the Panasonic - CR-1025EL, LITHIUM MANGANESE DIOXIDE 53.
IMPORTANT: Note the correct polarity with +ve facing upwards !!
Power down your Raspberry Pi first!
IMPORTANT: Installing your hardware correctly is important to avoid destroying your Pi or Zymkey. Be sure to follow the images below to ensure the first 10 GPIO pins are correctly aligned with the Zymkey header.
Note: the coin cell battery should be facing up.
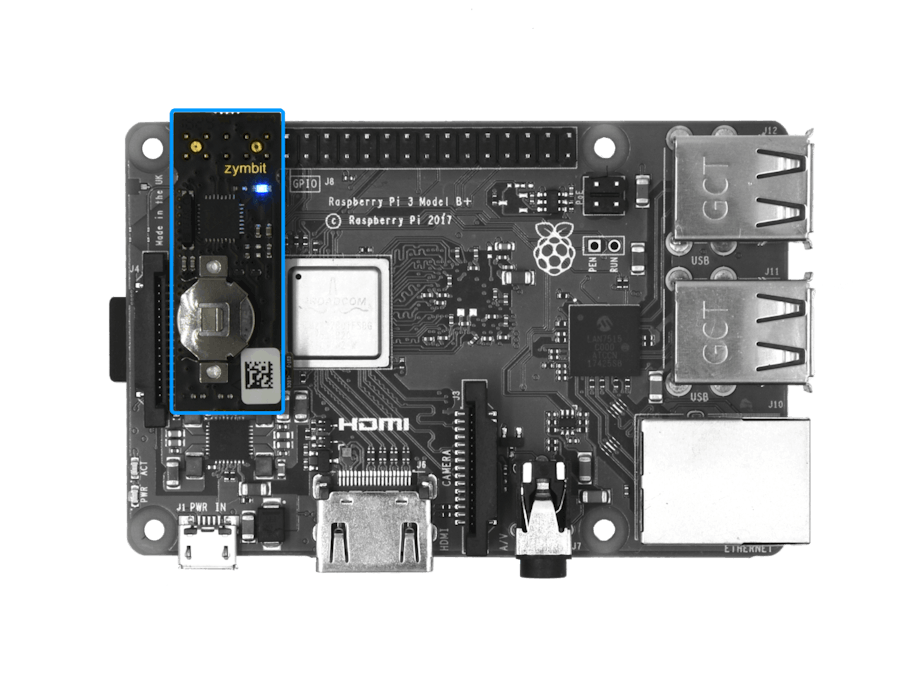
Fit the Zymkey 4i with LED and battery holder facing upwards. Be sure the black connector is properly aligned with the first 10 GPIO pins and that pressed firmly down onto the header. If misaligned, this could cause damage to the Zymkey and/or your Raspberry Pi. Your Zymkey should fit relatively snug and maintain a tight interference fit around the pins.
Zymkey occupies 10 pins on the GPIO header. It can also be used with Pi Plate devices attached, or other i2c devices attached. See options later for correct address range and use of IO pins.
Using an alternative GPIO pinThe default configuration uses GPIO4. This can be reconfigured to use another GPIO of your choice.Learn more>
Using an alternative I2C addressThe default I2C address for Zymkey is 0x30. If this conflicts with another device in your system, you can reconfigure the Zymkey to use another address of your choice.Learn more>
Option: Using Zymkey with another Pi Plate fitted.
Finally, power up the pi and you will see a blue led blinking rapidly and consistently (5 blinks per second)
(If the blue LED blinks erratically, or not at all, then there is an installation error and you should check your connections.)
Power QualityLearn why power quality matters to the reliable and secure operation of your system and Zymkey.3. CONFIGURE THE I2C BUS
For Raspbian Operating Systems you must configure the state of the I2C bus to “ON”.
For Ubuntu Operating Systems, the I2C bus is automatically configured and you may skip this step.
For Raspbian OS:
- Log in to your pi and run
sudo raspi-config - Select Interfacing Options -> I2C ->Would you like the ARM I2C interface to be enabled? select (Yes), enter, enter
- Arrow Right to Finish
Your I2C bus is now configured and ready to talk to the Zymkey. Next install the Zymkey interface software (ZKIFC) onto your Pi.
The default I2C address for Zymkey is 0x30.
IMPORTANT: The default mode for the cpu scaling governor is ondemand. There have been some issues with the interaction between the zymkey and the I2C bus, when the governor is set to ondemand. We highly recommend to switching the governor to performance to get the most out of the zymkey.How to set cpu governor to performance. 34
4. SOFTWARE PACKAGE INSTALLATION & APIFor a bare raspbian system, first login to your pi.
NOTE: Your Zymkey will require a number of packages to be installed from the Raspberry Pi and Zymbit apt repositories. The following setup script will be installing a number of files and software packages on your system:
- Zymbit.service files located in the /etc/systemd/system directory
- pip
Download and install the necessary Zymbit services onto your Pi.curl -G https://s3.amazonaws.com/zk-sw-repo/install_zk_sw.sh | sudo bash(grab a cup of coffee because this will take between 4 and 20 minutes).
Good security begins with assigning each device a unique and unalterable identity (Device ID), that is used to authenticate subsequent interactions with the device.
Zymkey generates a unique Device ID by measuring certain attributes of the specific host Raspberry Pi (Measurement), and then combining that Measurement with the unique ID of a specific Zymkey. The combination process uses a cryptographic function and this process is generally termed “binding”. On completion of a binding process, then Zymkey is said to be “bound” to the Pi.
Zymkey supports two operating modes:
- Developer Mode: bindings are temporary, zymkey can be moved to different Pi hosts and SD Cards
- Production Mode: binding is permanent! zymkey can NOT be moved to different Pi hosts or SD cards
When the software installation has completed, reboot your pi. After the reboot has completed, the pi will perform an operation that will temporarily bind the Zymkey to your pi. Once the Zymkey is bound to the pi, the Zymkey’s blue LED should blink slowly - once every 3 seconds - to indicate that the binding is complete.
At this point, your Zymkey is now in Developer Mode, the binding is temporary and the Zymkey can be moved to another Pi and the binding process repeated.
6. PRODUCTION MODE (permanent binding)When you have completed all your development work and you are ready to deploy your system into the field we recommend that you permanently bind your Zymkey to a 'specific host Pi and SD card '.
WARNING: THIS BINDING PROCESS IS PERMANENT AND CANNOT BE REVERSED. PAY ATTENTION TO THE FOLLOWING:
- Your specific Zymkey will be locked to the specific host Pi and it is impossible to move or bind your Zymkey to another Pi. There are no factory resets, masterkeys or other forms of recovery.
- If you are using the perimeter_detect features, then the sequence in which you arm, disarm is very important. Be sure to follow the process steps below.
- Once you have locked your Zymkey into production mode, zymbit cannot guarantee its operation if you subsequently do a major distribution upgrade (e.g. Raspbian Jessie to Stretch).** Contact Zymbit for more information. 152
- If you decide that you are not ready for permanent binding then leave it in developer mode, but beware this makes it easier for a bad actor to replace the host with a rogue hardware.
Do not cut the Lock Tab yet!
- Install the battery on Zymkey
- Place Zymkey onto the Pi (with power down on the pi)
- Turn on the Pi
- Install and bind the Zymkey and Pi
- Set Perimeter Event Actions to “none” or “notify only”
- Create your LUKS encrypted volume
- Install your applications into your encrypted volume
- Confirm your system and applications work fully as you intend
Do not cut the Lock Tab yet!
- Turn off the power to the Pi.
- Do not remove the battery.
- Remove the zymkey from the Pi
- Now Cut the Lock Tab
- Replace the Zymkey onto the Pi and turn on power to the Pi
- Close your perimeter circuit(s) (enclosure lid)
- Clear Perimeter Detect Events
- Get Perimeter Detect Info to confirm prior events are cleared and the perimeter is closed.
- If the Perimeter Detect Event returns clear, then you can ‘arm your system’ as you require by setting Set Perimeter Event Actions to “none”, “notify” or “selfdestruct”
- Your system is now armed.
IMPORTANT: first power down your Pi and Zymkey. Removing the Cut-2-Lock tab can be done in situ, or by removing the Zymkey from the Pi. Also insure that your perimeter detect actions are not set to self-destruct mode. Follow the steps outlined above, and refer to the programming api documents for more information on the operation of Perimeter Detect Events.
Cut using sharp diagonal cutter pliersRefer to Using Perimeter Detect 172
API DOCUMENTATIONAPI’s are available for Python, C, C++Go to API Documents >
APPLICATION EXAMPLESThe quickest way to get started is to see the various methods at work by running these scripts:python /usr/local/share/zymkey/examples/zk_app_utils_test.pypython /usr/local/share/zymkey/examples/zk_crypto_test.py
Please read the Zymkey community pages for documentation on:


Comments