

Hardware components | ||||||
 |
| × | 1 | |||
 |
| × | 1 | |||
 |
| × | 1 | |||
 |
| × | 1 | |||
Software apps and online services | ||||||
 |
| |||||
| ||||||
 |
| |||||
The System is such a useful IoT tool which helps to calculate the temperature and alert time to time to Owner via SMS. It can be further used in Power Plants or pharmaceutical company for temperature sensing and generating alerts whenever the threshold is reached.
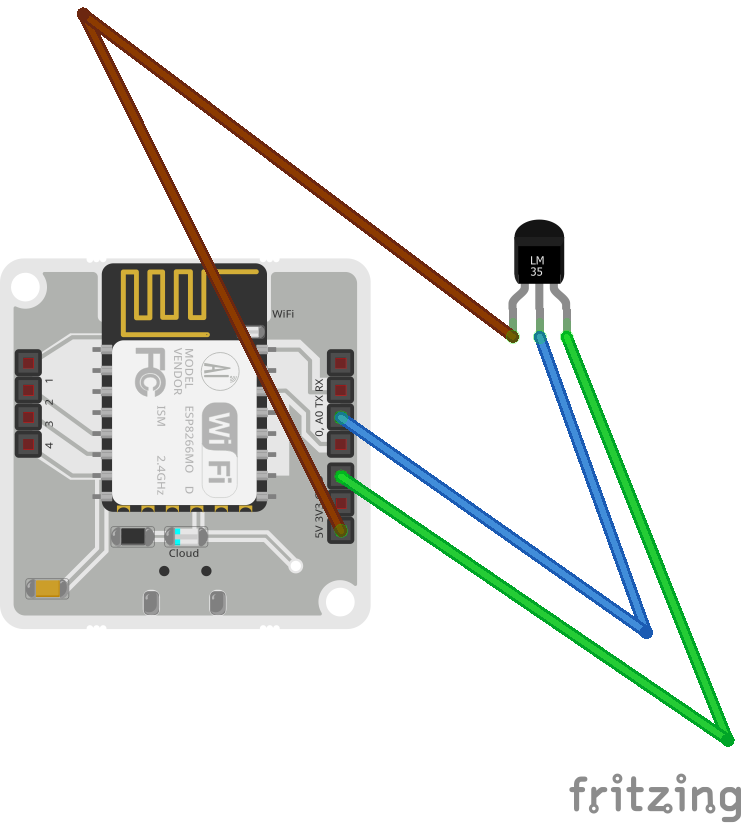
Step 1: Hardware ConfigurationA ) Hold the sensor in a manner such that you can read LM35 written on it.
B ) In this position, identify the pins of the sensor as VCC, Output and Gnd from your left to right.
C ) Bolt Wifi module is connected to LM35 temperature sensor through jumper wires.
D ) Using male to female wire we will connect the 3 pins of the LM35 to the Bolt Wifi Module as follows:
i) VCC pin of the LM35 is connected to 5v of the Bolt Wifi module.
ii) Output pin of the LM35 is connected to A0 (Analog input pin) of the Bolt Wifi module.
iii) GND pin of the LM35 is connected to the GND.
After making the connections take a look at images below for cross-checking :
Open the web browser and type https://cloud.boltiot.com/.
Login to your account if you don't have an account you can create an account.
In this above screen, will display for the first time if you open it the in the product section not linked is written.
then copy the Bolt Id and paste it in notepad as it is required in the further portion of the project.
On the left side of your screen, you can see products tabs you have to click on it.
then the products screen is open. there is an option "Add Product", click on it.
after click Add Product below screen is open.
Give the product name. Select input devices and GPIO pin.
then click on "Done" button. now product is ready.
Now, at the right-hand corner, you will saw link option in actions section click on a link and link the bolt device with the product
Step 3: Getting BolT API keyNow find API tab at left-side on screen and Click on it. note the API Key or paste it in the notepad
Open the web browser and type https://www.twilio.com/ or click on the link.
After open this link, you must sign up first.
After sign up, it may ask you to verify mobile and email do it.
now login and create project, it will ask some questions like which language you code and for what purpose you want their service select SMS.
when you create new project, first you have to click on "get a trial number"(find "get a trial number" on the screen) then choose the number and also copy the trial number, Account SID and Auth token and save it somewhere.
Step 5: CodeBefore going to coding you have to need Ubuntu O.S. If ubuntu os is already install on you system is well and good or else you can use Vmware or Virtualbox to run ubuntu on your windows system.
now open terminal and follow the commands as below:
1. create separate directory.
mkdir tempProject2. open created directory.
cd tempProject/3. Now, create configuration file using below command.
nano sconf.pyNow create a configuration file in which fill the following details that you have saved in the previous section.
SID = 'XXXXXXXXXXXXXXXXXXXXXX' #paste Account Sid from twilio project
AUTH_TOKEN = 'XXXXXXXXXXXXXXXXXXX' #paste Auth Token from twilio project
FROM_NUMBER = '+XXXXXXXXXXXXXXXXX' #Paste trial number from twilio project
TO_NUMBER = '+91XXXXXXXXXX'   #paste owner number
API_KEY = 'XXXXXXXXXXXXXXXXXXXXX' #paste API key from Bolt Iot Cloud
DEVICE_ID = 'BOLTXXXXX' #paste Device Id from Bolt Iot Cloud
After saving this file create the main file where the main logical code is written. Create the file by typing the command " nano tempSMS.py" in the Ubuntu terminal and write the code in that file which I have paste below in code section.
Now All Setup is ready.
run tempSMS.py on terminal using below command
python3 tempSMS.py


Comments