

Hardware components | ||||||
 |
| × | 1 | |||
 |
| × | 1 | |||
 |
| × | 2 | |||
 |
| × | 2 | |||
 |
| × | 1 | |||
 |
| × | 2 | |||
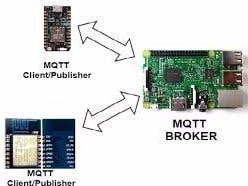
Raspberry Pi Talking to ESP8266 over WiFi using MQTT
MQTTMQTT is a machine-to-machine (M2M) data transfer protocol . MQTT was created with the goal of collecting data from many devices and then transporting that data to the IT infrastructure. It is lightweight, and therefore ideal for remote monitoring, especially in M2M connections that require a small code footprint or where network bandwidth is limited.
How MQTT work
MQTT is a publish/subscribe protocol that allows edge-of-network devices to publish to a broker. Clients connect to this broker, which then mediates communication between the two devices. Each device can subscribe, or register, to particular topics. When another client publishes a message on a subscribed topic, the broker forwards the message to any client that has subscribed.
MQTT is bidirectional, and maintains stateful session awareness. If an edge-of-network device loses connectivity, all subscribed clients will be notified with the “Last Will and Testament” feature of the MQTT server so that any authorized client in the system can publish a new value back to the edge-of-network device, maintaining bidirectional connectivity.
The project is divided in 3 parts
First, we create MQTT server on RPi and install some libraries.
Second, we will install libraries in Arduino IDE for NodeMCU to be work with MQTT, upload the code and check whether server is working or not.
Third, we create a script in Rpi ,upload the required code in NodeMCU and run the python script to control leds from both server and client side.
Here, server is RPi and client is NodeMCU.
Raspberry PiFirst, we install latest MQTT server and client in RPi
1. To use the new repository you should first import the repository package signing key:
wget http://repo.mosquitto.org/debian/mosquitto-repo.gpg.key
sudo apt-key add mosquitto-repo.gpg.key
Then make the repository available to apt:
cd /etc/apt/sources.list.d/
Depending on which version of Debian you are using:
sudo wget http://repo.mosquitto.org/debian/mosquitto-wheezy.list
sudo wget http://repo.mosquitto.org/debian/mosquitto-jessie.list
sudo wget http://repo.mosquitto.org/debian/mosquitto-stretch.list
sudo apt-get update
Then install Mosquitto server using .
sudo apt-get install mosquitto
If you are getting errors in installing Mosquitto like this.
The following packages have unmet dependencies:
mosquitto : Depends: libssl1.0.0 (>= 1.0.1) but it is not installable
Depends: libwebsockets3 (>= 1.2) but it is not installable
E: Unable to correct problems, you have held broken packages.
Then use this command to fix issues.
sudo apt --fix-broken install
After, installing MQTT server install client using command.
sudo apt-get install mosquitto-clients
You can check services using command.
systemctl status mosquitto.service
Now, we check using subscribe and publish. For subscribe and publish you can check commands. you can visit website also.
We successfully installed MQTT server and client .
Required library ==> paho-mqtt ,you can install using command.
sudo apt-get update
sudo apt-get install python python-pip
sudo pip install RPi.GPIO paho-mqtt
Go to directory cd /etc and open file dhcpcd.conf using any editor. At the end, write these four lines.
interface eth0
static ip_address=192.168.1.100                  // ip you want to use
interface wlan0
static ip_address=192.168.1.68
static routers=192.168.1.1                      // your Default gateway
static domain_name_servers=192.168.1.1
After that save it and reboot your pi
NodeMCUHere we install required libraries in Arduino IDE. We need two libraries.
1. Go to Sketch ==> Include library ==> Manage libraries.
2. Search for mqtt and install library by Adafruit or you can install any library.
3. It depend on sleepydog library so we need this library also.
Program
#include <ESP8266WiFi.h>
#include "Adafruit_MQTT.h"
#include "Adafruit_MQTT_Client.h"
/************************* WiFi Access Point *********************************/
#define WLAN_SSID       "YOURS SSID"
#define WLAN_PASS       "PASSWORD"
#define MQTT_SERVER      "RPi IP address"  // give static address
#define MQTT_PORT         1883
#define MQTT_USERNAME    ""
#define MQTT_PASSWORD         ""
// Create an ESP8266 WiFiClient class to connect to the MQTT server.
WiFiClient client;
// Setup the MQTT client class by passing in the WiFi client and MQTT server and login details.
Adafruit_MQTT_Client mqtt(&client, MQTT_SERVER, MQTT_PORT, MQTT_USERNAME, MQTT_PASSWORD);
/****************************** Feeds ***************************************/
// Setup a feed called 'pi_led' for publishing.
// Notice MQTT paths for AIO follow the form: <username>/feeds/<feedname>
Adafruit_MQTT_Publish pi_led = Adafruit_MQTT_Publish(&mqtt, MQTT_USERNAME "/leds/pi");
// Setup a feed called 'esp8266_led' for subscribing to changes.
Adafruit_MQTT_Subscribe esp8266_led = Adafruit_MQTT_Subscribe(&mqtt, MQTT_USERNAME "/leds/esp8266");
/*************************** Sketch Code ************************************/
void MQTT_connect();
void setup() {
 Serial.begin(115200);
 delay(10);
 Serial.println(F("RPi-ESP-MQTT"));
 // Connect to WiFi access point.
 Serial.println(); Serial.println();
 Serial.print("Connecting to ");
 Serial.println(WLAN_SSID);
 WiFi.begin(WLAN_SSID, WLAN_PASS);
 while (WiFi.status() != WL_CONNECTED) {
   delay(500);
   Serial.print(".");
 }
 Serial.println();
 Serial.println("WiFi connected");
 Serial.println("IP address: "); Serial.println(WiFi.localIP());
 // Setup MQTT subscription for esp8266_led feed.
 mqtt.subscribe(&esp8266_led);
}
uint32_t x=0;
void loop() {
 // Ensure the connection to the MQTT server is alive (this will make the first
 // connection and automatically reconnect when disconnected).  See the MQTT_connect
 MQTT_connect();
 // this is our 'wait for incoming subscription packets' busy subloop
 // try to spend your time here
 // Here its read the subscription
 Adafruit_MQTT_Subscribe *subscription;
 while ((subscription = mqtt.readSubscription())) {
   if (subscription == &esp8266_led) {
     Serial.print(F("Got: "));
     Serial.println((char *)esp8266_led.lastread);
   }
 }
}
// Function to connect and reconnect as necessary to the MQTT server.
void MQTT_connect() {
 int8_t ret;
 // Stop if already connected.
 if (mqtt.connected()) {
   return;
 }
 Serial.print("Connecting to MQTT... ");
 uint8_t retries = 3;
 while ((ret = mqtt.connect()) != 0) { // connect will return 0 for connected
      Serial.println(mqtt.connectErrorString(ret));
      Serial.println("Retrying MQTT connection in 5 seconds...");
      mqtt.disconnect();
      delay(5000);  // wait 5 seconds
      retries--;
      if (retries == 0) {
        // basically die and wait for WDT to reset me
        while (1);
      }
 }
 Serial.println("MQTT Connected!");
}
Just for checking whether its works or not. Here I have not created any script in RPi . we are just using commands to subscribe and publish. We will create script for controlling later on.
mosquitto_pub -h raspberrypi -t "/leds/pi" -m "ON"
mosquitto_pub -h raspberrypi -t "/leds/pi" -m "OFF"
mosquitto_pub -h raspberrypi -t "/leds/pi" -m "TOGGLE"
mosquitto_pub -h raspberrypi -t "/leds/esp8266" -m "ON"
mosquitto_pub -h raspberrypi -t "/leds/esp8266" -m "OFF"
mosquitto_pub -h raspberrypi -t "/leds/esp8266" -m "TOGGLE"
-h == > host name
-t == > topic
-m == > message
As it works so we move to next step.
- Complete code to be used in Arduino IDE.
/***************************************************
  NodeMCU
****************************************************/
#include <ESP8266WiFi.h>
#include "Adafruit_MQTT.h"
#include "Adafruit_MQTT_Client.h"
/************************* WiFi Access Point *********************************/
#define WLAN_SSID       "Your SSID"
#define WLAN_PASS       "PASSWORD"
#define MQTT_SERVER      "192.168.1.68" // static ip address
#define MQTT_PORT         1883
#define MQTT_USERNAME    ""
#define MQTT_PASSWORD         ""
#define LED_PIN     5                // Pin connected to the LED. GPIO 2 (D4)
#define BUTTON_PIN  4               // Pin connected to the button. GPIO 15 (D8)
/************ Global State ******************/
// Create an ESP8266 WiFiClient class to connect to the MQTT server.
WiFiClient client;
// Setup the MQTT client class by passing in the WiFi client and MQTT server and login details.
Adafruit_MQTT_Client mqtt(&client, MQTT_SERVER, MQTT_PORT, MQTT_USERNAME, MQTT_PASSWORD);
/****************************** Feeds ***************************************/
// Setup a feed called 'pi_led' for publishing.
// Notice MQTT paths for AIO follow the form: <username>/feeds/<feedname>
Adafruit_MQTT_Publish pi_led = Adafruit_MQTT_Publish(&mqtt, MQTT_USERNAME "/leds/pi");
// Setup a feed called 'esp8266_led' for subscribing to changes.
Adafruit_MQTT_Subscribe esp8266_led = Adafruit_MQTT_Subscribe(&mqtt, MQTT_USERNAME "/leds/esp8266");
/*************************** Sketch Code ************************************/
void MQTT_connect();
void setup() {
 Serial.begin(115200);
 delay(10);
 pinMode(LED_PIN, OUTPUT);
 digitalWrite(LED_PIN, LOW);
 // Setup button as an input with internal pull-up.
pinMode(BUTTON_PIN, INPUT_PULLUP);
 Serial.println(F("RPi-ESP-MQTT"));
 // Connect to WiFi access point.
 Serial.println(); Serial.println();
 Serial.print("Connecting to ");
 Serial.println(WLAN_SSID);
 WiFi.begin(WLAN_SSID, WLAN_PASS);
 while (WiFi.status() != WL_CONNECTED) {
   delay(500);
   Serial.print(".");
 }
 Serial.println();
 Serial.println("WiFi connected");
 Serial.println("IP address: "); Serial.println(WiFi.localIP());
 // Setup MQTT subscription for esp8266_led feed.
 mqtt.subscribe(&esp8266_led);
}
uint32_t x=0;
void loop() {
  // Check if the button has been pressed by looking for a change from high to
 // low signal (with a small delay to debounce).
 int button_first = digitalRead(BUTTON_PIN);
 // Ensure the connection to the MQTT server is alive (this will make the first
 // connection and automatically reconnect when disconnected).  See the MQTT_connect
 MQTT_connect();
 // this is our 'wait for incoming subscription packets' busy subloop
 // try to spend your time here
 // Here its read the subscription
 Adafruit_MQTT_Subscribe *subscription;
 while ((subscription = mqtt.readSubscription())) {
   if (subscription == &esp8266_led) {
     char *message = (char *)esp8266_led.lastread;
     Serial.print(F("Got: "));
     Serial.println(message);
        // Check if the message was ON, OFF, or TOGGLE.
     if (strncmp(message, "ON", 2) == 0) {
       // Turn the LED on.
       digitalWrite(LED_PIN, HIGH);
     }
     else if (strncmp(message, "OFF", 3) == 0) {
       // Turn the LED off.
       digitalWrite(LED_PIN, LOW);
     }
     else if (strncmp(message, "TOGGLE", 6) == 0) {
       // Toggle the LED.
       digitalWrite(LED_PIN, !digitalRead(LED_PIN));
}
   }
 }
 delay(20);
 int button_second = digitalRead(BUTTON_PIN);
 if ((button_first == HIGH) && (button_second == LOW)) {
   // Button was pressed!
   Serial.println("Button pressed!");
   pi_led.publish("TOGGLE");
 }
}
// Function to connect and reconnect as necessary to the MQTT server.
void MQTT_connect() {
 int8_t ret;
 // Stop if already connected.
 if (mqtt.connected()) {
   return;
 }
 Serial.print("Connecting to MQTT... ");
 uint8_t retries = 3;
 while ((ret = mqtt.connect()) != 0) { // connect will return 0 for connected
      Serial.println(mqtt.connectErrorString(ret));
      Serial.println("Retrying MQTT connection in 5 seconds...");
      mqtt.disconnect();
      delay(5000);  // wait 5 seconds
      retries--;
      if (retries == 0) {
        // basically die and wait for WDT to reset me
        while (1);
      }
 }
 Serial.println("MQTT Connected!");
}
Now, we are done with NodeMCU side . As i discussed above we need python script for controlling leds using buttons .So, we are going to create script.
- Make an empty file let us assume mqtt_led.py
# RPi
import time
import RPi.GPIO as GPIO
import paho.mqtt.client as mqtt
# Configuration:
LED_PIN        = 24
BUTTON_PIN     = 23
# Initialize GPIO for LED and button.
GPIO.setmode(GPIO.BCM)
GPIO.setwarnings(False)
GPIO.setup(LED_PIN, GPIO.OUT)
GPIO.output(LED_PIN, GPIO.LOW)
GPIO.setup(BUTTON_PIN, GPIO.IN, pull_up_down=GPIO.PUD_UP)
# Setup callback functions that are called when MQTT events happen like
# connecting to the server or receiving data from a subscribed feed.
def on_connect(client, userdata, flags, rc):
   print("Connected with result code " + str(rc))
   # Subscribing in on_connect() means that if we lose the connection and
   # reconnect then subscriptions will be renewed.
   client.subscribe("/leds/pi")
# The callback for when a PUBLISH message is received from the server.
def on_message(client, userdata, msg):
   print(msg.topic+" "+str( msg.payload))
   # Check if this is a message for the Pi LED.
   if msg.topic == '/leds/pi':
       # Look at the message data and perform the appropriate action.
       if msg.payload == b'ON':
           GPIO.output(LED_PIN, GPIO.HIGH)
       elif msg.payload == b'OFF':
           GPIO.output(LED_PIN, GPIO.LOW)
       elif msg.payload == b'TOGGLE':
           GPIO.output(LED_PIN, not GPIO.input(LED_PIN))
# Create MQTT client and connect to localhost, i.e. the Raspberry Pi running
# this script and the MQTT server.
client = mqtt.Client()
client.on_connect = on_connect
client.on_message = on_message
client.connect('localhost', 1883, 60)
# Connect to the MQTT server and process messages in a background thread.
client.loop_start()
# Main loop to listen for button presses.
print('Script is running, press Ctrl-C to quit...')
while True:
   # Look for a change from high to low value on the button input to
   # signal a button press.
   button_first = GPIO.input(BUTTON_PIN)
   time.sleep(0.02)  # Delay for about 20 milliseconds to debounce.
   button_second = GPIO.input(BUTTON_PIN)
   if button_first == GPIO.HIGH and button_second == GPIO.LOW:
       print('Button pressed!')
       # Send a toggle message to the ESP8266 LED topic.
       client.publish('/leds/esp8266', 'TOGGLE')
When you run the script your script should be look like this, if result code is not zero then their is an error you can check error on paho website.
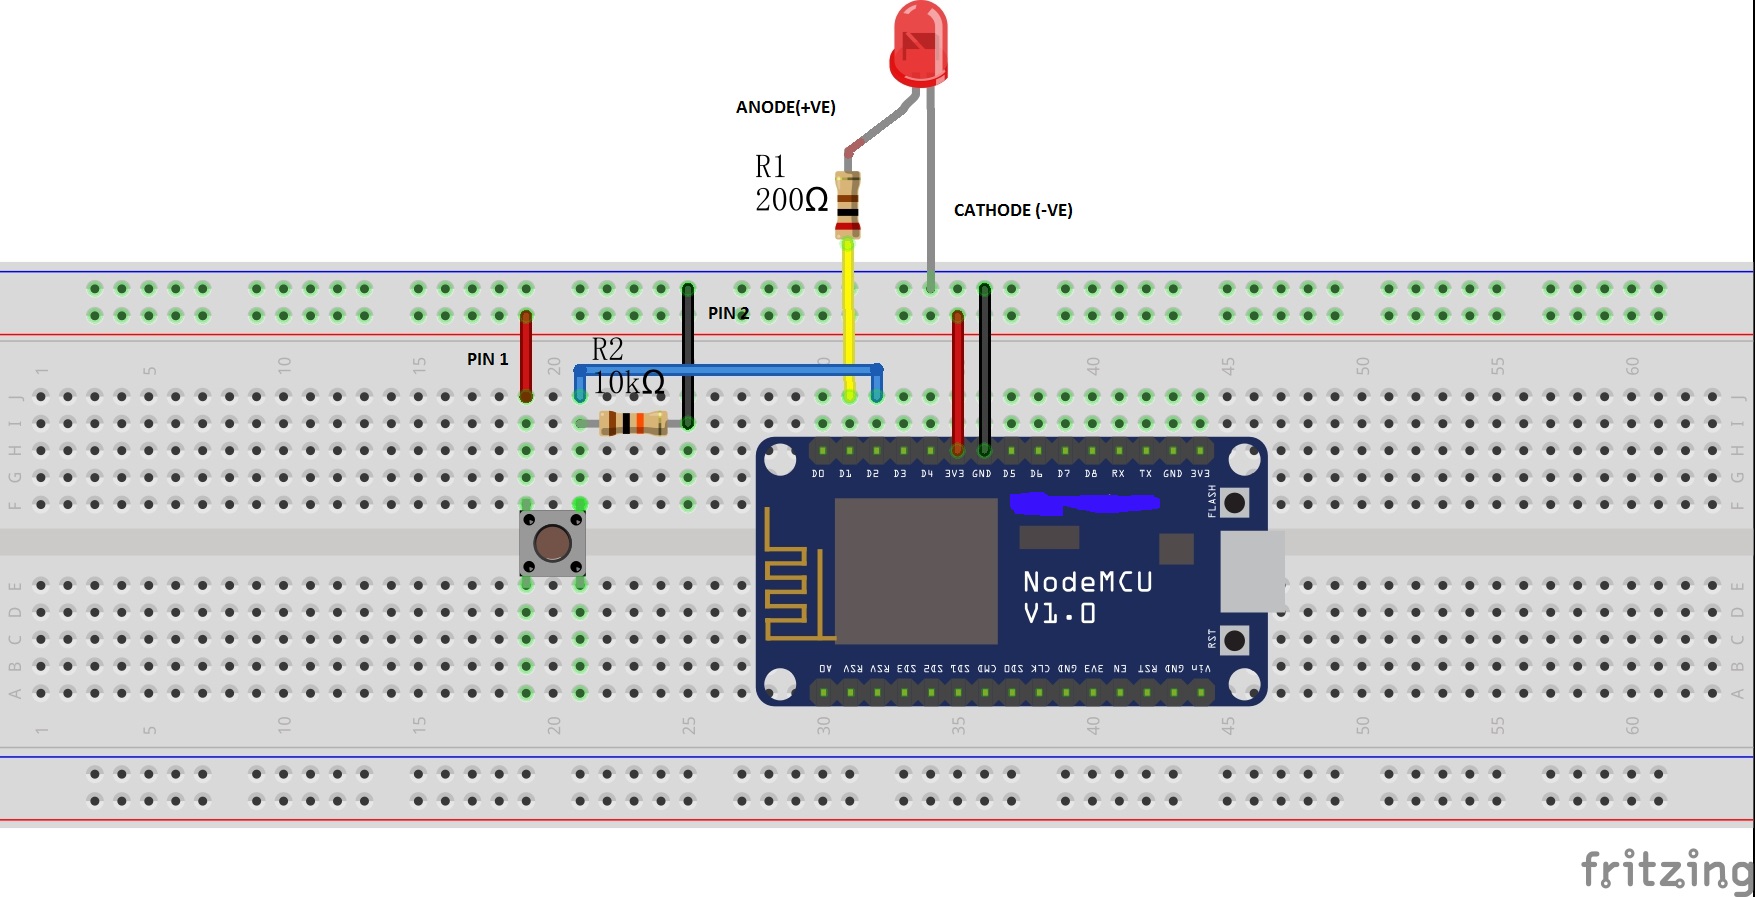
NodeMCU === > Button
Gnd === > Gnd
3.3V === > PIN1
GPIO4 (D2) === > PIN2
NodeMCU === > LED
Gnd === > Cathode (-ve)
GPIO5 (D1) === > Anode(+ve)
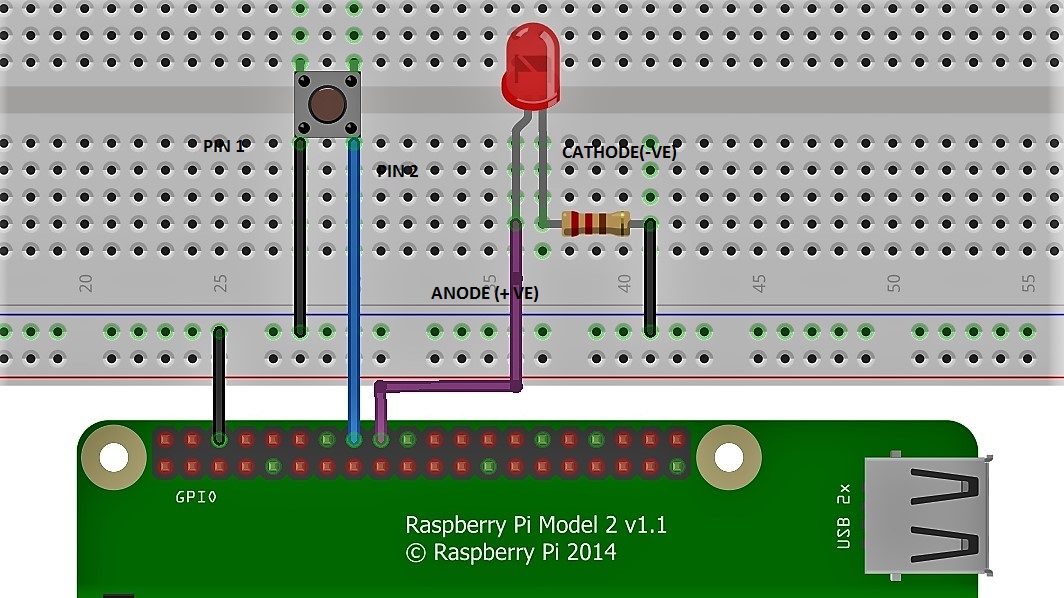
RPi === > Button
Gnd === > PIN1
GPIO 23 === > PIN2
RPi === > LED
Gnd == > Cathode(-ve)
GPIO 24 === > Anode(+ve)
Make sure you script is running otherwise it will not able to control led using buttons.


_3u05Tpwasz.png?auto=compress%2Cformat&w=40&h=40&fit=fillmax&bg=fff&dpr=2)
Comments