


Hardware components | ||||||
| × | 1 | ||||
 |
| × | 5 | |||
 |
| × | 2 | |||
 |
| × | 1 | |||
Software apps and online services | ||||||
 |
| |||||
| ||||||
| ||||||
Hand tools and fabrication machines | ||||||
| ||||||
Turn Any Device into a Drum Machine / Synth with Arduino
Traditional musical instruments carry geography, learning frameworks, and even subtle forms of exclusion. What instruments can we build from discarded devices that cross our path? What do we learn in the process? And most importantly: what kind of unpredictable, raw, and deeply personal music emerges from them
A few months ago, I was given a 1990s electrostimulator. You turned the knobs, connected pads, and your muscles would contract for massage or exercise purposes. It had enough knobs, switches, and even jacks that looked perfect for audio—so I got to work.
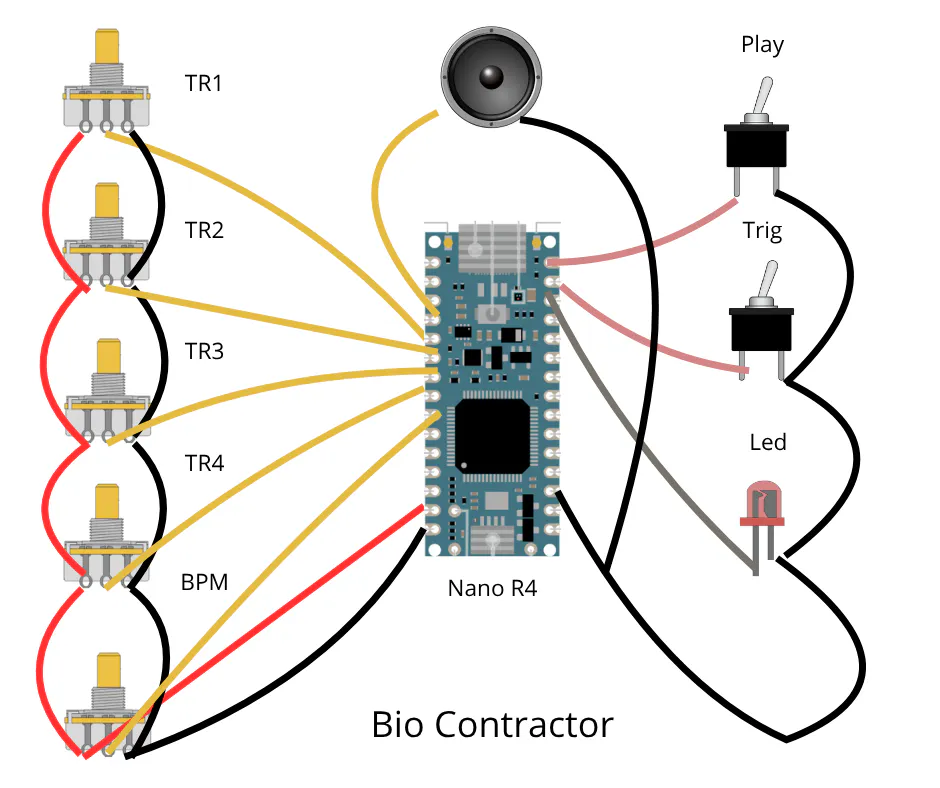
The CircuitThe circuit is straightforward:
- 5 potentiometers connected to analog inputs
- 2 switches connected to digital inputs
- 1 LED connected to a digital output
- 1 audio jack connected to an analog output
I also added a DC barrel jack to VIN and GND, although the device can be powered via USB-C as well.
The rest of the original electronics are not required. They can either be left in place or removed.
If you don’t have access to a device with built-in knobs and switches, you can use off-the-shelf components and design or reuse an enclosure.
The Arduino Nano R4 BoardAny Arduino can work, but memory matters since audio samples are stored in Flash. In this build I used an Arduino Nano R4, though an UNO R4 minima UNO WiFi R4 will also work.
The Nano R4 is based on the Renesas RA4M1 microcontroller, featuring:
- 256 kB Flash
- 32 kB SRAM
- 8 kB EEPROM
- 48 MHz clock
- Built-in RTC
- 14-bit ADC
- 12-bit DAC
The 14-bit ADC is especially useful for higher-resolution potentiometer readings.
Sound GenerationIt’s not widely known, but Arduino can generate more than simple beeps—it can play decent-quality samples.
The workflow:
- Export audio as raw, headerless, signed 8-bit PCM at 16384 Hz using Audacity
- Convert to arrays using Mozzi Python script
python.exe char2mozzi.py file.raw file.h mysound 16384- Use the Mozzi library to handle playback and timing
I used sounds from a Boss DR-110 drum machine, plus two voice samples:
“Arduino” and “Open Source,” generated using ElevenLabs
Uploading is simple:
- Connect the board
- Open Arduino IDE
- Upload the binary
Audio output can be sent to any mixer or amplified speaker.
Power can come from USB or a 5V supply connected to VIN and GND.
I wrote a calibration script to measure pot actual ranges and remap values accordingly. With new potentiometers, this step isn’t necessary.
How It Works- Bottom-right knob: BPM control
- “Gimnasia–Masaje” switch: Play / Stop
- Remaining knobs: pattern composition + triggering “Arduino” / “Open Source” samples
- "Contracción" LED: BPM indicator
- “Normal–Exponencial” switch: triggers FM synthesis with random variations
Future improvements could include: reducing noise on the output stage and replacing unused audio jack holes with additional switches for distortion or modulation
The Bio Contractor is a simple but engaging project. It transforms discarded electronics into a playable instrument at the cost of an Arduino and minimal wiring.
More broadly, this kind of work reframes what an instrument is. Instead of buying into predefined interfaces, you extract one from the world around you. The constraints of the original device—its quirks, limitations, and ergonomics—become compositional elements. The result is not just sound generation, but a negotiation between past purpose and present intent.
Demo


_t9PF3orMPd.png?auto=compress%2Cformat&w=40&h=40&fit=fillmax&bg=fff&dpr=2)


Comments