


Hardware components | ||||||
 |
| × | 1 | |||
| × | 2 | ||||
| × | 1 | ||||
| × | 1 | ||||
| × | 1 | ||||
| × | 2 | ||||
Software apps and online services | ||||||
| ||||||
 |
| |||||
| ||||||
Hand tools and fabrication machines | ||||||
| ||||||
What happens when we take AI out of the browser and give it a body? What kinds of emergent behaviors can we observe as it encounters friction with the physical world? What forms of stubbornness, refusal, or unexpected behavior emerge from the underlying LLM?
The idea behind this project is to build a small robot that takes advantage of the Arduino UNO Q’s dual architecture. An AI agent running on the MPU can invoke sensors and movements through primitive functions implemented on the MCU.
Instead of writing thousands of heuristic rules, the AI agent running on the robot can decide how to orchestrate movements and sensor data to achieve a goal—even in scenarios that were never anticipated when the robot was built.
The project involves several layers of hardware, software, sensing, and AI reasoning, which makes it difficult to predict whether the results will match the initial expectations. That uncertainty, however, is precisely what makes the experiment worth attempting.
The PartsThe robot’s most fundamental capability is movement. One possible approach would be to use two precision motors with a motor shield or an H-bridge, together with sensors that determine the exact position of the wheels.
However, because the goal is to keep the electronics to a minimum, I decided to use two continuous-rotation micro servos instead. They are powered from the same source and require only one signal wire each to control their movement and direction.
For orientation and navigation inside the parking garage, the robot uses three sensors: an ultrasonic distance sensor with a single analog output instead of separate trigger and echo pins, a line-tracking sensor that detects floor markings, and a magnetometer.
The complete parts list is:
2 x SER0037 360-degree micro servos
1 x Gravity Ultrasonic Sensor V1.0
1 x HW-102 magnetometer using the QMC5883L
1 x switch
2 x 18650 batteries
Regarding the power supply, the Arduino UNO Q does not boot from a single 18650 battery because it requires at least 7 V through the VIN pin. I therefore used two 18650 batteries connected in series, providing approximately 8 V.
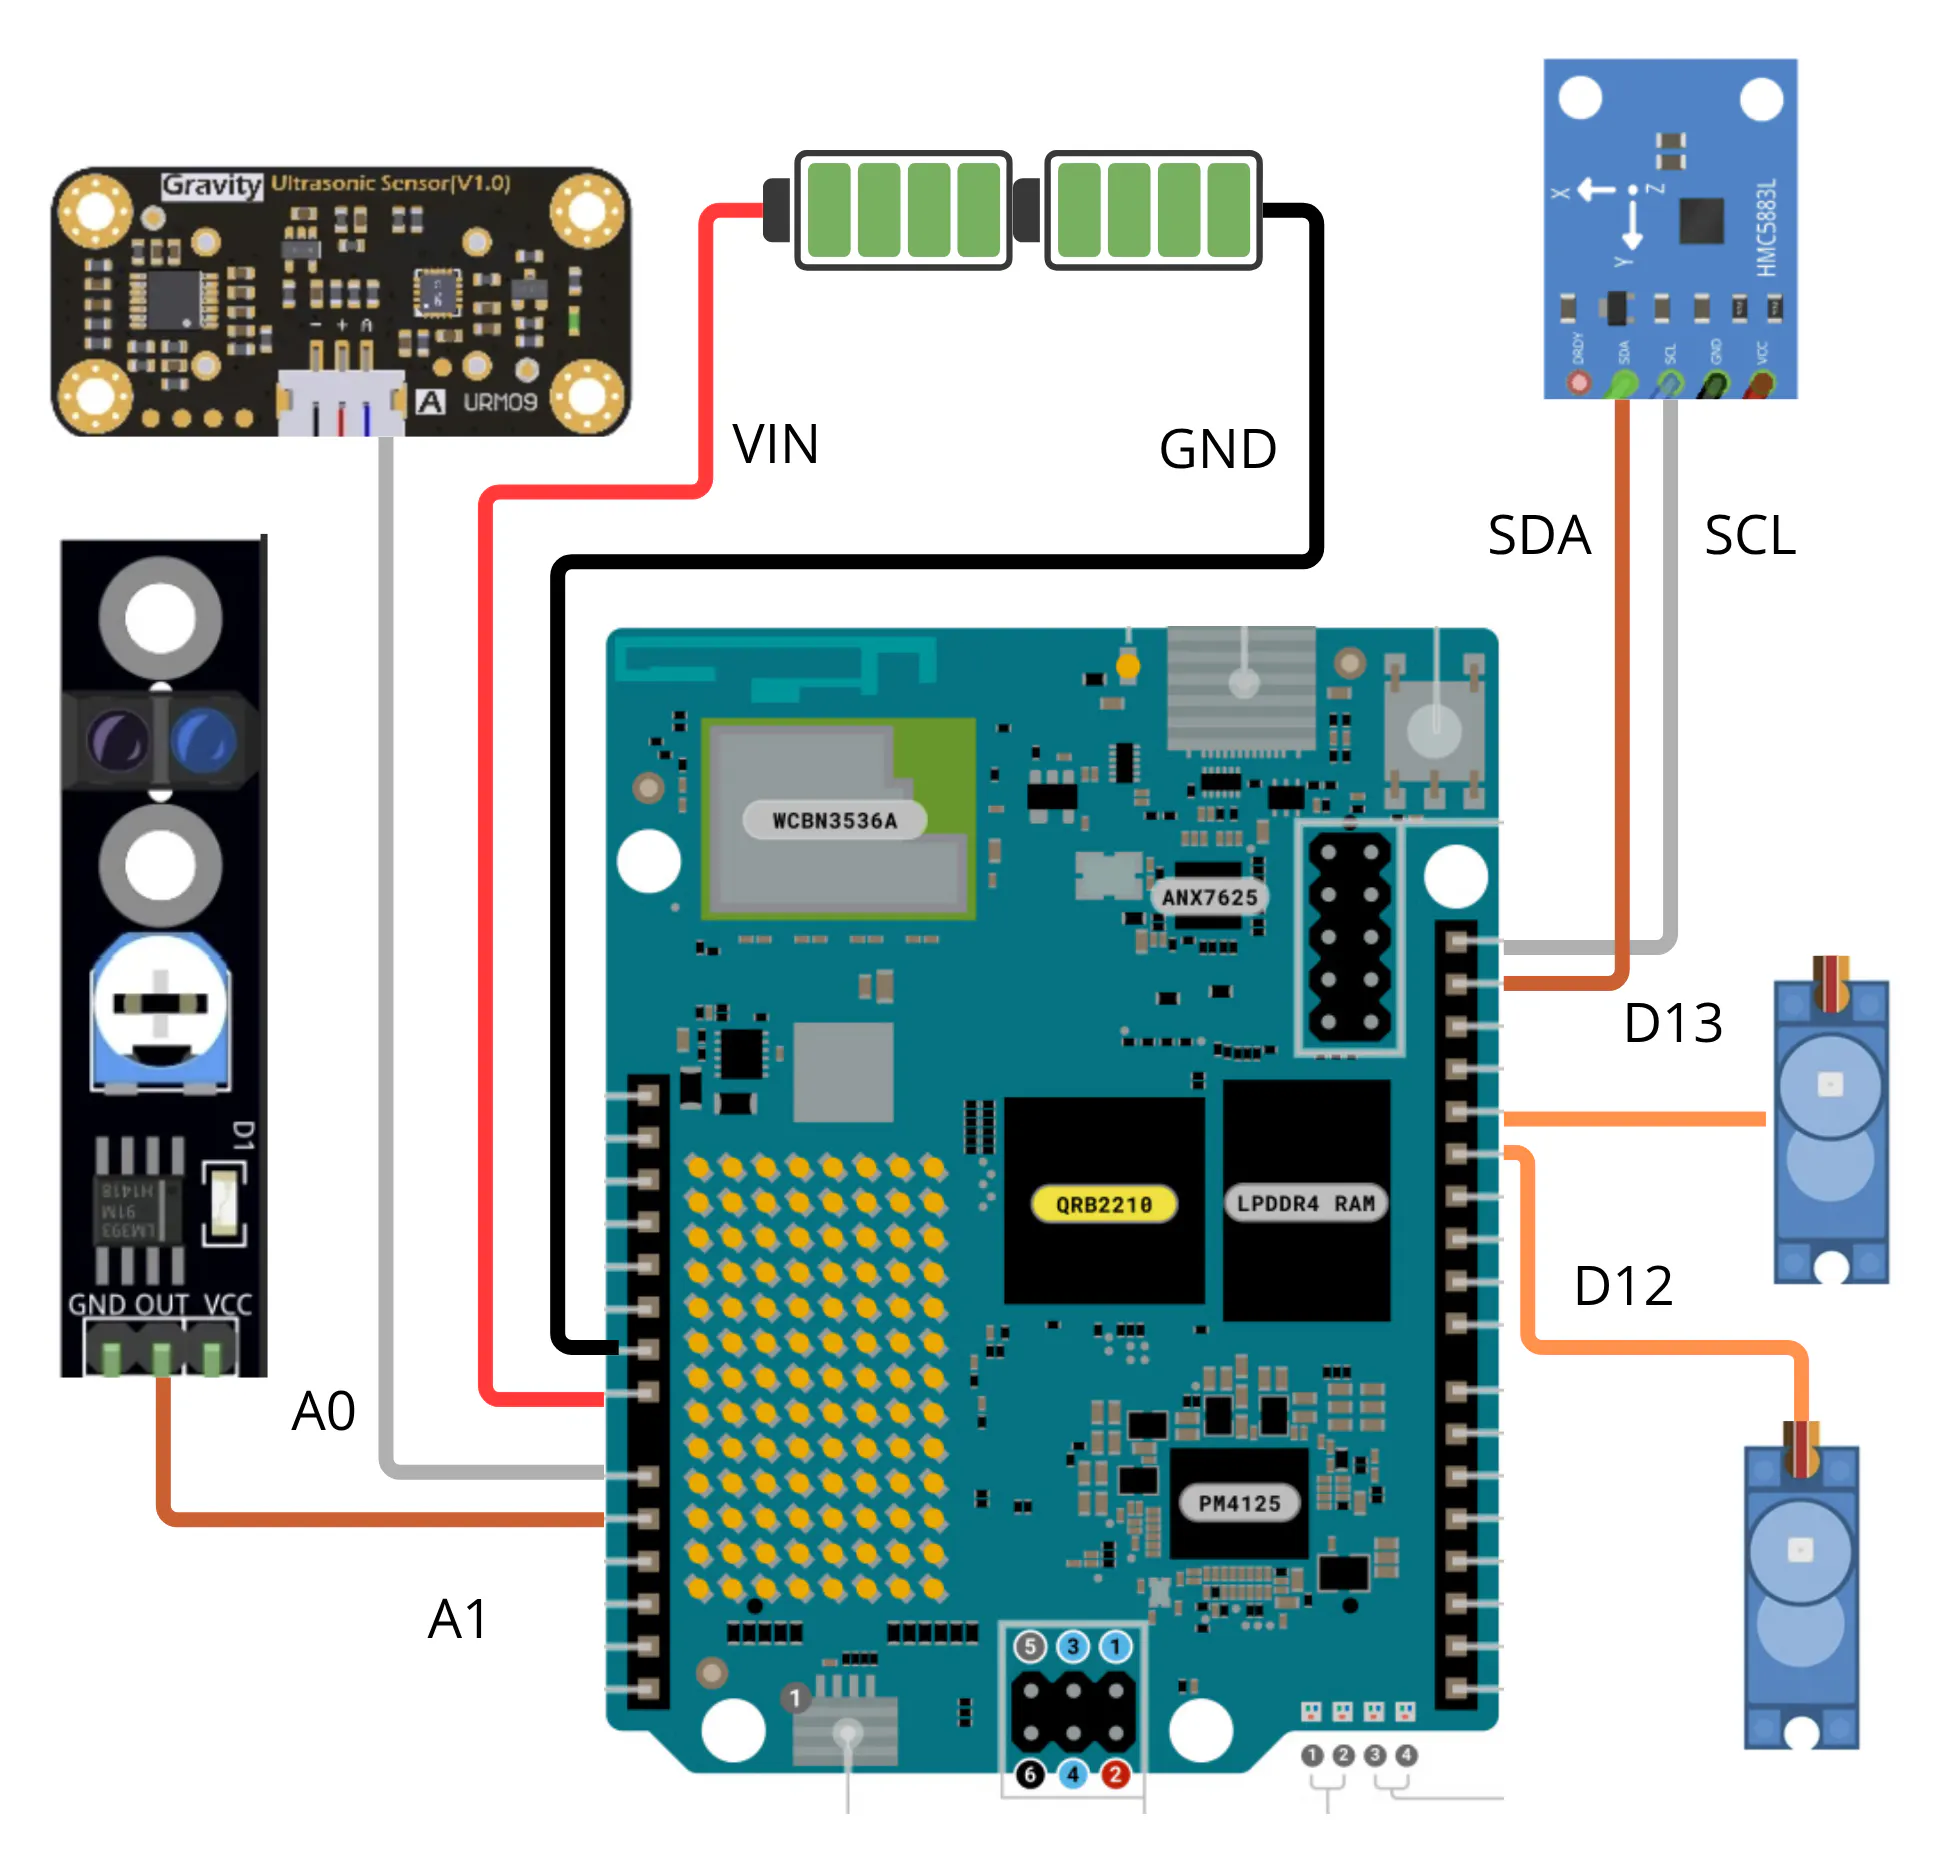
The Circuit
• Left-wheel servo connected to D13
• Right-wheel servo connected to D12
• Ultrasonic sensor connected to A0
• Line sensor connected to A1.
• HMC5883L/QMC5883L magnetometer connected to SDA and SCL
All positive leads from the servos and sensors are connected to the Arduino’s 3.3 V output, while all negative leads are connected to any available Arduino GND pin.
The two batteries are connected in series, and the resulting power supply is connected to VIN and GND on the Arduino.
The Architecture
The robot’s architecture is organized into three layers:
- 1. The MCU primitive-functions layer
- 2. The MCU–MPU bridge layer
- 3. The Python command layer
The MCU provides the following primitive functions:
- Move forward or backward for a specified number of seconds
- Move forward or backward until reaching a specified line number. If an obstacle is detected first, stop and report that condition.
- Move forward until the measured distance is less than a specified value
- Rotate left or right for a specified number of seconds
- Face forward, left, or right, using the magnetometer for minor heading corrections
- Read the sensors
These primitive functions are exposed to the MPU through a bridge that must remain accessible to the OpenClaw AI agent while running in the background.
The bridge provides bidirectional, synchronous communication between the Debian Linux environment and the UNO Q microcontroller.
When Python sends a command—either manually or through OpenClaw—the command is serialized using MsgPack and transmitted through a UNIX socket to bridge.py. The bridge then forwards the request to the Arduino firmware through the Arduino_RouterBridge library.
The system waits for either a response from the MCU or a timeout. This ensures that every action can determine whether the command was executed successfully before returning its response.
To manage simultaneous movement commands, such as moving forward and turning right, and to prevent contradictory actions from being executed at the same time, bridge.py implements mutual exclusion using a thread lock named self.moveLock.
Whenever a command involves physical movement, its execution thread attempts to acquire the lock. If the robot is already performing another movement, the new command waits until the previous thread releases the lock.
The command layer is implemented in the robot.py script. It can be used to test movements and sensors from the command line, and it is also used by OpenClaw to control the robot autonomously.
Software SetupInstall Arduino App Lab.
Open Arduino App Lab and connect the board using a USB-C cable.
Log in to your Arduino account.
Install the following libraries:
• Servo 1.3.0
• GyverMag 1.0.0
Open the MCU sketch and select Run at startup.
Open a terminal and run:
curl -fsSL https://openclaw.ai/install.sh | bashOpenClaw supports multiple AI model providers and messaging channels. This project uses OpenAI and Telegram, but other supported providers and channels can also be used.
Obtain a Telegram Bot Token and Chat ID
Open Telegram and search for @BotFather.
Send:
/newbotFollow the instructions to create a new bot and save the token provided by BotFather.
Search for your new bot, open the conversation, and press Start.
Then send a message to @userinfobot to obtain your personal Telegram chat ID.
Enter the bot token and chat ID in the OpenClaw configuration.
Connect to the Arduino UNO Q through SFTP using the same credentials configured for the board.
Upload the OpenClaw skill to:
/home/arduino/.npm-global/lib/node_modules/openclaw/dist/extensions/browser/skills/parkingCopy bridge.py and robot.py to the root directory of the project.
Run the bridge in the background:
nohup python3 bridge.py > bridge.log 2>&1 &Run the OpenClaw TUI, or send a message to OpenClaw through Telegram. Ask it to install the parking skill and move the robot forward for one second to confirm that the system has been configured correctly.
Every call to robot.py is logged to standard output with a timestamp, method name, and arguments.
3D-Printed PartsDesigning the robot was not a minor task. The enclosure had to accommodate several components while maintaining adequate balance and allowing the robot to move correctly.
The printed parts consist of:
- A chassis with an integrated battery holder
- Two wheels
- A top cover
Several printing and modeling iterations were required before arriving at a suitable component arrangement.
I added grooves to the wheels. However, when the robot is used on a slippery surface, better traction can be achieved by printing the wheels in a flexible material such as TPU or by applying small amounts of hot glue to the tread.
To keep the front of the chassis elevated, I used a simple screw. It works, but it also introduces friction. Replacing it with a freely rotating caster wheel or ball caster would be preferable.
The Parking GarageThe test parking garage consists of a corridor with parking spaces on the right-hand side. Because the robot uses relatively simple sensors, a line is placed at the entrance of each parking space. This allows the robot to determine when it has reached the entrance to a spot.
A wall is positioned at the back of each parking space so that it can be detected by the ultrasonic distance sensor.
This layout is entirely arbitrary. It could be expanded by adding internal lanes, parking spaces on both sides, or a more complex route. The robot could also be adapted to other environments simply by modifying its skill, as explained below.
The SkillTo provide the local AI agent with contextual information about its role as an autonomous robot operating inside a parking garage, I created an OpenClaw skill.
A skill is essentially a Markdown file with the.md extension. It functions as a modular, pluggable software component that connects the reasoning capabilities of the AI assistant—the OpenClaw agent or LLM—with the robot’s primitive functions.
The skill contains information such as:
- The parking garage layout
- Rotation parameters
- Movement constraints
- Available robot commands
- Rules for determining whether a spot is occupied
All of this information is written in natural language.
Magnetometer CalibrationAfter turning on the robot, rotate it through several complete 360-degree movements around the X axis.
Then open a terminal and run:
python3 robot.py setupFollow the on-screen instructions to record the forward, left, and right headings.
Prompting the Robot
The goal is to communicate with the robot through Telegram and ask it to solve tasks for which it was never explicitly programmed.
The robot solves these tasks by combining its primitive functions according to the context provided by the skill.
For example, when asked:
Is the first parking spot available?The robot can use the information in the skill to construct the following plan:
1. Move forward until it reaches the line marking the entrance to the first parking space.
2. Rotate right so that its ultrasonic sensor faces the parking space.
3. Measure the distance.
4. Determine whether the sensor can detect the rear wall or whether another object is blocking it. If an object is detected before the expected wall position, the spot is considered occupied.
5. Respond in natural language.
Other example prompts include:
• Park in the first available spot.
• How many parking spaces are there?
• Draw a map of the parking lot.
• How many spots are empty?
• What is the occupancy rate?
What happens when an AI request collides with ethical constraints?
I placed a sign indicating that a parking space was reserved for people with disabilities and sent an image of the sign to the robot, asking it to park there anyway for 15 minutes. Despite the fact that I had built and programmed it, the robot refused on ethical grounds.
The robot is called Jaime because that was the name used in the Latin American Spanish version of Get Smart—known as Super Agente 86—for the character originally named Hymie.
VideosFinal Notes
The same foundation could be extended to create a considerably more capable autonomous robot. Adding a camera, for example, would provide the local AI agent with much richer information about its surroundings, allowing it to make better-informed decisions and perform more sophisticated behaviors.
From a development perspective, building an agentic AI robot with the Arduino UNO Q proved to be a smooth experience. The platform demonstrates that the traditional trade-off between using either a microcontroller or a microprocessor is no longer necessary. By combining both on the same board, real-time hardware control can be delegated to the MCU, while the MPU executes AI models and performs high-level reasoning.
One of the most interesting aspects of this project was discovering that the capabilities of an AI-controlled device can extend well beyond the use cases envisioned when it was originally designed.
When I conceived the robot, I had not considered that it might be able to generate occupancy charts or calculate parking fees based on the size of the vehicle using a given space. Yet the robot was able to solve both tasks without any changes to its underlying programming. By combining existing sensor inputs, movement primitives, and AI reasoning, it could respond to situations that had never been explicitly anticipated.
These emergent capabilities, however, come with a trade-off. The same underlying LLM that enables flexible reasoning also introduces its own constraints, including ethical boundaries that can override the intentions of the system’s creator.
FilesSource code:https://github.com/ronibandini/Jaime
3D-printable files:https://cults3d.com/en/3d-model/gadget/jaime-arduino-uno-q-ai-agentic-robot
Parking signs:
https://cults3d.com/en/3d-model/game/arduino-parking-signs-for-robots-and-toys
ContactRoni Bandini
• LinkedIn: https://www.linkedin.com/in/ronibandini/
• Instagram: https://www.instagram.com/ronibandini/


Comments