"HOME AUTOMATION USING BOLT IOT & GOOGLE ASSISTANT"Home automation refers to the automatic and electronic control of household features, activities, and appliances. In simple terms, it means you can easily control the utilities and features of your home via the Internet to make life more convenient and secure. It is a network of hardware, communication, and electronic interfaces that work to integrate everyday devices via the Internet. Each device has sensors and is connected through WiFi, so you can manage them from your smartphone or tablet whether you’re at home, or miles away. This allows you to turn on the lights, lock the front door, or even turn down the heat, no matter where you are.
There are three main elements of a home automation system: sensors, controllers, and actuators.
- Sensors can monitor changes in daylight, temperature, or motion detection. Home automation systems can then adjust those settings (and more) to your preferences.
- Controllers refer to the devices — personal computers, tablets or smartphones — used to send and receive messages about the status of automated features in your home.
- Actuators may be light switches, motors, or motorized valves that control the actual mechanism, or function, of a home automation system. They are programmed to be activated by a remote command from a controller.
The major concept used in the Google assistant-controlled Home automation is the Internet of Things. The Internet of things (IoT) describes physical objects (or groups of such objects) that are embedded with sensors, processing ability, software, and other technologies, and that connect and exchange data with other devices and systems over the Internet or other communications networks
I am using Bolt IoT WiFi Module to process data and Google Assistant as voice input on a mobile device. The idea behind this is to control home devices with voice.
HARDWARE & SOFTWARE IMPLEMENTATION or SETUP1. HardwareSetup:-
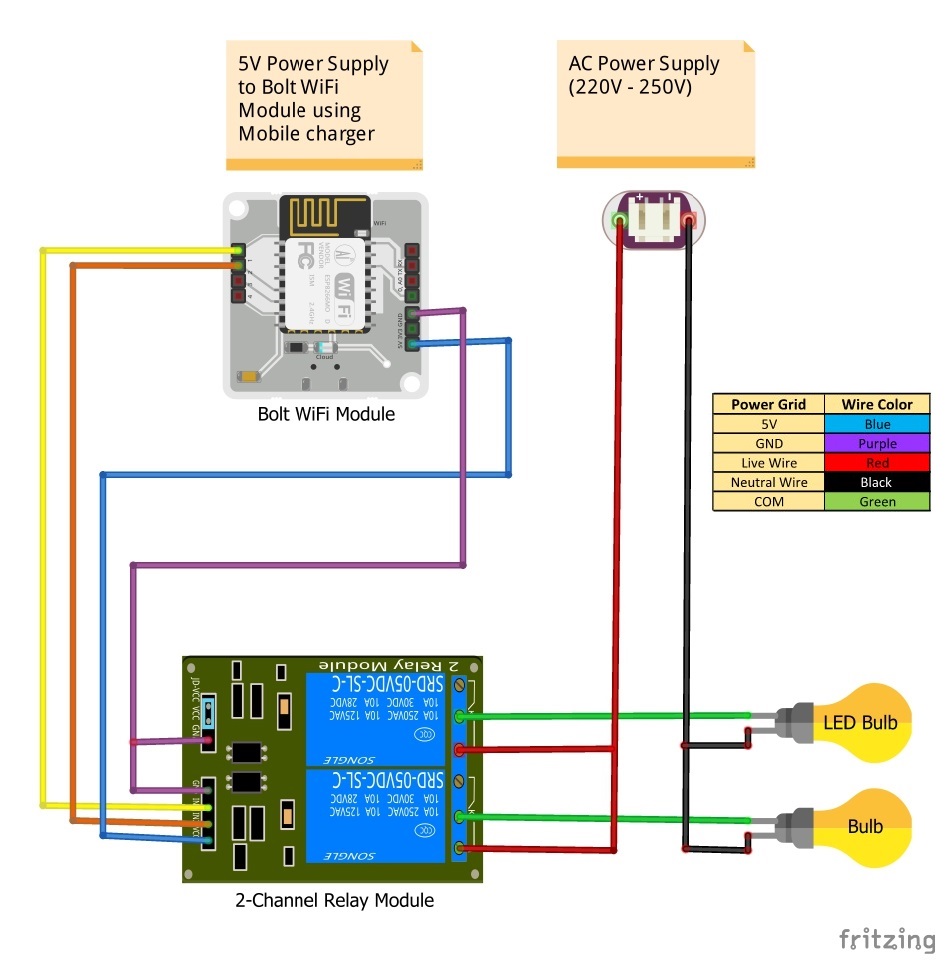
- Step 1 - Connection between Bolt WiFi & 4-channel Relay Module for reference use circuit diagram uploaded below.
- Step 2 - Complete Hardware connection.
2. Software / Web Application Setup:-
**Important Note - Use only one Gmail account for Google Assistant, Bolt Cloud and also for Zapier so that the project can work properly.**
2. A. How to setup Bolt Cloud for coding of Home Automation
- Step 1 - Open the main web page of Bolt Cloud by using this link https://cloud.boltiot.com/login?
- Step 2 - After login, this page can be seen.
- Step 3 - Go to Products and click on '+Add Products'.
- Step 4 - Click on 'Create New Product'.
- Step 5 - Give a name & icon (if any) for your product and select connection as 'Output devices' and data collection as 'GPIO' then click on 'Done'.
- Step 6 - After that, click on 'Configure this product'.
- Step 7 - After that, this page will open.
- Step 8 - Then go to 'Hardware', and select '1' and '2' Digital Pin or you can select any PIN from '0 to 4' but you have to connect the jumper wires as per then give them 'Variable Name' as per your choice.
- Step 9 - After that go to 'Code', and give Filename as per your choice and select 'js' as an extension, then paste the code from the CODE section below or you can write your own code.
- Step 10 - After that, press 'Ctrl+S' to save the code and hardware configuration, then click on the 'Save' button.
- Step 11 - Wait till you get a pop-up message as 'File saved successfully.' Then click on the 'X' like the button to exit the configuration.
- Step 12 - After that this page will open, then click on the 'Link' button
- Step 13 - Now the Bolt WiFi module is successfully connected to the product, after that click on 'View this device'.
- Step 14 - After that below page will be shown with this, we can control our Home_Automation products by clicking on 'LED On' then LED Bulb will Turn on and clicking on 'LED Off' then LED Bulb will Turn off. Similarly with others also.
- Step 15 - We can control the product by using Bolt-Mobile App, we need to login using the same Google account as used in the Bolt Cloud account, then this screen will come (Fig.2.A.15(A)) and then click on 'BOLTxxxxxxx' ('x' means device number of your Bolt WiFi module) under DEVICES. Then Fig.2.A.15(B) will be shown by that we can control our Home_Automation products very similar to Fig.2.A.14.
2. B. How to setup Zapier (alternate option for IFTTT)
**Zapier is a product that allows end-users to integrate the web applications they use. Zapier provides workflows to automate the use of web applications together. It is often described as a translator between web APIs.It alsogives on new account14 days of all the app events for free.**
- Step 1 - Go to https://zapier.com/ for Zapier. If you are new then you have to create an account on Zapier using the same Google account as used for Bolt Cloud.
- Step 2 - After creating/login into the account this page will load, then click on 'Create Zap'.
- Step 3 - Click on 'Name you zap' to change the name of zap of your liking, and next in 'Trigger' use/select 'Google Assistant' as App Event.
- Step 4 - After selecting Google Assistant, in 'Choose app & event' than in 'Trigger Event' select 'New Pushed Voice Message' then click on 'Continue'.
- Step 5 - Then in 'Set up trigger' give 'Trigger Phase(s)' of your liking and then click on 'Continue'.
- Step 6 - After that in 'Test trigger', click on 'Test trigger'
- Step 7 - Wait for some time to get the results, then click on 'Continue'.
- Step 8 - In 'Action' select 'Webhooks by Zapier' as App Event.
- Step 9 - Then in 'Choose app & event' then in 'Action Event' select 'GET' and click on 'Continue'.
- Step 10 - In 'Set up action' in 'URL' insert the below link by changing API_KEY, DEVICE_ID, PIN_NUMBER & state. To turn the home appliances ON, we use the LOW state and we use the HIGH state to turn it OFF as we operate it by a Relay Module. URL is used to access and operate the home appliances by digitalWrite() with our bolt cloud. "URL:https://cloud.boltiot.com/remote/API_KEY/digitalWrite?deviceName=DEVICE_ID&pin=PIN_NUMBER&state=HIGH/LOW." Then in 'Send as JSON' select 'Yes' and then scroll down and click on 'Continue'.
- Step 11 - Then in 'Test action' check all the details, if everything is good then click on 'Test & Review'.
- Step 12 - After that click on 'Turn on Zap' for your zap to run the voice control process.
- Step 13 -Create more Zaps like this by following the above Steps from 'Step 1 to Step 13'.
With this, the setup for Zapier is completed. Now we can run our project.
RESULTSFor the full output of my project watch the video provided below
FUTURE SCOPEThe future scope of this project is that we can connect various appliances to the above circuit to switch them ON / OFF on command of your voice. E.g. Fan, Air Conditioner, Decorative Lights, etc. for your needs.
CONCLUSIONIn this project, voice commands are given to the Google assistant. The voice commands for Google assistant have been added through the Zapier website and the Bolt IoT account is also linked to it. In this home automation, users have given commands to Zapier through Google assistant. Home appliances like Bulb and Night Lamp are being controlled according to the given commands. The commands given through the Google assistant are decoded and then sent to the microcontroller and it controls the relays. The device connected to the respective relay is turned On or OFF as per the user request to the Google Assistant. The microcontroller used is Bolt WiFi (ESP-12E) Model (ESP8266MOD) and the communication between the microcontroller and the application is established via Wi-Fi (Internet).
The Home Automation system is working satisfactorily by connecting simple appliances (LED Bulb & Night Lamp Bulb) to it and were successfully controlled from a mobile device/phone.
REFERENCE 


Comments