

Hardware components | ||||||
 |
| × | 1 | |||
Software apps and online services | ||||||
 |
| |||||
Hand tools and fabrication machines | ||||||
 |
| |||||
First of all, watch this video until the end.
You don’t need fancy equipment to do SMD soldering at home. You can easily do it using a soldering iron.
SMD stands for Surface Mount Device and they are components that you solder on the surface of a circuit board.
Let me guide you through how to do SMD soldering with a soldering iron.
SMD stands for Surface Mount Device and indicates that the component is mounted on the surface of the circuit board in contrast to through-hole components which are mounted in holes.
These are the soldering tools you should have in order to solder surface mount components:
- Soldering iron (use a thin tip if you have)
- Solder
- Solder flux (useful, but not necessary)
- Tweezers
- Microscope or a loupe
Soldering a resistor is the simplest way to start learning SMD soldering.
Start by applying flux to one pad on the circuit board. The flux cleans the pad and makes it easier for the solder to fasten properly.
Apply some solder to the tip of your iron and touch the circuit board pad with the tip so that some of the solder passes on to the pad.
Place the resistor in its place an hold it there with a pair of tweezers while you touch the soldering tip so that it heats both the component and circuit board pad.
The resistor should now be fastened on one side. Apply solder to the soldering tip again and touch the iron tip on the other side.
Your resistor should now be good to go, but you might want to inspect the solder joints with your microscope or loupe to make sure the connection is good.
The method to solder a surface mount chip is very similar to the method for soldering a resistor.
Start by applying flux on all the pads on the circuit board.
Apply some solder to one of the chip’s corner pads.
Place and align the chip using tweezers.
Hold the chip in place while touching the corner pad with the tip of the soldering iron so that the solder melts the pin and the pad together.
Check the alignment of the chip. If it is not in its place, use your soldering iron to loosen the pin chip and align the chip properly.
Continue soldering on the opposite corner by putting a bit of solder on the soldering iron tip then touching the circuit board pad and pin at the same time. Do this for all the pins of the chip, one by one.
After all the pins have been soldered you should inspect the solder joints carefully with a microscope or loupe to check for bad joints or solder bridges.
Alternative MethodsThere are a few alternative methods of smd soldering. Below, I will explain two methods that I use.
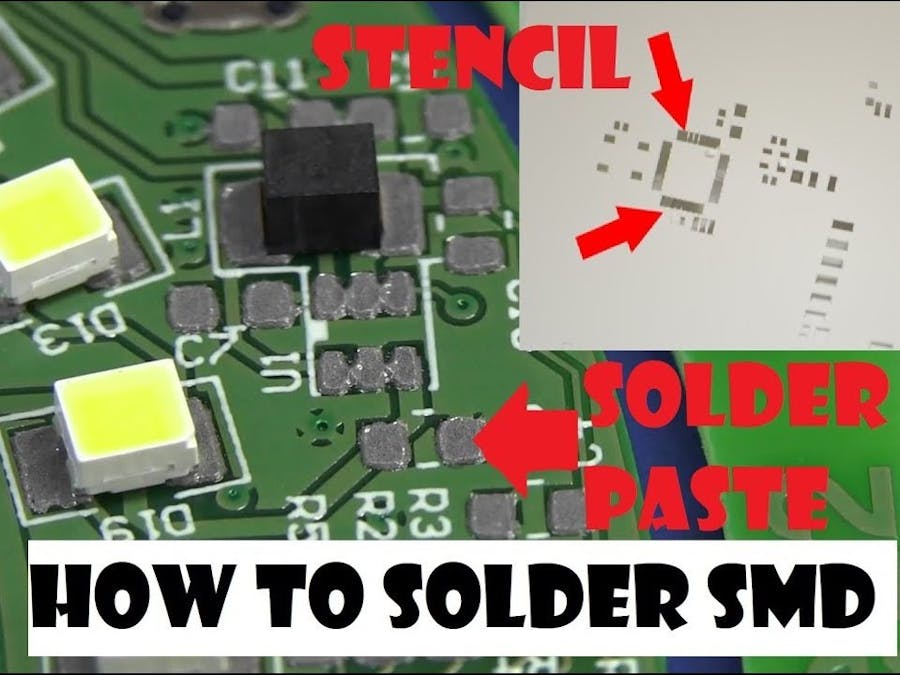
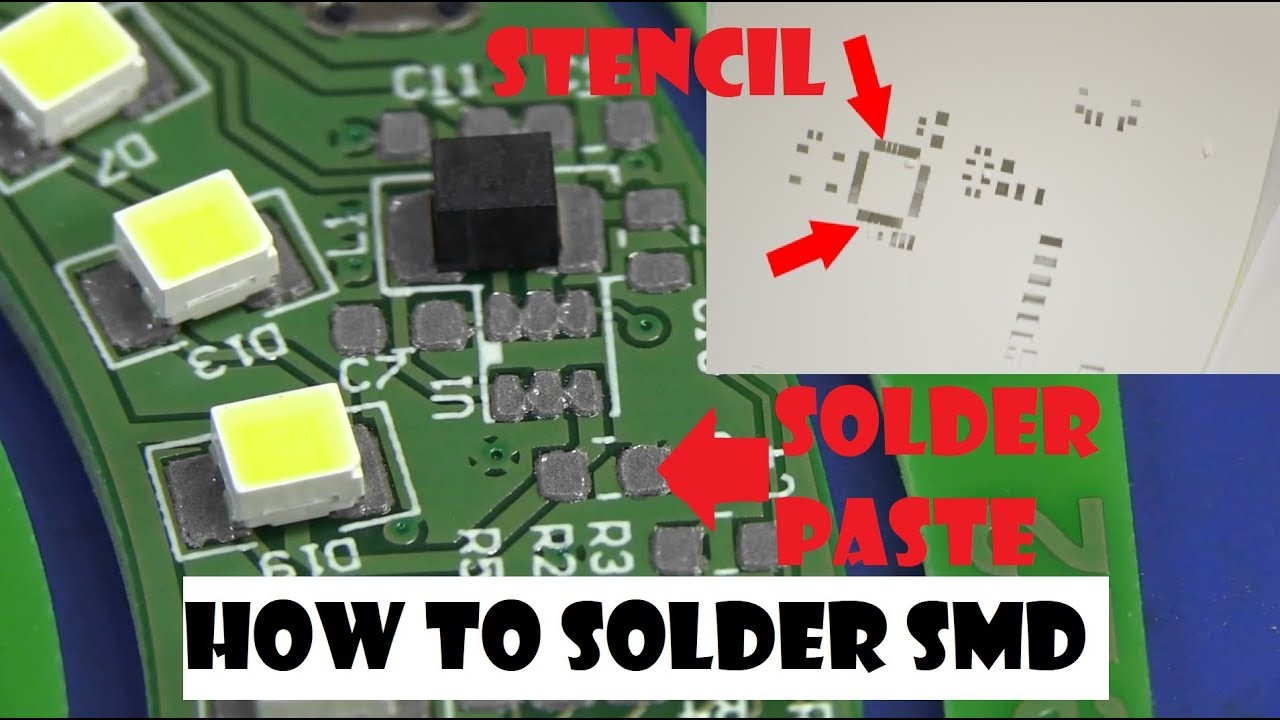
Using Solder PasteStart by applying flux to the circuit board pads. Then apply solder paste on the all the pads of the component you want to solder.
Using tweezers, place the component in its correct position and hold it there. Place the tip of the soldering iron onto each of the pads so that the solder melts and makes good connections between the component and the board.
This method is for soldering chips.
As usual start by applying flux to the pads on the circuit board. Fasten one of the corner pins of the chip to its pad by using a bit of solder. Make sure the chip is properly aligned on the pads.
Now use your soldering iron and flood the pins with solder so that all the pins are connected. On the picture below, only a few pins are flooded, but the idea is to flood all the pins.
Then start on one end and heat a pin so that the solder melts on the next 2-3 pins. Use a solder sucker to suck up excess solder.
Continue down the row and heat 2-3 pins at once while you suck the solder away. After all the excess solder has been removed, check for solder bridges with a microscope.
An SMD soldering method not covered here is the reflow oven.
This is the most common soldering method in the professional world.
Using StencilTools you're going to need:
- Stencil
- PCB that matches the Stencil
- Solder Paste (Kester Easy 256)
- Wiper of some sort
- Flat spot/table
- Good lighting!
- Rubbing Alcohol
- Lots of paper towels
Optional Stuff:
- Tupperware container
- Mini-fridge
- Screw driver or mixing tool
- Trashed PCBs for framing
Solder paste is a sticky grey substance that is somewhat liquid - well that's a paste now isn't it... Pretty much lead and tin mixed together with flux and some other magic ingredients. We use Easy 256 from Kester. Why? It's a No-Clean paste which means after you are done reflowing the board, you're done! No need to wash the board. Any solder paste will do.
One of the main problems is getting the paste. A 500g jar can cost from $50-$200 which is bad enough. The company you purchase it from will most likely charge you an arm and a leg for overnight shipping, cold packaging, and hazardous handling. Yep, lead is considered hazardous. Who knew? To top things off, I mentioned this "lead being hazardous" thing to my sister who works as an Emergency Room Nurse. She pointed out that there are no symptoms of lead poisoning - short of dementia. One has to be specifically blood tested for higher levels of lead. So I'm not sure if this means we're ok, or if we are actually poisoned and the preposterous nature of these tutorials are proof...
Kester Easy Profile 256 - Notice our paste is expired...
The solder paste suppliers insist on shipping cold packed overnight delivery because the solder paste can become 'unusable' if it's temperature is not closely maintained. Of course we didn't find this to be the case - but then again, we're not producing 10, 000 units of a board. Just imagine if you screened and placed $40, 000 worth of parts and PCBs only to find out the paste had gone bad. The batch might be lost. Who are you going to sue? Now you know why suppliers are so uptight, but we don't have to be...
We did notice that the paste will change over time without refrigeration. A syringe or tube of paste should be okay in an air tight container, in a cool place (basement), for multiple weeks. Buy your supply accordingly. It may make sense to buy a mini-fridge like we did from Tar-chet. $60 goes quite a ways these days.
There's some economics here that I refuse to calculate. But we save money by buying paste in larger quantities and then paying extra for storage (money for a fridge and energy costs). In the end, the paste lasts longer and I think it's cheaper in the long term. You could store the solder paste in your normal fridge but every other website says this is a badidea. I'll agree because it costs me nothing. Remember the dementia thing?
ToolsThese are pretty basic. Do note that we are still looking for a good, cheap, replacement for our squeegee.
Mainly, you need a stir stick (screw driver), a whole bunch of paper towels, rubbing alcohol for clean-up, and some sort of a spatula/squeegee. I would recommend using a screw driver that you never plan on using again. For that matter, pretty much everything around the stenciling area gets grubby with dried paste after a few days of usage.
The $35 squeegee from Madell Tech came with our stencil printer (shown off to the right in the above picture). While the printer was a waste of $300, we do use the flat metal base - though you can use any flat surface. The problem with the printer is that it uses only framed stencils. Since we had no idea what we were doing initially, this sounded ok. We've never actually bought a framed stencil (>$150). Stencil printers will hold a framed stencil in place while the operator manipulates the position of the metal base (with PCB sitting on top) under the stencil with small dials all around the base. This would be ideal if we needed to stencil a large number of boards by hand, but for single units it actually really easy just to hold the stencil in place.
This squeegee has a replaceable thin metal blade that flexes nicely when you're applying paste. While I can't tell a difference, Ben claims the blade is wearing out - and this is common with higher end squeegees - but do you think I'll ever replace it? Probably not... As the blade wears out the aperture thicknesses become non-uniform : the blade digs into some holes while riding higher over others. A few stenciled PCBs and you'll see just how not-mission-critical this is. We've had really good results with 0603, 0.5mm pitch QFNs, and BGAs! If you can't readily find a solder paste squeegee, we've used razor blades with pretty good results.
The solder paste is stored in the Tupperware container and that is in turn stored in a zip lock bag. This sealed package is stored in the fridge when not in use. Every time we use the paste, we give it a good stir with the screw driver. If the past seems dry or sticky, we add new paste from the large tube by shoving a (cleaner) screw driver in one end to forward the stopper. This goes against all recommendations so be warned - we are basically adding contaminants by mixing new paste with used paste. We also use the paste fairly chilled - we like the consistency to be thicker when stenciling. Again, the true aficionados claim it should be room temperature. Your guess is as good as ours - practice is the key here.
Here the squeegee is shown after its first use. Notice the nice layer on the paddle. It's primed and ready to go again!
The Stencil -
Pololu is a good place to get a cheap plastic stencil. They charge a $20 setup fee and $1 per inch after that. They use either a 3mil or 4mil sheet of mylar and can get some pretty good accuracy. Ok, read that again: $20 setup and $1 per inch. That means if your PCB is a 3x4 PCB and you've got the top paste gerber (*.gtp Protel) or bottom paste gerber (*.gbp) file, you can have a stencil for $32. $32! That's 1/5th the price of anyone else!
The stencil comes as a rolled piece of clear plastic. They can usually cut us a stencil same day or next day. USPS Priority from Nevada is 3 days. Not too shabby.
We use 4mil stencils for larger 0805-1206 parts and 3mil for tight pitch devices. Just ask Pololu for their recommendation. The thinner the stencil, the less paste will be applied. The thinner the paste, the lower the probability of jumpers and the higher probability of disconnects.
The clear Mylar laser cut solder paste stencil
You may notice that there are multiples of designs and different designs on the same stencil. You can help offset the $20 setup fee by panelizing your different designs onto one stencil. While this may not help the hobbyist who works on only 1 or 2 layouts at a time, we cram 6 or 8 designs onto one sheet! It works - we promise.
Under the stencil is a 2x4 panel of MiRFs. Uber-tight, 0603 with the QFN nRF2401A IC. We panelize the design and send that panel file to Gold Phoenix. We then send the top paste layer (we rarely put parts on the back of PCBs these days) to Pololu to have the stencil cut. The stencil always beats the PCB in the mail.
Paste Time! -
Enough talk - time to paste! First we must surround the boards we want to stencil with other boards of similar thickness. Since we only deal with 0.062" boards, this is a snap.
Why the extra boards? As you drag the squeegee across the stencil, the stencil must remain flat or else the stencil will flex/ripple and paste will squeeze into and around the apertures where it's not supposed to be! This way you can drag the squeegee across a completely flat service that is the puzzle array of PCBs. Any trashed PCBs will do - as you can see, we have plenty.
See the stencil? The design we need on this stencil is loosely lined up with the board in the middle.
Next, a good glob of newly mixed paste is plopped down. This seems like a lot, especially at $0.25 a gram, but don't worry, we are going to recover 95% of it! You only have to do this once - the squeegee will contain enough residual paste for 10-15 applications. We use it 3-4 times and then scrape the paste back into the Tupperware dish.
Now is when you line up the stencil. Do you need to be dead on? Pretty close. Can I redo it if necessary? Of course - if you mess up it's not the end of the world, we'll show you! Ben installed a flood light next to the stencil area which helped tremendously with alignment.
Again, note that the paste is actually on top the clear stencil (not on the PCB itself).
Once you've got the stencil right where you want it, pin it with your bad hand (I'm left handed so I use my right). Hold the stencil to the framing PCBs underneath. Remember, if the stencil slips, you get to start over.
You'll notice I am using a special 'paste squeegee'. I believe we paid around $50 for this little guy. You can spend upwards of $500 for some professional SMD squeegees. However, a savvy SFE client pointed out this great woodworking website:
http://www.leevalley.com/wood/page.aspx?c=1&p=49548&cat=1, 310, 41069
http://www.leevalley.com/wood/page.aspx?c=1&p=32670&cat=1, 310, 41069
http://www.leevalley.com/wood/page.aspx?c=1&p=32672&cat=1, 310, 41069
We have not used these mini-scrapers but they look very promising! We've also had some good luck with basic spackle spatulas from the hardware store.
Swipe #1 - I put a thick layer over 6 of the boards, go back and make sure you have everything covered. Pinning hand stays still.
Here is swipe #2 - board is covered. Pinning hand stays still.
Swipe #3 - finally, we swipe with a more vertical hold on the squeegee removing most of the paste remaining on the stencil - while leaving paste in the apertures filled up to the thickness of the stencil. The stencil is nearly clean and a quick inspection shows that all the apertures are filled (I didn't miss any, I promise!).
Your pinning hand should be holding the stencil firmly in place. Again, if the stencil slips, you get to start over.
Now, keeping your pinning hand in place, pull the opposite side of the stencil up - lifting the stencil away from your board and towards the pinning hand. In this case it would be the left side of the stencil being lifted towards the right hand. Lift your pinning hand only after the stencil is lifted from the board being worked.
Ohhhh! Ahhh! Ok, so this is a picture of the second board I stenciled. The larger the board, the harder it is to keep opposite corners lined up (true framed stencils will fix that problem). So I screwed the pooch with the first board I stencil. What to do? Take a picture of course!
The first board that I stencil after coffee is on the left. Try #2 is on the right. Obviously the one on the left is so far off, it's not usable. All you have to do is wipe it off with a paper towel. No alcohol or scrubbing needed, just wiper 'er off good and start again by lining up the stencil. It can sit there for probably 45 minutes before the paste starts drying out and turning hard.
Oh, and the board on the right is probably the best I've ever done. You can be off considerably and still get it to work *very well*. The human eye can actually detect very small difference between the paste and the pad. Don't be too picky your first try - believe me, it will work!
There will be paste left on some parts of the stencil the second time around. You just have to be good at looking through the apertures and lining up the shinny pads. You can stop and clean the stencil, but this is not needed. Practice practice practice!
Cleaning the Stencil -
So you're done playing and it's time to clean up. Rubbing alcohol is your friend.
Place the stencil on a paper towel and wet another paper towel with a little bit of alcohol. Wipe one side clean - it's pretty easy. Some of the excess paste will slide through to the other side. Flip the stencil over and repeat.
Clean stencil!
We store our stencils flat in a drawer. Don't leave alcohol on them for more than a minute or two or else the plastic Mylar will start to deform (very bad). Be gentle with the stencil and you can use it for >100 applications. We've nearly worn out a stencil but this was probably 100+ applications with nearly as many cleanings. The alcohol will thin the stencil over time.
Placing Components -
Eventually, you will have a PCB with solder paste. Carefully avoid touching the PCB as the solder paste is easily disturbed. Picking it up by the corners is usually the best option.
Unfortunately Jeff populated the MiRFs and cooked them on the Reflow Skillet before I could snap a photo. That's right, we populate the PCBs by hand! Anyone can populate even the smallest of parts with only a pair of tweezers.
Placing 0603 components packed tightly around a QFN IC is actually not that bad. It has taken everyone in the office some practice, but all you need are your parts and a print-off indicating where the parts go. Ben can drink a full pot of coffee and plop parts down with amazing speed - just don't take his magical tweezers.


Comments