


Hardware components | ||||||
 |
| × | 1 | |||
Software apps and online services | ||||||
| ||||||
Greetings everyone, and welcome to my article tutorial. Today, I'll guide you through the process of creating a GPS Vehicle Tracker using Raspberry Pi Pico.
Project Overview:
Build a professional GPS-based vehicle tracking system using Raspberry Pi Pico, the SIM800L GSM module, and the Neo-6M GPS receiver. This project tracks real-time vehicle location via SMS and Google Maps, offering reliable performance even with poor connectivity. Perfect for IoT, vehicle monitoring, and asset tracking applications, all programmed in MicroPython using Thonny IDE.
Before beginning, a huge shoutout to JLCMC for sponsoring.
Now, let's get started with our project!
SuppliesElectronic Components Required:
- Raspberry Pi Pico
- NEO-6M GPS Module
- SIM800L GPRS GSM Module
- BreadBoard
- Red LED
Additional Tools:
- Hot Glue
- Cutter
- Soldering Iron
Software:
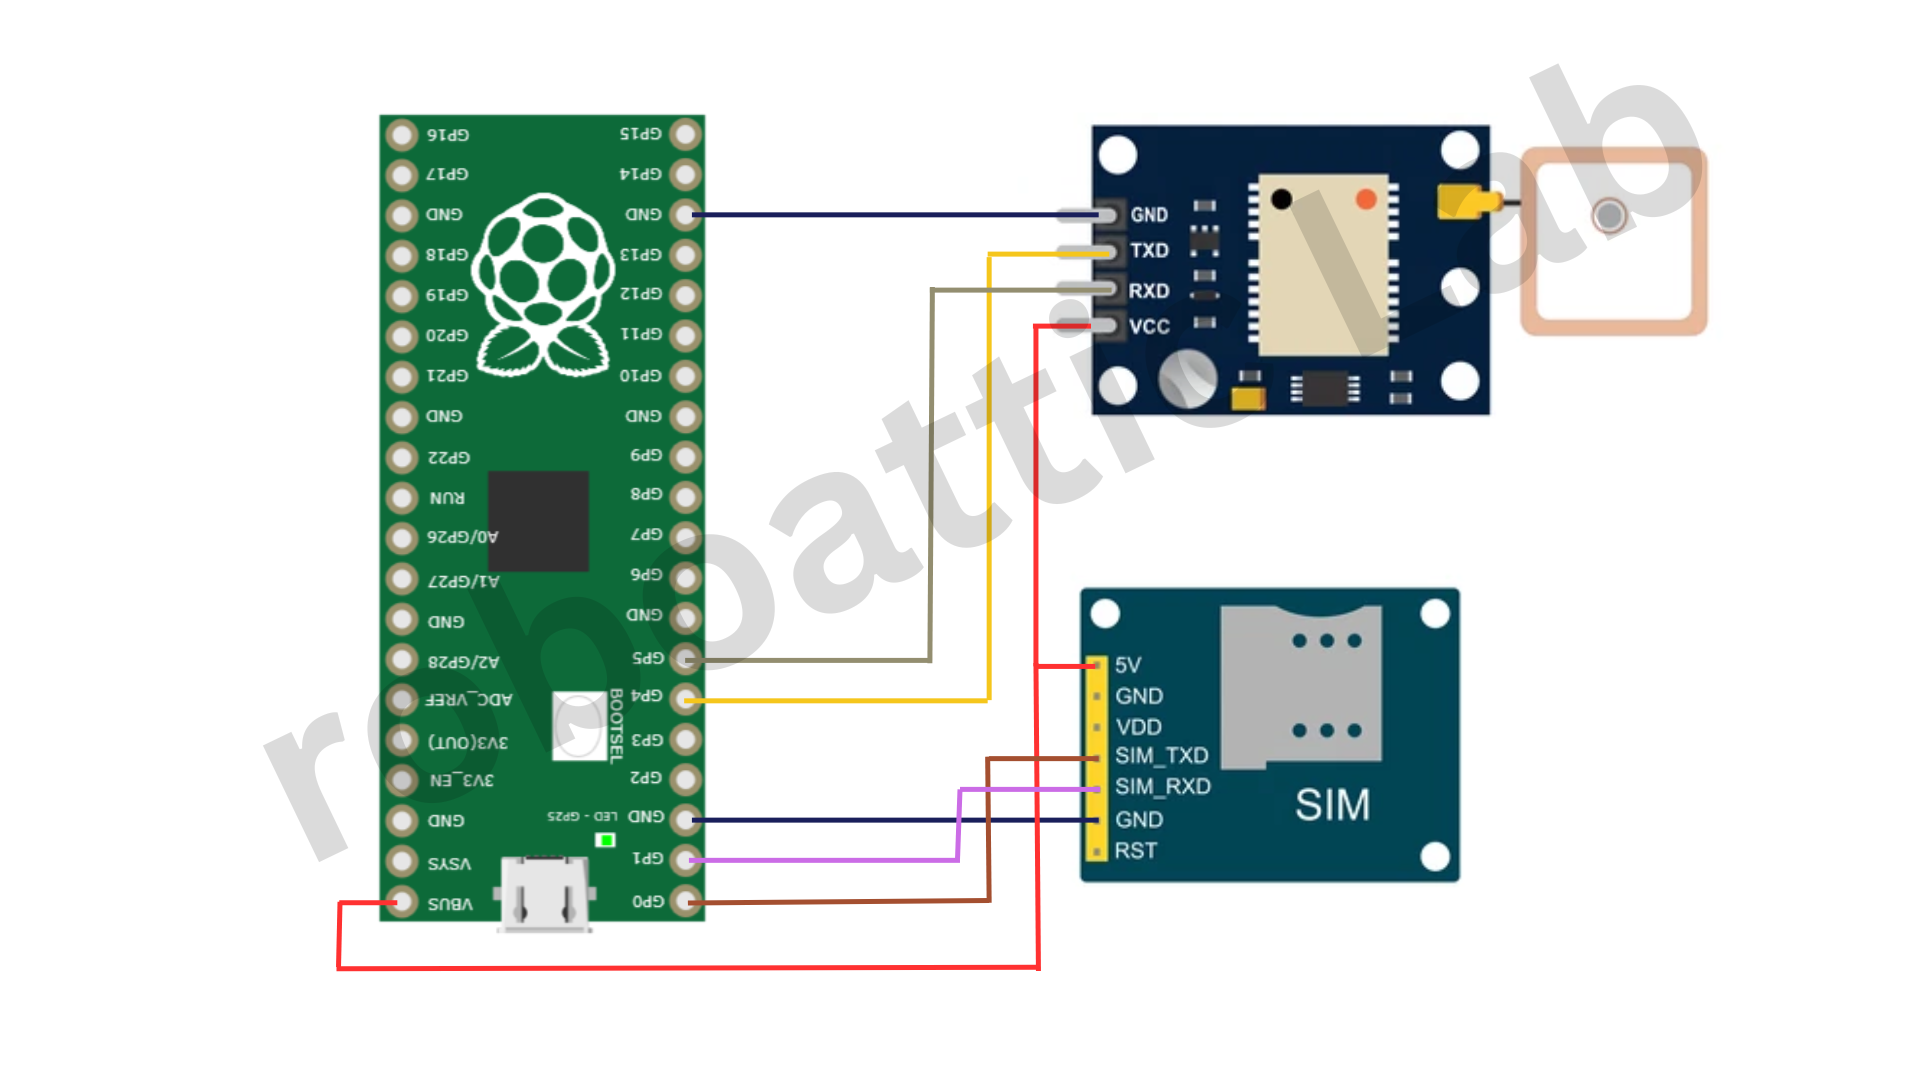
Step 1: Components Assembly & Circuit Design- Mount the Raspberry Pi Pico, NEO-6M GPS Module, & SIM800L GPRS GSM Module into the BreadBoard.
- Using the jumper wire, connect the SIM800L GPRS GSM Module:
GSM Module → Raspberry Pi Pico
TX → GP1 (UART0 RX - Pin 2)
RX → GP0 (UART0 TX - Pin 1)- Using the jumper wire, connect the NEO-6M GPS Module:
GPS Module → Raspberry Pi Pico
TXD → GP5 (UART1 RX - Pin 7)
RXD → GP4 (UART1 TX - Pin 6)
See you in the next step...
Elevate Your Electronic Projects - JLCMCJLCMC is your one-stop shop for all electronic manufacturing needs, offering an extensive catalog of nearly 600, 000 SKUs that cover hardware, mechanical, electronic, and automation components. Their commitment to guaranteeing genuine products, rapid shipping (with most in-stock items dispatched within 24 hours), and competitive pricing truly sets them apart. In addition, their exceptional customer service ensures you always get exactly what you need to bring your projects to life.
They have everything you need for your next project:
- Custom Linear Guide Shafts:Precision-engineered for applications like 3D printing, CNC machines, and industrial automation.
- Aluminum Profiles:Versatile, durable framing solutions—perfect for machine enclosures, workstations, and custom assemblies.
To show their support for our community, JLCMC is offering an exclusive $70 discount coupon. This is the perfect opportunity to save on high-quality components for your next project. Don’t miss out—visit https://jlcmc.com/?from=RLO to explore their amazing range of products and grab your discount coupon today!
Step 2: Power Supply CircuitFollow the steps:
- Now connect the NEO-6M GPS Module and the SIM800L GPRS GSM Module:
VCC --> VBUS (Raspberry Pi Pico)
GND --> GND (Raspberry Pi Pico)- USB Power Supply: Simply connect the Raspberry Pi Pico to your computer or car USB charger using a USB cable. This provides both power and programming access.
- External Power Supply (Recommended for Field Use): If you’re deploying the system in a vehicle or remote location, you can use a regulated 5V external power source. Ensure that the SIM800L module receives stable voltage (3.7V–4.2V range), using an external power source or a Li-ion battery with proper regulation is ideal for reliable GSM performance.
The above video will provide you with a clear explanation of the code and how to upload it.
Full Code:https://github.com/ShahbazCoder1/GPS-Vehicle-Tracker-using-Raspberry-Pi-Pico-MicroPython-Thonny-IDE
In this project we are using the MicropyGPS library by Michael Calvin McCoy
Troubleshooting Steps:GPS Not Getting Fix- Ensure GPS antenna has clear view of the sky.
- Wait 2-5 minutes for initial satellite lock (cold start)
- Check UART connections (TX/RX not reversed)
- Verify 3.3V power supply to GPS module
- Check power supply (needs 3.7-4.2V with sufficient current)
- Verify SIM card is active and has credit
- Check antenna connection
- Ensure correct APN settings for your carrier
- Try AT commands manually to test the module.
- Verify phone number format (include country code)
- Check if the SIM card has SMS capability
- Ensure GSM module is registered on the network.
- Check signal strength in your area
- Ensure MicroPython firmware is properly installed
- Check USB cable connection
- Try different USB port
- Restart Thonny IDE
Congratulations! You’ve successfully built your GPS Vehicle Tracker using Raspberry Pi Pico. A demonstration video of this project can be viewed here: Watch Now
Thank you for your interest in this project. If you have any questions or suggestions for future projects, please leave a comment, and I will do my best to assist you.
For business or promotional inquiries, please contact me via email at Email.
I will continue to update this article with new information. Don’t forget to follow me for updates on new projects and subscribe to my YouTube channel (YouTube: roboattic Lab) for more content. Thank you for your support.

Comments