

Hardware components | ||||||
 |
| × | 1 | |||
 |
| × | 1 | |||
Software apps and online services | ||||||
 |
| |||||
My daily routine involves catching the 7:15 am train to work, and delays or cancellations of this train can have a knock on effect since there is only one train every 30 minutes to my station. Many times I have arrived at the station, only to read 'CANCELLED' on the status board, and 30 minutes is not quite long enough to make the round trip to home worthwhile, so I have to endure a tedious wait at the station.
Ideally I would like to know the status of this train before leaving my house in the morning. I'm sure there are apps that will send you a notification with the train status, but this approach relies on checking my phone for the notification. Much more reliable (and fun!) would be to get a visual notification of the train status that I cannot miss. Unmissable notifications could include sounding an audible alert or blink lights on or off. For this project I chose to have the colour of a smart light in my home change colour to display the train status, to create a traffic light warning system that I can't miss, even without coffee!
Home-assistantHome-assistant is an open source home automation system that is run locally, typically on a Raspberry Pi. With a recent release setting up Home-assistant couldn't be easier, and consists of downloading a disk image, flashing that to an SD card, plugging the card into the pi, and running through a basic setup. The user then adds different components to Home-assistant, where components provide control over hardware or interaction with online services. This project makes use of the UK Transport component to provide UK train and bus status data via the TransportAPI service.
Take a minute to read about state_objects in Home-assistant, in order to understand the relationship between an object (the representation of a device e.g. lamp within Home-assistant), its state, and the objects attributes.
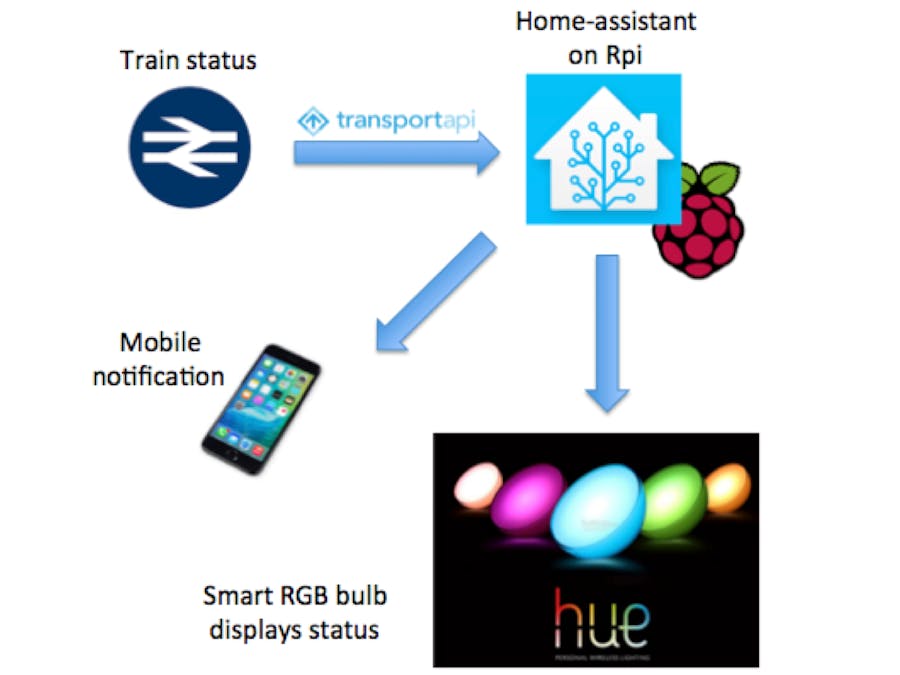
SetupThe setup for this project is represented in Figure 1 below. Once home-assistant is configured, train status data will be pulled in and automatically refreshed. The status of a particular train is then displayed using a smart lamp and sent to a mobile as a notification.
This project uses a smart light to display the status of my train via the colour of the light. There are many different brands of light supported by Home-assistant. I chose the Philips Hue Go which can display a wide range of colours. Home-assistant will automatically discover Hue lights on your network, assigning them an 'entity id' (a unique identified for that device) which in this case picks up from the name you gave the light in the Hue iOS/Android app, and appends it to the domain that the device is in (here the light
domain). In my case I named the light 'lamp' in the Hue iOS/Android app and Home-assistant assigned the entity id light.lamp
. Using scripts we can call services on light.lamp
such as turning the light on/off or changing its colour. For example, the script in this project turns on the lamp and sets the colour to red using the following service call: hass.services.call('light', 'turn_on', { "entity_id": 'light.lamp', 'color_name': 'red'}
Adding Train Status Data
The UK Transport component provides UK train (and bus) status data as a sensor, so follow the instructions to setup a sensor for your train route. I set one up for the MAL-WIM train route by adding the following* to the configuration.yaml file:
sensor:
 - platform: uk_transport
   app_id: my_transportAPI_id
   app_key: my_transportAPI_key
   queries:
     - mode: train
       origin: MAL
       destination: WIM
This creates a sensor with the entitiy id sensor.next_train_to_wim
. This sensor displays the status (ON TIME, LATE etc) of the next train departing from MAL. This sensor has an attribute entry called next_trains
which is a python list containing the data for upcoming trains on that train route departing from MAL. For busy stations next_trains
can contain the data for as many as 30 upcoming trains in my experience, however transportAPI appears to return the upcoming trains within a time window, so if your station is relatively quiet, the data for fewer upcoming trains is returned. We could create a unique sensor for each upcoming train in next_trains
in order to look for our 7:15 am train, but a better approach is to create a script to search through next_trains
for the 7:15 am train. The script with extracting the status of that particular train and put it into another sensor with the entity id sensor.morning_train
. The script will also contain the instructions of what action to take when status data for the 7:15 am train is available.
* Note that my_transportAPI_id
and my_transportAPI_key
are my unique credentials from my transportAPI developer account. I have a free account, which allows my credentials to be used to make 1000 API requests per day. Therefore the data in my sensor is refreshed every 87 seconds.
We require a script to search through next_trains
for the 7:15 am train and add the logic to trigger the lamp and notifications when there is data this train. Traditionally Home-assistant scripts were limited to yaml, and whilst this approach is fine for simple scripts, it becomes quite challenging to create complex scripts with yaml. Furthermore, each time you edit a yaml script to have to restart Home-assistant for the changes to take effect. Fortunately the recently released python_scripts component allows us to write scripts in python, and see the effects of editing the scripts without needing to restart Home-assistant, making development of the scripts rapid and interactive.
Python_scripts are run in a sandboxed environment, and cannot store data persistently. Therefore to store the last status of the 7:15 train, the script writes the status data to a sensor created specifically for the purpose, with the entity id sensor.morning_train
. For the following script to work, you first have to create sensor.morning_train
. Since this is a one-time setup, and we don't want to overcomplicate our script or overpopulate our config, we will use the Home-assistant RESTful API to create sensor.morning_train
by performing an HTTP POST from the Terminal/command line, entering YOUR_PASSWORD for Home-assistant (if set) and replacing 192.168.0.100
with the IP of your pi hosting Home-assistant or with localhost if running locally:
curl -X POST
-H "x-ha-access: YOUR_PASSWORD" \
-H "Content-Type: application/json" \
-d '{"state": "Blank"}' \
http://192.168.0.100:8123/api/states/sensor.morning_train
Check in the list of entities in Home-assistant that sensor.morning_train
has been created and has state "Blank".
You are now ready to add the python_script. Paste the following code into a text editor, and edit MAIN_ENTITY_ID
, TOI_TIME
and NOTIFY_ID
to match your setup, and save as train_state.py:
train_state.py
"""
Script to receive alerts for train of interest (TOI).
"""
SCHEDULED = False
# Set config
MAIN_ENTITY_ID = 'sensor.next_train_to_wim'
TOI_ENTITY_ID = 'sensor.morning_train'
TOI_TIME = '07:15'
# Set notification details
MSG_TITLE = "Train Status Update"
NOTIFY_ID = 'robins_and_marias_iphones'
if hass.states.get(MAIN_ENTITY_ID).state == "No departures":
   logger.warn('No Departures')
else:
   attributes = hass.states.get(MAIN_ENTITY_ID).attributes
   try:
       for train in attributes['next_trains']:
           if train['scheduled'] == TOI_TIME:
               SCHEDULED = True
               train_status = train['status']
               if train_status != hass.states.get(TOI_ENTITY_ID).state:
                   hass.states.set(TOI_ENTITY_ID, train_status)
                   if train_status == 'ON TIME':
                       hass.services.call('notify', NOTIFY_ID, {
                           "title": MSG_TITLE,
                           "message": "The {} is on time."
                           .format(TOI_TIME)})
                       hass.services.call('light', 'turn_on', {
                           "entity_id": 'light.lamp',
                           'color_name': 'green'})
                   elif train_status == 'LATE':
                       hass.services.call('notify', NOTIFY_ID, {
                           "title": MSG_TITLE,
                           "message": "The {} will be late and its ETA is"
                           .format(TOI_TIME) + train['estimated']})
                       hass.services.call('light', 'turn_on', {
                           "entity_id": 'light.lamp',
                           'color_name': 'orange'})
                   elif train_status == 'CANCELLED':
                       hass.services.call('notify', NOTIFY_ID, {
                           "title": MSG_TITLE,
                           "message": "The {} has been cancelled."
                           .format(TOI_TIME)})
                       hass.services.call('light', 'turn_on', {
                           "entity_id": 'light.lamp',
                           'color_name': 'red'})
               break
   except:
       logger.warn('Error in train_state.py')
if not SCHEDULED:
   hass.states.set(TOI_ENTITY_ID, 'No data')  # check no data
#logger.warn('Test complete')
Place train_state.py
in a folder called python_scripts within the config directory as per the documents. Add to your config:
python_script:
Once you have completed testing of the script, make any edits to suit your preferences.
Adding the automation
We need to add an automation to trigger the python_script to run. Home-assistant provides us with a handy editor to create the automation. Use the editor to create the automation below:
Save the automation. Viewing the file this produces we see the following:
- action:
 - service: python_script.train_state
 alias: train_state_trigger
 condition:
 - after: 06:00:00
   before: 08:00:00
   condition: time
 id: '1503121451330'
 trigger:
 - entity_id: sensor.next_train_to_wim
   platform: state
The automation states that: when sensor.next_train_to_wim
receives new data, and if the time is after 6 am but before 8 am, then run the python_script called train_state.py. I added the time condition since I noticed that the data for such an early train is returned by transportAPI the night before. This could be because my station has only a single train before the 7:15 am train. If you are at a busier station perhaps the data for your train-of-interest will not be available until closer to the departure.
Restart Home-assistant to make the changes take effect. Once operational, you should receive a notification and alert from your lamp with the status of the train. Images from my setup are below.
I use the Home-assistant iOS app for notifications, although there are many other options for mobile notifications and I have had a good experience with both the Telegram (bit more involved setup but allows images in notifications) and Pushbullet platforms.
Optional extra: Train time-table displayYou can also add a table to display live data from next_trains
. Head to the forums to get the latest information on how to do this.
I hope that you will find receiving train alerts in this way fun and useful. The approach adopted here, using a python_script to search the attributes of a sensor, can be adapted for use with any sensor that has interesting data buried in its attributes. I hope also that this project demonstrates the positives of scripting with python_scripts (compared to yaml) and that we see many more python_scripts on the forums soon. Happy automating :-)


Comments