Hardware components | ||||||
| × | 1 | ||||
| × | 1 | ||||
| × | 1 | ||||
| × | 1 | ||||
| × | 1 | ||||
| × | 1 | ||||
| × | 1 | ||||
| × | 1 | ||||
| × | 1 | ||||
| × | 1 | ||||
| × | 1 | ||||
| × | 1 | ||||
Software apps and online services | ||||||
![]() |
| |||||
|
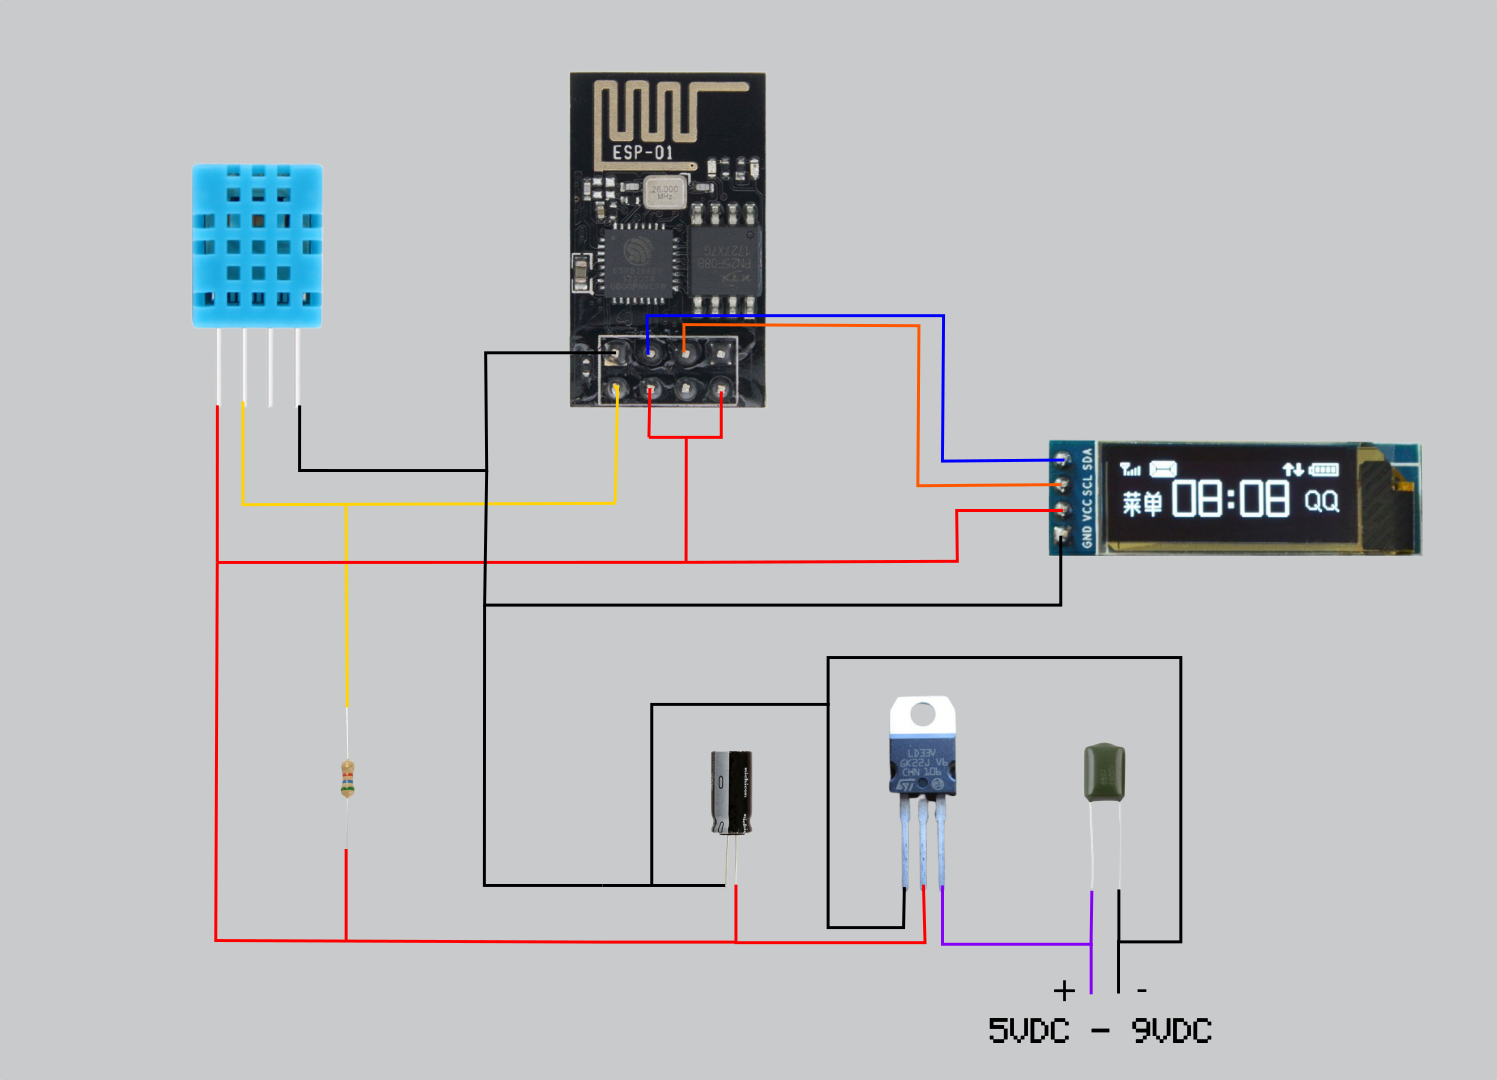
Last week I published a project called Simplest IoT temperature and humidity meter. That is a good project because you can collect and graph temperature and humidity in an IoT platform like Adafruit IO. But what about if I want to know the temperature right now? Well, I had to enter Adafruit IO and see it. Then I thought If I could put a screen and see the temperature without entering Adafruit.
Well, I added an OLED 0.91 inch OLED screen to the previous project and I can see the temperature and humidity in the device screen.
In this video, you can see it working.
If you know some Spanish, you can view the next video where I explain how the circuit works.
In the next picture, you can see my Adafruit Dashboards.
You can also check temperature and humidity in real-time in the following link:
https://io.adafruit.com/rjconcepcion/dashboards/temperatura-and-humedad
If you do not know how to setup Adafruit IO, you can check the tutorial in the following link:
https://learn.adafruit.com/adafruit-io-basics-analog-input
I hope you enjoy this project.
Note: If you are having issues connecting, please ensure you have the latest Adafruit IO Arduino library.
// IoT humidity and temperature meter with Oled screen
// I used some code from Adafruit IO example.
// Adafruit IO Analog In Example
// Tutorial Link: https://learn.adafruit.com/adafruit-io-basics-analog-input
//
// Adafruit invests time and resources providing this open source code.
// Please support Adafruit and open source hardware by purchasing
// products from Adafruit!
//
// Written by Todd Treece for Adafruit Industries
// Copyright (c) 2016 Adafruit Industries
// Licensed under the MIT license.
//
// All text above must be included in any redistribution.
/************************** Configuration ***********************************/
// edit the config.h tab and enter your Adafruit IO credentials
// and any additional configuration needed for WiFi, cellular,
// or ethernet clients.
#include "config.h"
#include <DHT.h> // DHT11 library
#include <Wire.h> // I2C library
#include <Adafruit_GFX.h> // Graphic library
#include <Adafruit_SSD1306.h> // Monochrome OLEDs SSD1306 drivers librarry
/************************ Example Starts Here *******************************/
// Use GPIO1 connected to the DHT11 sensor.
#define DHTPIN 1
// Select sensor type. In this case is DHT11. You can also use DHT22.
#define DHTTYPE DHT11
// Set our screen size.
#define SCREEN_WIDTH 128 // OLED display width, in pixels
#define SCREEN_HEIGHT 32 // OLED display height, in pixels
// Set screen values.
#define OLED_RESET -1 // Reset pin # (or -1 if sharing Arduino reset pin)
Adafruit_SSD1306 display(SCREEN_WIDTH, SCREEN_HEIGHT, &Wire, OLED_RESET);
// Variables
int current_temp = 0;
int last_temp = -1;
int current_hum = 0;
int last_hum = -1;
// Initialize DHT sensor
DHT dht(DHTPIN, DHTTYPE);
// set up the temperature, humidity and heat index feeds.
AdafruitIO_Feed *temp_feed = io.feed("temp_feed");
AdafruitIO_Feed *hum_feed = io.feed("hum_feed");
AdafruitIO_Feed *st_feed = io.feed("st_feed");
void setup() {
// start the serial connection
Serial.begin(115200);
dht.begin();
// wait for serial monitor to open
while(! Serial);
// connect to io.adafruit.com
Serial.print("Connecting to Adafruit IO");
io.connect();
// wait for a connection
while(io.status() < AIO_CONNECTED) {
Serial.print(".");
delay(500);
}
// we are connected
Serial.println();
Serial.println(io.statusText());
//Set I2C screen pins
Wire.begin(2, 0); // GPIO2 => SDA, GPIO0 => SCL
// SSD1306_SWITCHCAPVCC = generate display voltage from 3.3V internally
if(!display.begin(SSD1306_SWITCHCAPVCC, 0x3C)) { // Address 0x3C for 128x32
Serial.println(F("SSD1306 allocation failed"));
for(;;); // Don't proceed, loop forever
}
delay(2000); // Pause for 2 seconds
// Clear the buffer
display.clearDisplay();
// Set text size and color.
display.setTextSize(1);
display.setTextColor(WHITE);
}
void loop() {
//Show a initial message on the screen.
display.clearDisplay();
display.setCursor(0, 10);
display.println("IoT temp & hum meter");
display.println("www.rjconcepcion.com");
display.display();
// io.run(); is required for all sketches.
// it should always be present at the top of your loop
// function. it keeps the client connected to
// io.adafruit.com, and processes any incoming data.
io.run();
// Get humidity value
float hum = dht.readHumidity();
// Get temperature value
float temp = dht.readTemperature();
// Calculate heat index
float st = dht.computeHeatIndex(temp, hum, false);
// wait for 15 seconds
delay(15000);
// Check for reading measures
if (isnan(hum) || isnan(temp)){
Serial.println("Error en obtener los datos ");
return;
}
// Store current values.
current_temp = temp;
current_hum = hum;
// return if the value hasn't changed
if((current_temp == last_temp) && (current_hum == last_hum))
return;
// Send the feeds to Adafruit IO
temp_feed->save(current_temp);
hum_feed->save(current_hum);
st_feed->save(st);
// Store last values.
last_temp = current_temp;
last_hum = current_hum;
// Show temperature value on the screen
display.clearDisplay();
display.setCursor(0, 10);
display.println("Temperatura: ");
display.print(temp);
display.println(" *C ");
display.display();
delay(15000);
// Show humidity value on the screen
display.clearDisplay();
display.setCursor(0, 10);
display.println("Humedad: ");
display.print(hum);
display.println(" %\t");
display.display();
delay(15000);
// Show heat index value on the screen
display.clearDisplay();
display.setCursor(0, 10);
display.println("Sensacion Termica: ");
display.print(st);
display.println(" *C");
display.display();
delay(15000);
}
/************************ Adafruit IO Config *******************************/
// visit io.adafruit.com if you need to create an account,
// or if you need your Adafruit IO key.
#define IO_USERNAME "rjconcepcion"
#define IO_KEY "ce712b7e28e641ada9ce2757ccf00bcb"
/******************************* WIFI **************************************/
// the AdafruitIO_WiFi client will work with the following boards:
// - HUZZAH ESP8266 Breakout -> https://www.adafruit.com/products/2471
// - Feather HUZZAH ESP8266 -> https://www.adafruit.com/products/2821
// - Feather HUZZAH ESP32 -> https://www.adafruit.com/product/3405
// - Feather M0 WiFi -> https://www.adafruit.com/products/3010
// - Feather WICED -> https://www.adafruit.com/products/3056
// - Adafruit PyPortal -> https://www.adafruit.com/product/4116
// - Adafruit Metro M4 Express AirLift Lite -> https://www.adafruit.com/product/4000
// - Adafruit AirLift Breakout -> https://www.adafruit.com/product/4201
// - Adafruit AirLift Shield -> https://www.adafruit.com/product/4285
// - Adafruit AirLift FeatherWing -> https://www.adafruit.com/product/4264
#define WIFI_SSID "wifi SSID"
#define WIFI_PASS "Your wifi password"
// uncomment the following line if you are using airlift
// #define USE_AIRLIFT
// uncomment the following line if you are using winc1500
// #define USE_WINC1500
// comment out the following lines if you are using fona or ethernet
#include "AdafruitIO_WiFi.h"
#if defined(USE_AIRLIFT) || defined(ADAFRUIT_METRO_M4_AIRLIFT_LITE)
// Configure the pins used for the ESP32 connection
#if !defined(SPIWIFI_SS) // if the wifi definition isnt in the board variant
// Don't change the names of these #define's! they match the variant ones
#define SPIWIFI SPI
#define SPIWIFI_SS 10 // Chip select pin
#define NINA_ACK 9 // a.k.a BUSY or READY pin
#define NINA_RESETN 6 // Reset pin
#define NINA_GPIO0 -1 // Not connected
#endif
AdafruitIO_WiFi io(IO_USERNAME, IO_KEY, WIFI_SSID, WIFI_PASS, SPIWIFI_SS, NINA_ACK, NINA_RESETN, NINA_GPIO0, &SPIWIFI);
#else
AdafruitIO_WiFi io(IO_USERNAME, IO_KEY, WIFI_SSID, WIFI_PASS);
#endif
/******************************* FONA **************************************/
// the AdafruitIO_FONA client will work with the following boards:
// - Feather 32u4 FONA -> https://www.adafruit.com/product/3027
// uncomment the following two lines for 32u4 FONA,
// and comment out the AdafruitIO_WiFi client in the WIFI section
// #include "AdafruitIO_FONA.h"
// AdafruitIO_FONA io(IO_USERNAME, IO_KEY);
/**************************** ETHERNET ************************************/
// the AdafruitIO_Ethernet client will work with the following boards:
// - Ethernet FeatherWing -> https://www.adafruit.com/products/3201
// uncomment the following two lines for ethernet,
// and comment out the AdafruitIO_WiFi client in the WIFI section
// #include "AdafruitIO_Ethernet.h"
// AdafruitIO_Ethernet io(IO_USERNAME, IO_KEY);
Comments