

Hardware components | ||||||
 |
| × | 1 | |||
 |
| × | 1 | |||
 |
| × | 1 | |||
 |
| × | 1 | |||
 |
| × | 1 | |||
| × | 1 | ||||
Software apps and online services | ||||||
 |
| |||||
| ||||||
 |
| |||||
| ||||||
| ||||||
| ||||||
This system used to detect the anomaly in the temperature using the Z-score analysis and raises the alert through Telegram and when the anomaly continues it will send an SMS and an email as well.
It is having a vast range of applications and can be used anywhere we want to monitor temperature anomaly. But for now, we will observe its functioning for the refrigerators.
Consider a scenario in which a pharmaceutical company needs to store its medicine at a particular temperature, but unfortunately, the refrigeration system breaks downs, or due to the carelessness of some workers, the door of the refrigerator might be left open. In both cases, the whole batch of medicines will be spoiled and the company will bear huge losses. To prevent such types of situations "Temperature anomaly detection system" comes into play and raises the alert when the anomaly is detected or continues.
- The LM35 sensor will read the temperature of its surroundings in every 10 seconds.
- Based on the temperature records the upper and the lower threshold temperature values will be calculated.
- As the temperature crosses the upper or the lower threshold values the alert will be raised on the telegram channel.
- If the temperature is still outside the threshold range then the alert will be sent to the owner by email and SMS and the buzzer will turn on.
- The buzzer can be turned off by the Bolt android app by a "BUZZER OFF" button.
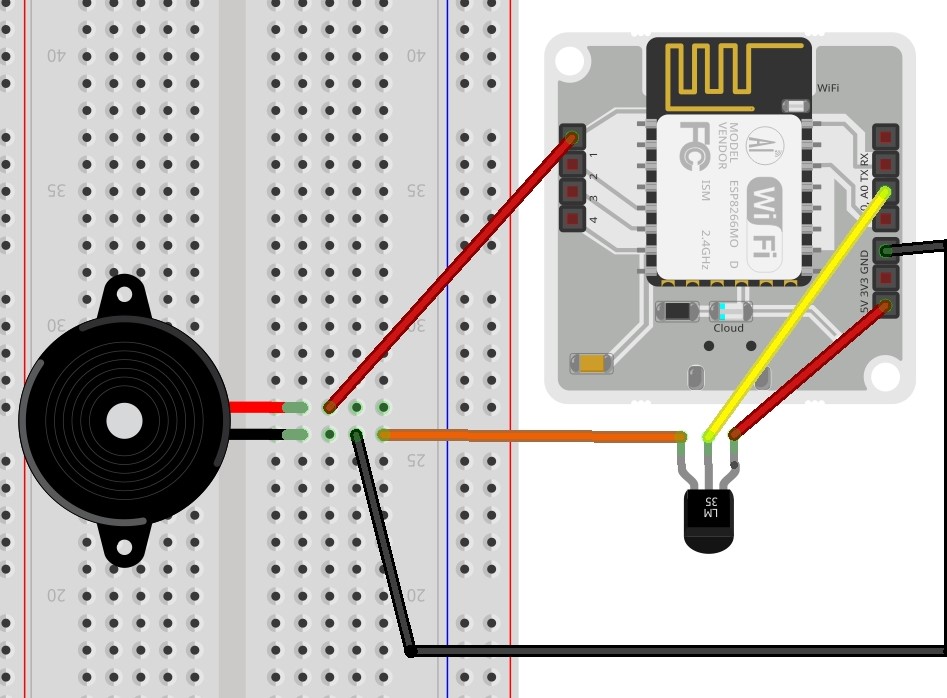
- LM35 is a precession Integrated circuit Temperature sensor, whose output voltage varies, based on the temperature around it. Its first pin from the left is provided with an input of 3-5.5V. The second pin gives the analog output of 10mV/°C and the third pin is grounded.
- Here red wire is connected between 5V of Bolt wifi module and first pin of LM 35. Similarly, the yellow wire is connected between the A0 pin of Bolt and 2nd pin of LM35, and the orange wire is connected between the 3rd pin of LM35 and a port on a breadboard which is further connected with GND on Bolt Module with a black wire.
- a piezo buzzer is a type of electronic device that's used to produce a tone, alarm, or sound.
- Connect the positive (long pin ) of the buzzer to the digital i/o pin '1' of bolt module and negative(short pin) to the ground of Bolt Module, which is already connected on the breadboard.
- Get the API Key and device id from https://cloud.boltiot.com/home/
- Establishing a telegram channel with Bot as administrator:
Step 1: search for BotFather and type the command '/newbot'. Then give a name and username for this bot. In this step, you will get the bot ID.
Step 2: Create a new channel from the side drawer. Give a name and description to this channel. In the channel settings set type as Public channel and give a unique link, this link will be your chat id.
Step 3: Go to the 'administrator' option and search for your bot. Then give your bot permissions.
- Get Account Sid, Auth. Token and Trial Number by logging into Twilio Dashboard
- Get the mailgun API and URL by logging into mailgun
- In the Oracle VM VirtualBox create a new file that consists of all necessary info for messaging.
sudo nano conf.pythen write the following code:
api_key='XXXXXXXXXXXXXXXXXXXXXXX'
dev_id='BOLTXXXXXXXXX'

#Twilio

sid='XXXXXXXXXXXXXXXXXXXXX'
auth_token='XXXXXXXXXXXXXXXXXXXXX'
from_no='XXXXXXXXXXXX'
to_no='+XXXXXXXXXXXXXXX'

#Mailgun

mailgun_api='XXXXXXXXXXXXXXXXXXXXXXXX'
sandbox_url='XXXXXXXXXXXXXXXXXXXXXXXXXX'
sender_email='test@'+sandbox_url
recipient_email='XXXXXXXXXXXXXXXXXXXXX@XXXXXXX.XXXXXXXX'

#telegram

tele_chat_id='@XXXXXXXX'
tele_bot_id='botXXXXXXXXXXXXXXX'- Now create a new python file as TempDetect.py. This file is the main file which fetches data from the sensor, computes bounds and send alerts
sudo nano TempDetect.py- Import the necessary file and packages
import conf,json,time,math,statistics,requests
from boltiot import Bolt,Sms,Email- defining a function to fetch data from the sensor:
#collecting data from LM35 sensor

mybolt=Bolt(conf.api_key,conf.dev_id)
def fetch_data():
    try:
        print("\nTrying to fetch data")
        response=mybolt.analogRead('A0')
        data=json.loads(response)
        if data['success']!=1:
            print('Request failed and response is: '+str(data))
            return None
        sensor_val=int(data['value'])*100/1024
        return sensor_val

    except Exception as e:
        print(e)
return None- Computing Thresholds from the previous data using Z-score analysis:
The Z-score analysis is used for anomaly detection. The anomaly here means a variable's value (temperature value) going beyond a certain range of values. The range of values is called bounds (upper bound and lower bound). These bounds are calculated using the input values, frame size, and multiplication factor. The frame size is the minimum number of input values needed for Z-score analysis and the multiplication factor determines the closeness of the bounds to the input values curve.
Here the input is represented as 'Vi', 'r' denotes the frame size and 'C' is the multiplication factor. Firstly we calculate the mean (Mn) of the input values (for every new input, the mean is calculated again). The variation of each input value (from the mean) is given as (Vi - Mn)^2. The Z-score (Zn) is calculated as shown above ( square root of the mean of the variation of each input value multiplied by the multiplication factor). The bounds are represented as 'Tn' and the upper bound is calculated as (Vi + Zn) and the lower bound is calculated as (Vi - Zn).
The frame size and multiplication factor are determined using the trial-and-error method
Function to compute bounds is:
#computing bounds to detect anomaly
his_data=[]
frame_size=10
factor=1.7


def bounds(his_data,frame_size,factor):
    if len(his_data) < frame_size:
        print('Data insufficient...\n{} more data required'.format(frame_size-len(his_data)))
        return None

    if len(his_data) > frame_size:
        del his_data[0:len(his_data)-frame_size]

    val = his_data[-1]
    Mn = statistics.mean(his_data)
    Var = 0
    for data in his_data:
        Var = Var+math.pow((data-Mn), 2)
    Z = factor*math.sqrt(Var/frame_size)
    high_bound=val+Z
    low_bound=val-Z
    print('High Bound is {} and low Bound is {}'.format(high_bound, low_bound))
return [high_bound, low_bound]- defining a function to detect the anomaly:
From the above function, we have calculated the upper bound and the lower bound on the basis of A-score analysis of the previous data.
Now in this function, we will check whether an anomaly is occurring or not and count the number of continuous anomalies.
#Detecting anomaly

anomaly_count=0


def detect_anomaly(temp,bound):
    global anomaly_count
    if temp > bound[0] or temp < bound[1]:
        anomaly_count=anomaly_count+1
        print('anomaly detected '+str(anomaly_count))
        return True

    else:
        anomaly_count=0
return False- Defining functions to send alerts:
The alert message will be sent to telegram if the anomaly is detected and will be sent to email and SMS also if detected more than twice.
#Send telegram message

def send_telegram(message):
    print('Trying to send telegram message.....')
    url='https://api.telegram.org/'+conf.tele_bot_id+'/sendMessage'
    data={'chat_id':conf.tele_chat_id,'text':message}
    try:
        response=requests.request('POST',url,params=data)
        print('sending alert through Telegram')
        print('response from Telegram: '+response.text)
    except Exception as e:
        print(e)

    return json.loads(response.text)['ok']


#sending sms through Twilio

def send_sms_twilio(message):
    sms=Sms(conf.sid,conf.auth_token,conf.to_no,conf.from_no)
    try:
        print('Trying to send SMS')
        response=sms.send_sms(message)
        print('response from the twilio is: '+str(response))
        print('status of sms is: '+str(response.status))
    except Exception as e:
        print('exception occured: \n'+e)


#sending mail through mailgun

def send_email_mailgun(message):
    mailer=Email(conf.mailgun_api,conf.sandbox_url,conf.sender_email,conf.recipient_email)
    try:
        print('Trying to send email')
        response=mailer.send_email('URGENT: Refrigeration Issue',message)
        print('response received from the mailgun is: '+str(json.loads(response.text)['message']))
    except Exception as e:
print(e) - To repeat the steps we will have to use the while loop. The sensor must read the data every 10 seconds and update the array of data collected according to frame size. On the basis of this data, upper and lower bounds will be calculated and the anomaly will be detected if the current temperature value crosses either of the thresholds. The anomaly count also increases as the anomaly detected continuously and when the number crosses 2 then the buzzer will turn on and alert will be sent to the concerned person by email and SMS.
The code will be:
while True:
    try:
        temp=fetch_data()
        print('Current Temprature is: '+str(temp))
        if temp!=None:
            his_data.append(temp)
        if bound:
            result_anomaly=detect_anomaly(temp,bound)
        bound=bounds(his_data,frame_size,factor)
        if bound==None:
            print('Please Wait.....')
            time.sleep(10)
            continue
        if result_anomaly==True:
            message='An anomaly is detected in the functioning of your Refrigerator. Current temprature is '+ str(temp)
            send_telegram(message)
            if anomaly_count > 2:
                critical_message=message+'\nANOMALY IS DETECTED MORE THAN 2 TIMES.\nHence the alarm is raised automatically.\n Press the "BUZZER OFF" button through Bolt app to stop the Buzzer'
                send_sms_twilio(critical_message)
                send_email_mailgun(critical_message)
                res=mybolt.digitalWrite('1','HIGH')
                print(str(json.loads(res)))
    except Exception as e:
        print(e)

time.sleep(10)- As anomaly is detected more than twice the buzzer will turn on which can be switched off by a buzzer off button using bolt app. To configure the buzzer off button follow the steps:
Step 1: create a new product in the link https://cloud.boltiot.com/home
Step 2: Name the product as TempDetect set it as an output device and set GPIO for collecting data
Step 3: Link this product to your bolt device and click on the 'configure' button
Step 4: In the hardware, section select A0 pin and enter the variable name as 'temp'
Step 5: In the code, section name the file as 'Buzzer' and format as 'HTML', then enter the following code and save the configuration.
<!DOCTYPE html>
<html>
    <head>
        <title>Buzzer</title>
        <script type="text/javascript" src="https://cloud.boltiot.com/static/js/boltCommands.js"></script>
       <script>
       setKey('{{ApiKey}}','{{Name}}');
       </script>
       <style>
.button1 {
  background-color: #4CAF50; /* Green */
  border: none;
  color: white;
  padding: 20px;
  text-align: center;
  text-decoration: none;
  display: inline-block;
  font-size: 16px;
  cursor: pointer;
  border-radius: 50%;
  top: 50%;
  left: 50%;
   margin: 0;
  position: absolute
  transform: translate(-50%, -50%);
  }
  </style>
   </head>
   <body>
       <center>
        <div style="height: 50px;">If your device shows the anomalous behavior more than 2 times</div>
        <div style="height: 50px;">then the buzzer will automatically turns on,</div>
        <div style="height: 50px;">to switch it off press the following</div>
        <div style="height: 50px;">'BUZZER OFF' button</div>
        <div style="height: 150px;">
       <button class="button1" onclick="digitalWrite('1','LOW');">BUZZER OFF</button>
       </div>
       </center>
</body>5. Testing the circuit
Step 1: Connect the Bolt wifi module with 5V input and put it inside the refrigerator and close the door
Step 2: In the Oracle VM Virtualbox run the TempDetect.py python file by using a command:
sudo python3 TempDetect.pyStep 3: After 2 minutes open the door of the refrigerator and leave it open.
Step 4: If the buzzer is raised turn it off by Bolt App.
6. OutputAfter executing the command sensor starts sending the data:
But it is less than the frame size hence more data is required. After collecting 10 data, it started computing the thresholds as well.
After 2 mins. when the door of the refrigerator was left open then an anomaly was detected more than times. The following images will show you the response as an anomaly is being detected continuously.
When the anomaly was detected then these alert were sent
The response from the buzzer is:
{'value':'1','success':1}
which shows that buzzer will turn on as anomaly continues


Comments